Access Management
- Persons
- Person Groups
- Lock Persons
- Block List
- Permissions
- Time Models
- Devices
- Device Groups
- Control Profiles
- Companies
- Mass Change
- Qualifications
- Settings
Persons
The Persons menu item allows you to manage the personnel in your system. Here you can create new persons or change details of existing persons.
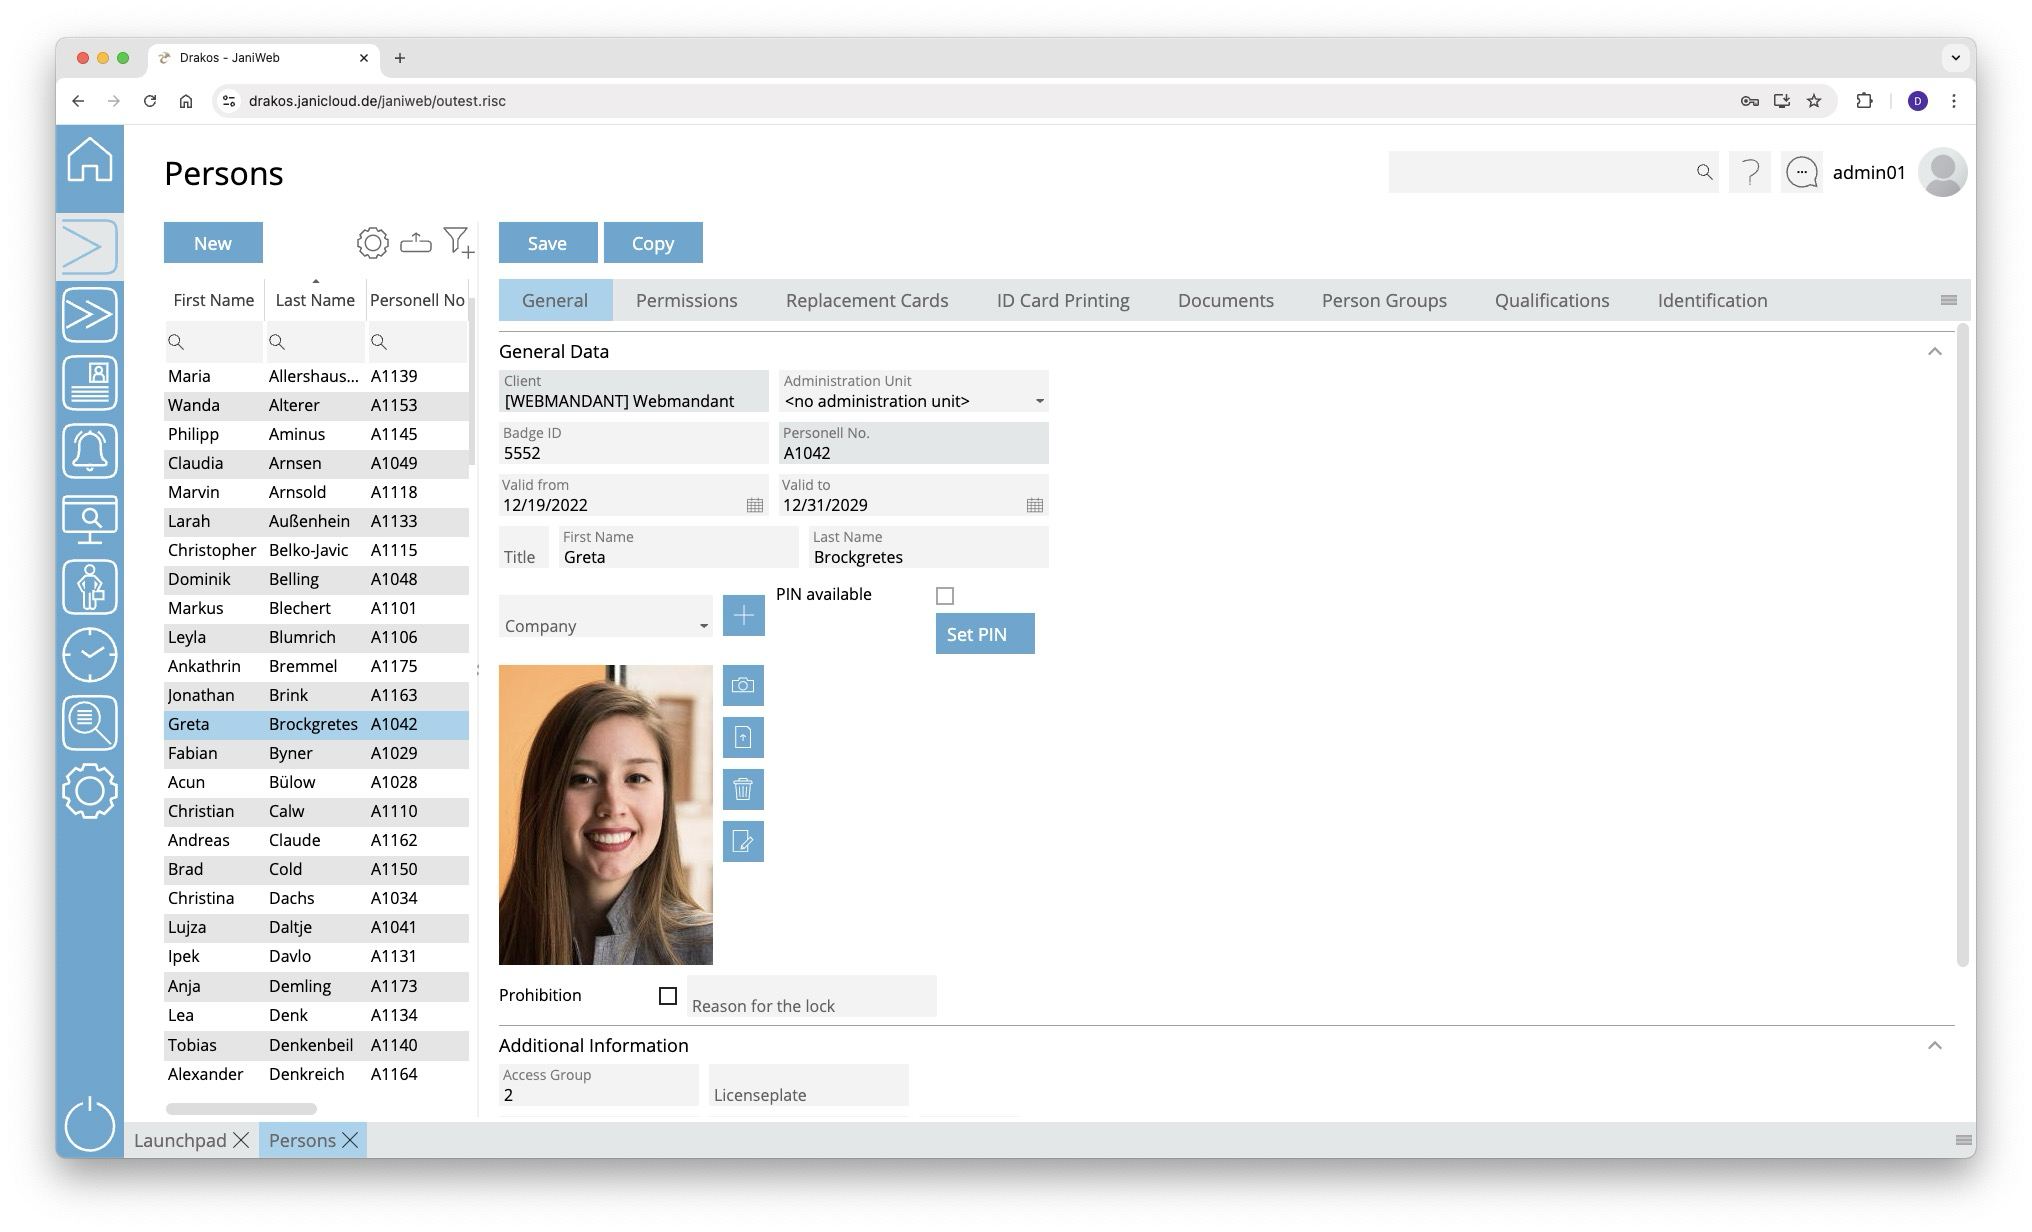
List of persons
The list contains the persons that have already been created. Select a person to view details.
The list offers the following options:
- Select columns to display: Press the gear icon. Select which columns you want to display and in which order. Arrange the columns using the mouse or the arrow icons. Press Apply to adopt the changes.
- Filter by client and status: Press the filter icon. Select the clients and the status (Active, Active in future, Inactive) for which persons should be displayed. Changes are visible immediately.
- Search in columns: Enter text or numbers in the search field (magnifying glass icon) of a column to search for names, personnel numbers, or other criteria. The entries take effect immediately: the list only displays hits.
Tip: Search for substrings. You can find “Spencer-Churchill” with “spe”, “chur” or “hill”. The search is not case sensitive. - Export the entire list: Press the download icon. Select the format in which you want to export the list. The export files are downloaded or displayed depending on the browser/operating system settings.For details on the available export formats, see the General > Export Formats chapter of this manual.
Button New
Press New to create a new person. Enter the required information about the person on the tab General Data and press Save.
Tab General Data
This is where you store and edit personal data. You can individually define which fields and areas are available here via Settings > tab General.
Personal data that is transferred from external systems (e.g. SAP) cannot be changed here. They must be edited in the respective source system.
Tab Permissions
Here you can grant (Add Device Group / Add Device) or revoke (Remove Group / Remove Device) permissions for a person.
The lists on the tabs Add Group / Add Device provide an overview of all permissions linked to the person. The column Origin indicates where the permission comes from. For example, it could have been passed on to the person via a person group or transferred from the Janitor system.
If the tabs Delete Device or Delete Group contain a device or device group, access via this device or device group is not possible. This also applies if a permission for the device or device group has been granted on the tab Add Device or Add Device Group.
A tick after the title of a tab indicates that there is data within the tab.
Workflow Permissions
This feature is optional and not available in every installation.
If assigning a device or device group is associated with a workflow, the permission becomes active only after the decision-maker approves the workflow request.
If you select a device or device group that has a workflow, a dialog box appears. This prompts you to enter values for the time model and the validity of the permission. You also have the option of leaving a comment for the decision-maker.
You can create multiple workflow requests at once. To send them, press Save.
Workflow requests are indicated by different colors:
You can extend the validity of approved permissions. To do this, press Extend. Then select new validity dates and create another workflow request.
Tab Replacement Badges
Here you can issue up to three replacement IDs for one person. Only one ID can be active at a time.
- Press Issue Badge.
- Select an ID from the list or enter the number manually. IDs marked in red are already assigned.
You can define the number range for replacement IDs individually for each location via the menu item Settings.
Tab Badge Printing
This feature is optional and not available in every installation. Depending on the version, it may also be available in the main menu.
This tab allows you to print badges with the person’s information. You can define the layouts for printing badges via the menu item Badge Printing > Settings.
Tab Documents
Here you can link documents to the personnel master record. To upload new documents, drag the file(s) into the area provided. Or press Upload Documents and select the desired files on your computer.
Tab Person Groups
Here you can see to which person groups the selected person is assigned. You can manually add or exclude person groups. Manual adjustments overwrite the automatic assignment based on the person’s criteria.
Manual adjustments are marked accordingly:
- Manually assigned: The person group is highlighted in green and the note manually assigned is added.
- Manually excluded: The group of persons is highlighted in yellow and the note manually excluded is added.
You can remove manual adjustments at any time using the trash can icon.
Tab Qualifications
Qualifications enable you to unlock permissions for the selected person. Use the menu item Qualifications to specify which qualifications can be selected here.
Tab Identification
Here you can manage the various media that a person can use to identify themselves on a device. To add a new identification medium, press Add.
- Identification: Enter the value for the medium in this column (e.g. “F DD 193E” for a license plate).
- Type: Select the type of identification in this column (e.g. license plate).
- Valid from / Valid to: Define a validity period for the medium.
- Prohibition: In this column, you can block individual identification media.
- Reason for ban: You can enter a comment here as a reason for the ban.
- To remove an identification medium, use the trash icon.
Press Save to save the entries.
TIPS
Person Groups
You can use the menu item Person Groups to group staff according to departments or other criteria.
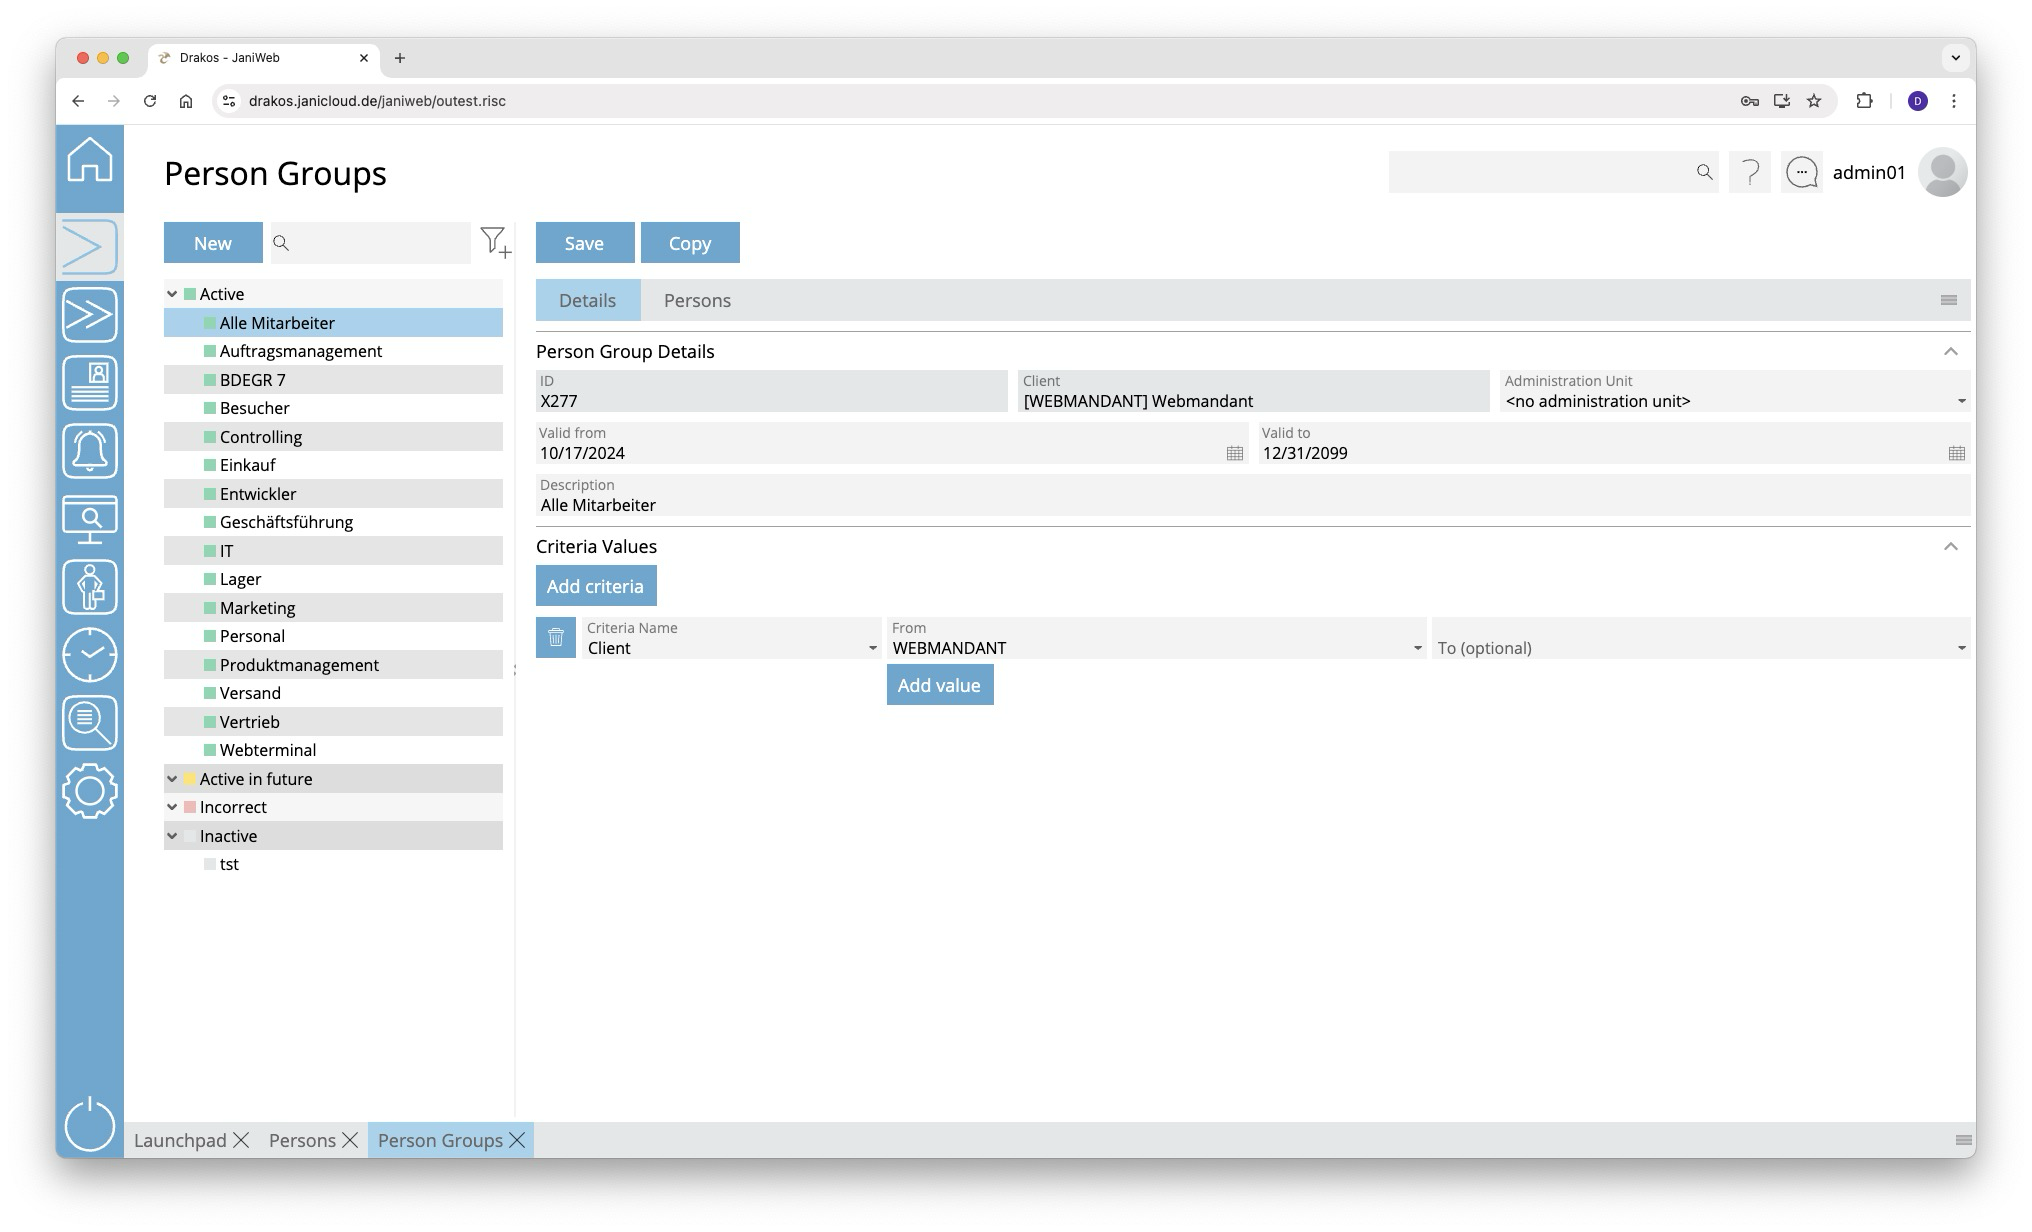
List of person groups
The list contains all person groups already created, grouped by their status. Select a person group to view details.
The list offers the following options:
- Search: Enter text or numbers in the search field (magnifying glass icon) at the top to search for groups. The entries take effect immediately: the list only displays hits. The search is not case sensitive.
- Filter: Press the filter icon. Select the criteria for which you want to display groups. Changes are visible immediately.
Button New
Press New to create a new person group. Enter a description, a validity period, and a client, and press Save.
Tab Definition
Area Person Group Details
Define the details of the person group, such as the label and validity period.
Area Criteria Values
Specify the criteria according to which the person group is formed. To add a new criterion:
- Press Add criteria.
- Select the required criterion from the list field.
- Enter a single value (From) or a range of values (From–To).
- To set additional values for the same criterion, press Add value.
Logic of criteria and values
- The values within the same criterion are linked logically by OR (one match is sufficient).
- Different criteria are linked logically by AND (all criteria must be met).
Tab Persons
The list displayed here contains all persons who belong to the selected person group. Persons in this list have either been assigned automatically based on criteria or added manually.
- Press Add to add a person to the group independently of their criteria.
- Use the trash icon to remove a person from the group independently of their criteria.
Furthermore, the list offers the following options:
- Select columns to display: Press the gear icon. Select which columns you want to display and in which order. Arrange the columns using the mouse or the arrow icons. Press Apply to adopt the changes.
- Search in columns: Enter text or numbers in the search field (magnifying glass icon) of a column to search for names, personnel numbers, or other criteria. The entries take effect immediately: the list only displays hits.
Tip: Search for substrings. You can find “Spencer-Churchill” with “spe”, “chur” or “hill”. The search is not case sensitive. - Export the entire list: Press the download icon. Select the format in which you want to export the list. The export files are downloaded or displayed depending on the browser/operating system settings. For details on the available export formats, see the General > Export Formats chapter of this manual.
TIPS
Lock Persons
The menu item Lock Persons allows you to block and unblock badges en masse based on certain criteria.
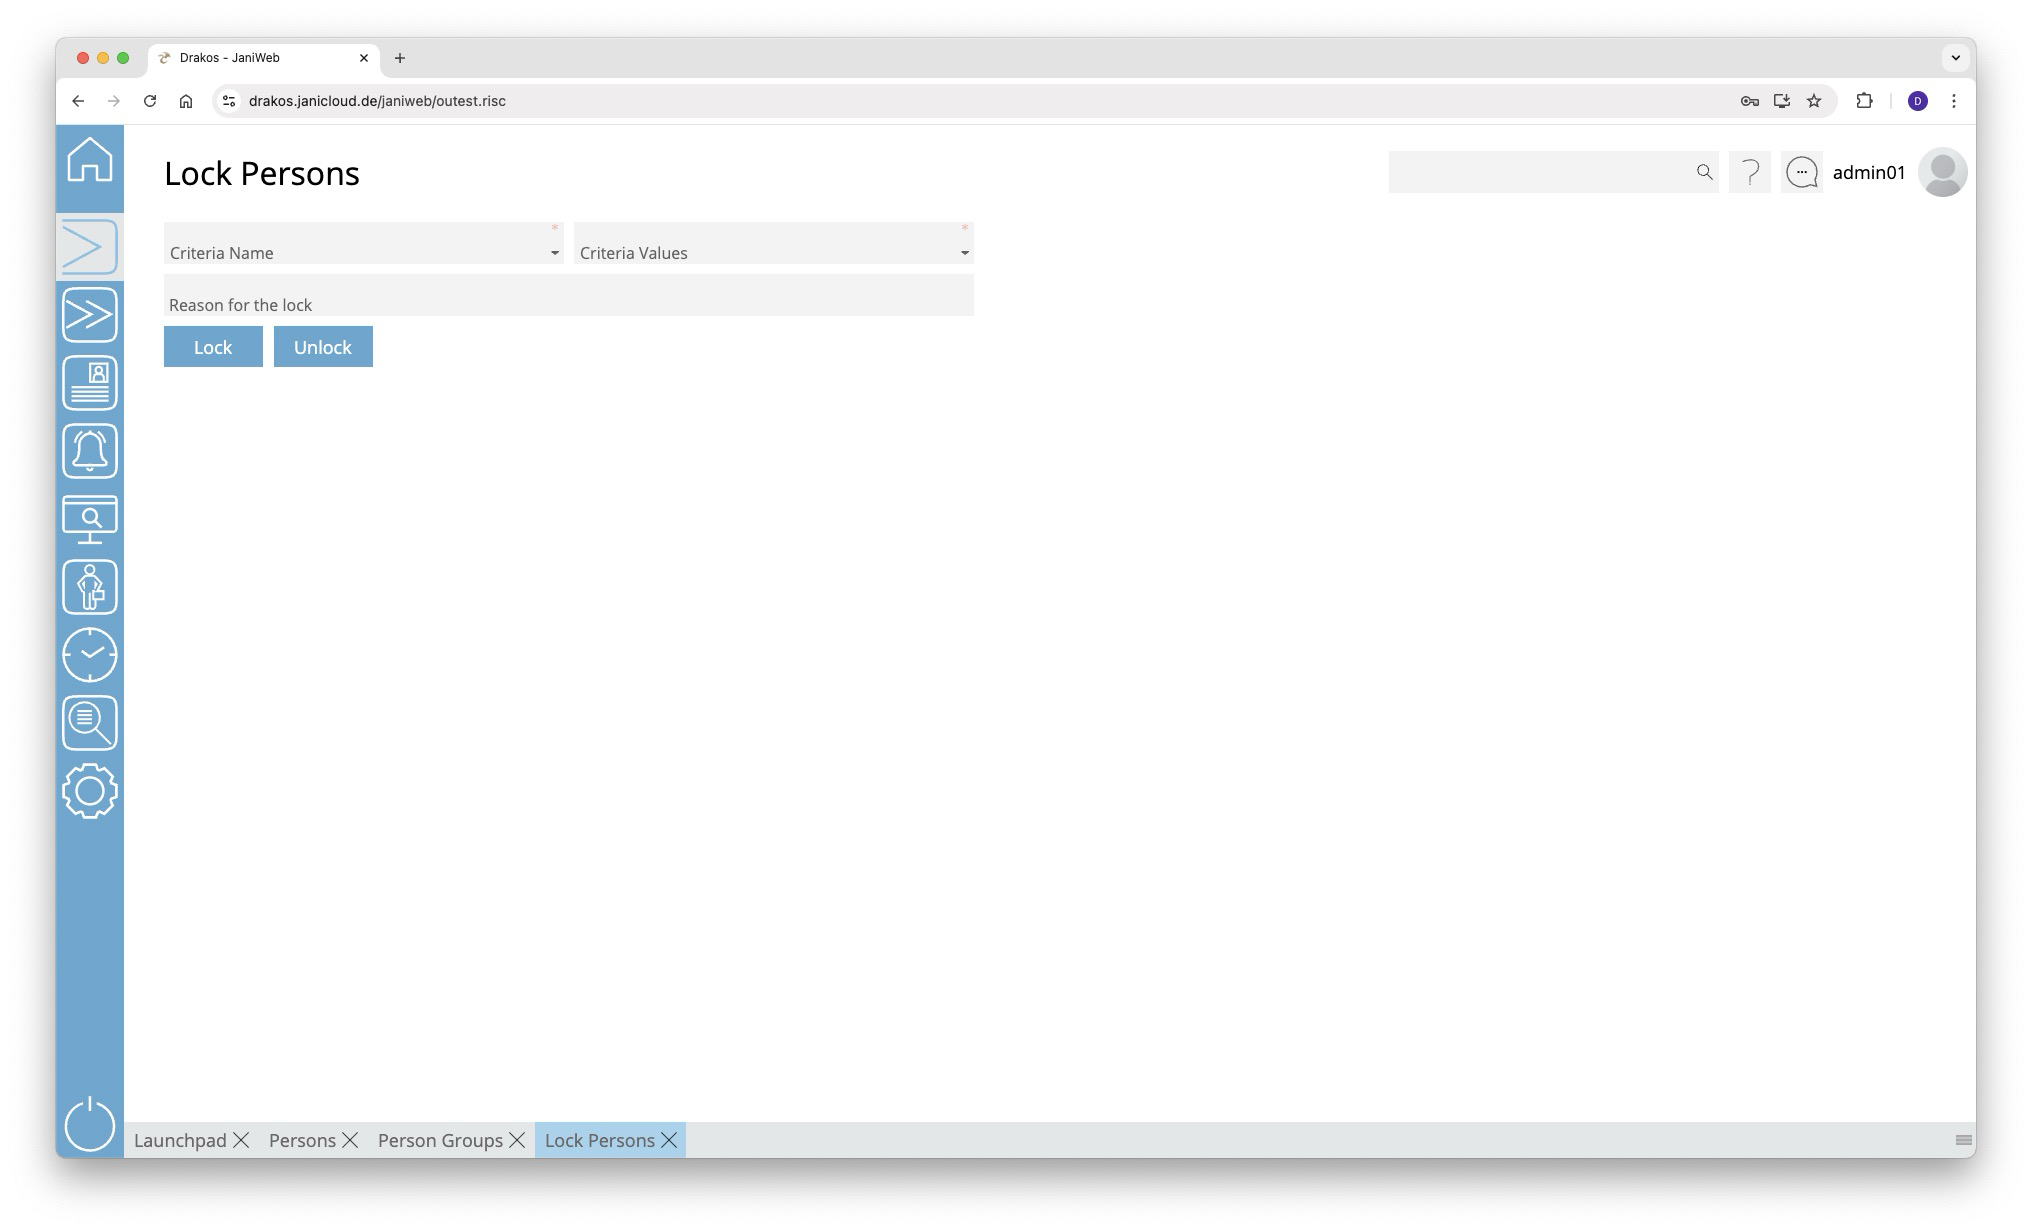
Locking persons
- Select a criterion from the list field (e.g. badge number or PDC group).
- Select a value from the Criteria Values drop-down list.
- (Optional) Enter a reason for the ban in the field Reason for the lock.
- Press Lock to lock the person(s).
Unlocking persons
Follow steps 1 and 2 above and press Unlock.
Block List

Permissions
Use the menu item Permissions to grant individual persons or entire groups of persons permissions for certain devices or device groups.
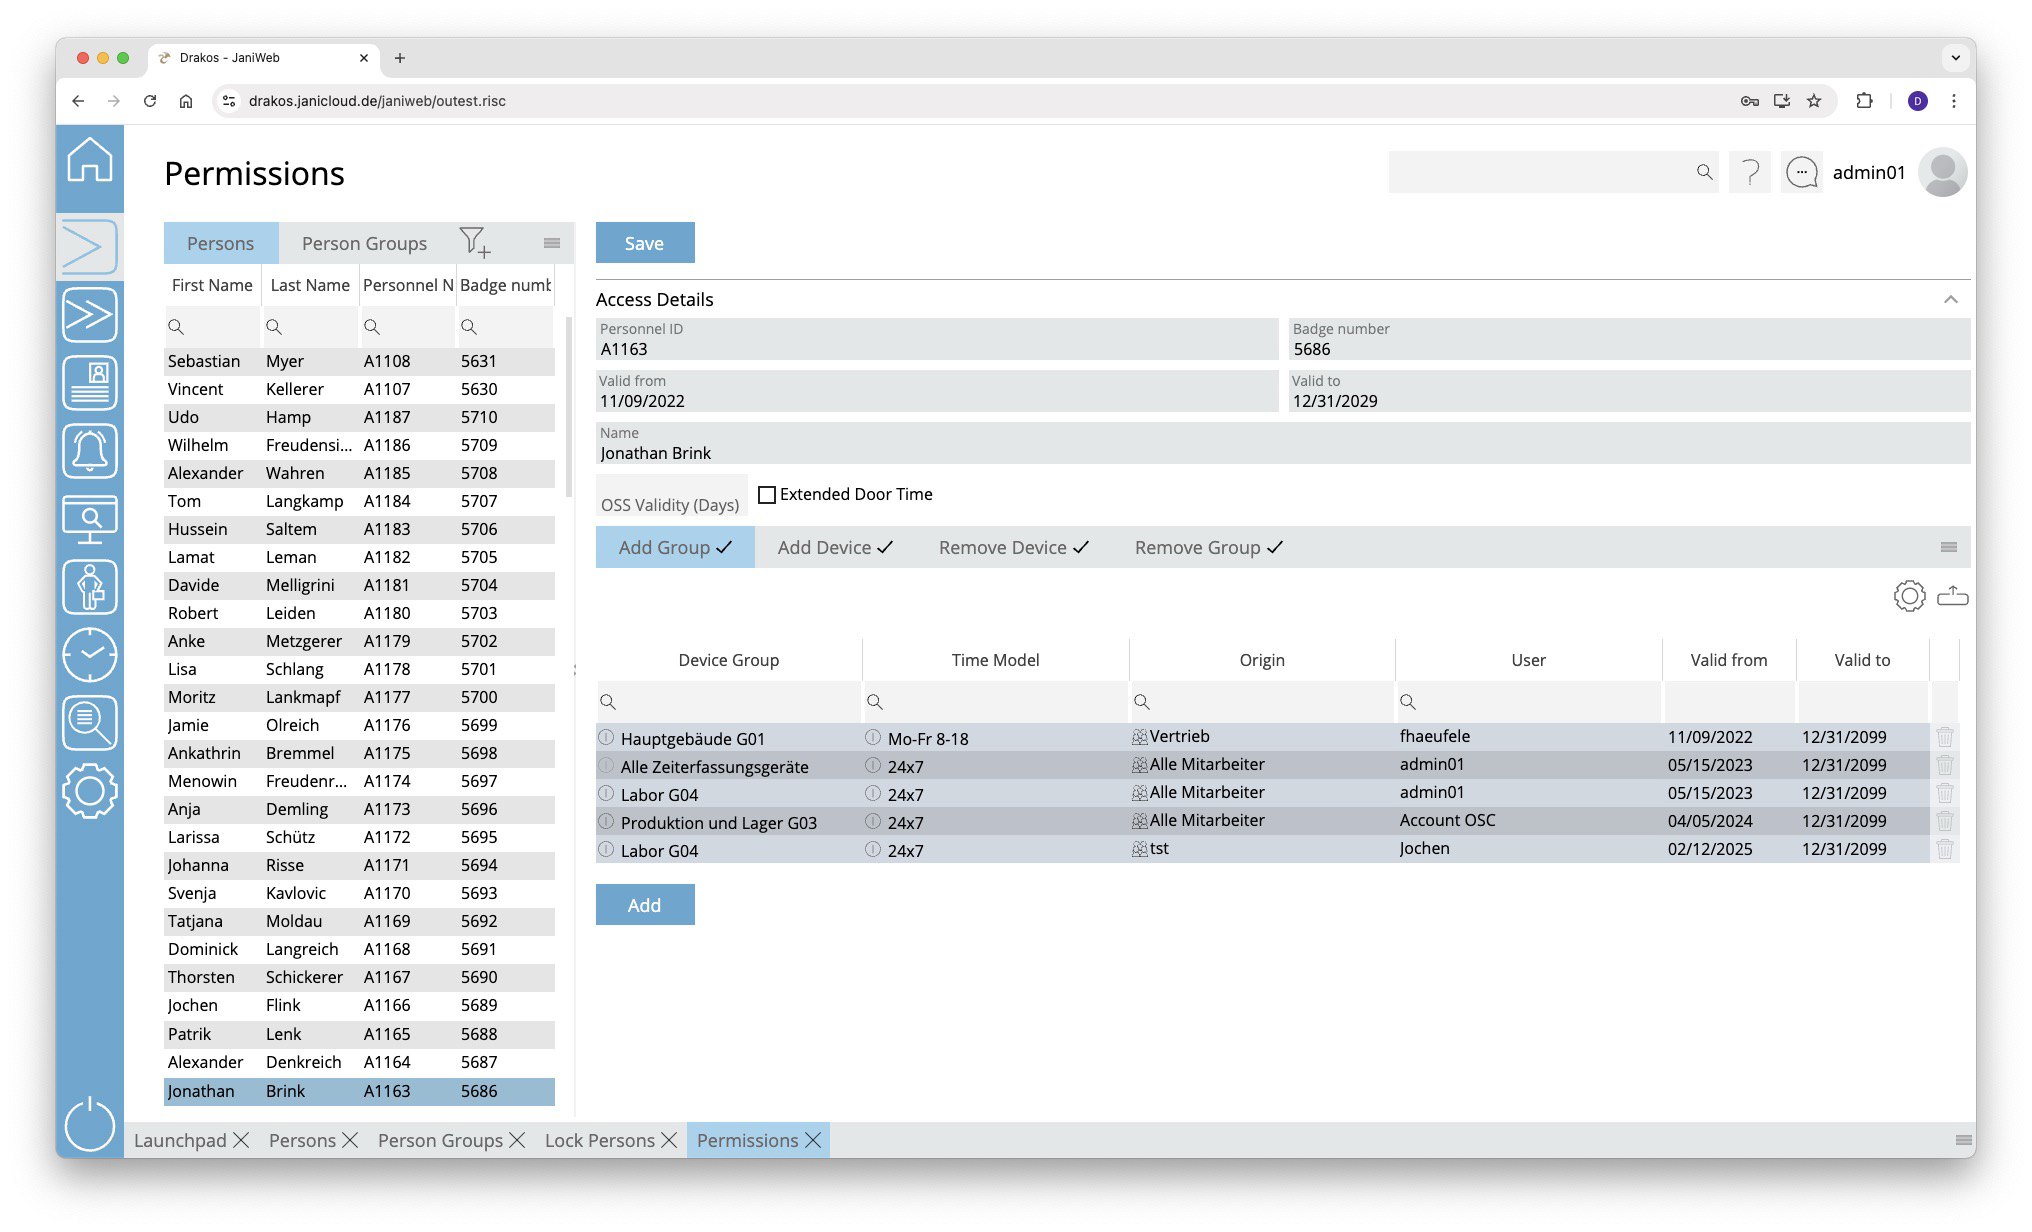
List of persons and groups of persons
Select a person or group of persons from the list on the corresponding tab page to display the existing permissions.
Tabs Add Group / Add Device
Here you can grant the selected person/group of persons permissions to use certain device groups or devices. To add another device group or device to the list:
- Press Add.
- Select a Device Group or a Device.
- Select the desired Time Model.
- Set a validity period.
- Press Save.
A tick after the title of a tab indicates that there is data within the tab.
Tabs Remove Device / Remove Group
These lists are used to remove permissions for certain device groups or devices.
Example: Anna B. belongs to the group of persons called “laboratory technicians”. This group of persons has permission for the device group “laboratory”. However, Anna is not allowed to enter a particular laboratory. Add the access device for this laboratory to the Remove Device list.
To add further device groups or devices to the list, follow the steps in the previous section. However, a time model cannot be selected here.
If the tabs Remove Device or Remove Group contain a device or device group, access via this device or device group is not possible. This also applies if a permission for the device or device group has been granted on the tabs Add Device or Add Group.
A tick after the title of a tab indicates that there is data within the tab.
Workflow Permissions
This feature is optional and not available in every installation.
If assigning a device or device group is associated with a workflow, the permission becomes active only after the decision-maker approves the workflow request.
If you select a device or device group that has a workflow, a dialog box appears. This prompts you to enter values for the time model and the validity of the permission. You also have the option of leaving a comment for the decision-maker.
You can create multiple workflow requests at once. To send them, press Save.
Workflow requests are indicated by different colors:
You can extend the validity of approved permissions. To do this, press Extend. Then select a new validity period and create another workflow request.
TIPS
The column Origin indicates where the permission comes from. For example, the permission might have been inherited by the person, or it might have been granted by the system Janitor.
Time Models
Use this menu item to manage time models for access permissions. By linking a time model to a device group or a single device, you determine the times at which they may be used.
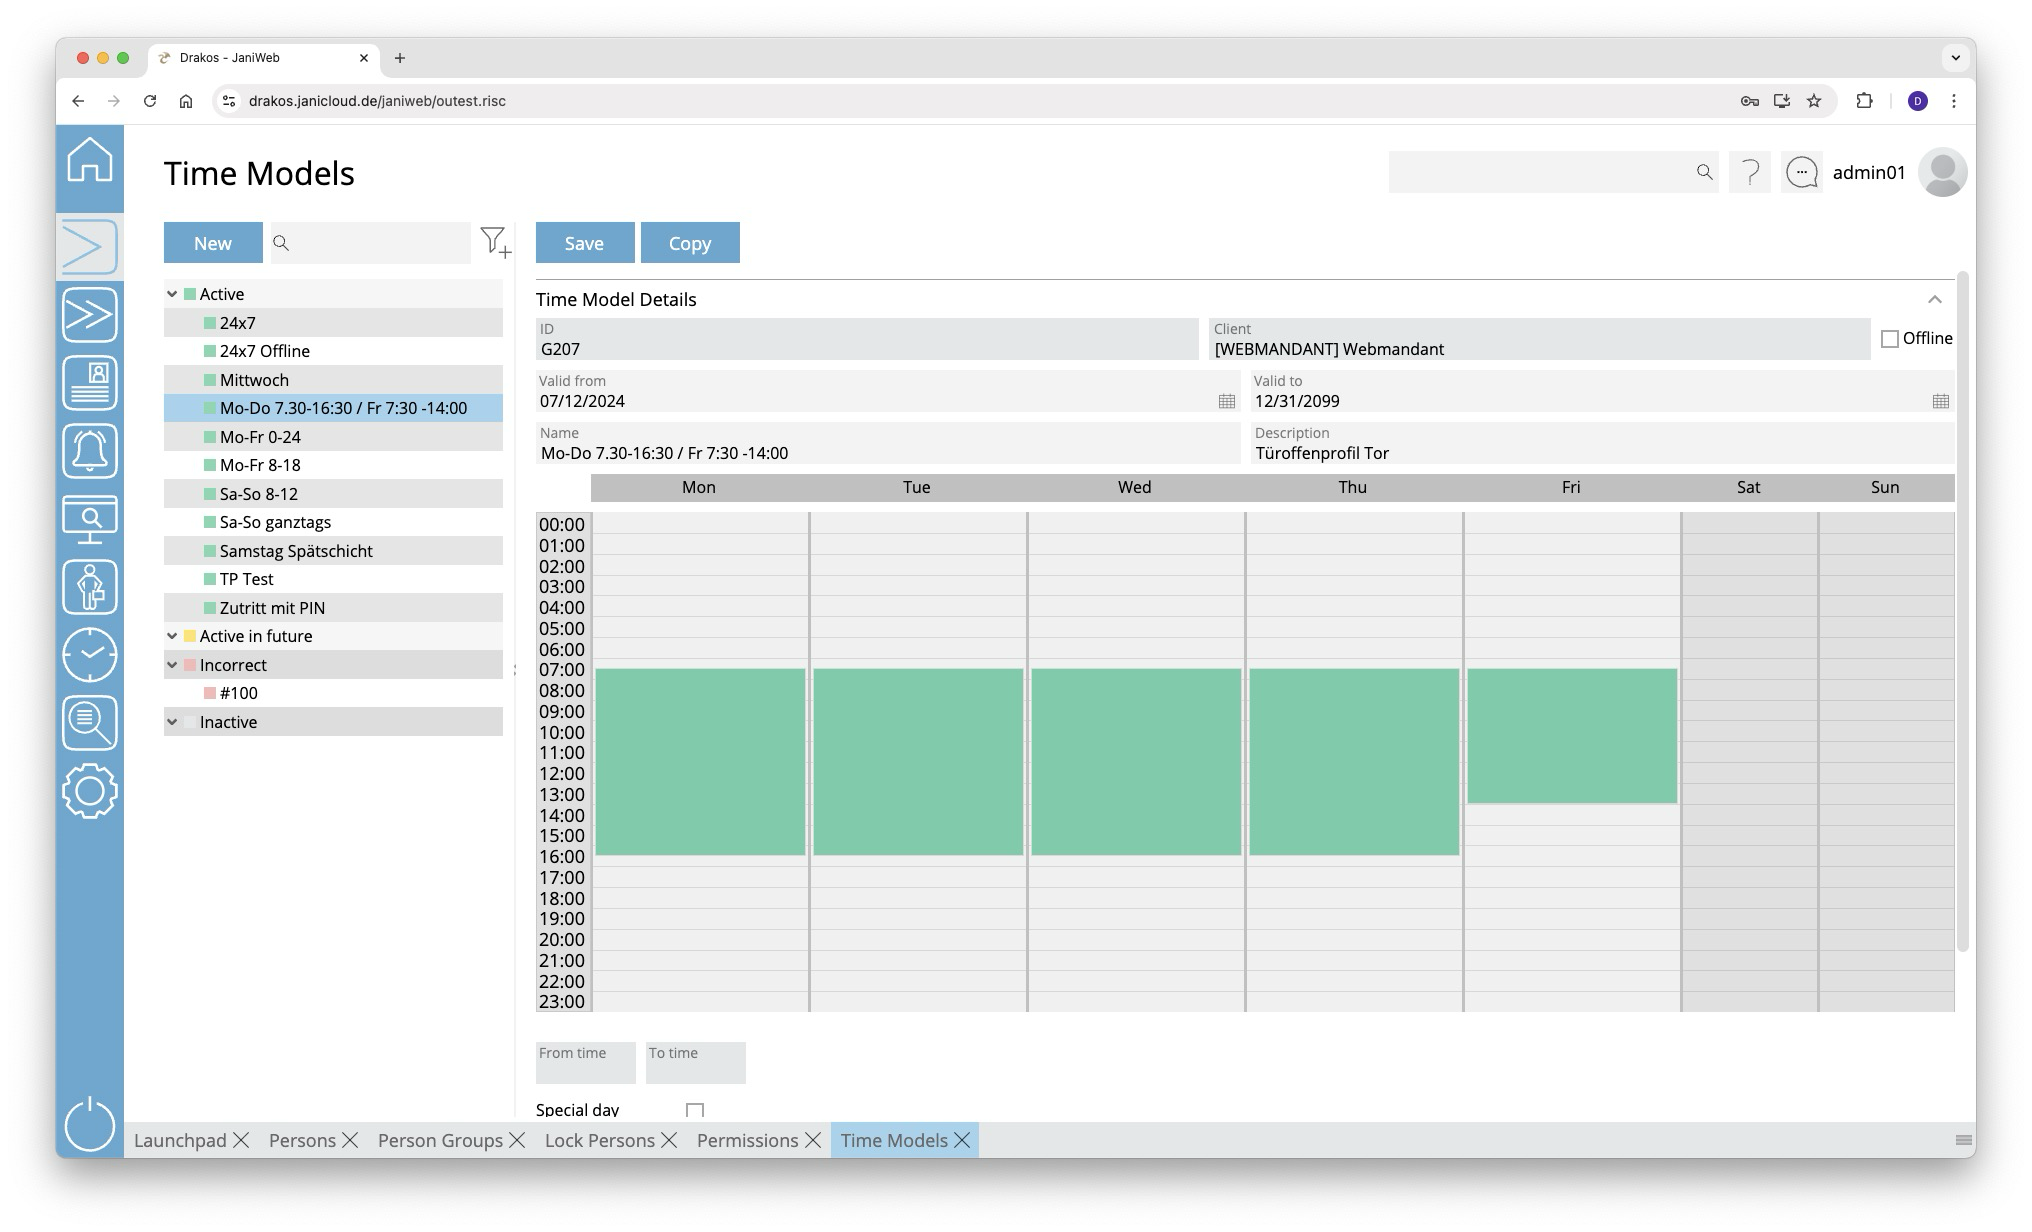
List of time models
The list contains the time models that have already been created. Select a time model to display its properties.
Button New
Press New to create a new time model.
- Entering basic data: Enter a description, select the client and define the validity period.
-
Editing the weekly overview: To define the periods during the week when access should be allowed, proceed as follows:
-
Right-click on the desired day and select New time period. A green marker appears.
-
Drag the marker with the mouse or enter the start and end times in the From time and To time fields.
-
Repeat the steps for all other periods and days that should be included in this time model.
-
- Specify access options:
- Holiday Classes: This is where you determine the bank holidays on which access should be allowed. If a check mark is set, this time model applies to holidays that belong to the holiday class. If no check mark is set, this time model does not apply to any holidays.
- PIN required: Select whether access should only be possible with a PIN.
- PIN in master record: Select whether the PIN should be transmitted together with the master record.
- Save: Press Save to save your entries.
Button Copy
You can copy an existing time model to use as a basis for a new time model. Click Copy at the top to make the desired changes. Then click Save.
Option Offline
If the Offline option is set, the ID must be selected from the list. Also you can choose the Validation duration. Offline time models can only be assigned to offline components or offline device groups.
TIPS
It is possible to create multiple time periods per day.
- Delete a time period: To remove a time period, right-click it and select Delete.
- Copying a period: To copy a period to the clipboard, right-click on it and select Copy.
- Inserting a period: To insert a copied period on a different day of the week, right-click on the desired day and select Paste.
Devices
This menu item allows you to manage the devices for access control and time tracking and to query their status.
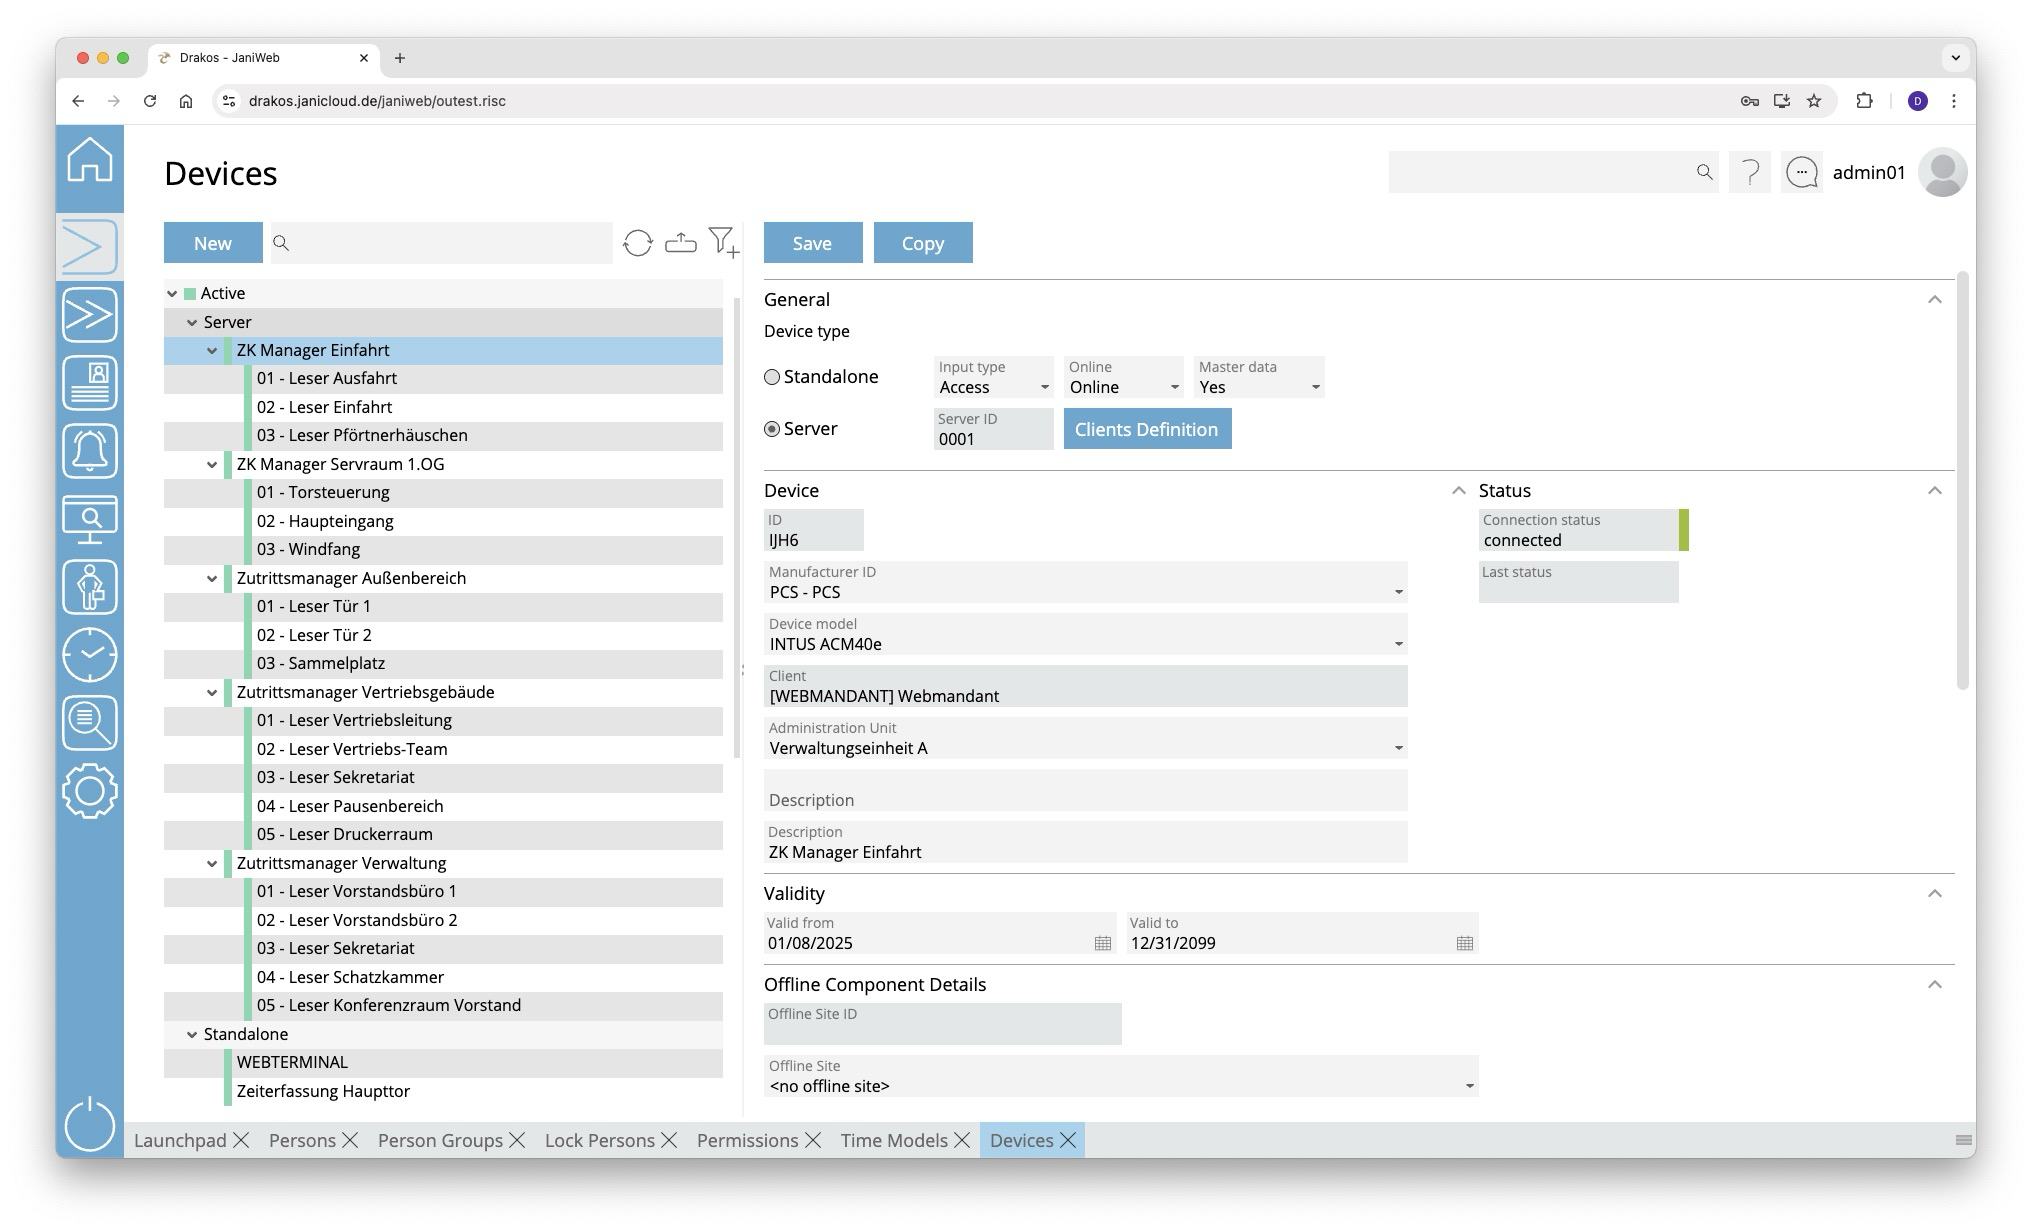
List of devices
The list contains the devices that have already been created, sorted by device type. Select a device to view details.
The list offers the following options:
- Search: Enter text or numbers in the search field (magnifying glass icon) at the top to search for devices. The entries take effect immediately: the list only displays hits. The search is not case sensitive.
- Filter: Press the filter icon. Select the criteria for which you want to display devices. Changes are visible immediately.
- Refresh: Press Refresh to update the list of devices and their status information. This can be useful for troubleshooting, for example.
- Export the entire list: Press the download icon. Select the format in which you want to export the list. For details on the available export formats, see the General > Export Formats chapter of this manual.
Button New
Press New to create a new device. Enter the required information and press Save.
Area General
- Select whether the device is a Standalone device, a Server or an Offline component.
- Specify whether the device is used for Time recording, Access or plant data collection (PDC).
Button Clients Definition
- Press this button to assign and configure a sub-reader for an access server.
- Make sure to select the correct Client Position for sub-readers.
Area Status
In the Connection status field, you can see the connection status of the device. This can have the following statuses:
- connected - the device is connected
- disconnected - the connection to the device is disconnected
- unknown - the status of the device is unknown
The time at which a status was last transmitted is shown in the Last status field.
The Device status field shows the mode the device is in. The following modes are possible:
- online - the device expects an online response from the device communication
- offline - the device accepts bookings and checks the internal memory to see whether it is an authorised or unauthorised booking
- autonomous - the device does not expect a connection to the device communication and saves the bookings in the temporary memory
The Last master record download field indicates the time at which the device was last supplied with master data. (only available for devices from the manufacturer Dormakaba)
The Master record log button can be used to check which master data has been sent to the device. (only available for devices from the manufacturer Dormakaba)
Area Device
Enter the basic information about the device.
- Select a Manufacturer ID and a Client.
- Enter a Description and additional information for the device.
Area Validity
Define the period during which the device should be active.
Area Network
Specify the network settings required for the device.
Area Options
- Location: Enter a location for the device.
- Time zone: If you are managing devices in different time zones, make sure that the correct time zone is selected.
- Holiday Calendar: Select the appropriate bank holiday calendar for the device.
Area Offline Component Details
Select the Offline Site to which the component belongs. (You can create offline sites under Settings > Tab Offline Components.)
Parameters for offline components (manufacturer Dormakaba)
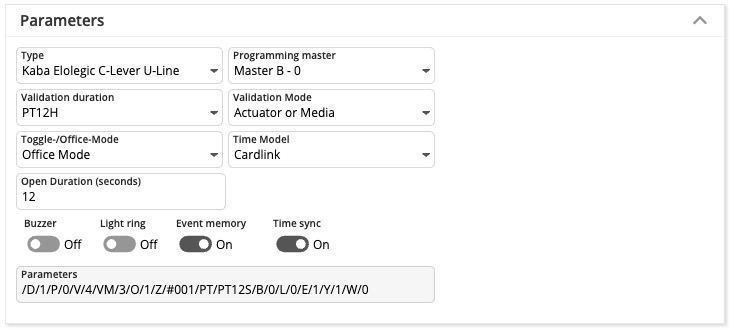
Attention: After changing the parameters, the offline component must be rewritten with the programmer.
- Type: Here you define the type of offline component.
- Programming master: Use this setting to define the programming master for the offline component.
- Validation duration: Determines the validation duration. (Validation durations you can define into Settings menu)
- Days: P[number of days]D (example: P7D for seven days)
- Hours: PT[number of hours]H (example: PT1H for one hour)
- Fixed time: HH:MM:SS (example: 12:00:00 for daily at 12 o’clock)
- Validation Mode: Defines the validation mode.
- Toggle-/Office-Mode: Activates Office Mode/ Day Night Mode.
- Off: The door can only be opened with an authorized booking.
- Office Mode: The first authorized booking on the offline component within the selected time model opens the door. A subsequent authorized booking closes the door again. The door remains open until the authorized time has expired and then closes again.
- Day Night Mode: Automatic unlocking of offline components in a defined time model.
- Time Model: Defines the time model in which Office Mode/ Day Night Mode applies.
- Open Duration (seconds): Specify how long the offline component opens the door after a successful booking.
- Buzzer: Switches the buzzer on or off.
- Light ring: Switches the light ring on or off.
- Event memory: Determines whether bookings are saved to the component or not.
- Time sync: Activates or deactivates the time sync.
Parameter offline components
| Switch | Meaning | Values |
| /B/ | Summer |
|
| /L/ | Light ring |
|
| /E/ | Save events |
|
| /Y/ | Sync time |
|
| /M/ | EM_MSG | |
| /V/ | Period |
|
| /D/ | Type |
0=198, Kaba Elolegic digital cylinder U-Line |
| /O/ | Mode |
|
| /Z/ | OMZPS | |
| /W/ | Offline site |
|
| /P/ | Program master number |
|
Area Device Group Assignment
The device groups to which the device is assigned are displayed in this area.
TIPS
- Press Copy at the top to create a copy of the selected device, including its properties.
- The current network connection status and other device status messages appear in the Status area.
Device Groups
Use this menu item to create device groups. Device groups make it easier to manage devices and assign permissions. We recommend always grouping devices, especially for larger installations.
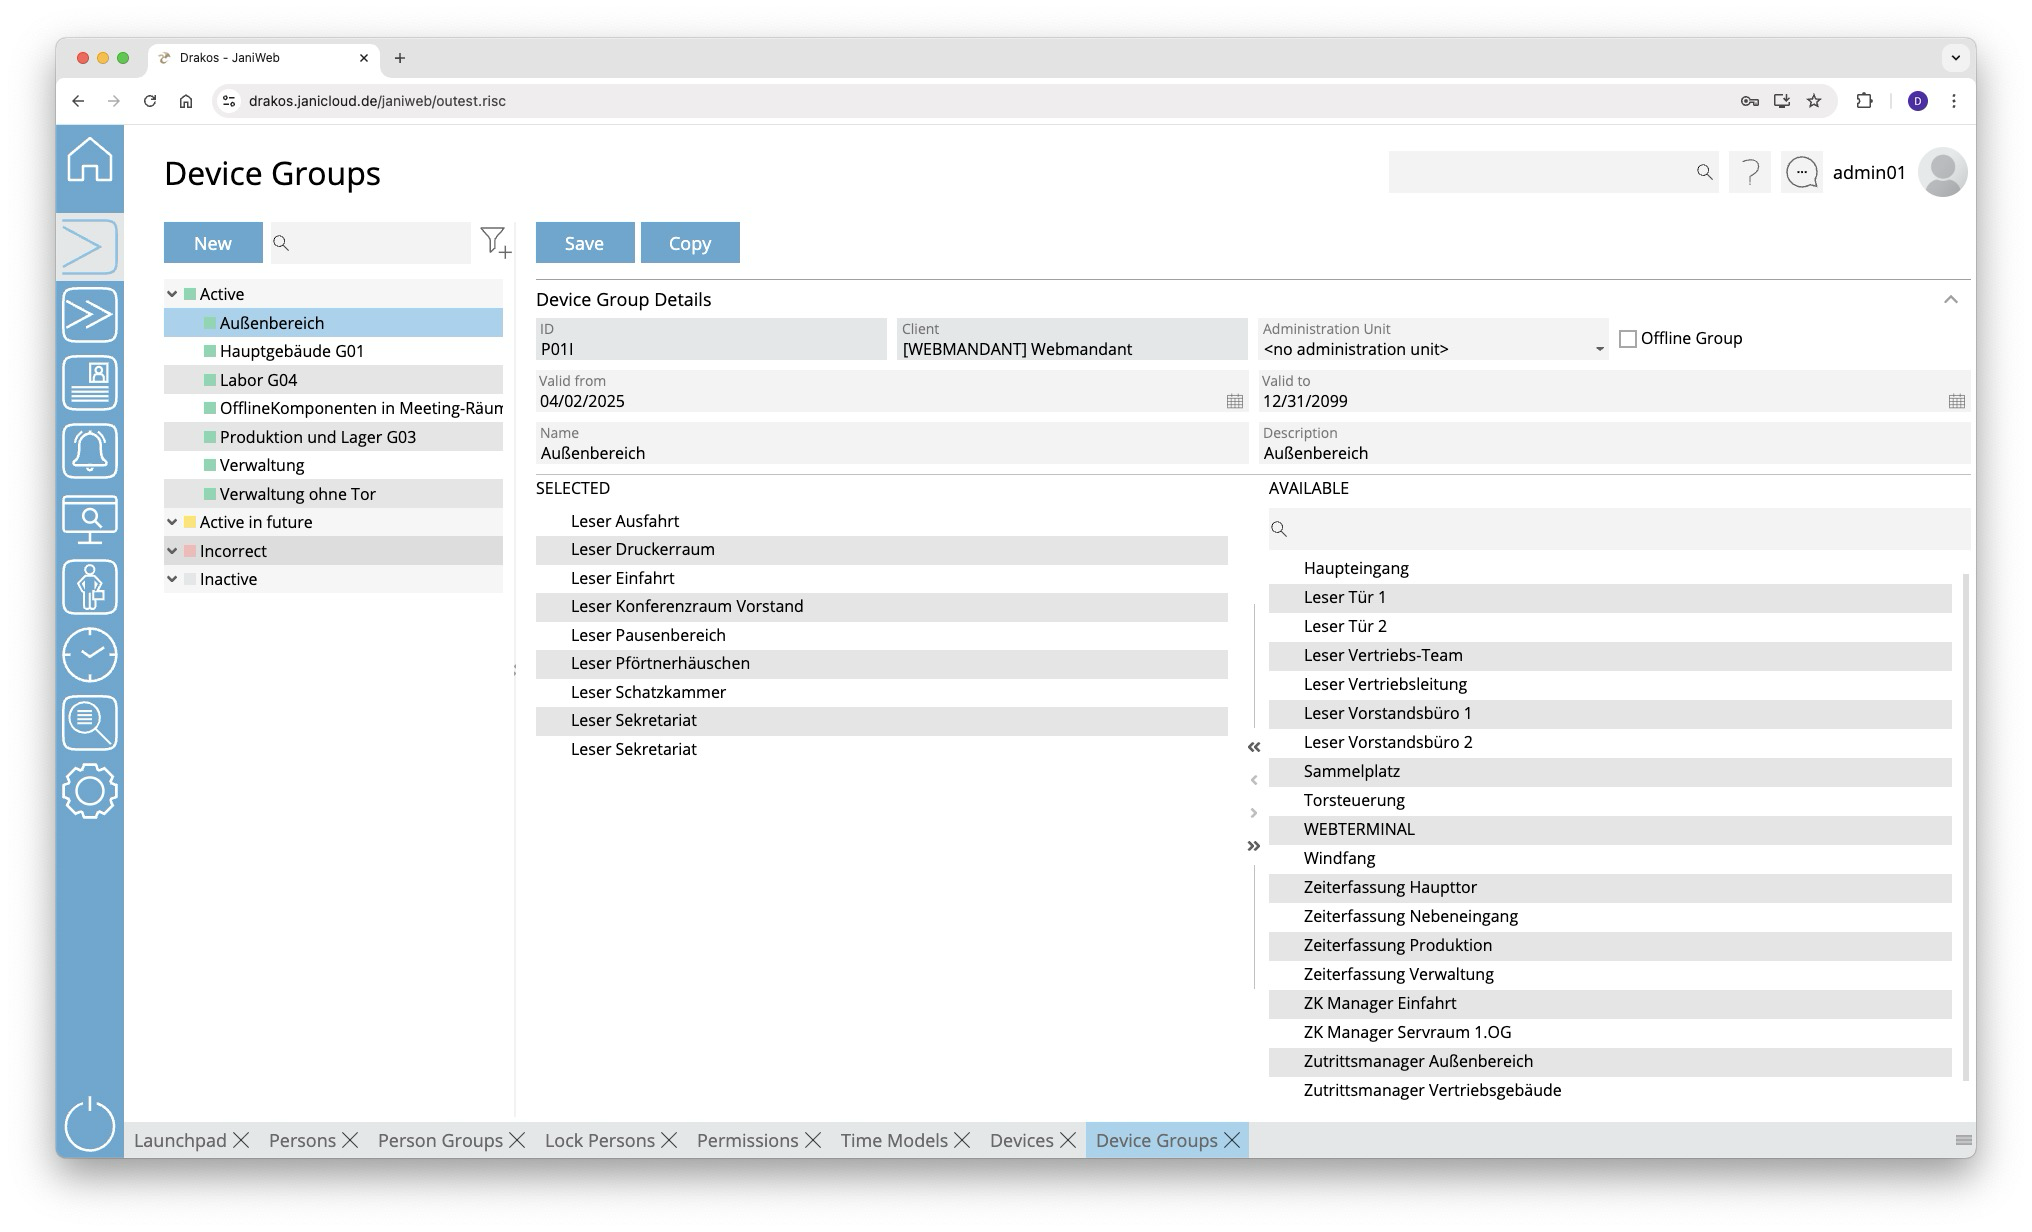
List of device groups
The list contains the groups that have already been created. Select a group to view details.
The list offers the following options:
- Search: Enter text or numbers in the search field (magnifying glass icon) at the top to search for groups. The entries take effect immediately: the list only displays hits. The search is not case sensitive.
- Filter: Press the filter icon. Select the criteria for which you want to display groups. Changes are visible immediately.
Adding/removing devices
To add or remove devices from a group, select the group from the list.
- Add: Drag the devices from the right-hand list (Available) to the left-hand list (Selected).
- Remove: Drag the devices from the left-hand list (Selected) to the right-hand list (Available).
You can also select several devices and move them at the same time. As an alternative to using the mouse, use the arrows between the windows.
Devices can belong to multiple groups at the same time.
Attention: If you change the assignment of an offline component to an offline device group, the affected component must be rewritten with the programmer.
Button New
- Press New to create a new device group.
- Enter a Description, select a Client and define a validity period (Valid from – Valid to).
- Select whether it is an Offline Group (a group of offline components). As soon as this option is selected, only offline devices appear in the Available list.
- Add devices to the group as described above.
TIPS
Control Profiles
Use the menu item Control Profiles to link time models to devices to determine when access through the respective door should be possible.
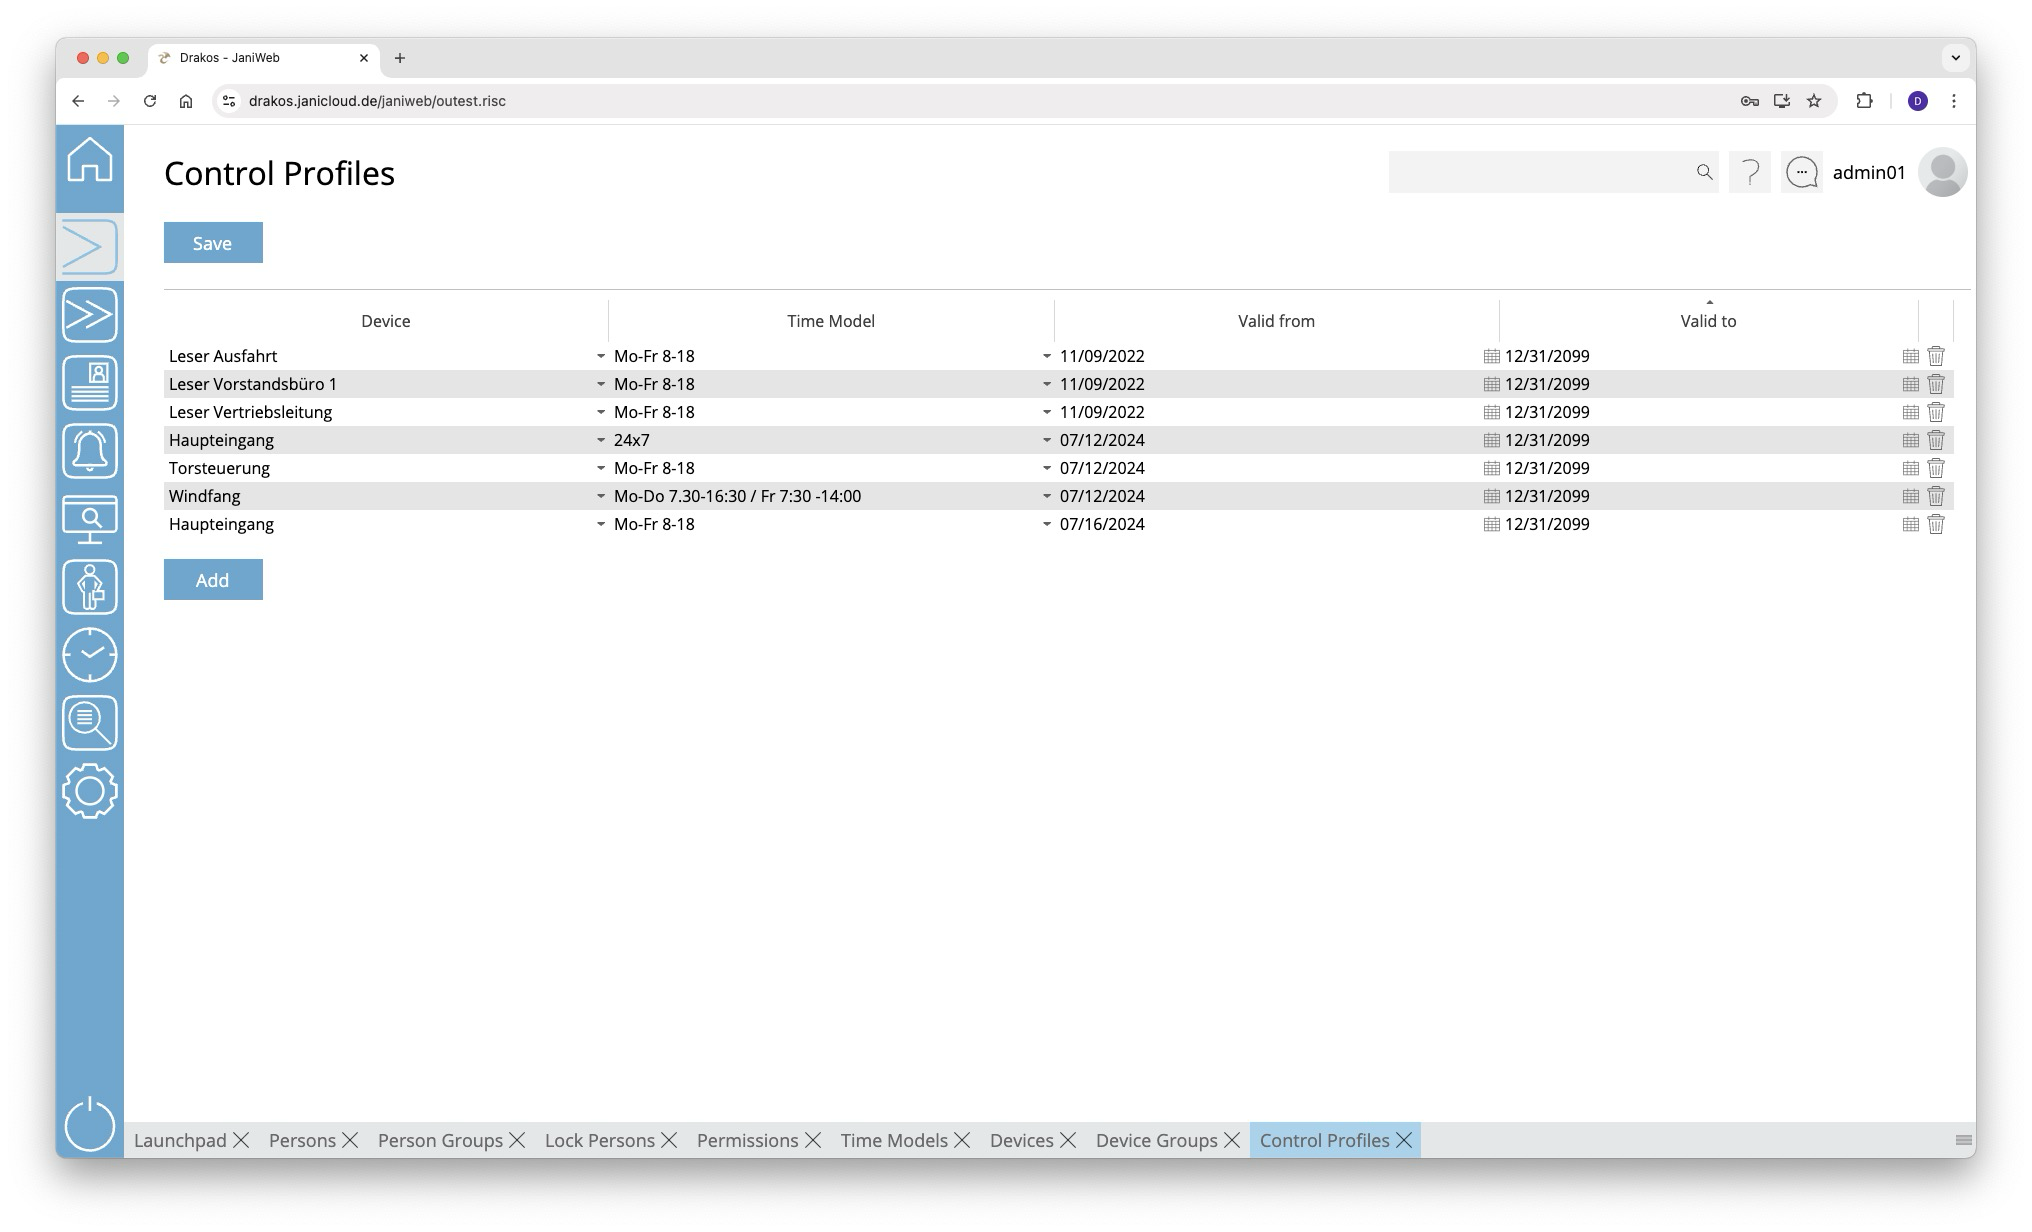
List of control profiles
The list contains the control profiles that have already been created. You have the following options here:
- Changing a control profile: Select a different time profile for the desired device and press Save.
- Adding a control profile:
- Press Add. An empty entry will appear at the end of the list.
- Select a device in the Device column
- Select the desired time model in the Time Model column.
- Press Save.
- Removing a control profile: Press the trash icon to remove a profile. A confirmation dialog will appear.
When a control profile has been created for a device, the doors associated with it will remain open during the time period specified in the assigned time model.
It is possible to create multiple control profiles for a device.
TIPS
Control profiles can also only be effective for a certain period of time. Use the Valid from and Valid to columns for this purpose.
Companies
Use the menu item Companies to manage companies. Companies created here can be assigned to persons or visitors via the menu items Persons or Visitors.
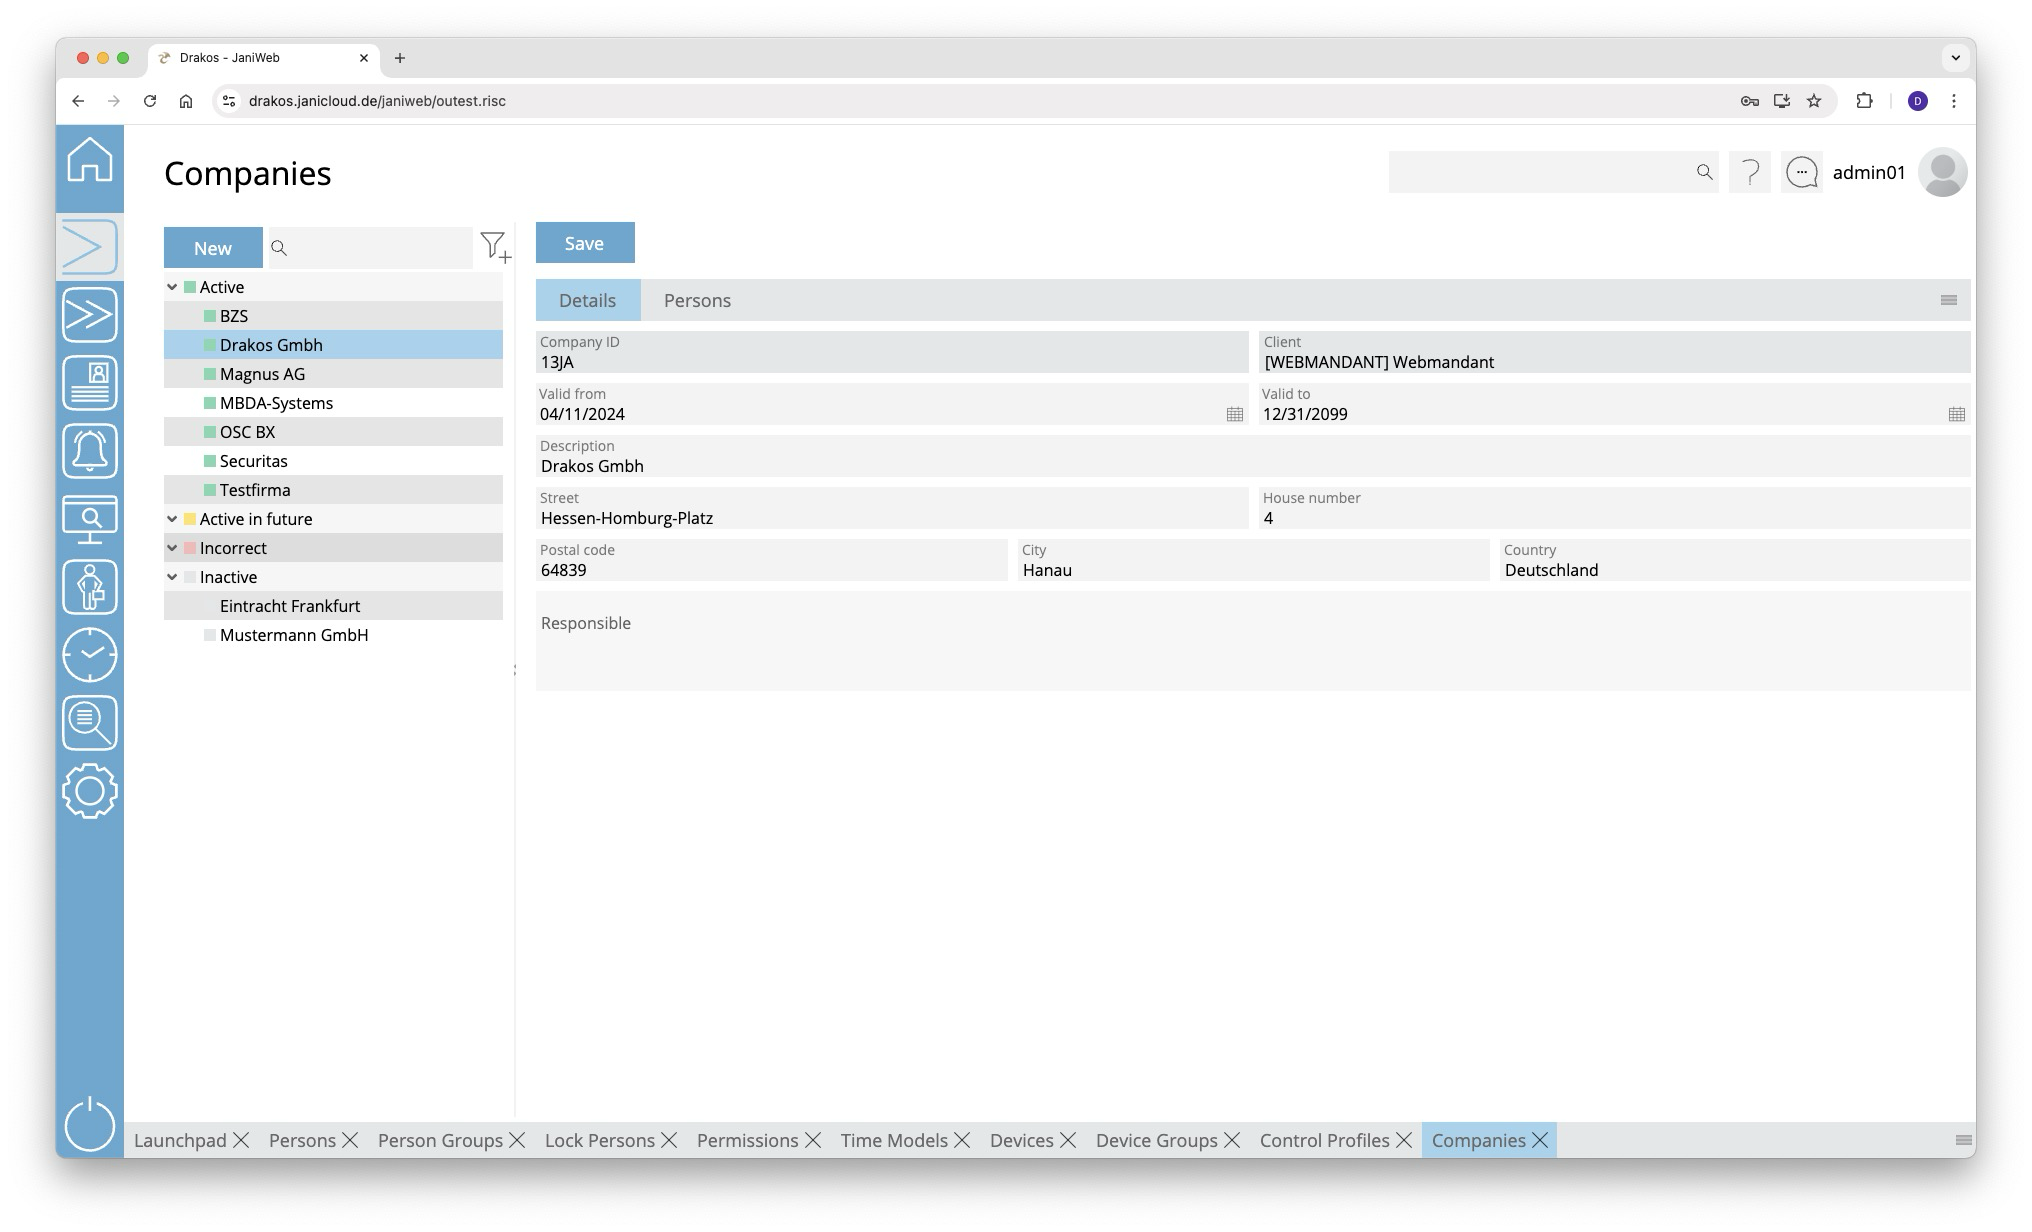
List of companies
The list contains the companies already created, sorted by their current status (Active, Active in future, Incorrect, Inactive). Select a company to view details.
The list offers the following options:
- Search: Enter text or numbers in the search field (magnifying glass icon) at the top to search for companies. The entries take effect immediately: the list only displays hits. The search is not case sensitive.
- Filter: Press the filter icon. Select the criteria for which you want to display companies. Changes are visible immediately.
Button Save
You can change the details of the selected company. Press Save to save the changes.
Button New
Press New to create a new company. Enter the required information for the company on the tab Details and press Save.
Tab Persons
The tab Persons provides an overview of which persons are assigned to the respective company.
TIPS
- Filter: Use the filter icon to filter by status (active, inactive, etc.).
- Export: Use the export icon to export the list of assigned persons.
Mass Change
You can edit or delete multiple persons at the same time using the Mass Change menu item.
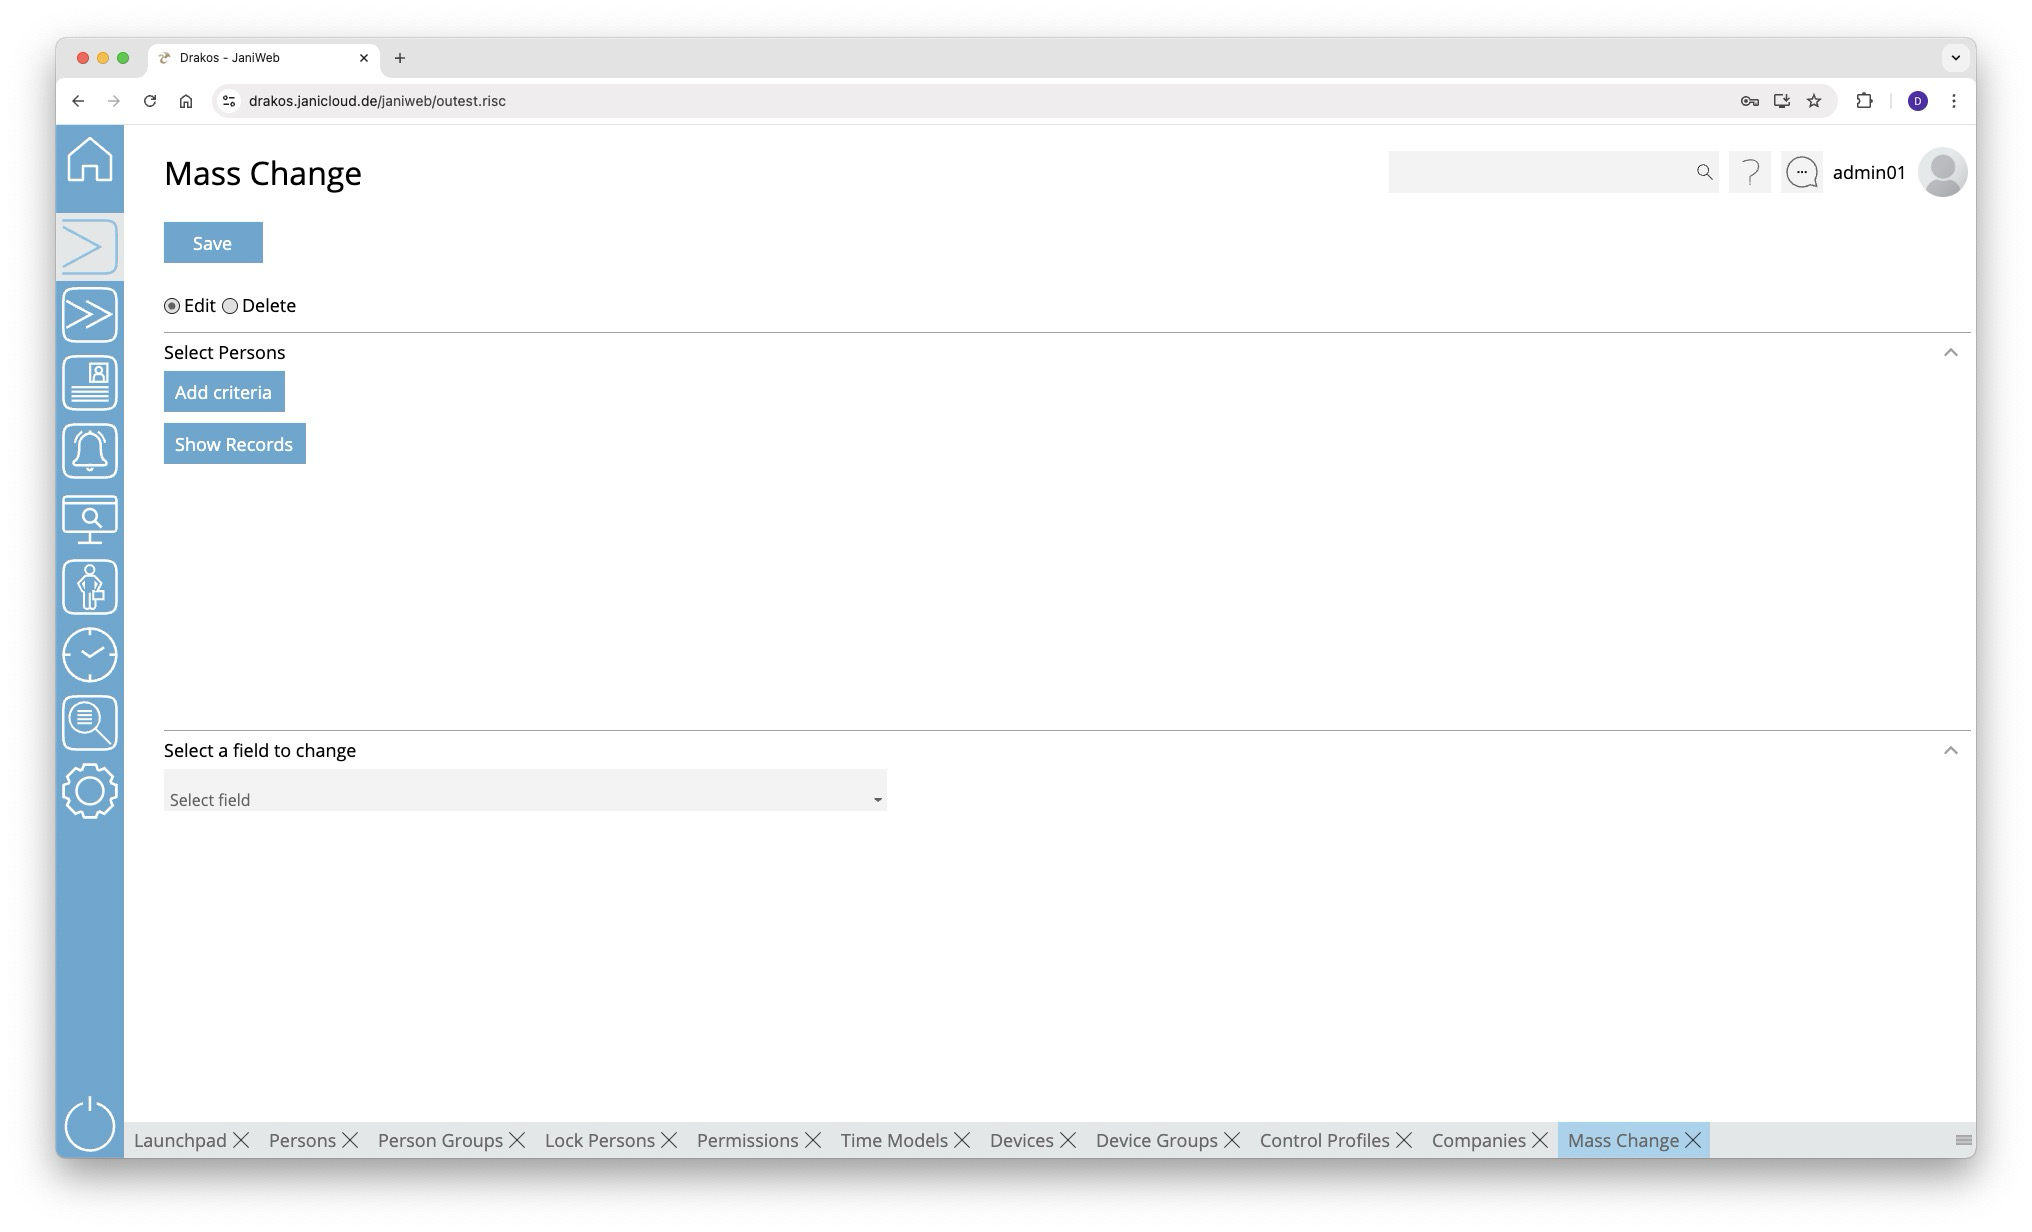
Radio buttons Change/Delete
Select whether you want to use the mass change to Change or Delete.
Area Select Persons
Enter the criteria for selecting the persons to be changed or deleted.
- Press Add criteria.
- Select the required criterion from the list field.
- Press Add value.
- In the From field, select a single value or use both fields to specify a range. You can also specify multiple values for the same criterion (Add value).
- (Optional) Add another criterion with value(s).
Press Show Records to display the master records selected for change or deletion.
Logic of criteria and values
- The values within the same criterion are linked logically by OR (one match is sufficient).
- Different criteria are linked logically by AND (all criteria must be met).
Area Select a field to change
This area appears if you have selected Change at the top.
- Select the field whose value you want to change.
- Enter the new value.
- Press Save to execute the mass change. A confirmation dialog appears.
Area Delete permissions/master records
This area appears if you have selected Delete at the top.
- Select what you want to delete:
- Access permissions of the selected persons that have expired by a certain date:
Select Access permissions expired before. - Master records of the selected persons that have expired by a certain date (the master records are completely removed from the system):
Select Master records expired before.
- Access permissions of the selected persons that have expired by a certain date:
- Enter an expiration date.
- Press Save to remove the selected data.
Qualifications
The Qualifications menu item allows you to create profiles to which certain permissions are linked. By assigning such a qualification to persons, the persons automatically inherit the permissions of the qualification.
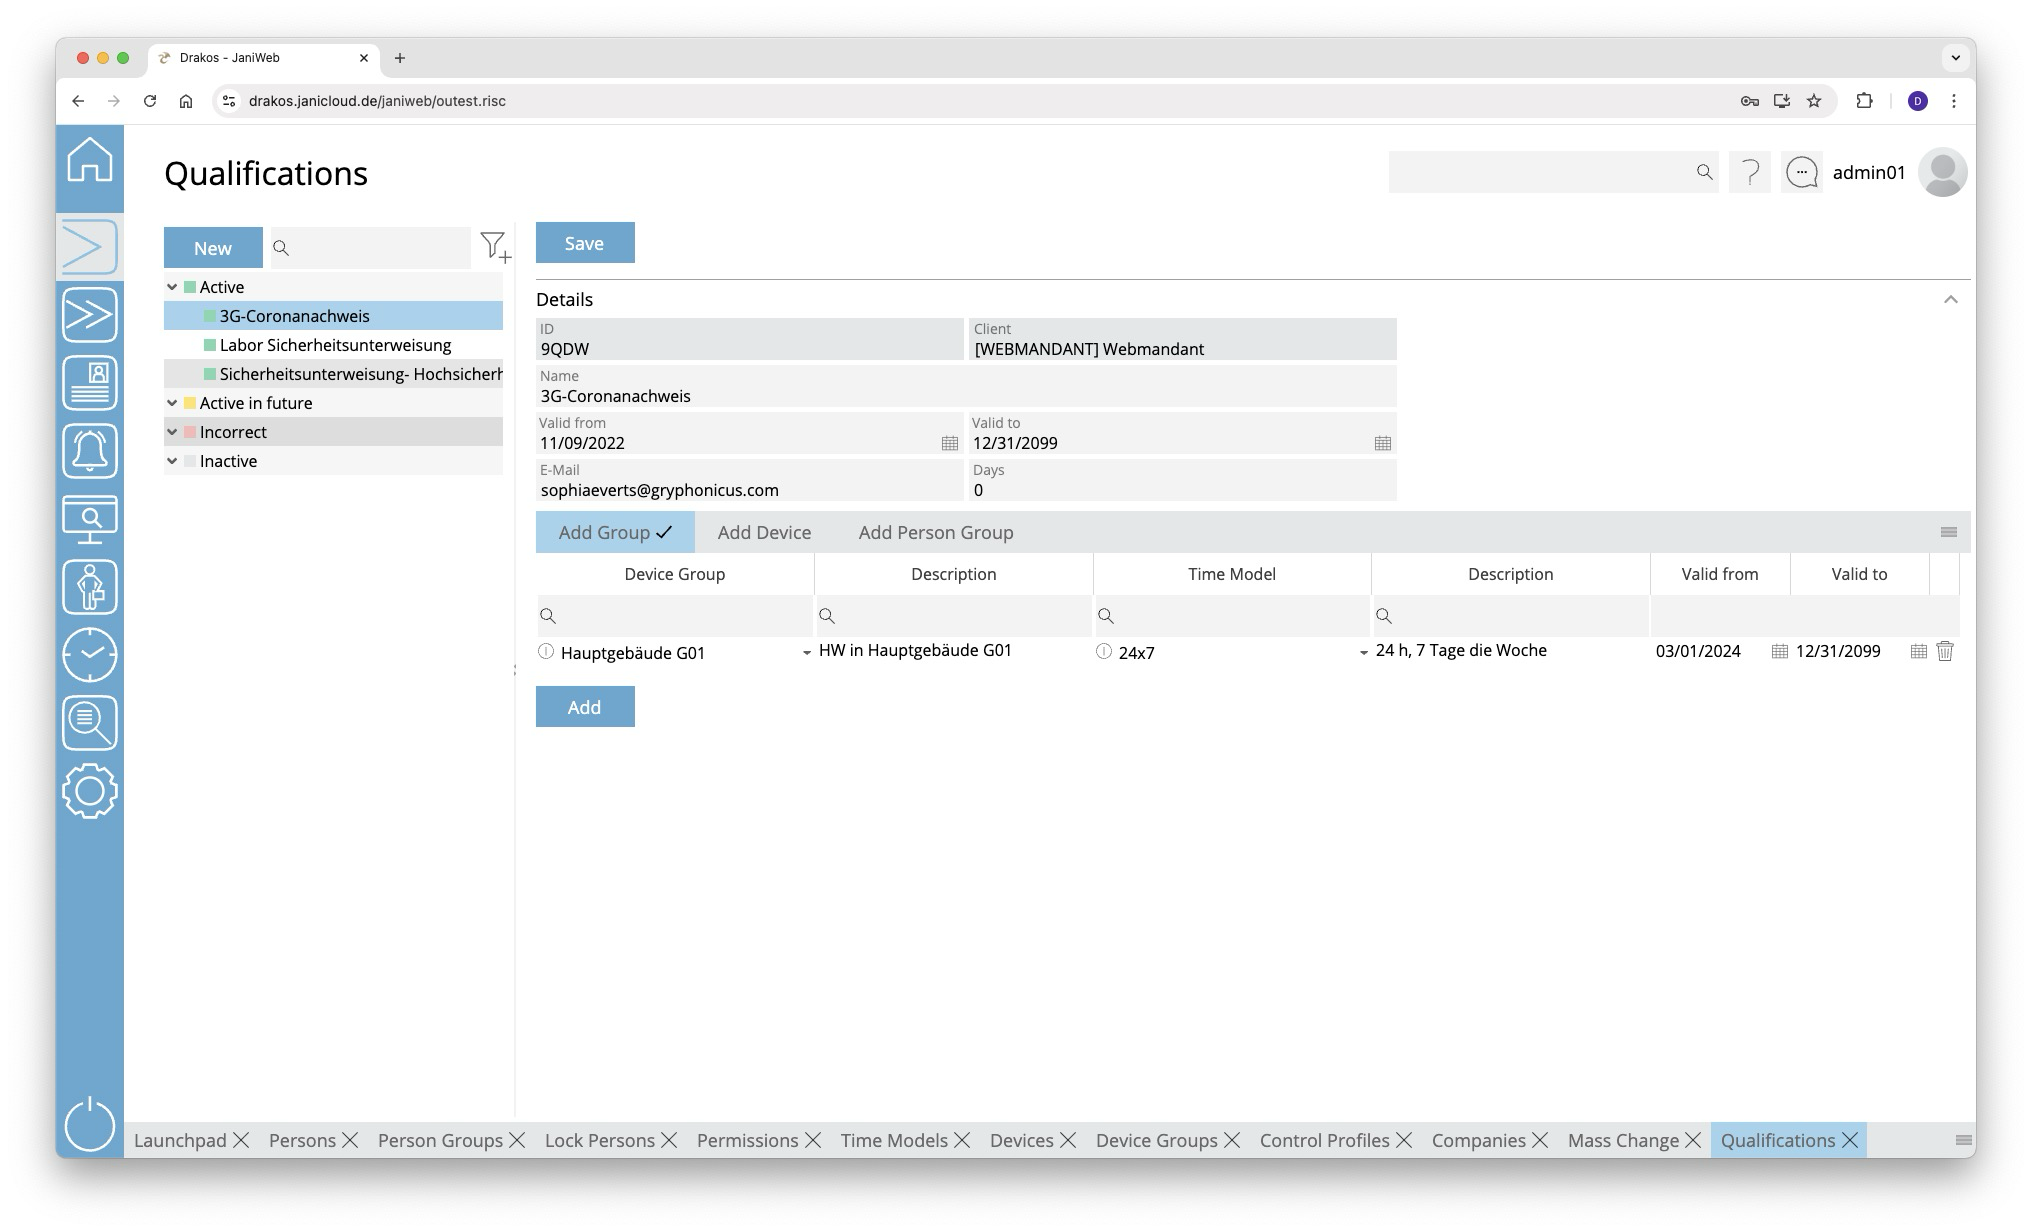
List of qualifications
The list contains the qualifications that have already been created. Select an entry to view details.
The list offers the following options:
- Search: Enter text or numbers in the search field (magnifying glass icon) at the top to search for qualifications. The entries take effect immediately: the list only displays hits. The search is not case sensitive.
- Filter: Press the filter icon. Select the criteria for which you want to display qualifications. Changes are visible immediately.
Button New
Press New to create a new qualification. Enter a description and additional information, and press Save.
Area Details
Define the general properties of the qualification here.
- Description: Enter a descriptive label for the qualification.
- E-Mail: Enter the E-Mail address to which a notification is to be sent when a qualification is about to expire.
- Days: Specify how many days before the qualification expires the E-Mail notification is to be sent.
Press Save to apply your changes.
Tabs Add Device Group / Add Device
Here you can link permissions for the use of certain device groups or devices to the selected qualification. To add another device group or device to the list:
- Press Add.
- Select a Device Group or a Device.
- Select the desired Time Model.
- Set a validity period.
- Press Save.
To remove a device group or device from the list, press the corresponding trash icon.
A tick after the title of a tab indicates that there is data within the tab.
Add person group tabs
Here you have the option of assigning a qualification to all persons in the added person groups at once.
- Click on Add.
- Select a person group.
- Specify a validity period.
- If the validity is not valid, persons in this group of people are denied access to the devices/device groups assigned to the qualification.
- Press Save.
To remove a person group from the list, press the corresponding trash can icon.
A tick after the title of a tab indicates that there is data within the tab.
TIPS
To assign a qualification to a person, select the person via the Persons menu item. Then select the desired skill on the Qualifications tab.
till Version 1.32.X - Permissions for devices / device groups that are assigned to a qualification can only be changed via the qualification. It is then no longer possible to create permissions for these devices or device groups in the usual way.
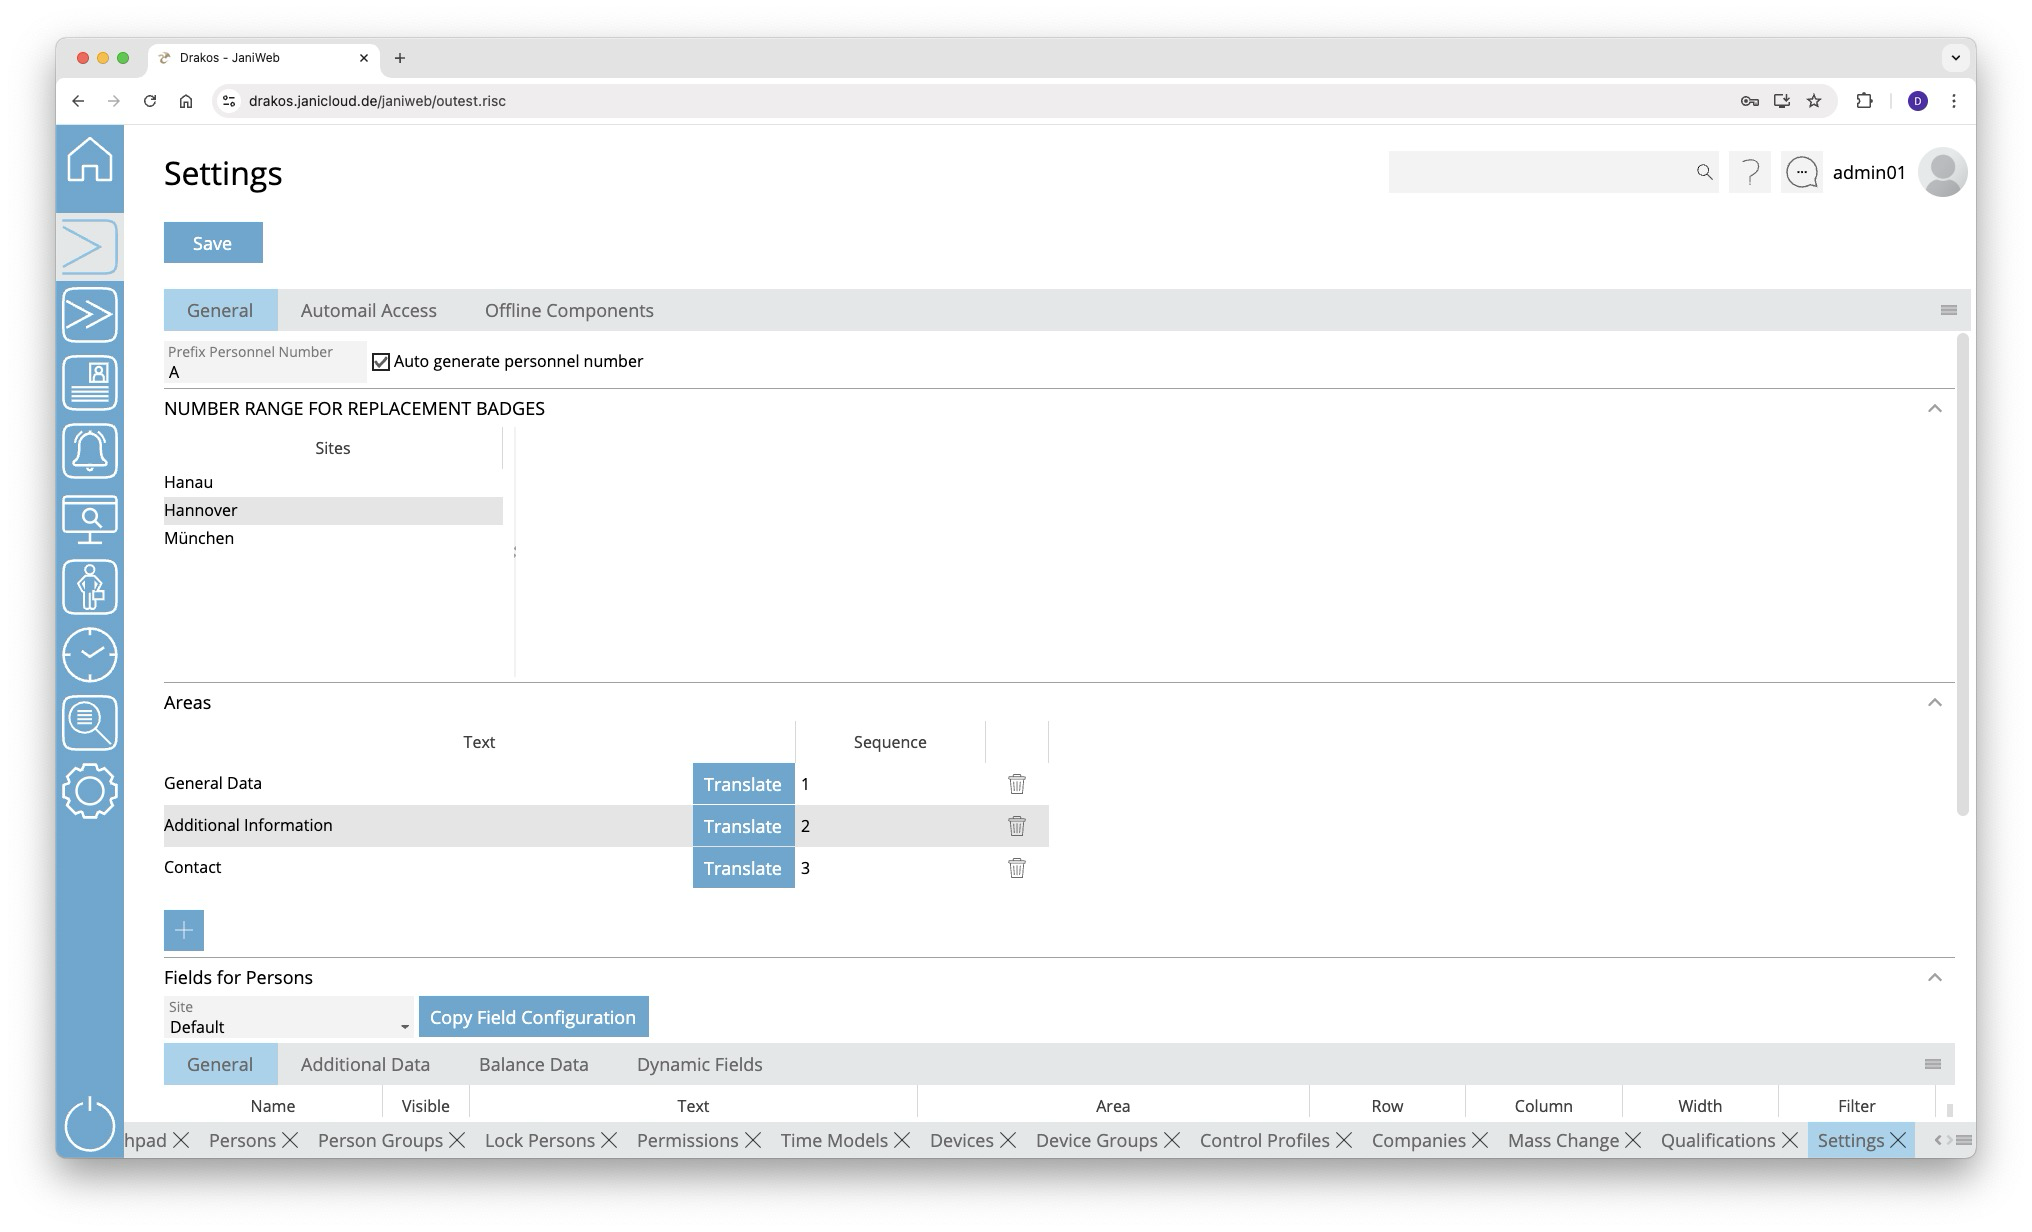
Settings
You can use the Settings menu option to make various settings (number ranges for replacement badges, fields for persons) for access management.
Button Save
Press Save to apply your changes.
Tab General
Here you determine whether personnel numbers should be created manually or automatically assigned by the system.
- Prefix Personnel Number: Enter a letter that is added as a prefix to the personnel number for automatically generated personnel master records.
- Auto generate personnel number: Select this option if you want the system to automatically assign personnel numbers when personnel master records are created.
Area Number Range for Replacement Badges
Here you define number ranges for issuing replacement badges. Create a separate definition for each site. You can either specify a range (From badge number / To badge number) for all replacement badges or create individual numbers under badges.
Area Areas
Here you determine which areas appear in the Persons menu item. When you select the visible fields for persons (Fields for Persons), you determine where the corresponding field is displayed by selecting one of the areas defined here.
To create a new area, perform the following steps:
- Press the plus icon (Add) to add a new entry.
- Press Translate.
- Enter the area description for the respective languages.
- Press Save.
Enter a number in the Order column to determine the order in which the areas are displayed.
When creating a new area, you must first save it before you can assign a field to it.
Area Fields for Persons
This is where you manage the fields for the Persons menu item.
List field Site
You can define the visibility and positioning of the fields separately for each site. Select the site for which the settings in this area should apply.
The fields displayed to the user depend on the site assigned to the user. If no site is assigned to a user, the settings for the Default site are used. To assign sites to a user, use the Settings in the main menu, menu item Users.
Tabs General Data / Additional Data / Balances
Specify which fields are visible (check box in the second column) and where they are positioned (Row, Column, Width).
To define the name for a field, press Translate. Enter the names for the respective languages and press Save.
In the Filter column, you can determine whether this field should be searchable in the list of persons.
Tab Dynamic Fields
Here you can define up to 20 dynamic fields. For each dynamic field, specify whether it should be a list field (drop-down), a date field, a checkbox or a free text field.
To define the name for a field, press Translate. Enter the names for the respective languages and press Save.
Button Copy Field Configuration
You can use this button to copy the field configuration from the currently selected site to another site. To do this, click the button and then select the site for which you want to copy the field configuration from the site drop-down menu. Confirm your selection with the Ok button.
Area Disable Editing XML Fields
Use the Disabled option to prevent users from changing field contents when printing badges, for example. When selected, the information from the master record is always used.
Area Name Subsystem Grouping
In this area, meaningful names can be assigned to the three-digit identifiers of the Subsystem Groupings. These names help users to assign persons to the correct Subsystem Grouping more easily and quickly. Use the + button to add new entries. Enter the three-digit identifier of the BDE group in the Subsystem Grouping column and enter the name using the Translate button in the Name column. Entries can be deleted using the bin button.
Tab Automail Access
Here you can define combinations of persons/person groups and devices/device groups that you want to be informed about by E-Mail as soon as they are assigned as permission by a user.
- Press Add to create a new entry.
- Select a person group or person.
- Select a device group or device.
- Enter the E-Mail address for the notification.
- Press Save.
Tab Offline Devices
This is where you define all settings for offline sites and their components (Cardlink, Pegasys and OSS).
Tab Offline Sites
Create the offline sites required for your offline components here. To assign components to sites, use the menu item Devices.
List of offline sites
The list contains all the offline sites that have already been created. Select an entry to view details.
Button New
Press New to create a new offline site. Enter the required information and press Save to confirm. You can now assign offline components to the offline site using the menu item Devices.
Button Delete
Click Delete to delete the selected offline site. A confirmation dialog will appear.
Tab General Data
Enter the required information for the selected offline site.
Area Cardlink, Area OSS
Specify the data for the relevant offline type.
Area Update Devices (OSS components only)
Add devices that should serve as update devices for the OSS offline site. People can use these devices to load their current permissions for OSS components on their badges.
Area Master Media (Cardlink components only)
Master media are used to configure Cardlink components so that they read badges correctly.
Tab Cardlink Settings
Use the numbered fields to define different validation periods for Cardlink components. Use one of the following formats:
- Days: P[number of days]D (example: P7D for seven days)
- Hours: PT[number of hours]H (example: PT1H for one hour)
- Fixed time: HH:MM:SS (example: 12:00:00 for daily at 12 o’clock)
The validation duration 0 is set to forever and cannot be changed.
Other fields:
- Default validation duration: Define which validation duration should be used by default. Enter the number of the corresponding period (0–7).
- Validation priority: Enter the priority of the validation periods here (from highest to lowest priority, separated by commas).