# Analyses
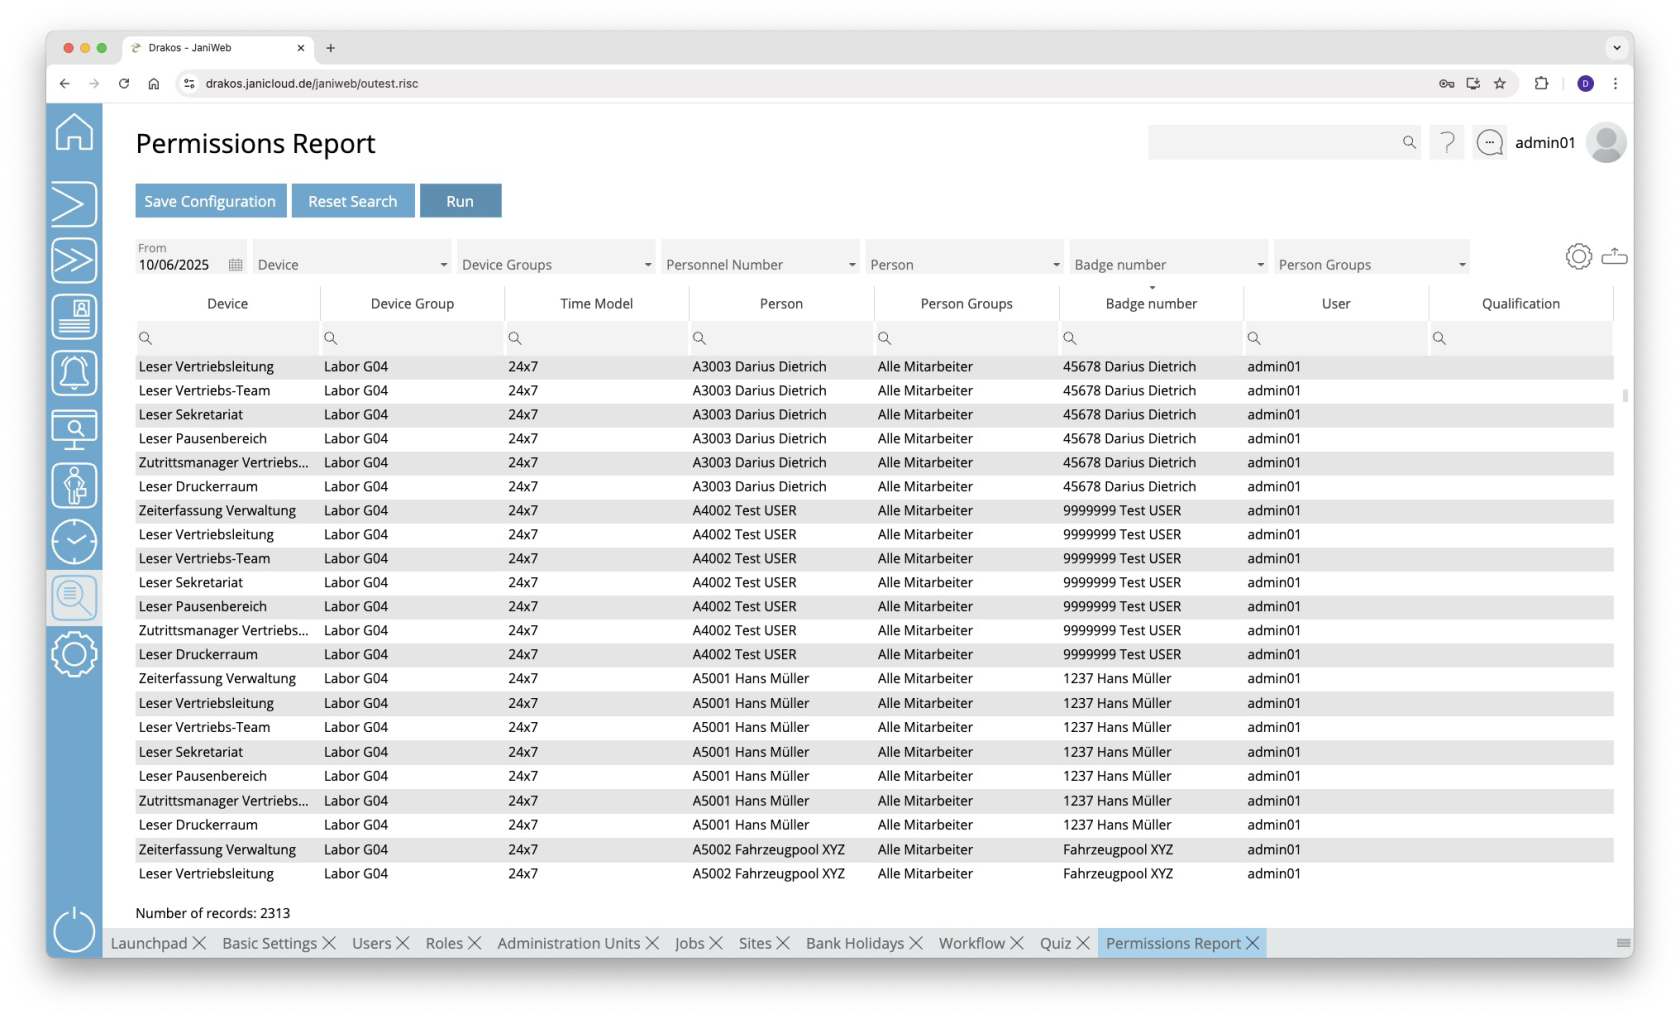
# Permissions
**Use the *Permissions* menu to determine which persons are authorized to access which devices and at what times.**
[](https://manual.drakos.de/uploads/images/gallery/2025-10/FfJimage.png)
## Creating the report
- Select the date for which you want to generate the report.
- (Optional) Use the additional fields to narrow the report. For example, you can find out which persons are authorized on a particular device or on which devices a particular person is authorized. You can also display permissions for a badge number or person group.
- Press *Run* to start the report.
### Further options with the report
- **Select columns to display:** Press the gear icon. Select which columns you want to display and in which order. Arrange the columns using the mouse or the arrow icons. Press *Apply* to adopt the changes.
- **Search in columns:** Enter text or numbers in the search field (magnifying glass icon) of a column to search for names, personnel numbers, or other criteria. The entries take effect immediately: the list only displays hits.
- **Export the entire list:** Press the download icon. Select the format in which you want to export the list. The export files are downloaded or displayed depending on the browser/operating system settings. For details on the available export formats, see the [General > Export Formats](https://manual.drakos.de/books/janiweb-j92/page/export-formats) chapter of this manual.
- **Save report:** For details on saving reports, see the chapter [General > Custom Reports](https://manual.drakos.de/books/janiweb-j92/page/custom-reports).
### Color highlighting
In the report, individual permissions can be highlighted in the following colors:
- **Blue:** The permission has been assigned by a third-party system (e.g. SAP (Janitor)).
## Button *Reset Selection*
Press *Reset Selection* to reset all fields to their initial value.
---
##### TIPS
- The column *User* shows which user has assigned the permission.
- Double-click the column *Time Model* of a row to display a weekly plan for the corresponding time model.
- Double-click the column *Device Group* of a row to display the devices contained in the group.
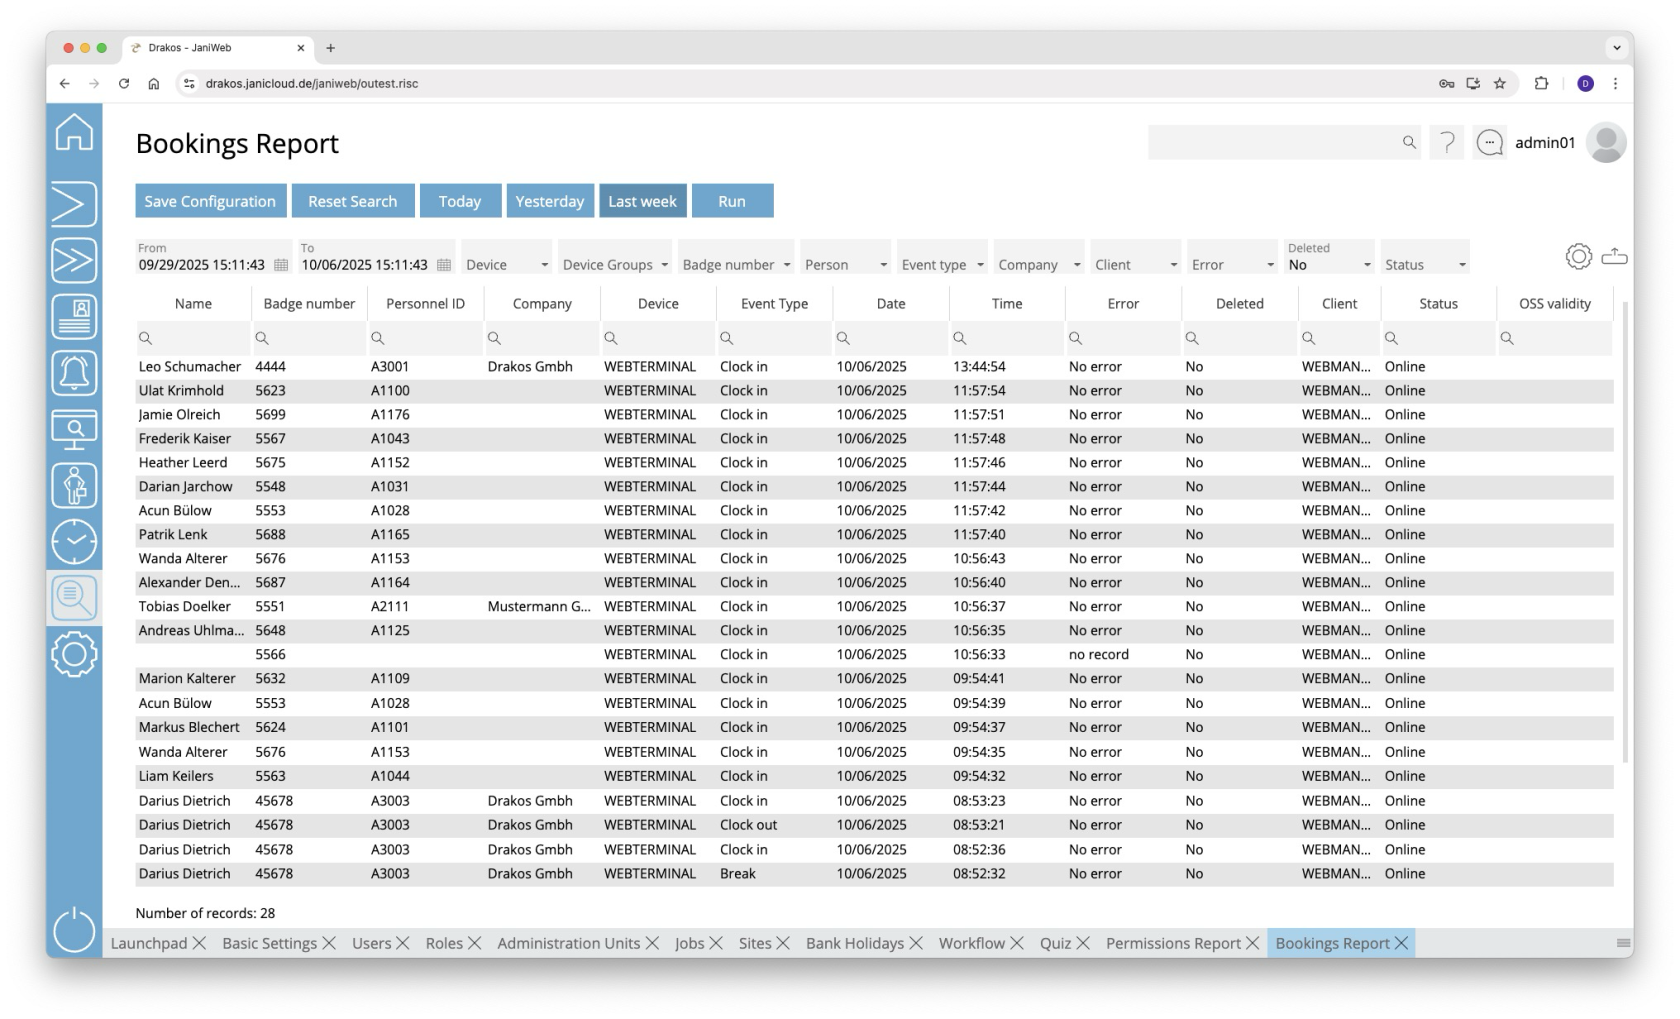
# Bookings
**Use the menu item *Bookings* to output a booking list. This makes it possible to evaluate which person has booked on a device at a specific point in time.**
[](https://manual.drakos.de/uploads/images/gallery/2025-10/uTXimage.png)
## Creating the report
- Specify the time period for which you want to generate the report (*From* – *To*). Or press *Today*, *Yesterday* or *Last week* to quickly generate a report for the corresponding period.
- (Optional) Use the additional fields to narrow the report.
- Press *Run* to start the report.
### Further options with the report
- **Select columns to display:** Press the gear icon. Select which columns you want to display and in which order. Arrange the columns using the mouse or the arrow icons. Press *Apply* to adopt the changes.
- **Search in columns:** Enter text or numbers in the search field (magnifying glass icon) of a column to search for names, personnel numbers, or other criteria. The entries take effect immediately: the list only displays hits.
- **Export the entire list:** Press the download icon. Select the format in which you want to export the list. The export files are downloaded or displayed depending on the browser/operating system settings. For details on the available export formats, see the [General > Export Formats](https://manual.drakos.de/books/janiweb-j92/page/export-formats) chapter of this manual.
- **Save report:** For details on saving reports, see the chapter [General > Custom Reports](https://manual.drakos.de/books/janiweb-j92/page/custom-reports).
## Button *Reset Selection*
Press *Reset Selection* to reset all fields to their initial value.
---
##### TIPS
Double-click the column *Device* of a line to show details about the corresponding device.
# Booking Sequence Check
**Use the menu item *Booking Sequence Check* to see whether persons have adhered to a predefined booking sequence from entry to clock-in and clock-out. If the check fails, a corresponding status message is displayed in the result of the report.**
- Specify the time period for which you want to generate the report (*From – To*). Or press *Today*, *Yesterday* or *Last week* to quickly generate a report for the corresponding period.
- To evaluate entry bookings: Select *Entrance Devices* in conjunction with *Entrance event types*.
- To evaluate exit bookings: Select *Exit Devices* in conjunction with *Exit event types*.
- Specify a *Period (minutes)* to evaluate related bookings.
- (Optional) Use the additional fields to narrow the report.
- Press *Run* to start the report.
In this report, use criteria and values to define the group of persons to be evaluated and select the data fields to be displayed from a list. To do so, follow these steps:
1. Press *Add criteria.*
2. Select the required criterion from the list field.
3. Press *Add value.*
4. In the field From, select a single value or use both fields to specify a range. You can also specify multiple values for the same criterion (*Add value*).
5. (Optional) Add another criterion with value(s).
6. Drag the data fields (columns) you want to display from the list *Available* to the list *Selected*. Or use the arrow buttons.
7. Press *Run* to start the report.
**Logic of criteria and values**
- The values within the same criterion are linked logically by OR (one match is sufficient).
- Different criteria are linked logically by AND (all criteria must be met).
- **Search in columns:** Enter text or numbers in the search field (magnifying glass icon) of a column to search for names, personnel numbers, or other criteria. The entries take effect immediately: the list only displays hits.
- **Export the entire list:** Press the download icon. Select the format in which you want to export the list. The export files are downloaded or displayed depending on the browser/operating system settings. For details on the available export formats, see the [General > Export Formats](https://manual.drakos.de/books/janiweb-j92/page/export-formats) chapter of this manual.
- **Save report:** For details on saving reports, see the chapter [General > Custom Reports](https://manual.drakos.de/books/janiweb-j92/page/custom-reports).
## Button *Reset Selection*
Press *Reset Selection* to reset all fields to their initial value.
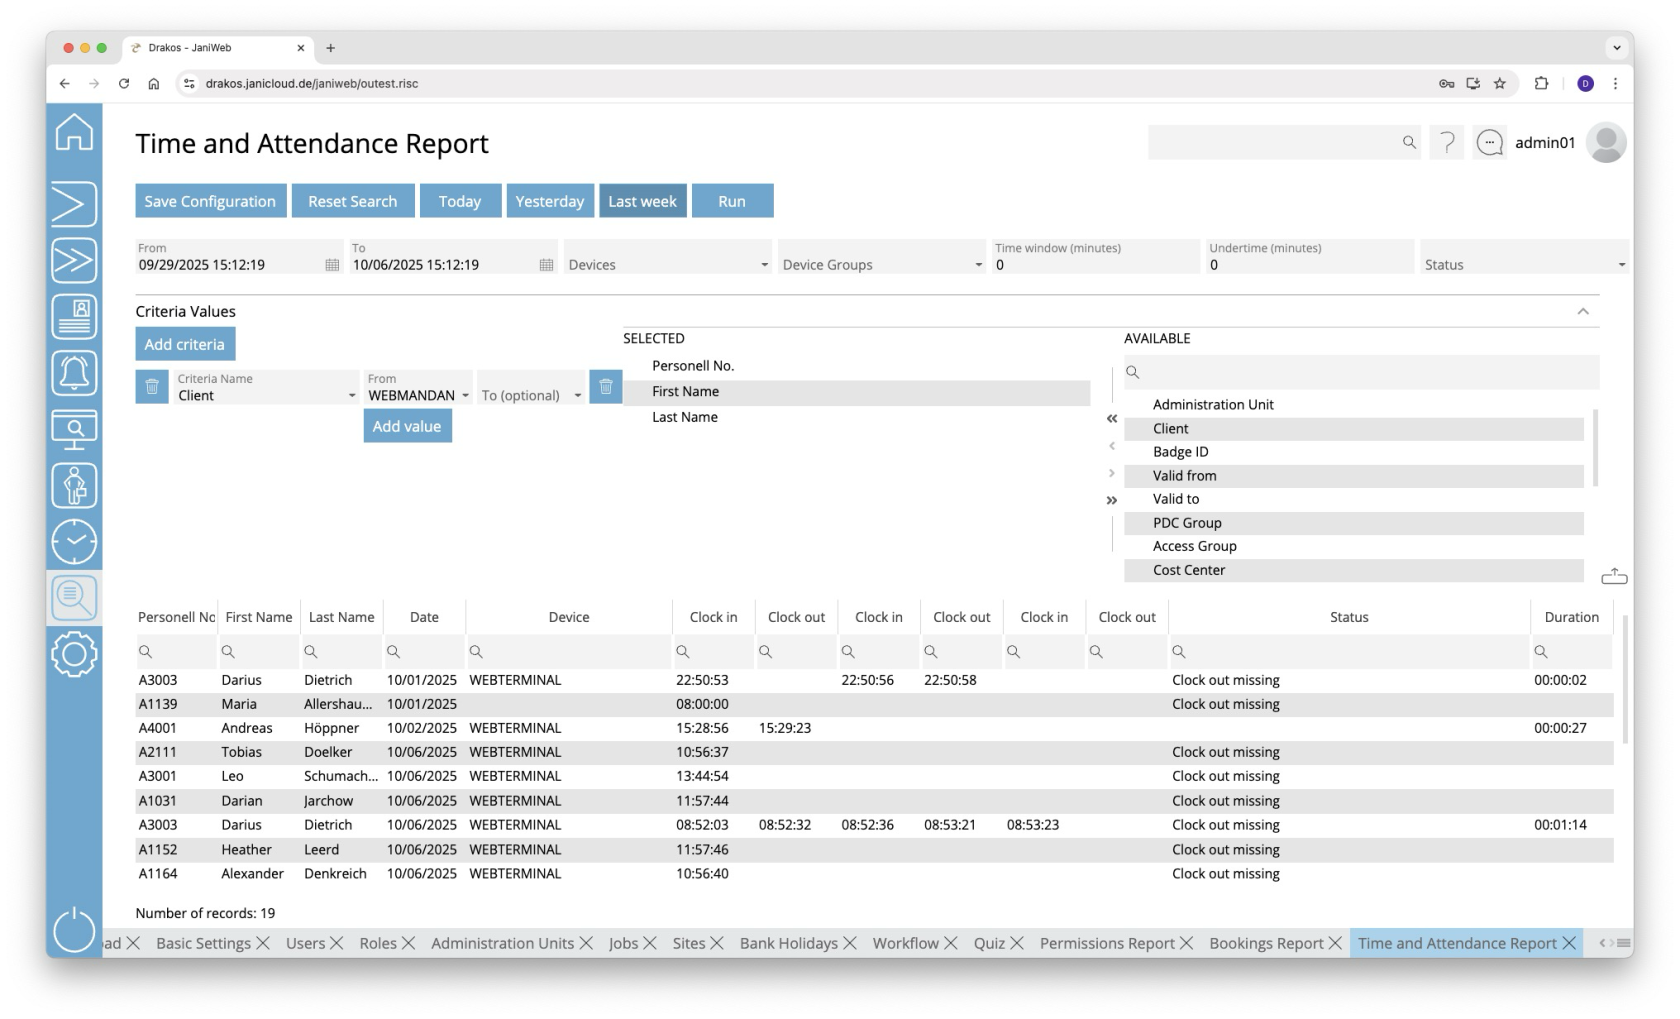
# Time and Attendance
**Use the menu item *Time and Attendance* to see whether persons have adhered to booking sequence for clock-in and clock-out bookings. If the check fails, a corresponding status message is displayed in the result of the report.**
[](https://manual.drakos.de/uploads/images/gallery/2025-10/pEFimage.png)
## Creating the report
- Specify the time period for which you want to generate the report (*From – To*). Or press *Today*, *Yesterday* or *Last week* to quickly generate a report for the corresponding period.
- If you only want to evaluate bookings from certain devices/device groups, you can restrict this using the *Devices/Device Groups* filter.
- Specify a *Period (minutes)* to evaluate related clock-in and clock-out bookings.
- If you want to check whether the length of the working time has been adhered to, you can set the value *Undertime (minutes)*
- If the working time (difference between clock-in and clock-out bookings) is less than this value, the status *Undertime* is set
- (Optional) Use the additional fields to narrow the report.
- Press *Run* to start the report.
In this report, use criteria and values to define the group of persons to be evaluated and select the data fields to be displayed from a list. To do so, follow these steps:
1. Press *Add criteria.*
2. Select the required criterion from the list field.
3. Press *Add value.*
4. In the field From, select a single value or use both fields to specify a range. You can also specify multiple values for the same criterion (*Add value*).
5. (Optional) Add another criterion with value(s).
6. Drag the data fields (columns) you want to display from the list *Available* to the list *Selected*. Or use the arrow buttons.
7. Press *Run* to start the report.
**Logic of criteria and values**
- The values within the same criterion are linked logically by OR (one match is sufficient).
- Different criteria are linked logically by AND (all criteria must be met).
- **Search in columns:** Enter text or numbers in the search field (magnifying glass icon) of a column to search for names, personnel numbers, or other criteria. The entries take effect immediately: the list only displays hits.
- **Export the entire list:** Press the download icon. Select the format in which you want to export the list. The export files are downloaded or displayed depending on the browser/operating system settings. For details on the available export formats, see the [General > Export Formats](https://manual.drakos.de/books/janiweb-j92/page/export-formats) chapter of this manual.
- **Save report:** For details on saving reports, see the chapter [General > Custom Reports](https://manual.drakos.de/books/janiweb-j92/page/custom-reports).
## Button *Reset Selection*
Press *Reset Selection* to reset all fields to their initial value.
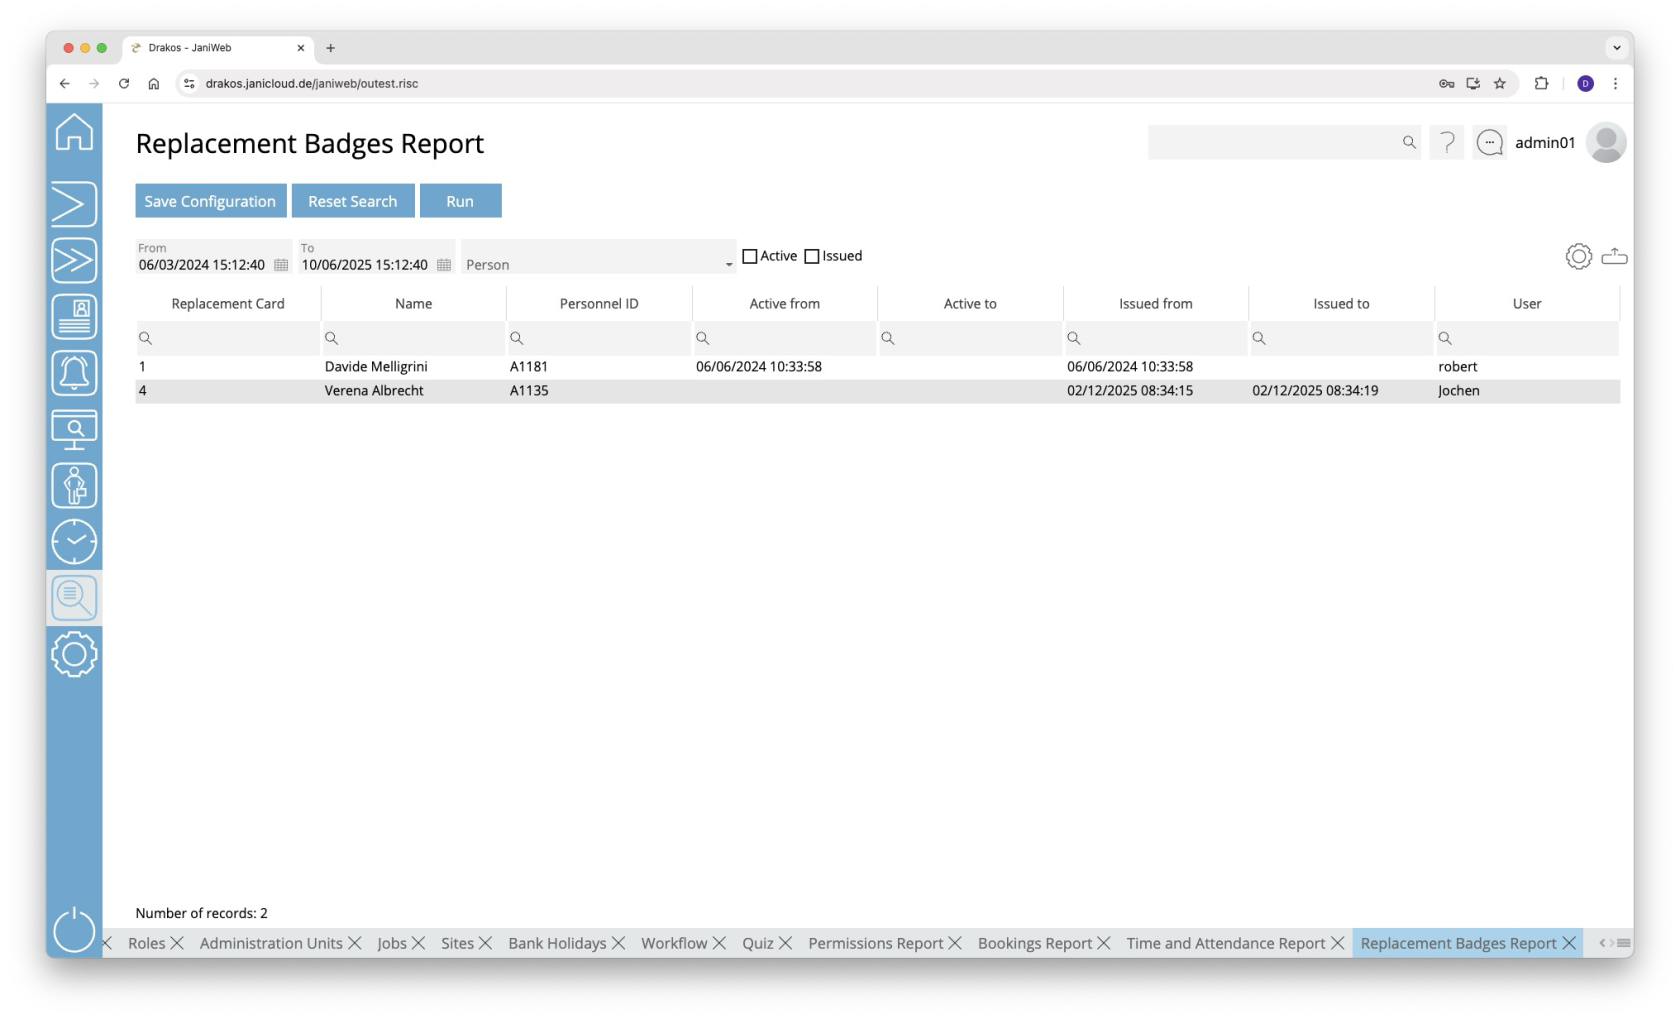
# Replacement Badges
**Use the menu item *Replacement Badges* to find out to which persons replacement badges have been issued. In addition, active replacement** **badges** **can be returned here.**
[](https://manual.drakos.de/uploads/images/gallery/2025-10/bJlimage.png)
## Creating the report
- Specify the time period for which you want to generate the report (*From* – *To*).
- (Optional) Select one or more *Persons* to narrow the report.
- (Optional) Select the options *Active* and/or *Issued* to display only active and/or issued replacement badges.
- Press *Run* to start the report.
### Further options with the report
- **Select columns to display:** Press the gear icon. Select which columns you want to display and in which order. Arrange the columns using the mouse or the arrow icons. Press *Apply* to adopt the changes.
- **Search in columns:** Enter text or numbers in the search field (magnifying glass icon) of a column to search for names, personnel numbers, or other criteria. The entries take effect immediately: the list only displays hits.
- **Export the entire list:** Press the download icon. Select the format in which you want to export the list. The export files are downloaded or displayed depending on the browser/operating system settings. For details on the available export formats, see the [General > Export Formats](https://manual.drakos.de/books/janiweb-j92/page/export-formats) chapter of this manual.
- **Save report:** For details on saving reports, see the chapter [General > Custom Reports](https://manual.drakos.de/books/janiweb-j92/page/custom-reports).
## Button *Reset Selection*
Press *Reset Selection* to reset all fields to their initial value.
---
##### TIPS
- Double-click on the column *Replacement Badge* of a row to return the corresponding replacement badge.
- Double-click on the column *Name* of a row to show details for the corresponding person.
# Change Log Persons
Use the menu item **Change Log Persons *to find out who changed the master data of a person and when.***
[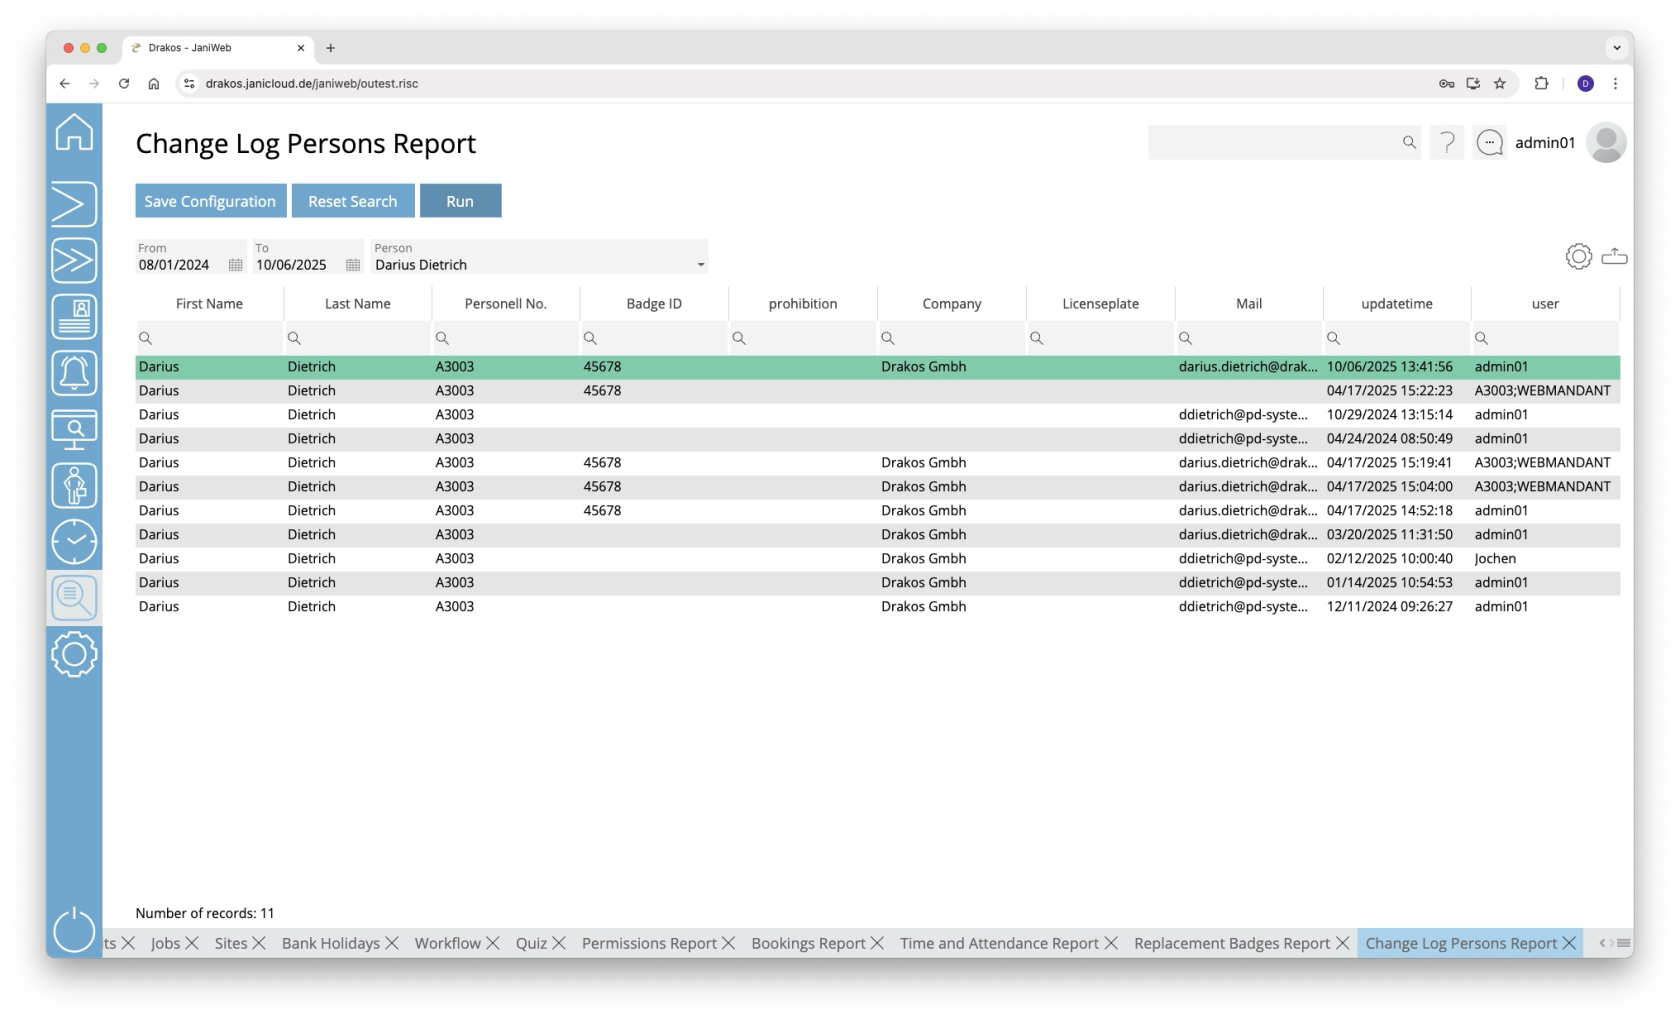](https://manual.drakos.de/uploads/images/gallery/2025-10/zPTimage.png)
## Creating the report
- Specify the time period for which you want to generate the report (*From* – *To*).
- Select the *Person* for whom you want to see the change log.
- Press *Run* to start the report.
The first line, highlighted in green, shows information about the current record of the person. The following lines show the historical changes. The column *Updated* shows the date and time of the change. The user who made the change appears in the column *User*.
### Further options with the report
- **Select columns to display:** Press the gear icon. Select which columns you want to display and in which order. Arrange the columns using the mouse or the arrow icons. Press *Apply* to adopt the changes.
- **Search in columns:** Enter text or numbers in the search field (magnifying glass icon) of a column to search for names, personnel numbers, or other criteria. The entries take effect immediately: the list only displays hits.
- **Export the entire list:** Press the download icon. Select the format in which you want to export the list. The export files are downloaded or displayed depending on the browser/operating system settings. For details on the available export formats, see the [General > Export Formats](https://manual.drakos.de/books/janiweb-j92/page/export-formats) chapter of this manual.
- **Save report:** For details on saving reports, see the chapter [General > Custom Reports](https://manual.drakos.de/books/janiweb-j92/page/custom-reports).
## Button *Reset Selection*
Press *Reset Selection* to reset all fields to their initial value.
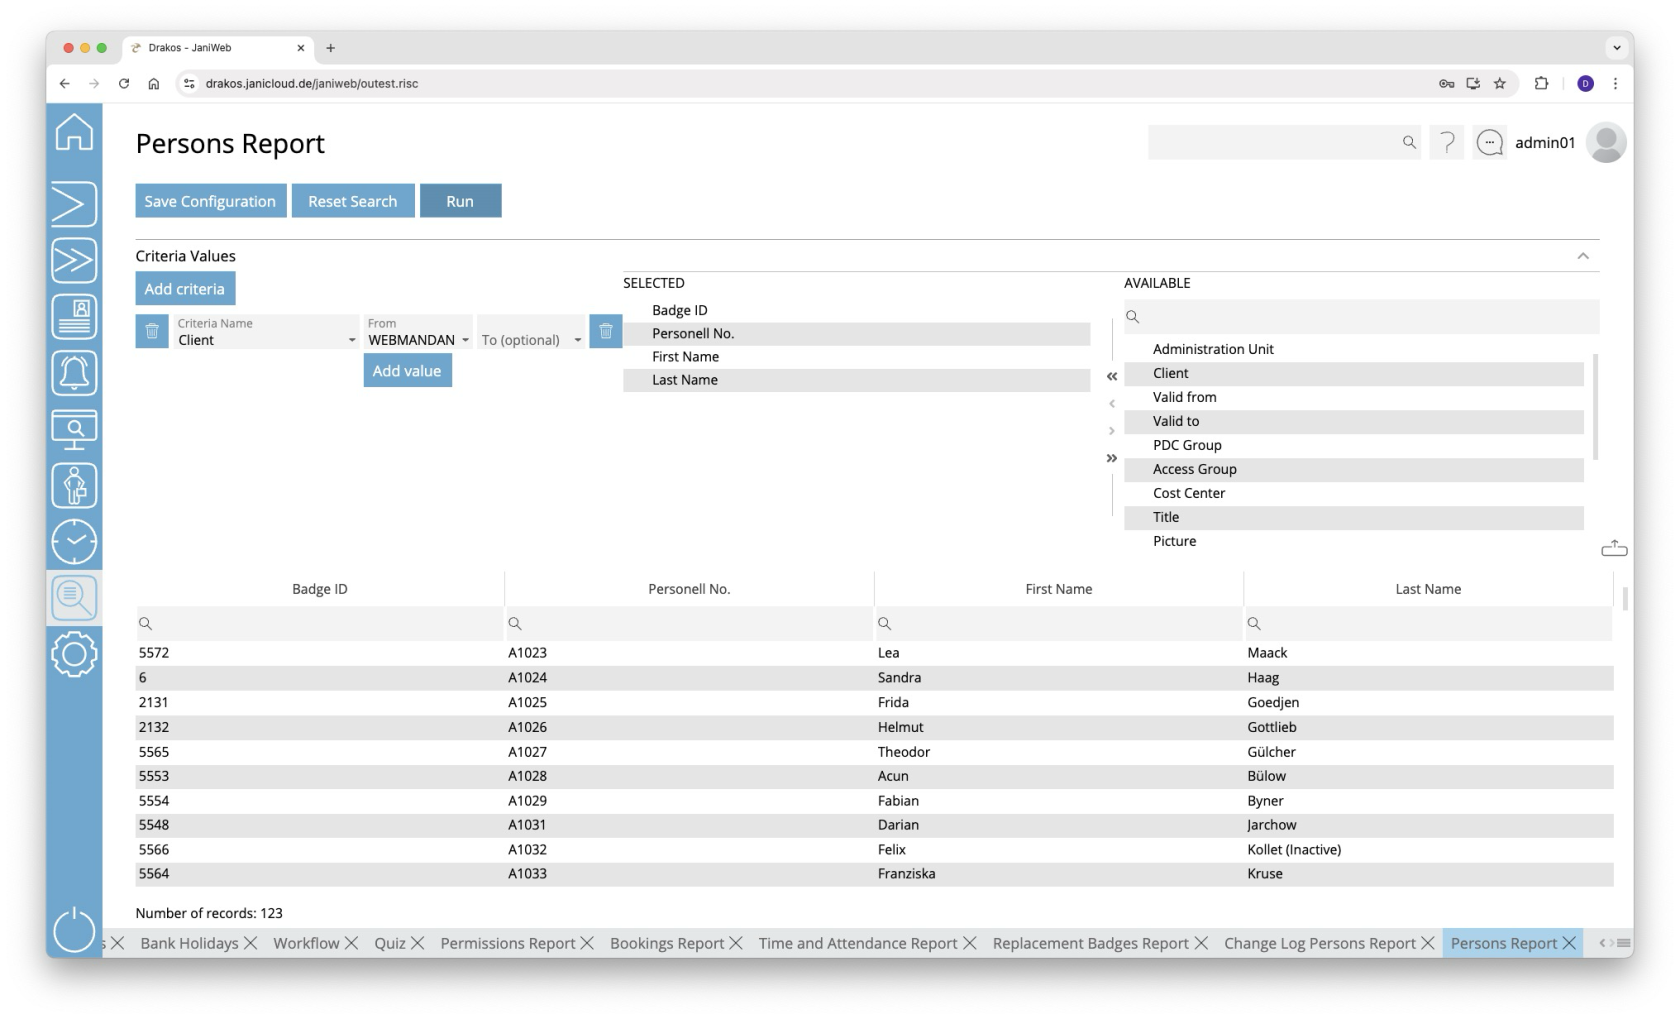
# Persons
**Use the menu item *Persons* to output a list of the existing personnel master records. All fields that describe a person can be displayed here.**
[](https://manual.drakos.de/uploads/images/gallery/2025-10/u5Oimage.png)
## Creating the report
In this report, use criteria and values to define the group of persons to be evaluated and select the data fields to be displayed from a list. To do so, follow these steps:
1. Press *Add criteria.*
2. Select the required criterion from the list field.
3. Press *Add value*.
4. In the *From* field, select a single value or use both fields to specify a range.You can also specify multiple values for the same criterion (*Add value*).
5. (Optional) Add another criterion with value(s).
6. Drag the data fields (columns) you want to display from the list *Available* to the list *Selected*. Or use the arrow buttons.
7. Press *Run* to start the report.
**Logic of criteria and values**
- The values within the same criterion are linked logically by OR (one match is sufficient).
- Different criteria are linked logically by AND (all criteria must be met).
### Further options with the report
- **Search in columns:** Enter text or numbers in the search field (magnifying glass icon) of a column to search for names, personnel numbers, or other criteria. The entries take effect immediately: the list only displays hits.
- **Export the entire list:** Press the download icon. Select the format in which you want to export the list. The export files are downloaded or displayed depending on the browser/operating system settings. For details on the available export formats, see the [General > Export Formats](https://manual.drakos.de/books/janiweb-j92/page/export-formats) chapter of this manual.
- **Save report:** For details on saving reports, see the chapter [General > Custom Reports](https://manual.drakos.de/books/janiweb-j92/page/custom-reports).
## Button *Reset Selection*
Press *Reset Selection* to reset all fields to their initial value.
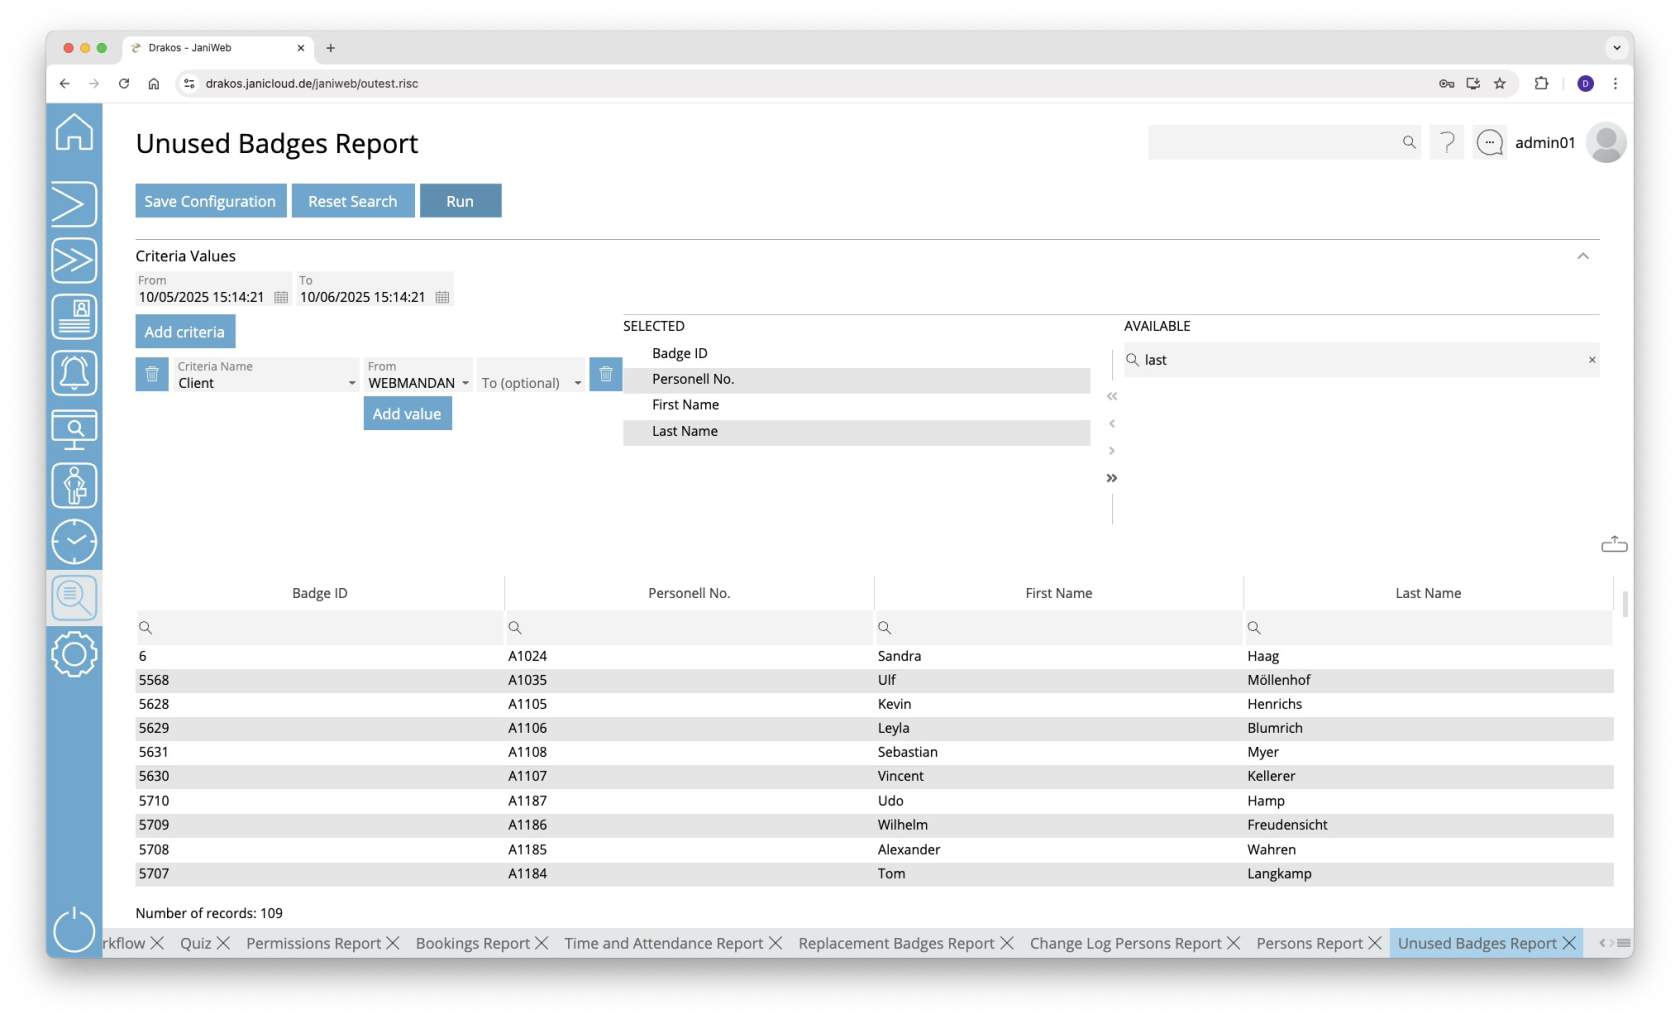
# Unused Badges
**Use the menu item *Unused Badges* to determine which persons have not used their badge during a specific period.**
[](https://manual.drakos.de/uploads/images/gallery/2025-10/pnHimage.png)
## Creating the report
In this report, use criteria and values to define the group of persons to be evaluated and select the data fields to be displayed from a list. To do so, follow these steps:
1. Specify the time period you want to check for unused badges (*From* – *To*).
2. Press *Add criteria.*
3. Select the required criterion from the list field.
4. Press *Add value*.
5. In the *From* field, select a single value or use both fields to specify a range.You can also specify multiple values for the same criterion (*Add value*).
6. (Optional) Add another criterion with value(s).
7. Drag the data fields (columns) you want to display from the list *Available* to the list *Selected*. Or use the arrow buttons.
8. Press *Run* to start the report.
**Logic of criteria and values**
- The values within the same criterion are linked logically by OR (one match is sufficient).
- Different criteria are linked logically by AND (all criteria must be met).
### Further options with the report
- **Search in columns:** Enter text or numbers in the search field (magnifying glass icon) of a column to search for names, personnel numbers, or other criteria. The entries take effect immediately: the list only displays hits.
- **Export the entire list:** Press the download icon. Select the format in which you want to export the list. The export files are downloaded or displayed depending on the browser/operating system settings. For details on the available export formats, see the [General > Export Formats](https://manual.drakos.de/books/janiweb-j92/page/export-formats) chapter of this manual.
- **Save report:** For details on saving reports, see the chapter [General > Custom Reports](https://manual.drakos.de/books/janiweb-j92/page/custom-reports).
## Button *Reset Selection*
Press *Reset Selection* to reset all fields to their initial value.
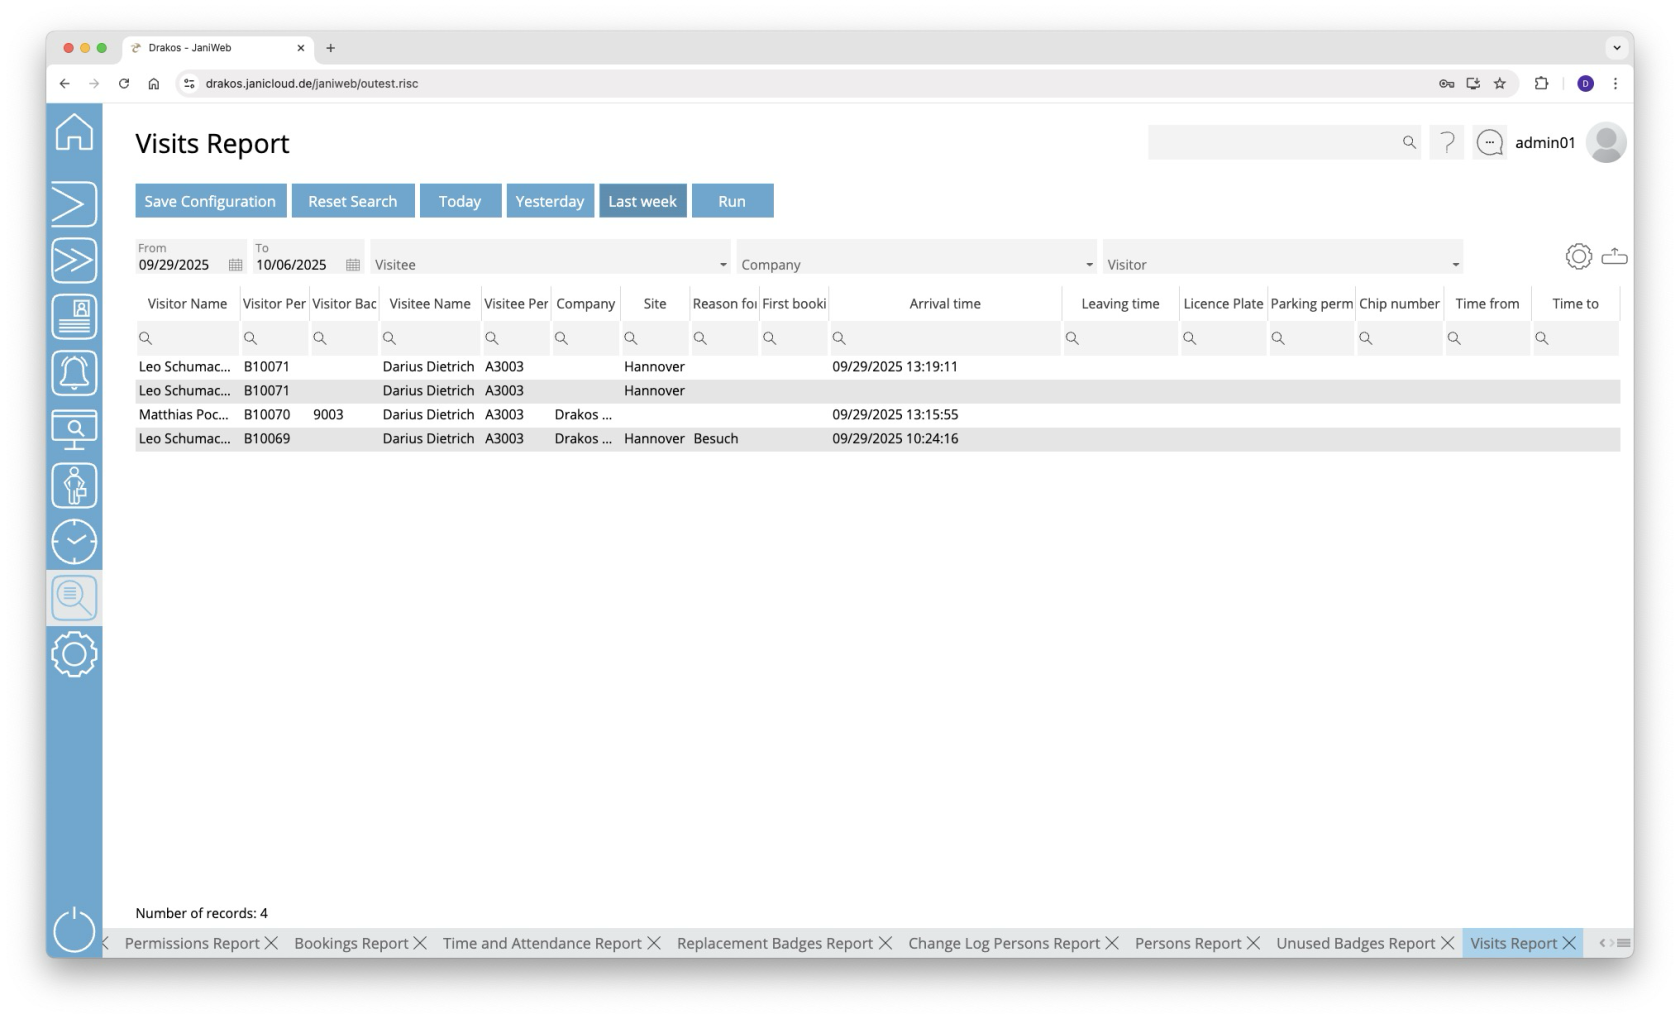
# Visits
**Use the menu item *Visits* to find out which employees have received which visitors and when.**
[](https://manual.drakos.de/uploads/images/gallery/2025-10/r6Yimage.png)
## Creating the report
- Specify the time period for which you want to generate the report (*From* – *To*). Or press *Today*, *Yesterday* or *Last week* to quickly generate a report for the corresponding period.
- (Optional) Use the additional fields to narrow the report.
- Press *Run* to start the report.
### Further options with the report
- **Select columns to display:** Press the gear icon. Select which columns you want to display and in which order. Arrange the columns using the mouse or the arrow icons. Press *Apply* to adopt the changes.
- **Search in columns:** Enter text or numbers in the search field (magnifying glass icon) of a column to search for names, personnel numbers, or other criteria. The entries take effect immediately: the list only displays hits.
- **Export the entire list:** Press the download icon. Select the format in which you want to export the list. The export files are downloaded or displayed depending on the browser/operating system settings. For details on the available export formats, see the [General > Export Formats](https://manual.drakos.de/books/janiweb-j92/page/export-formats) chapter of this manual.
- **Save report:** For details on saving reports, see the chapter [General > Custom Reports](https://manual.drakos.de/books/janiweb-j92/page/custom-reports).
## Button *Reset Selection*
Press *Reset Selection* to reset all fields to their initial value.
# Presence
[](https://manual.drakos.de/uploads/images/gallery/2025-01/dalle-2025-01-07-08-14-53-a-detailed-under-construction-scene-featuring-a-playful-and-vibrant-construction-site-with-cartoonish-elements-include-a-yellow-warning-sign-with.webp)
# Absences
**Use the menu item *Absences* to display a list of all absence requests created.**
[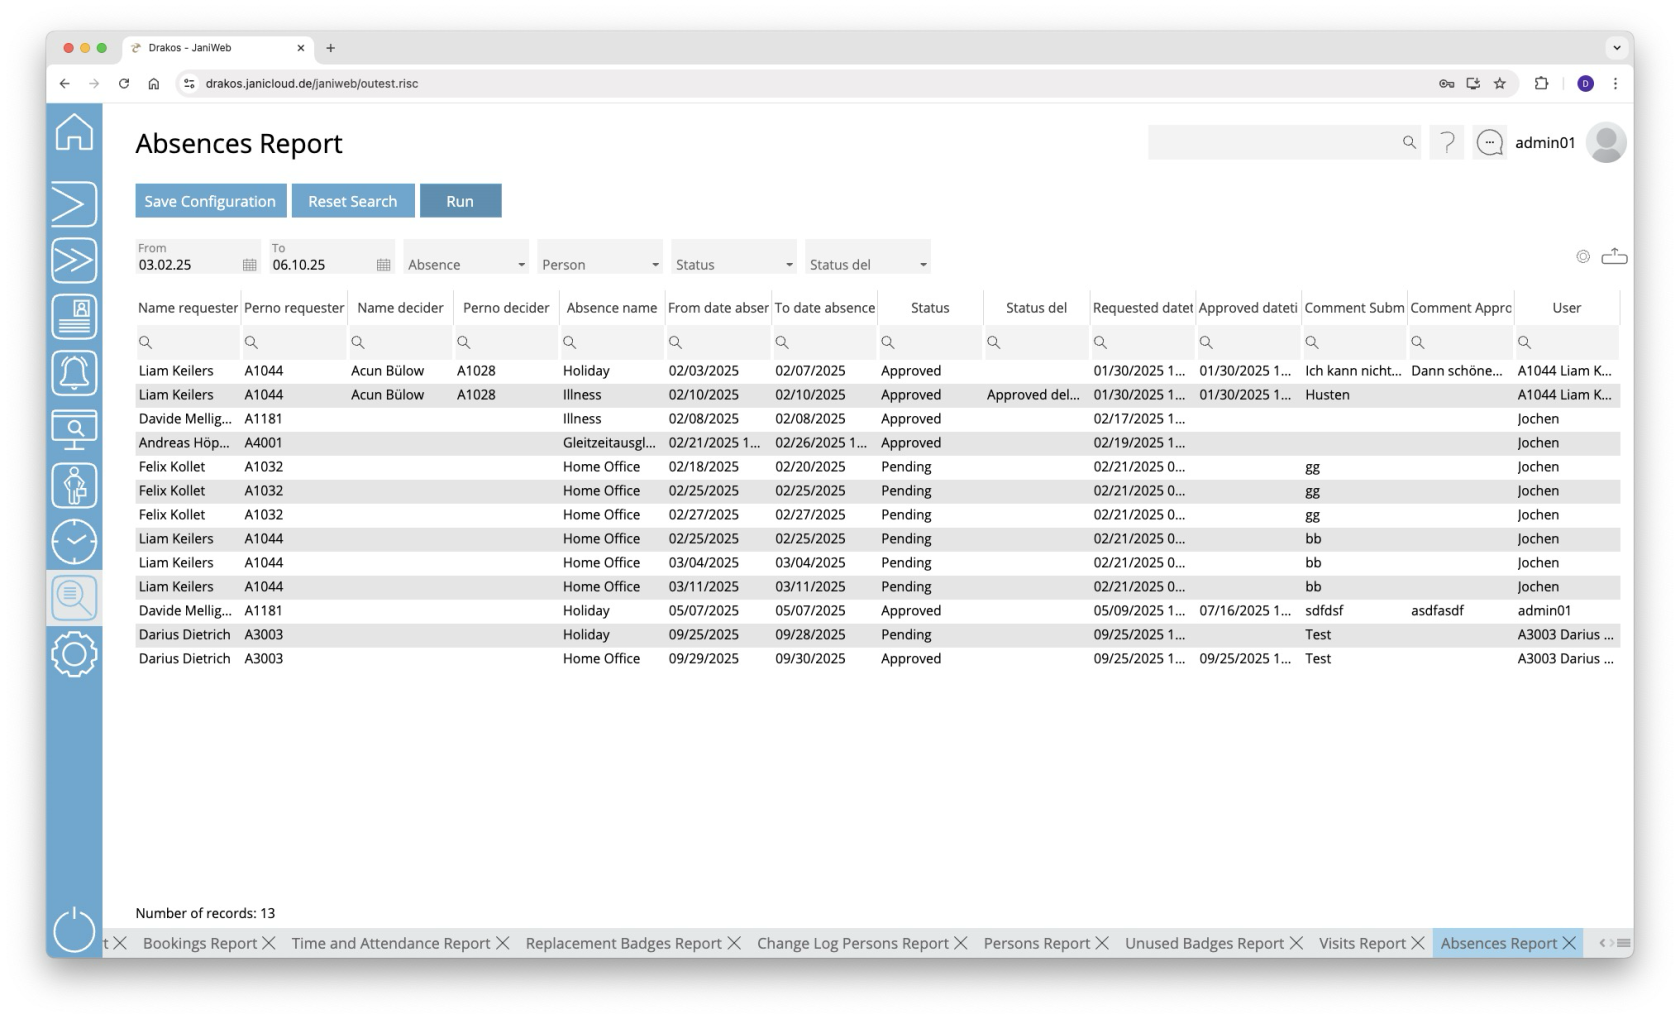](https://manual.drakos.de/uploads/images/gallery/2025-10/Xvyimage.png)
## Creating the report
- Specify the time period for which you want to generate the report (*From* – *To*).
- (Optional) Use the additional fields to narrow the report.
- Press *Run* to start the report.
### Further options with the report
- **Select columns to display:** Press the gear icon. Select which columns you want to display and in which order. Arrange the columns using the mouse or the arrow icons. Press *Apply* to adopt the changes.
- **Search in columns:** Enter text or numbers in the search field (magnifying glass icon) of a column to search for names, personnel numbers, or other criteria. The entries take effect immediately: the list only displays hits.
- **Export the entire list:** Press the download icon. Select the format in which you want to export the list. The export files are downloaded or displayed depending on the browser/operating system settings. For details on the available export formats, see the [General > Export Formats](https://manual.drakos.de/books/janiweb-j92/page/export-formats) chapter of this manual.
- **Save report:** For details on saving reports, see the chapter [General > Custom Reports](https://manual.drakos.de/books/janiweb-j92/page/custom-reports).
## Button *Reset Selection*
Press *Reset Selection* to reset all fields to their initial value.
# Qualifications
**Use the menu item *Qualifications* to display a list of all persons with an assigned qualification, along with the qualification’s validity period.**
[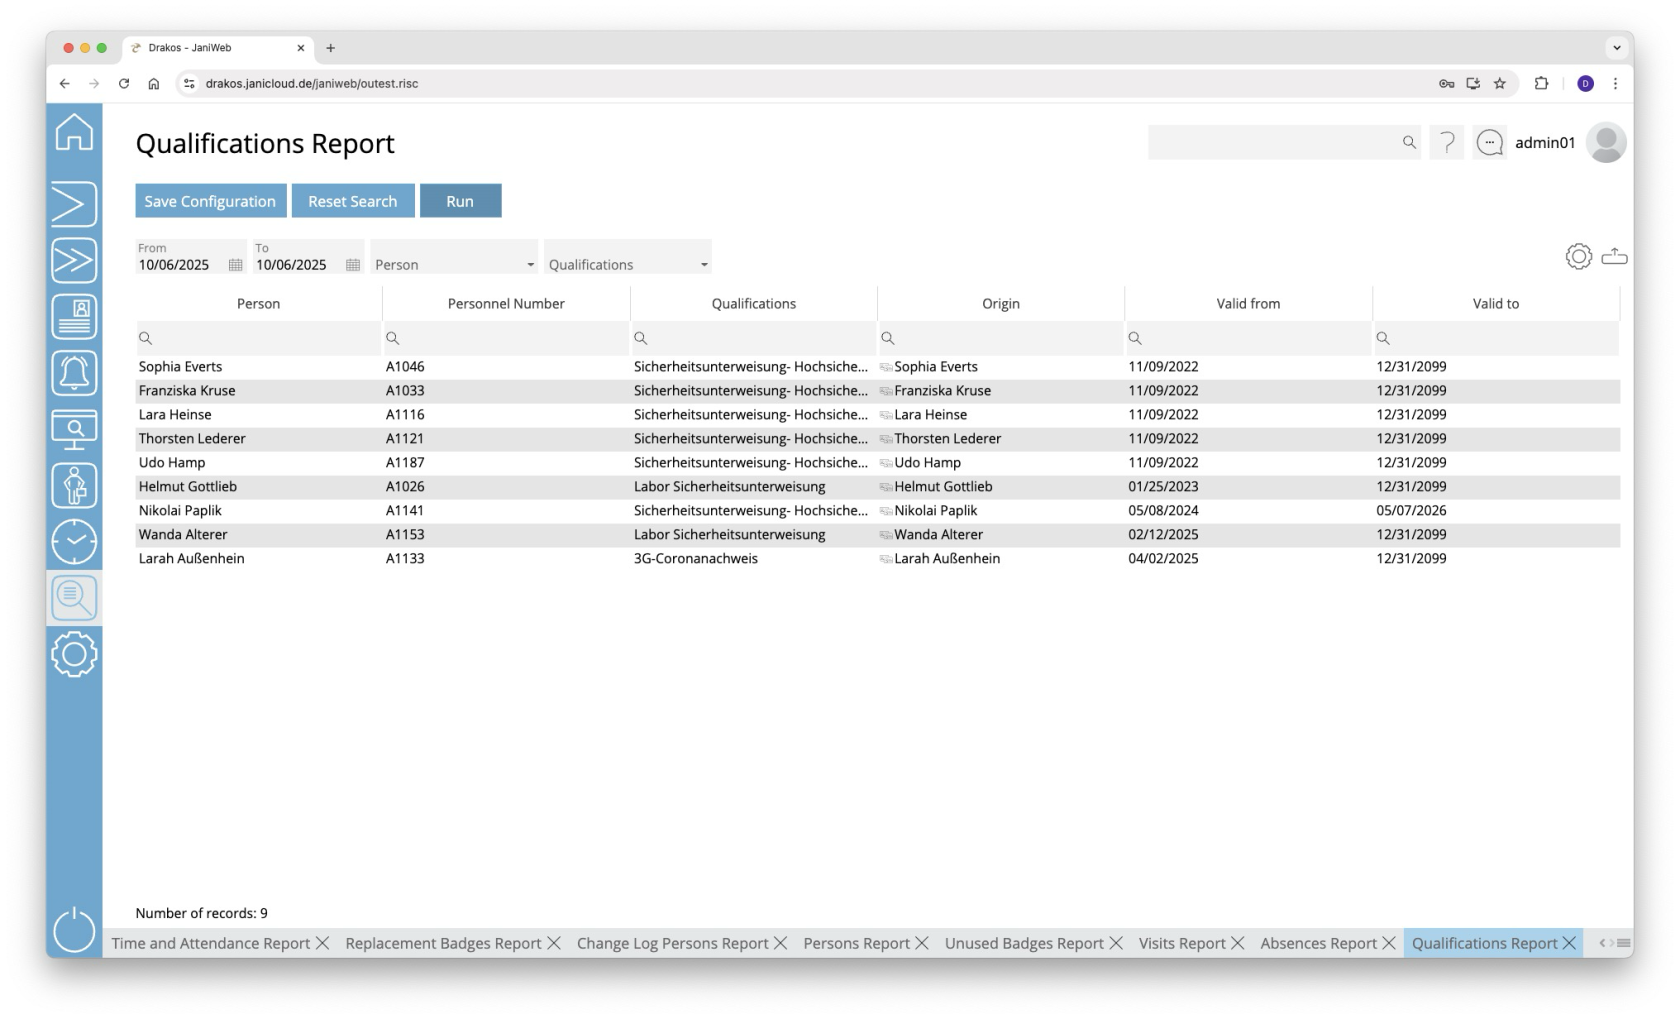](https://manual.drakos.de/uploads/images/gallery/2025-10/aNjimage.png)
## Creating the report
- Specify the time period for which you want to generate the report (*From* – *To*).
- (Optional) Use the additional fields to narrow the report.
- Press *Run* to start the report.
### Further options with the report
- **Select columns to display:** Press the gear icon. Select which columns you want to display and in which order. Arrange the columns using the mouse or the arrow icons. Press *Apply* to adopt the changes.
- **Search in columns:** Enter text or numbers in the search field (magnifying glass icon) of a column to search for names, personnel numbers, or other criteria. The entries take effect immediately: the list only displays hits.
- **Export the entire list:** Press the download icon. Select the format in which you want to export the list. The export files are downloaded or displayed depending on the browser/operating system settings. For details on the available export formats, see the [General > Export Formats](https://manual.drakos.de/books/janiweb-j92/page/export-formats) chapter of this manual.
- **Save report:** For details on saving reports, see the chapter [General > Custom Reports](https://manual.drakos.de/books/janiweb-j92/page/custom-reports).
## Button *Reset Selection*
Press *Reset Selection* to reset all fields to their initial value.
# Alarm Scenarios
**Use this menu item to output a list of events that have occurred and that are configured in alarm scenarios.**
[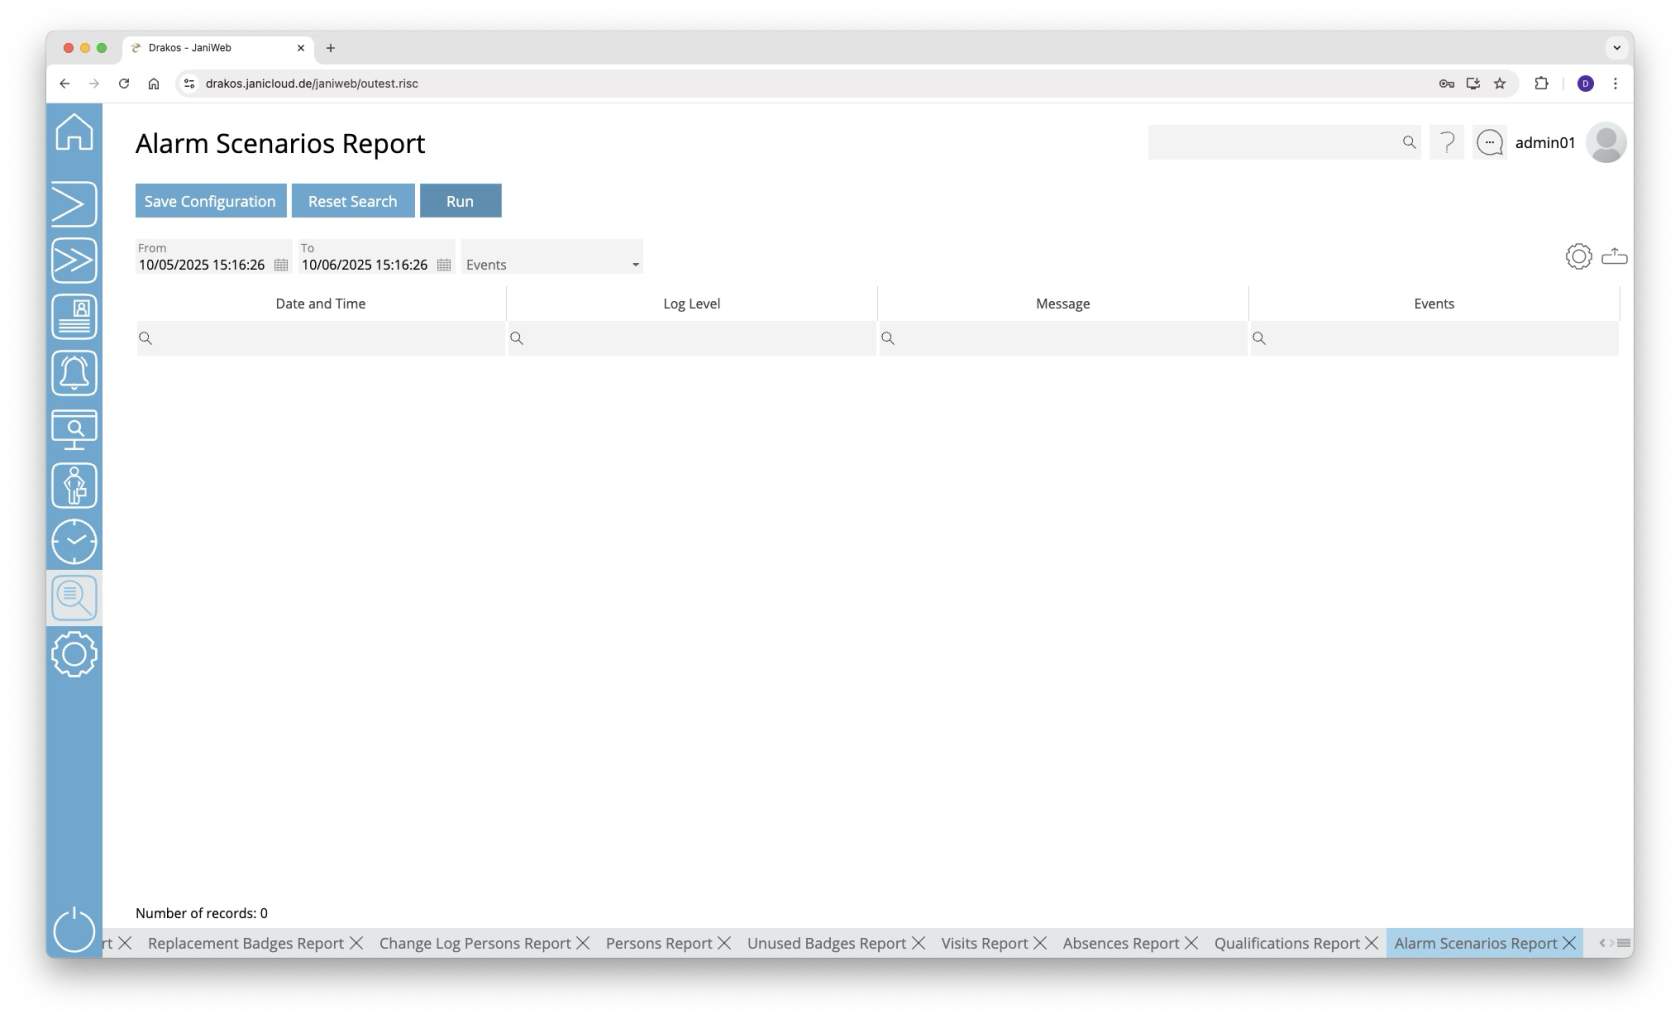](https://manual.drakos.de/uploads/images/gallery/2025-10/kGEimage.png)
## Creating the report
- Specify the time period for which you want to generate the report (*From* – *To*).
- (Optional) Use the field *Events* to restrict the report to specific events.
- Press *Run* to start the report.
### Further options with the report
- **Select columns to display:** Press the gear icon. Select which columns you want to display and in which order. Arrange the columns using the mouse or the arrow icons. Press *Apply* to adopt the changes.
- **Search in columns:** Enter text or numbers in the search field (magnifying glass icon) of a column to search for names, personnel numbers, or other criteria. The entries take effect immediately: the list only displays hits.
- **Export the entire list:** Press the download icon. Select the format in which you want to export the list. The export files are downloaded or displayed depending on the browser/operating system settings. For details on the available export formats, see the [General > Export Formats](https://manual.drakos.de/books/janiweb-j92/page/export-formats) chapter of this manual.
- **Save report:** For details on saving reports, see the chapter [General > Custom Reports](https://manual.drakos.de/books/janiweb-j92/page/custom-reports).
## Button *Reset Selection*
Press *Reset Selection* to reset all fields to their initial value.
# Workflow
[](https://manual.drakos.de/uploads/images/gallery/2025-01/dalle-2025-01-07-08-14-53-a-detailed-under-construction-scene-featuring-a-playful-and-vibrant-construction-site-with-cartoonish-elements-include-a-yellow-warning-sign-with.webp)
# Scan for Bookings
**Use this report, for example, to show a person a remaining time (e.g. for a smoke break) based on a booking.**
[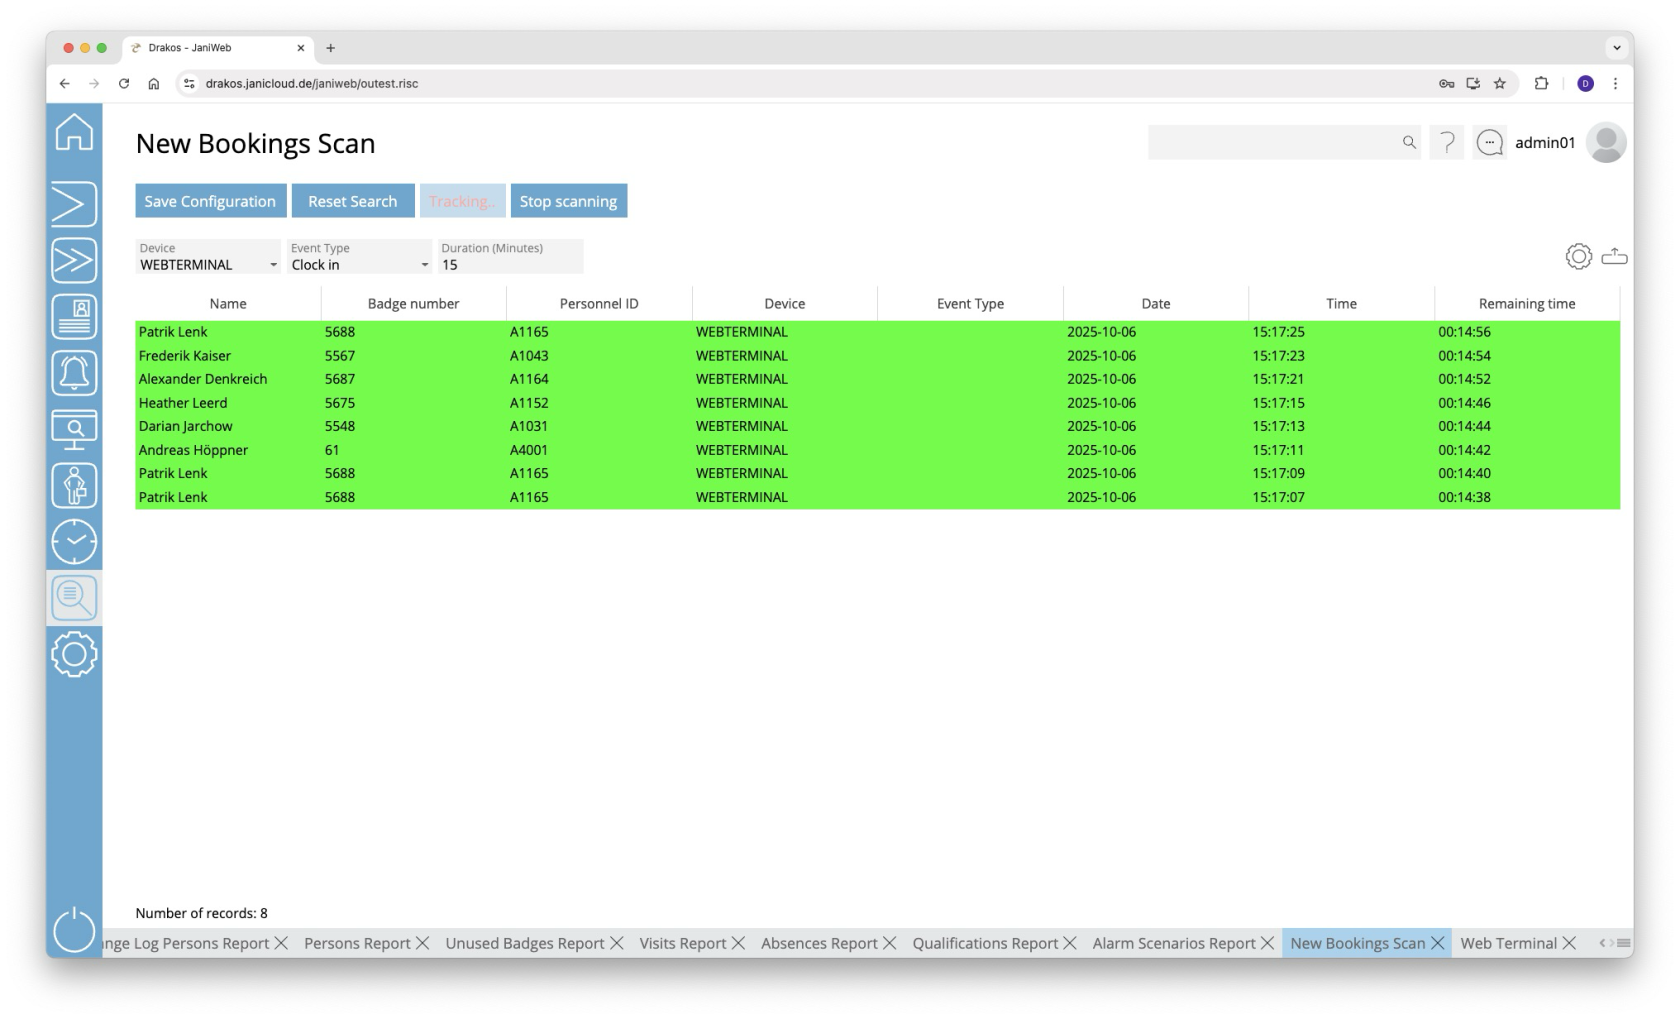](https://manual.drakos.de/uploads/images/gallery/2025-10/9wTimage.png)
### Starting a bookings scan
- Select the *Device* and the *Event Type* to be monitored.
- Enter a *Duration (Minutes)*.
- Press *Start scanning* to begin monitoring bookings.
The column *Remaining time* shows the time remaining.
To cancel the scan, press *Stop scanning*.
##### Color-coding of bookings
- **Green:** The booking is within the specified time period.
- **Red:** The booking has exceeded the specified time period.
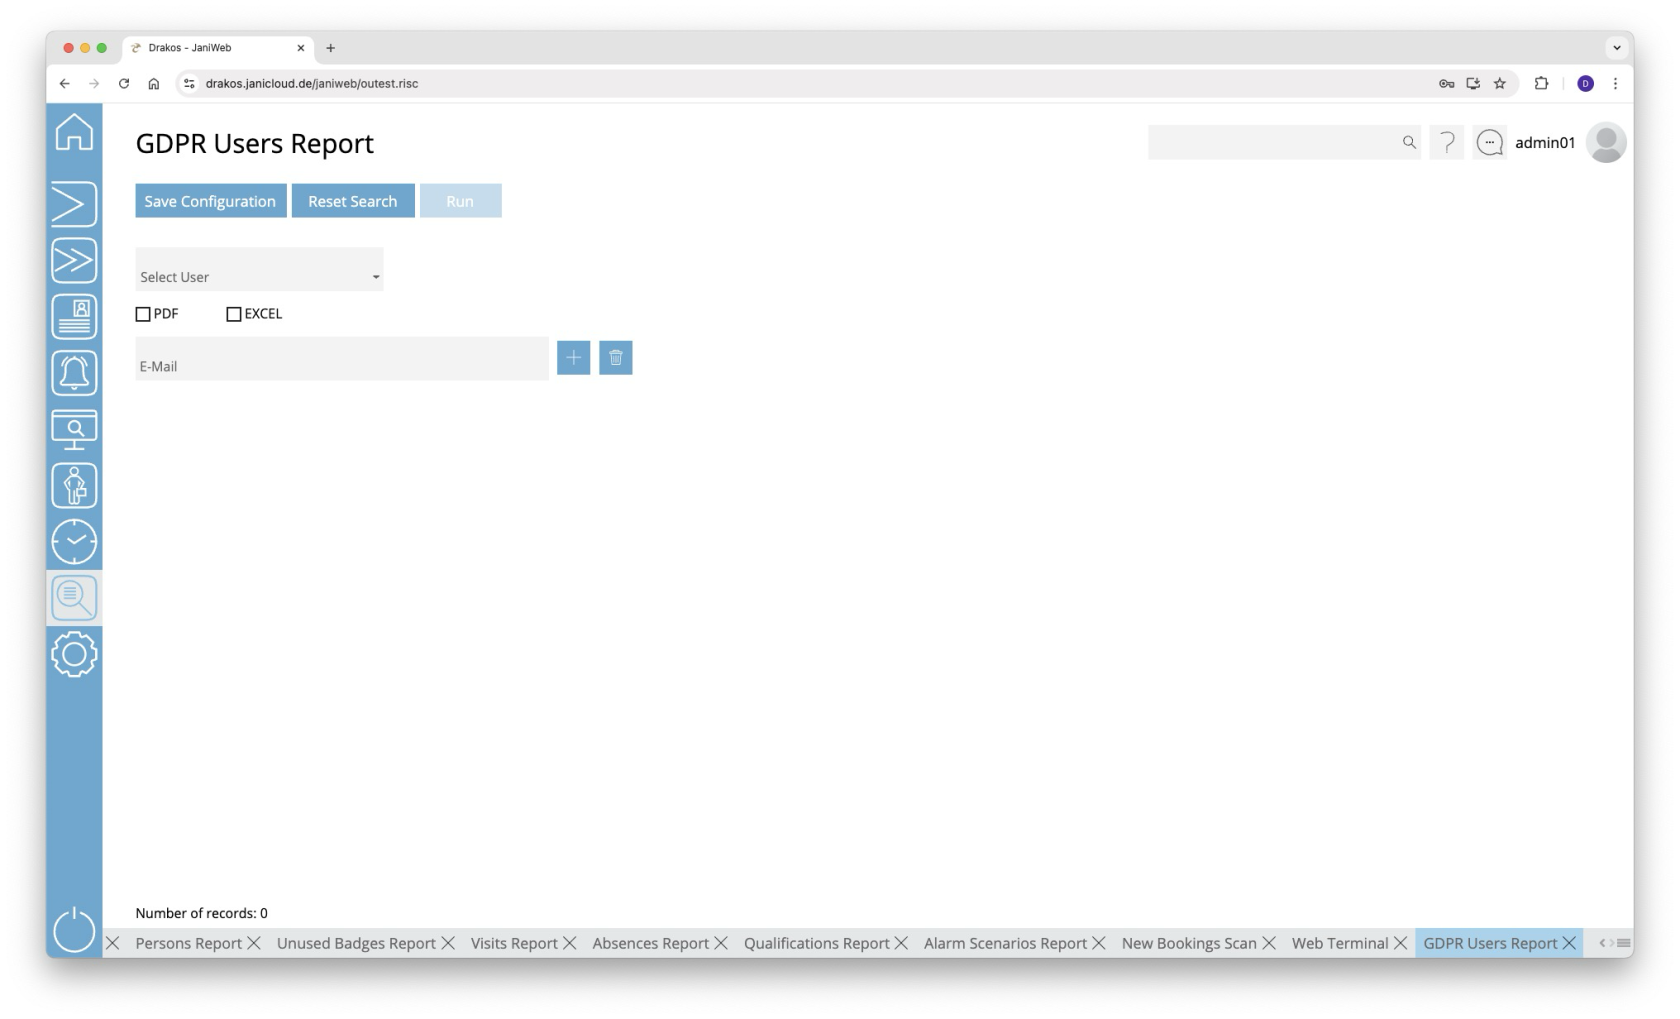
# GDPR Users
**Use this menu item to create a list of all actions that a specific user has performed in JaniWeb and to send it to one or more email addresses.**
[](https://manual.drakos.de/uploads/images/gallery/2025-10/LvWimage.png)
## Creating the report
1. Select the person for whom the report is to be created.
2. Select whether the report is to be created in PDF and/or Excel format.
3. Enter the email address to which the report is to be sent. Press the plus icon to enter additional email addresses.
4. Press *Run* to send the report.
# GDPR Persons
**Use this menu item to create a list of all the data entered for a particular person in JaniWeb and send it to one or more email addresses.**
[](https://manual.drakos.de/uploads/images/gallery/2025-10/etGimage.png)
## Creating the report
1. Select the person for whom the report is to be created.
2. Select whether the report is to be created in PDF and/or Excel format.
3. Enter the email address to which the report is to be sent. Press the plus icon to enter additional email recipients.
4. Press *Run* to send the report.
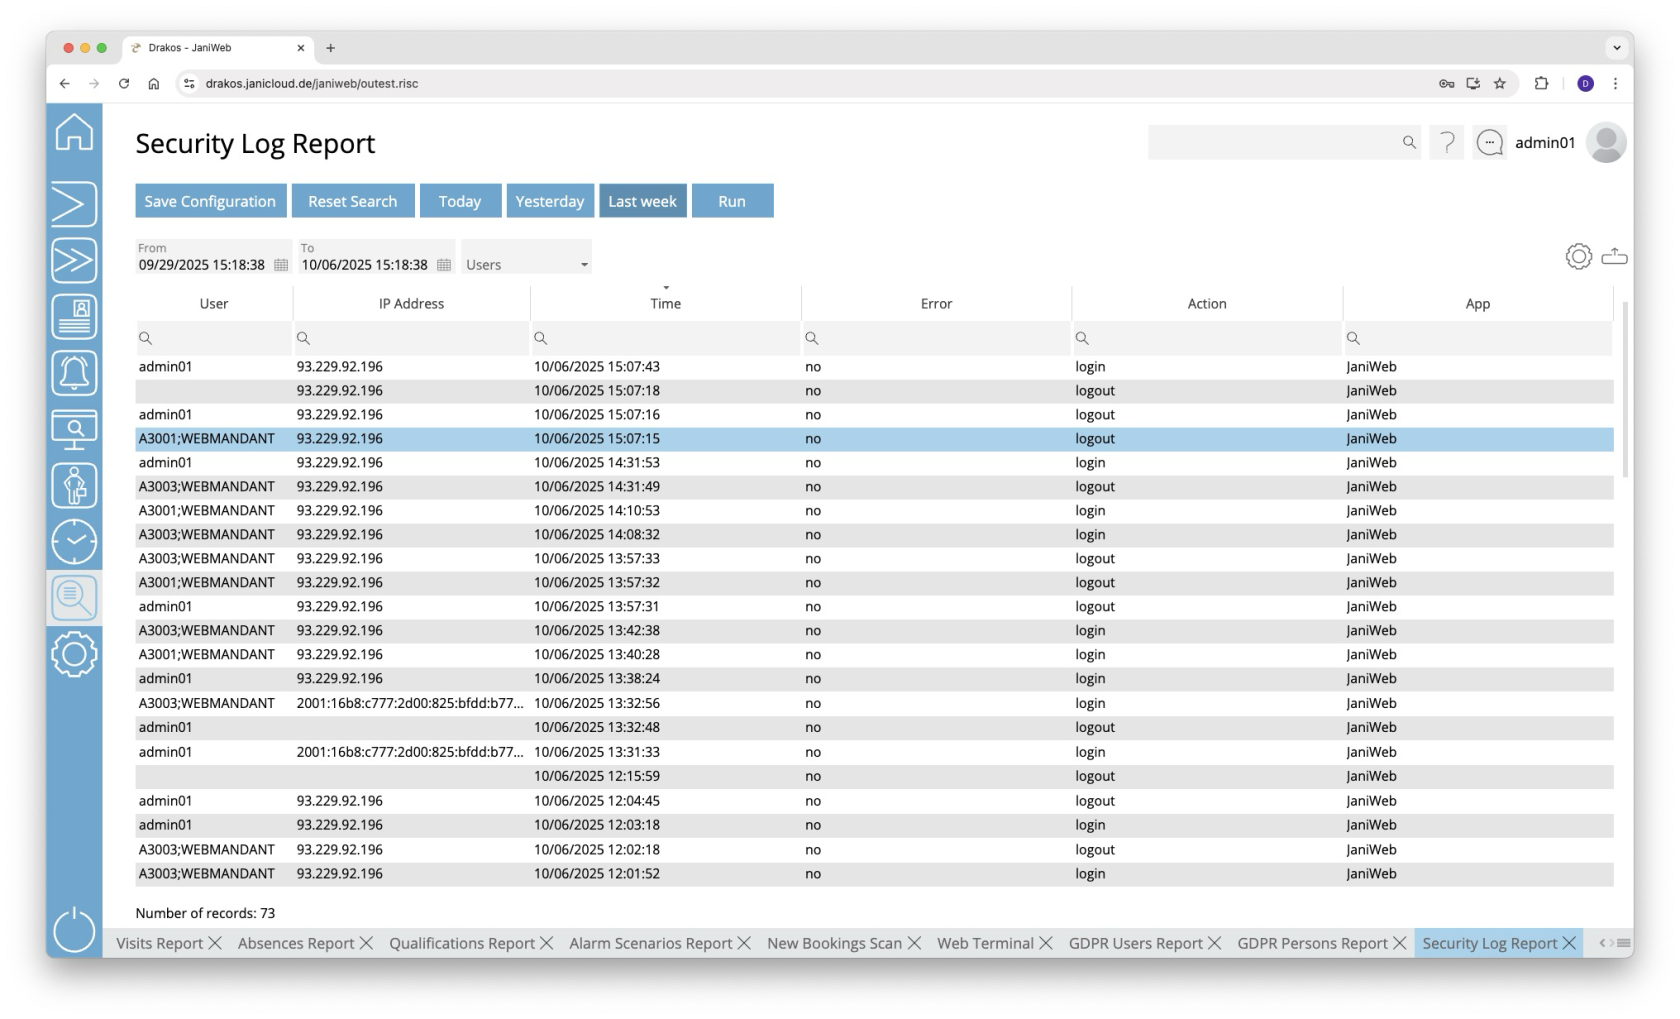
# Security Log
**Use the menu item *Security Log* to display a list of logins to JaniWeb. Failed attempts are also logged.**
[](https://manual.drakos.de/uploads/images/gallery/2025-10/G5Timage.png)
## Creating the report
- Specify the time period for which you want to generate the report (*From* – *To*). Or press *Today*, *Yesterday* or *Last week* to quickly generate a report for the corresponding period.
- (Optional) Select the *User* for whom you want to generate the report.
- Press *Run* to start the report.
### Further options with the report
- **Select columns to display:** Press the gear icon. Select which columns you want to display and in which order. Arrange the columns using the mouse or the arrow icons. Press *Apply* to adopt the changes.
- **Search in columns:** Enter text or numbers in the search field (magnifying glass icon) of a column to search for names, personnel numbers, or other criteria. The entries take effect immediately: the list only displays hits.
- **Export the entire list:** Press the download icon. Select the format in which you want to export the list. The export files are downloaded or displayed depending on the browser/operating system settings. For details on the available export formats, see the [General > Export Formats](https://manual.drakos.de/books/janiweb-j92/page/export-formats) chapter of this manual.
- **Save report:** For details on saving reports, see the chapter [General > Custom Reports](https://manual.drakos.de/books/janiweb-j92/page/custom-reports).
## Button *Reset Selection*
Press *Reset Selection* to reset all fields to their initial value.
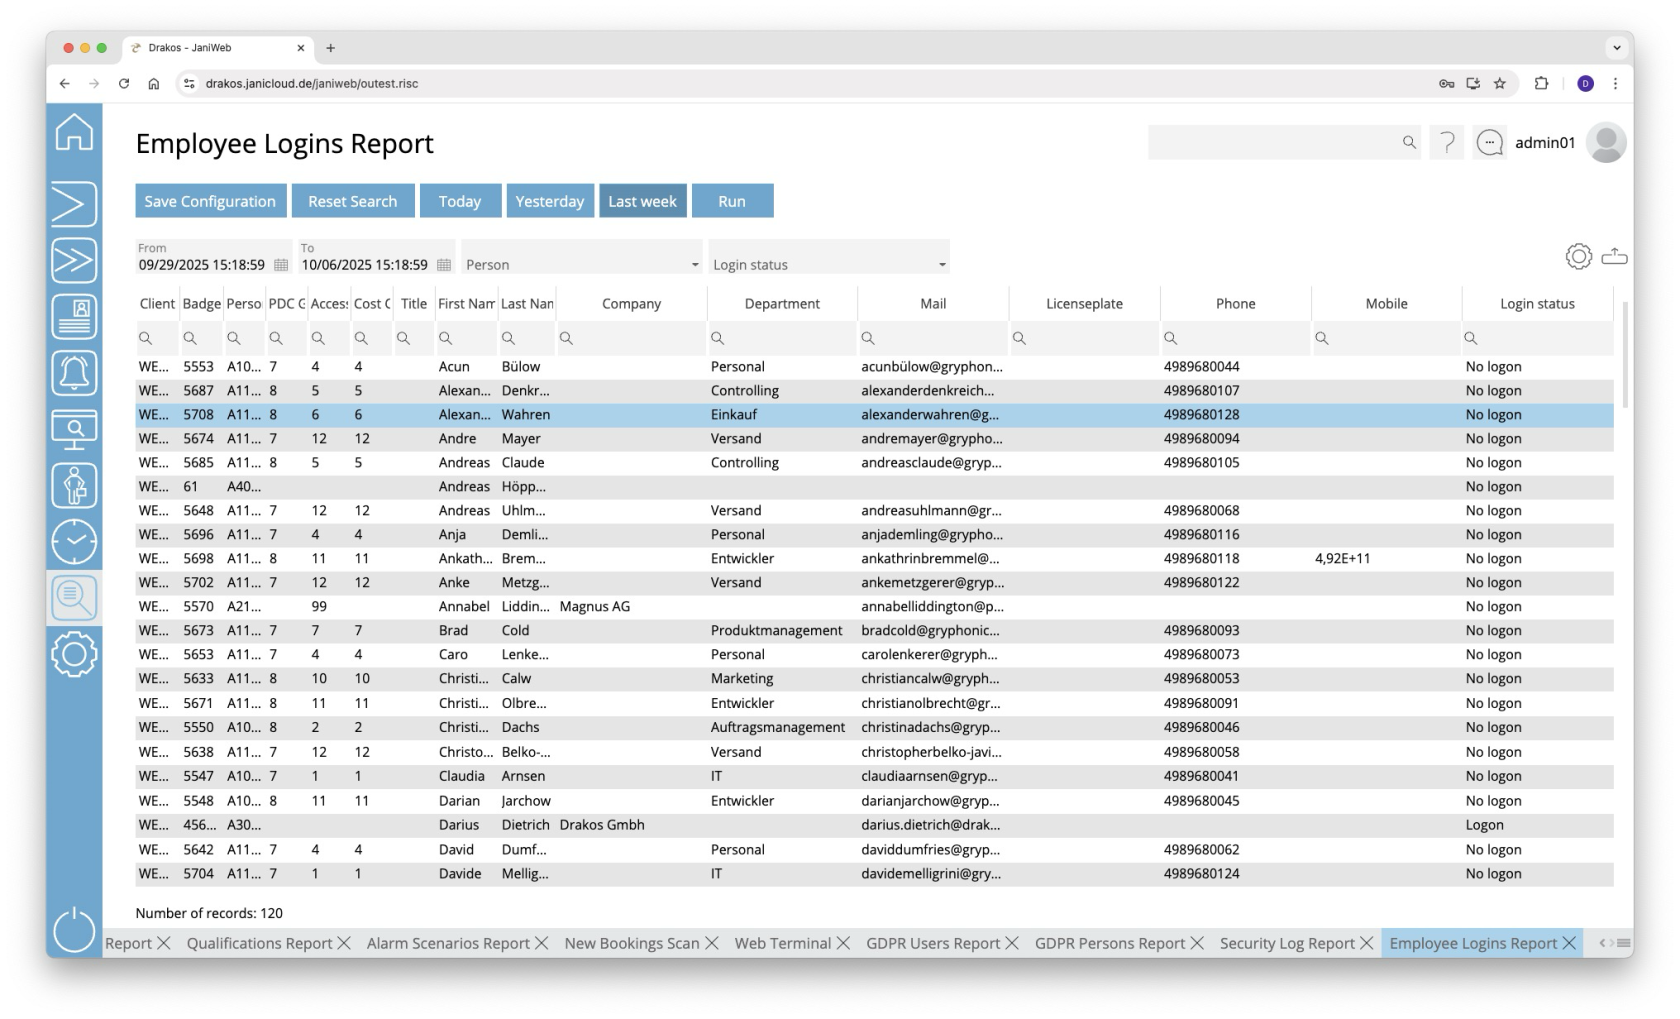
# Employee Logins
**Use this menu item to determine which persons were logged into JaniWeb during a specific period and which were not.**
[](https://manual.drakos.de/uploads/images/gallery/2025-10/HL3image.png)
## Creating the report
- Specify the time period for which you want to generate the report (*From* – *To*). Or press *Today*, *Yesterday* or *Last week* to quickly generate a report for the corresponding period.
- (Optional) Select a *Person* and/or a *Login status* to narrow the report.
- Press *Run* to start the report.
### Further options with the report
- **Select columns to display:** Press the gear icon. Select which columns you want to display and in which order. Arrange the columns using the mouse or the arrow icons. Press *Apply* to adopt the changes.
- **Search in columns:** Enter text or numbers in the search field (magnifying glass icon) of a column to search for names, personnel numbers, or other criteria. The entries take effect immediately: the list only displays hits.
- **Export the entire list:** Press the download icon. Select the format in which you want to export the list. The export files are downloaded or displayed depending on the browser/operating system settings.For details on the available export formats, see the [General > Export Formats](https://manual.drakos.de/books/janiweb-j92/page/export-formats) chapter of this manual.
- **Save report:** For details on saving reports, see the chapter [General > Custom Reports](https://manual.drakos.de/books/janiweb-j92/page/custom-reports).
## Button *Reset Selection*
Press *Reset Selection* to reset all fields to their initial value.
# Server Log
**Use the menu item *Server Log* to display a list of all system events.**
[](https://manual.drakos.de/uploads/images/gallery/2026-02/bildschirmfoto-2026-02-13-um-10-24-44.jpg)
## Creating the report
- Specify the time period for which you want to generate the report (*From* – *To*). Or press *Last hour* to quickly generate a report for the last hour.
- (Optional) Select one or more *Log Levels* to narrow the report.
- (Optional) Select one or more *Functions* to narrow the report.
- Press *Run* to start the report.
### Further options with the report
- **Search in columns:** Enter text or numbers in the search field (magnifying glass icon) of a column to search for names, personnel numbers, or other criteria. The entries take effect immediately: the list only displays hits.
- **Export the entire list:** Press the download icon. Select the format in which you want to export the list. The export files are downloaded or displayed depending on the browser/operating system settings. For details on the available export formats, see the [General > Export Formats](https://manual.drakos.de/books/janiweb-j92/page/export-formats) chapter of this manual.
- **Save report:** For details on saving reports, see the chapter [General > Custom Reports](https://manual.drakos.de/books/janiweb-j92/page/custom-reports).
## Button *Reset Selection*
Press *Reset Selection* to reset all fields to their initial value.
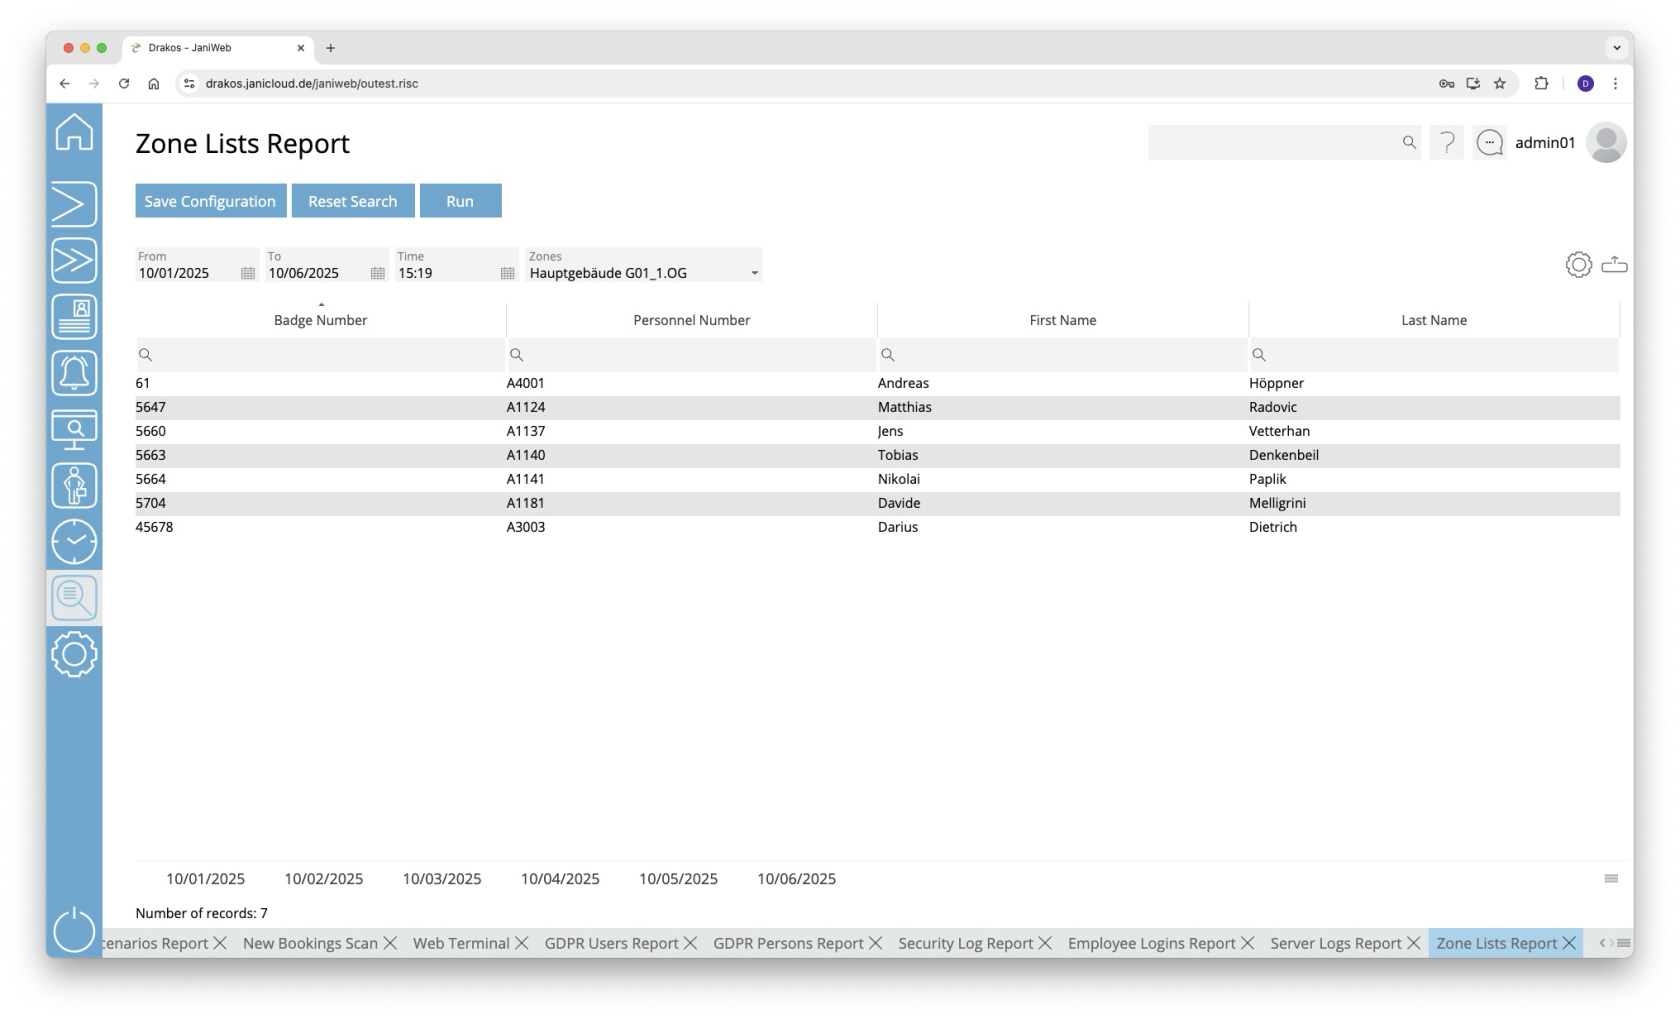
# Zone Lists
**Use the menu item *Zone Lists* to generate a zone list for a specific point in the past. This allows you to see which persons were present in a zone at a particular time.**
[](https://manual.drakos.de/uploads/images/gallery/2025-10/LP5image.png)
## Creating the report
- Enter the period for which you want to generate the report using the *From* and *To* fields.
- Then, specify the time in the *Time* field for which you want to generate the report.
- Select the zone for which you want to generate the report.
- Click *Run* to start the report generation.
- Below the report results, a tab is displayed for each day within the selected period. Each tab shows the status of the zone for the corresponding date.
### Further options with the report
- **Select columns to display:** Press the gear icon. Select which columns you want to display and in which order. Arrange the columns using the mouse or the arrow icons. Press *Apply* to adopt the changes.
- **Search in columns:** Enter text or numbers in the search field (magnifying glass icon) of a column to search for names, personnel numbers, or other criteria. The entries take effect immediately: the list only displays hits.
- **Export the entire list:** Press the download icon. Select the format in which you want to export the list. The export files are downloaded or displayed depending on the browser/operating system settings. For details on the available export formats, see the [General > Export Formats](https://manual.drakos.de/books/janiweb-j92/page/export-formats) chapter of this manual.
- **Save report:** For details on saving reports, see the chapter [General > Custom Reports](https://manual.drakos.de/books/janiweb-j92/page/custom-reports).
Would you like to automatically receive regular updates about which individuals are present in a specific zone? Then you can use the *Periodic Sending* feature. You can find instructions on how to set it up here: [General > Custom Reports.](https://manual.drakos.de/books/janiweb-j92/page/custom-reports)
## Button *Reset Selection*
Press *Reset Selection* to reset all fields to their initial value.
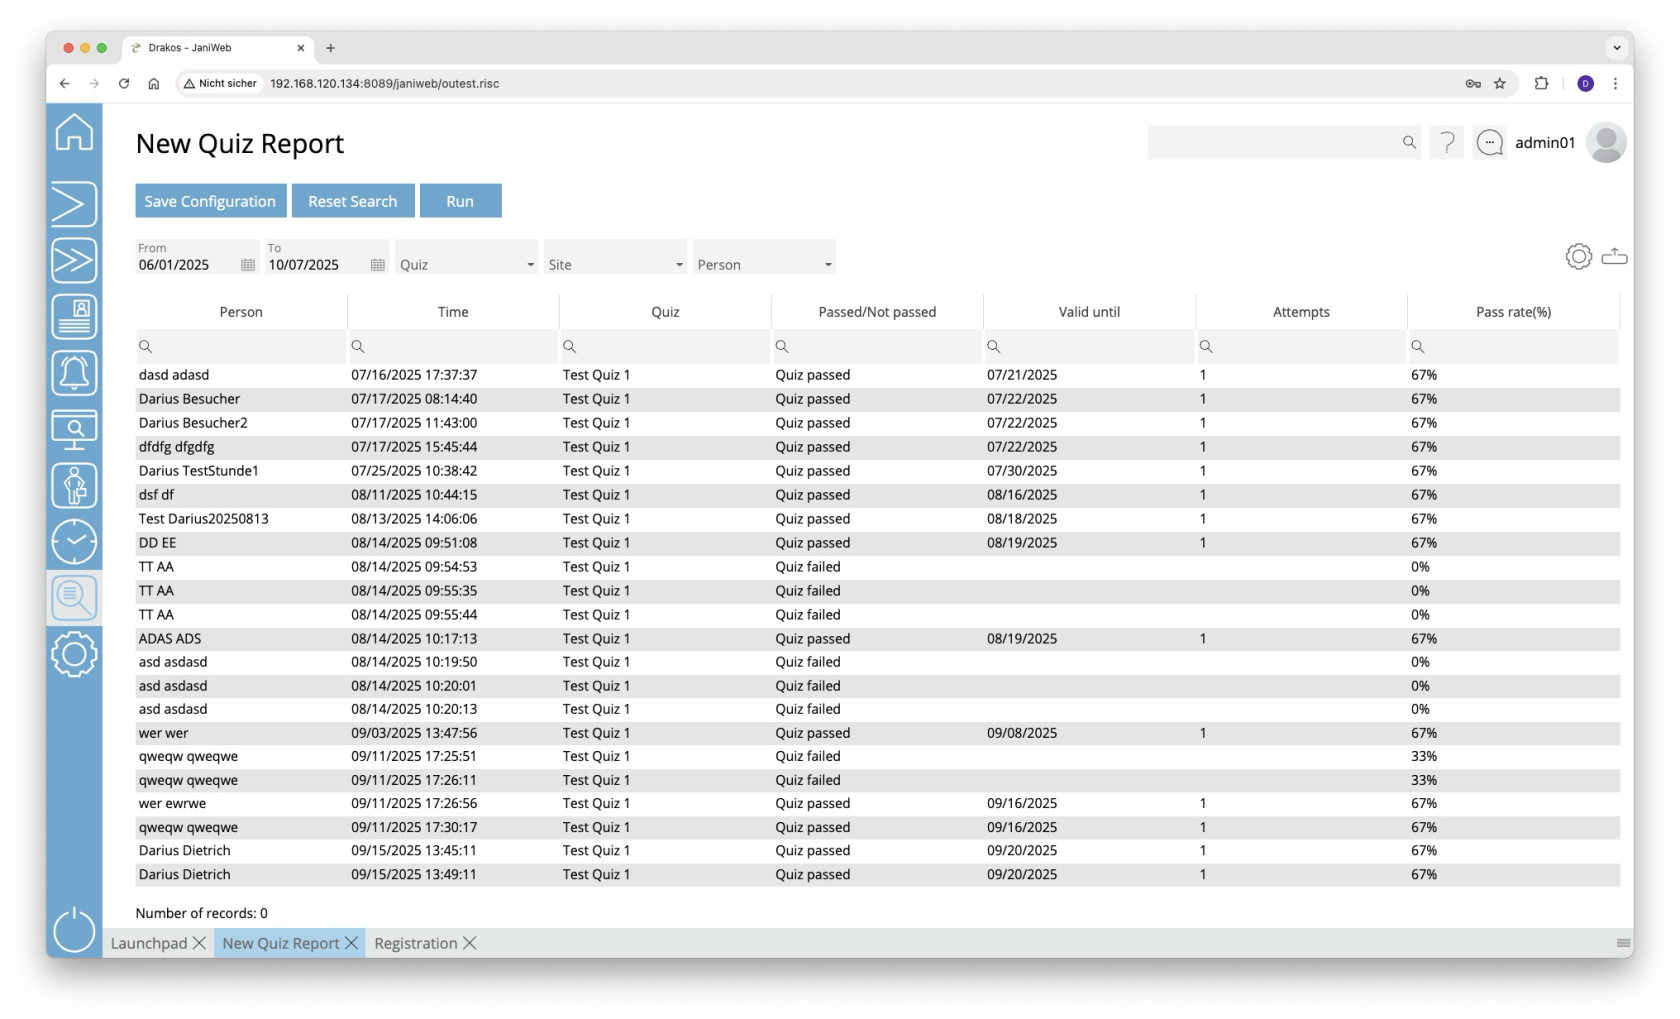
# Quiz Report
**You can use the Quiz Report menu item to evaluate which individuals passed or failed which quizzes.**
[](https://manual.drakos.de/uploads/images/gallery/2025-10/oSLimage.png)
## Creating the report
- Specify the time period for which you want to generate the report (*From* – *To*).
- (Optional) Use the additional fields to narrow the report.
- Press *Run* to start the report.
### Further options with the report
- **Select columns to display:** Press the gear icon. Select which columns you want to display and in which order. Arrange the columns using the mouse or the arrow icons. Press *Apply* to adopt the changes.
- **Search in columns:** Enter text or numbers in the search field (magnifying glass icon) of a column to search for names, personnel numbers, or other criteria. The entries take effect immediately: the list only displays hits.
- **Export the entire list:** Press the download icon. Select the format in which you want to export the list. The export files are downloaded or displayed depending on the browser/operating system settings. For details on the available export formats, see the [General > Export Formats](https://manual.drakos.de/books/janiweb-j92/page/export-formats) chapter of this manual.
- **Save report:** For details on saving reports, see the chapter [General > Custom Reports](https://manual.drakos.de/books/janiweb-j92/page/custom-reports).
## Button *Reset Selection*
Press *Reset Selection* to reset all fields to their initial value.
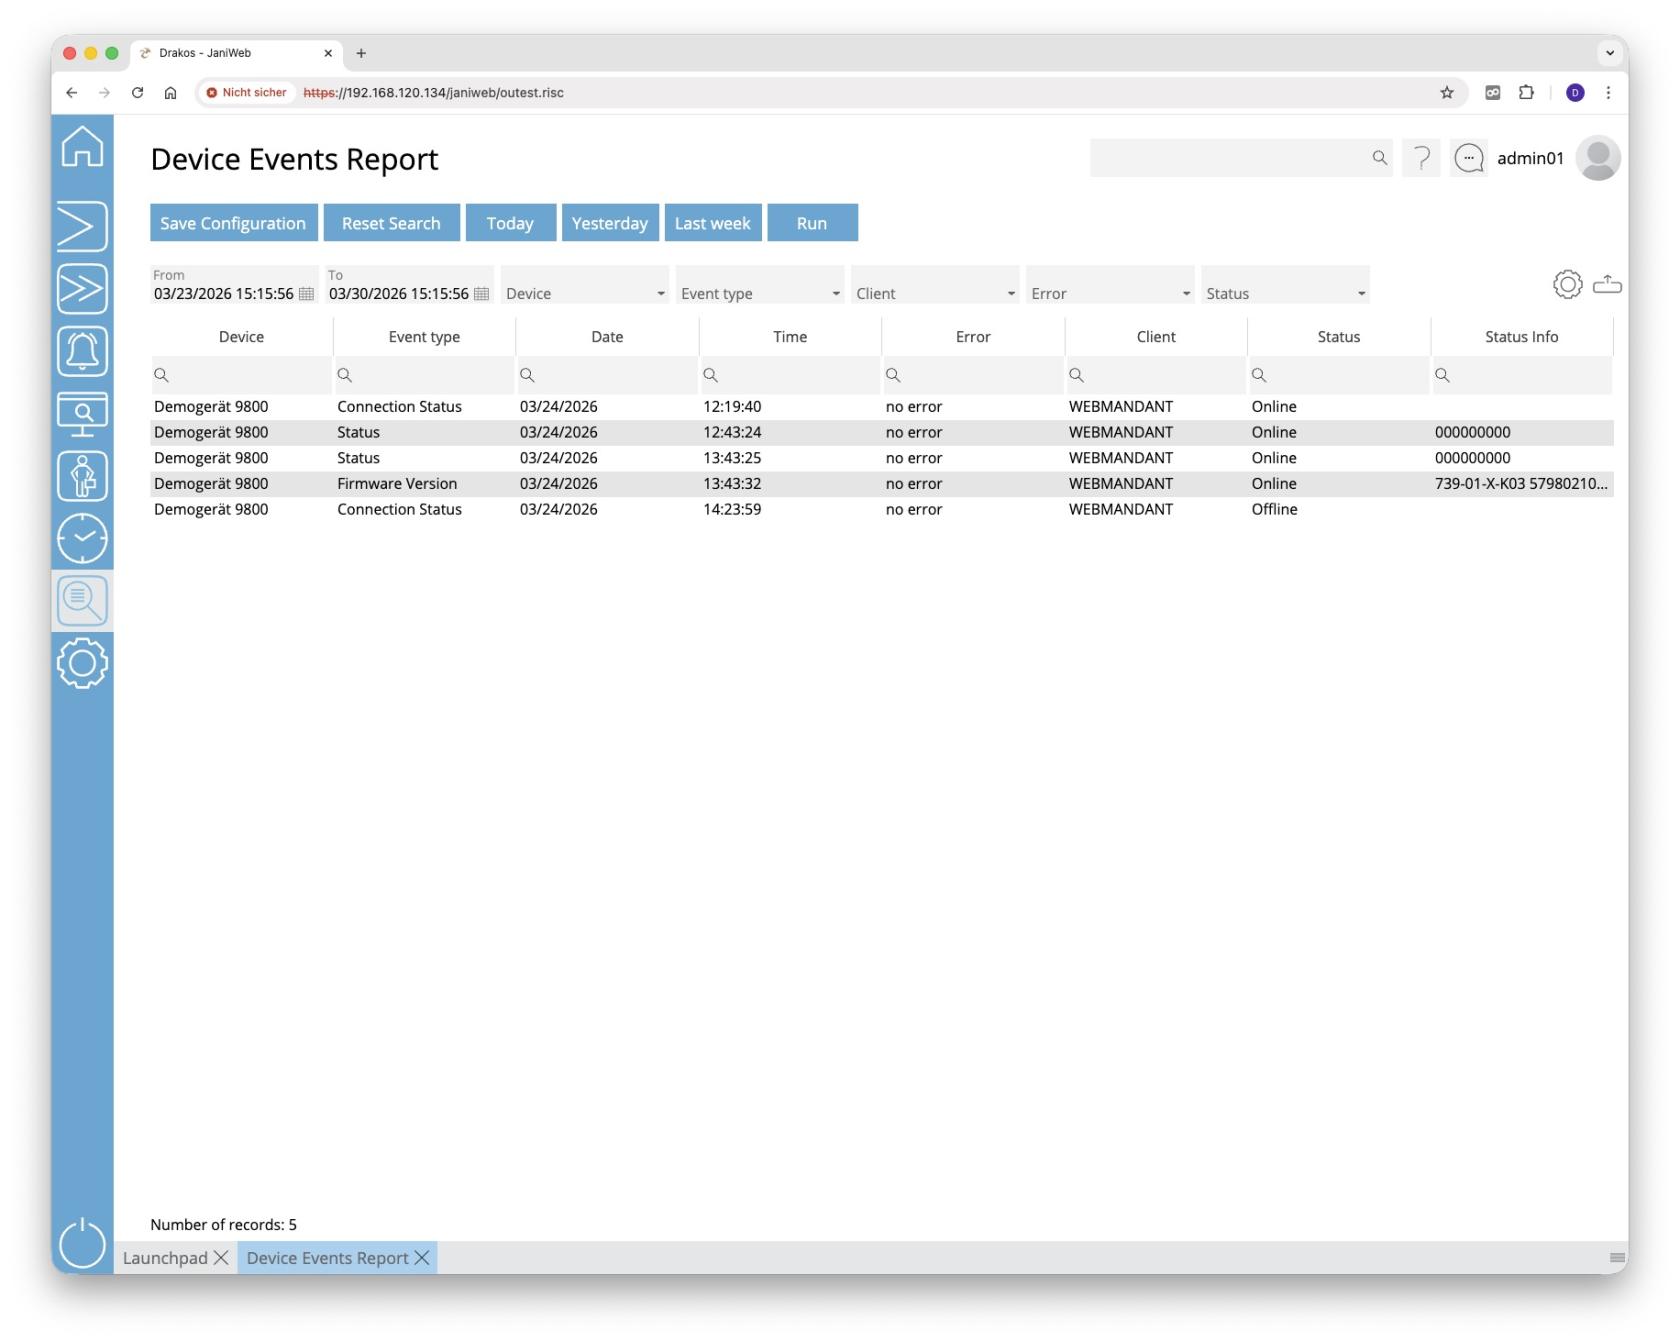
# Device Events
**You can view a list of device events via the *Device Events* menu option. This allows you to determine which device sent a message at a specific time.**
[](https://manual.drakos.de/uploads/images/gallery/2026-03/bildschirmfoto-2026-03-30-um-15-16-00.jpg)
## Creating the report
- Specify the time period for which you want to generate the report (*From* – *To*). Or press *Today*, *Yesterday* or *Last week* to quickly generate a report for the corresponding period.
- (Optional) Use the additional fields to narrow the report.
- Press *Run* to start the report.
### Further options with the report
- **Select columns to display:** Press the gear icon. Select which columns you want to display and in which order. Arrange the columns using the mouse or the arrow icons. Press *Apply* to adopt the changes.
- **Search in columns:** Enter text or numbers in the search field (magnifying glass icon) of a column to search for names, personnel numbers, or other criteria. The entries take effect immediately: the list only displays hits.
- **Export the entire list:** Press the download icon. Select the format in which you want to export the list. The export files are downloaded or displayed depending on the browser/operating system settings. For details on the available export formats, see the [General > Export Formats](https://manual.drakos.de/books/janiweb-j92/page/export-formats) chapter of this manual.
- **Save report:** For details on saving reports, see the chapter [General > Custom Reports](https://manual.drakos.de/books/janiweb-j92/page/custom-reports).
## Button *Reset Selection*
Press *Reset Selection* to reset all fields to their initial value.