**Changes made here may affect the application itself or its interfaces. Please only make changes here that you have discussed with your contact person.**
[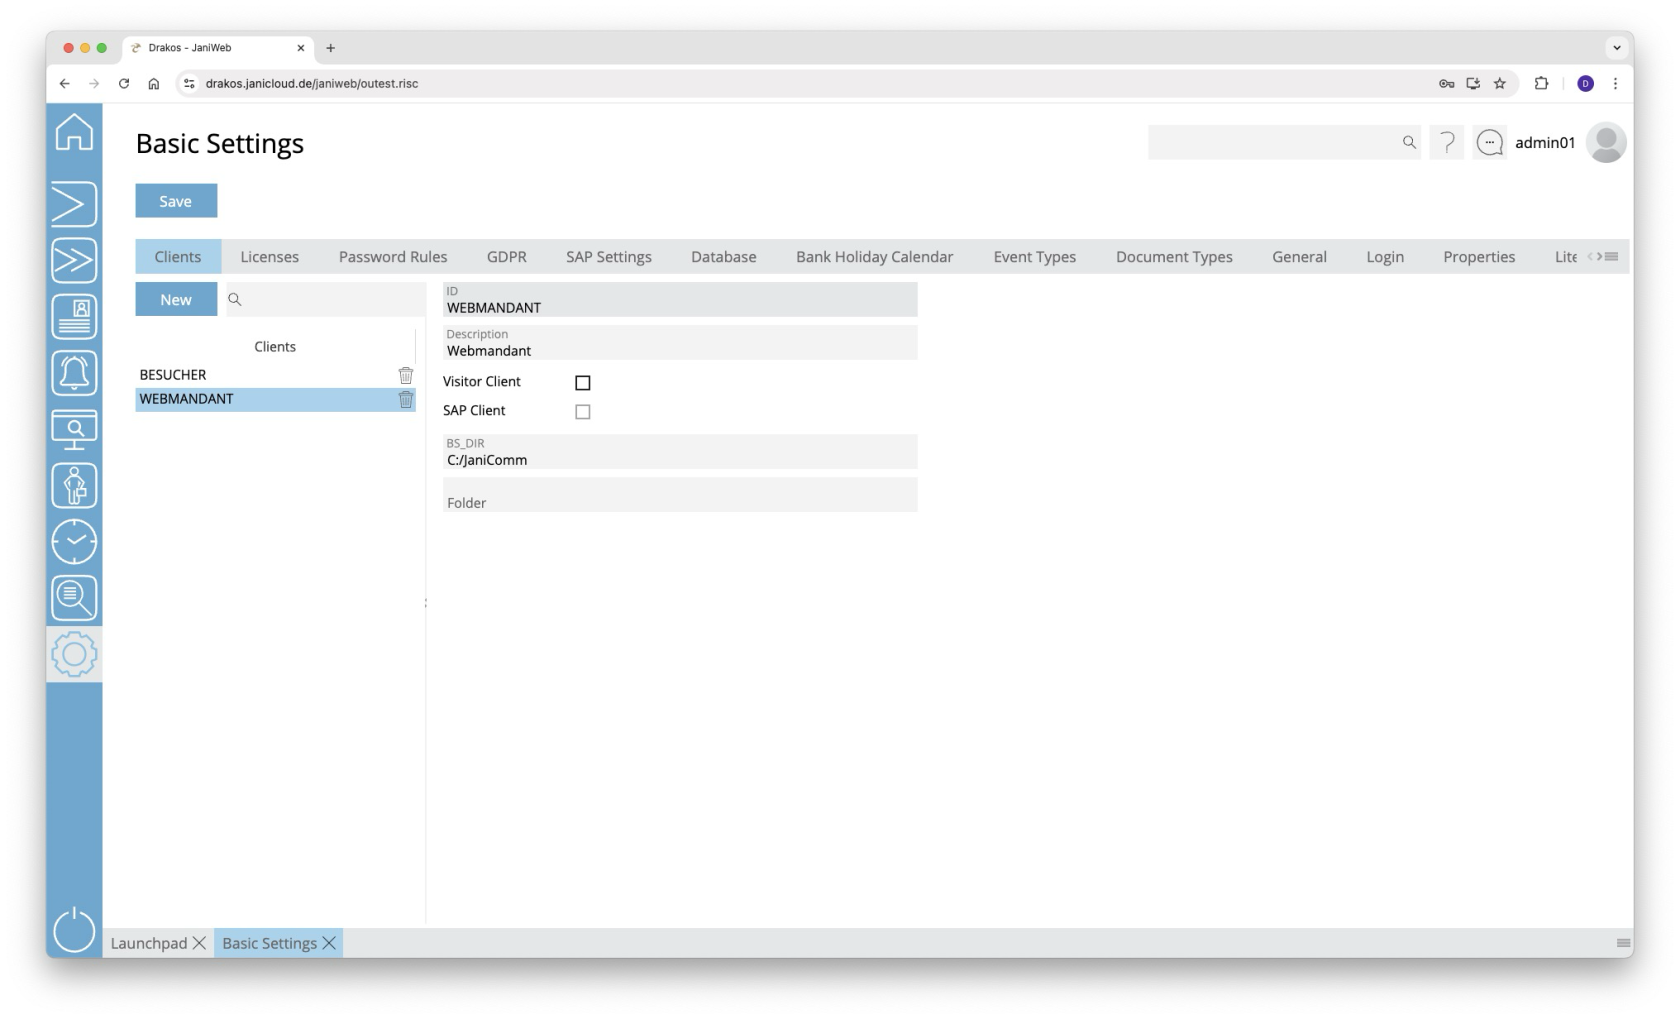](https://manual.drakos.de/uploads/images/gallery/2025-10/JCUimage.png) ## Tab *Clients* This is where you manage different clients in the system. Clients describe the origin of the data and are linked to the objects (e.g. persons, devices, device groups, etc.). The list contains the clients that have already been created. Select an entry to view details. Press *New* to create a new client. Enter the required data and press *Save.* ### Detail area - *ID:* Enter the 10-digit client ID. - *Description:* Enter a meaningful name. - *Visitor Client*: Select this option if the client is to be used for visitor management. - *SAP Client:* This field is automatically filled when importing data from SAP. - *BS\_DIR:* Specify the base directory of the application here. - *Folder:* Specify the name of the SAP exchange directory here. - *Control Management File Path:* In the field *Control Management File Path*, enter the directory in which parameter files for devices from the manufacturer Dormakaba are to be stored when they are created using control management. - this setting is applied only to devices for the connected client. - *terminal.localfile:* Enter the directory for the trigger file that triggers the creation of the *terminal.ini* file.- this setting is applied only to devices for the connected client. - *terminal.parameter:* Enter the directory in which parameter files for devices from the manufacturer Dormakaba are to be stored. - this setting is applied only to devices for the connected client. ## Tab *License* Here you can see which license you are using. ### Tab *Configuration* You can import a new license via the *License Key* field. Enter the new license key and press the *Update License* button. The list displays the features that are currently licensed. ### Tab *Monitoring* Any features whose use is restricted are displayed here together with their level of use. If required, activate the option *Alert for license violation for all users* and enter a note. ### Tab *Pay Per Use* Use the *Due Date* field to specify the day of the month on which the E-Mail for pay-per-use consumption should be generated. Consumption is always calculated for the previous month. Enter the recipient's email address in the *E-Mail* field. You can delete this using the *trash can* button or add additional E-Mail addresses using the *+* button. You can manually trigger the sending of the E-Mail using the *Send E-Mail* button. Then select the billing period for which you want to generate the email and confirm with the *Send E-Mail* button. You can check the status of the last email sendings using the *Show Log* button. ## Tab *Password Rules* Specify the strength of the passwords used. Enter the minimum *Password length* and select the desired options for the composition of passwords. - *Failed attempts:* Specify here after how many failed login attempts the user is blocked. - *Password expiration:* Specify here after how many days users are prompted to enter a new password. Enter the number 0 if passwords should be valid indefinitely. ## Tab *GDPR* Specify the number of days after which expired records are automatically deleted. This is also possible for the server log files. ## Tab *SAP Settings* Specify the number of days for which the backups of the SAP import files should be kept. You can also specify the file name for exported bookings. - *PTEX …:* Use these fields to define the file name and the client for deleted bookings. - *Enable API Gateway Data Import:* Activate this option to enable importing master data via the API gateway. If this option is selected, data is imported via both the file interface and the API gateway. - *Enable API Gateway Data Export:* Activate this option to enable exporting master data via the API gateway. - *Threshold person import (%)*: Use this field to set the threshold value for the import of persons. If the current import of persons falls below the threshold value (comparison with the number of persons from the last import), the import is rejected. You can use the *Import anyway* button to import a rejected import anyway. If the number of persons for import remains unchanged for 5 consecutive days, the persons will be imported on the 5th day. ### Tabs *General / Balance Data* Use these tabs to map the fields of an imported SAP record to the fields in JaniWeb. ## Tab *Database* Connection and other status information for the databases used is displayed here. - Press *Show function status* to display a list of the functions used for all databases in a pop-up window. - Press *Show procedure status* to display a list of the procedures used for all databases in a pop-up window. Information about the version of a function or procedure can be found in the column *Comment*. ## Tab *Holiday Calendar* Manage different holiday calendars here. These are used to group holidays regionally and assign them to persons. Press *New* to create a new holiday calendar. Enter an *ID* and a *Description*. Use the respective trash icon to delete a holiday calendar. ## Tab *Event Types* This is where you can specify the event types that should be available at the terminals. The event types are also used for the web terminal. For each booking type, specify whether the booking is triggered by the device itself or by a person (e.g. clock-in, clock-out). To set the *Text* for a event type, press *Translate*. Enter the names for the respective languages and press *Save.* With the *Booking Type* column you can select whether the booking marks the person as present or absent (this is particularly important for calculating working hours in the *Overview Bookings* menu item). Use the respective trash icon to delete a event type. ## Tab *Document Types* This is where you can manage the document types that are available for selection on the tab *Documents* in the personal master data. ## Tab *General* This is where you can define which areas and tiles should be preset in the launchpad. - *Background image:* Here you can upload a background image that will be displayed in the login screen. - *Logo:* Here you can upload a logo that will be displayed in the login screen. - *All Tiles:* Select this option to display all menu items as tiles on the launchpad by default. - *Info text* / *Info mail address:* Enter the text and email address that will be displayed in the info area (accessible via the user icon in the top right > Info). - *Image Aspect Ratio:* Define the aspect ratio (width:heigth) for images added in the menu items Persons/Visitors (e.g. *4:3*, *16:9*). ### Area *Launchpad Areas* Create areas here that will appear by default on the launchpad. - Press *Add* to create a new area. - To set the *Text* for an area, press *Translate*. Enter the names for the respective languages and press *Save.* - Enter a number in the *Sequence* column to determine the sequence in which the areas are displayed. ### Area *Visible Tiles* Create tiles here that are linked to a PDF or link. When the tile is pressed, the PDF or linked page opens. To set the *Text* and the *Description* for a tile, press *Translate*. Enter the names for the respective languages and press *Save.* ## Tab *Login* Specify here how users login. ### Area *Username and Password* If your system does not use LDAP login, you can assign fields from the HR master record as the *Username* and *Password*. - *Username:* Select the desired field from the personnel master record (for example, *Personnel No.*). - Password: Select the desired field from the personnel master record (e.g. *Personal PIN*). Select *Own Password* if the user should be able to set their own password. The user receives an *Initial Password* for the first login. Select a field from the personnel master record in the field of the same name. Forgotten passwords can be reset. To do this, remove the corresponding entry from the list. The user must then login again with their initial password. ### Area *Login Restrictions* Here you can specify which persons are allowed to login to JaniWeb. - *Criterion:* Select the database field that is used to check the login authorization. - *Filter:* Enter values separated by semicolons for users who are not allowed to login. - *Whitelist:* Press this button to enter IP addresses and DNS names of all clients from which the kiosk application, for example, may be accessed. ## Tab *Properties* This is where you make settings for the SMTP server, LDAP connection, database backup, and SAP exchange directory. Any changes made here require a restart of the Tomcat server. ### Area *Device Master Record Calculation* - *Enable FTP/SFTP for Master Record Dispatch:* Use this option to specify that master data is to be transferred to devices from the manufacturer Dormakaba using FTP/SFTP. - *BPA9 Fallback:* Specify an alternative method here for when transmission to a device via FTP/SFTP is not possible (e.g. for older devices). - Select *Server File System* if the master data file is to be created in a directory on the server. - Select *Network Directory* if the master data file is to be stored in a network directory via SFTP. - Press *Base supply* to recalculate all master data and send it to the devices. - *Trigger File Master Record Calculation :* Enter the path for the trigger file that is to be created after the master data calculation. If no file is to be created, the field can be left empty. - *Badge number length for Dormakaba:* Defines the number of digits used for the badge number when generating master records for Dormakaba devices. ### Area *Device Models* Specify the various device types that can be selected in the menu *Devices*. ### Area *Login* Specify here the required settings for logging in via LDAP or SSO. - If *Type* SSO is selected - *sso\_oidc\_authority:* authentication endpoint (https://login.microsoftonline.com/{tenant-id}) - *sso\_client\_id:* client ID of the registered application - *sso\_client\_secret:* application’s secret key - *sso\_redirect\_uri:* redirect URL after authentication (https://hostname-janiweb-server/janiweb/oidc-callback) - *sso\_redirect\_scope:* requested permissions - *sso\_field:* Enter the SSO field that is to be compared with the system field *sso\_person\_table* (hrcc1dnperso01, hrcc1dnbalan01, hrcc1dnperso01\_data\_relation) and *sso\_person\_field* in order to assign the correct person. - If *Type* LDAP is selected - *ldap\_host*: IP address of the LDAP server - *ldap\_port*: Port of the LDAP server - *ldap\_user:* Enter the full Distinguished Name (DN) for the LDAP user to search the Active Directory (AD) with. - *ldap\_pwd:* Password of the LDAP user - *ldap\_base\_dn:* Enter the AD directories to be searched (separate multiple directories with commas). - *ldap\_field:* Enter the LDAP field that is to be compared with the system field *ldap\_person\_table* (hrcc1dnperso01, hrcc1dnbalan01, hrcc1dnperso01\_data\_relation) and *ldap\_person\_field* in order to assign the correct person. - *ldap\_object\_catergory:* Enter the AD field to be searched for the permissions assigned in the roles under *LDAP Group*. - *using\_ssl:* Activate this option if SSL is to be used for the connection (LDAPS). - *ignore\_leading\_0:* Activate this option if leading zeros are to be ignored when matching the *ldap\_field*. ### Area *Email* Here you define the access data for the SMTP server used. - If *Authentication Type Basic Authentication* is selected - *smtp\_username:* Enter the user name. - *smtp\_password:* Enter the password. - *smtp\_server:* Enter the server address of the SMTP server. - *smtp\_port:* Enter the port of the SMTP server. - If *Authentication Type OAuth2* is selected - *smtp\_oauth2\_tenant\_id:* Microsoft tenant ID - *smtp\_oauth2\_client\_id:* client ID of the registered application - *smtp\_oauth2\_client\_secret:* application’s secret key - *smtp\_oauth2\_token\_endpoint:* URL to obtain OAuth 2.0 tokens (https://login.microsoftonline.com/{tenant-id}/oauth2/v2.0/token) - *smtp\_oauth2\_scope:* requested permissions (https://graph.microsoft.com/.default) - *smtp\_oauth2\_redirect\_uri:* redirect URL after authentication (optional) - If *Authentication Type* *OAuth2 Delegated* gesetzt ist - *oauth2\_delegated\_tenant\_id:* Microsoft tenant ID - *oauth2\_delegated\_client\_id:* client ID of the registered application - *oauth2\_delegated\_client\_secret:* application’s secret key - *oauth2\_delegated\_auth\_endpoint:* URL to obtain OAuth 2.0 authorization (https://login.microsoftonline.com/{tenant-id}/oauth2/v2.0/token) - *oauth2\_delegated\_token\_endpoint:* URL to obtain OAuth 2.0 tokens (https://login.microsoftonline.com/{tenant-id}/oauth2/v2.0/authorize) - *oauth2\_delegated\_scope:* requested permissions (https://graph.microsoft.com/.default) - *oauth2\_delegated\_redirect\_uri:* redirect URL after authentication (https://hostname-janiweb-server/janiweb/oauth2-callback) - *admin\_mail:* Enter the email address that the system uses to send messages.If the email address in the *admin\_mail* field differs from the one in the *smtp\_username* field, then the user in the *smtp\_username* field needs authorisation to send emails as the user in the *admin\_mail* field.
### Area *Master Record Lock* Activate the automatic master record lock here. You can specify after how many error attempts (*number of failed attempts*) within a certain period (*time period in seconds*) a master record should be locked. In addition, you can use the field *event types* to specify which booking errors should be taken into account. ### Area *SAP Settings* Make settings for updating SAP data here. - *sap\_refresh\_data\_dir:* Enter the directory from which the SAP import is to be read. Click the plus icon to select multiple directories. - *sap\_refresh\_archiving:* Activate this option if you want to archive the imported data. - *booking\_job\_archiving*: Activate this option if you want to archive the exported booking data. ### Area *Database Backup* Here you can configure an automatic database backup. The backup is performed once a day at night. - *db\_backup\_days:* Enter the number of days for which the backup is to be stored. - *db\_backup\_dir:* Enter the path where the backup should be saved. - *db\_backup\_filename:* Enter the file name of the backup. - *db\_backup\_tables:* Select the database tables to be backed up. ### Area *Devices* - *terminal.localfile:* Enter the directory for the trigger file that triggers the creation of the *terminal.ini* file. - *terminal.parameter:* Enter the directory in which parameter files for devices from the manufacturer Dormakaba are to be stored. - *term.ip.gid:* Specify the limit for the GID that can be assigned to a device. - term.ip.did: Specify the limit for the DID that can be assigned to a device. - *INTUS COM Directory:* Enter the directory where INTUSCOM is located. ### Area *Control Management* In the field *control.management.filelocation*, enter the directory in which parameter files for devices from the manufacturer Dormakaba are to be stored when they are created using control management. ### Area *Logging* In this area, you can use the field *logs\_directory* to specify the directory to be sent to the recipients (specified in the field *logs\_recipients*). Press *Send logs* to start sending. - *log\_directory*: The directory in which JaniWeb stores log files. - *log\_limit*: The maximum size of log files. - *log\_count*: The maximum number of log files. - *log\_level*: The logging level. ### Area *License Violation* Specify the threshold from which you would like to be informed about the current license usage. - *license\_usage\_email\_recipient:* Enter the email address to which information about license usage should be sent. Press the plus icon to add additional email recipients. - *license\_violation\_email\_recipient:* Enter the email address to which license violation information should be sent. Press the plus icon to add additional email recipients. ### Area *Other* Here you can define various other basic settings. - *inactivity\_time:* This value defines after how many minutes of inactivity a user will be automatically logged out. This is a global value that applies to all users. It can be overridden for individual users using the *Session Timeout (minutes)* setting in the [Users](https://manual.drakos.de/books/janiweb-j92/page/users) menu. - *booking\_report\_limit*: Use this option to define the maximum number of results displayed in the booking report. - *Delete archived booking records after (days):* Use this option to specify the number of days after which archived bookings are deleted. This does not affect archived bookings themselves. - *badges\_limit:* Specify here how many people can be loaded at once (e.g. via the menu item *Persons*). - *disable\_cookie\_login:* Activate this option if you do not want a cookie to be stored when logging in via the mobile application. - *Force Desktop Version:* Once this option is activated, the application will be shown always in the desktop version, even if it will be called from a mobile device. - *Extended names search:* This option must be activated if the first name and surname are split between the database fields hrcc1dnperso01.edit\_name and hrcc1dnperso01.sort\_name. - *Old Design*: Starting with version 2.0, JaniWeb has a new look. If you want to use the old look, you must enable this option. ## Tab *Literals* This is where you can edit the terms used in the JaniWeb user interface (tab *Literals*) and *Help texts* for various languages.**IMPORTANT:** If you change the terms used in the user interface, the operating instructions will no longer match the product. Drakos assumes no liability for the consequences of such changes.
## Tab *Import* You have the option to initially import personnel master records from a CSV file. The following fields describe a personnel master record. Entries with an *X* in the column *Mandatory* must be filled.| **Name** | **Data type** | **Table** | **Mandatory** |
| admin\_unit\_id | char (4) | hrcc1dnperso01 | |
| source\_sys | varchar (10) | hrcc1dnperso01 | X |
| timeid\_no | char (24) | hrcc1dnperso01 | |
| from\_date | date | hrcc1dnperso01 | X |
| to\_date | date | hrcc1dnperso01 | X |
| timeid\_version | char (1) | hrcc1dnperso01 | |
| perno | varchar (11) | hrcc1dnperso01 | X |
| first\_name | varchar (40) | hrcc1dnperso01 | X |
| last\_name | varchar (40) | hrcc1dnperso01 | X |
| langu | char (1) | hrcc1dnperso01 | |
| langu\_iso | char (2) | hrcc1dnperso01 | |
| subsystem\_grouping | char (3) | hrcc1dnperso01 | |
| access\_control\_group | char (2) | hrcc1dnperso01 | |
| personal\_code | char (4) | hrcc1dnperso01 | |
| comp\_code | char (4) | hrcc1dnperso01 | |
| costcenter | varchar (10) | hrcc1dnperso01 | |
| customer\_field\_1 | varchar (20) | hrcc1dnperso01 | |
| customer\_field\_2 | varchar (40) | hrcc1dnperso01 | |
| company\_id | varchar (4) | hrcc1dnperso01\_data\_relation | |
| prohibition | char (1) | hrcc1dnperso01\_data\_relation | |
| prohibition\_reason | varchar (150) | hrcc1dnperso01\_data\_relation | |
| ident | varchar (2) | hrcc1dnperso01\_data\_relation | |
| varchar (100) | hrcc1dnperso01\_data\_relation |
| **Field** | **Values** | **Description** | |
|---|---|---|---|
| gruppe | Terminal group from term\_down => htyp. If no match is found, DEFAULT is used. | These 4 columns declare from where to start loading the options for a booking. | |
| sprache | ISO language code from hrcc1dnperso01 => langu\_iso. If the language is not available, DE is used. | ||
| hersteller\_id | D, K, PCS | Manufacturer from term\_down => hersteller\_id | |
| satza | Terminal record type of the booking. If not available, the record type falls back to an empty string. | ||
| sapsatza | SAP record type (e.g. P10, P20) to be transferred to SAP. If this field is filled, hrcc1upteven01 is served. | Fields for hrcc1upteven01 | |
| sapinfo | Additional SAP information, which is transmitted in customer\_field\_1. Mainly for P60 (e.g. }{AM0001). | ||
| security answer | **Comma separated** **Semicolon separated** Static response text to the terminal. | Field antwort 1 / field info 1 The texts of the two fields are concatenated. Field antwort 1 / fields info x antwort is output first, followed by all info fields with the length specified in ilen. Fields antwort x / fields info x A field from antwort and one from info are displayed alternately. Fields are separated by commas. The fields separated by a semicolon are applied in the anhang\_flag field with the saldo flag set. zmail = hrcc1dnperso01.mail\_indicator imail = hrcc1dnbalan01.time\_eval\_mail\_indicator Literals for zmail, imail will be configured in following table: imail = (**SELECT** **`text`** **FROM** **`mail\_texte`** **WHERE** **`kennzeichen`** = 'I' **AND** **`wert`** = iflag); zmail = (**SELECT** **`text`** **FROM** **`mail\_texte`** **WHERE** **`kennzeichen`** = 'Z' **AND** **`wert`** = zflag); | |
| info | name, statv, info1, info2, info3, info4, info5, info6, info7, info8, info9, infoa, imail, zmail, lbook | **Comma separated** **Semicolon separated** Dynamic response text to the terminal. Is mainly read from hrcc1dnbalan01. | |
| iform | R, L | Specifies on which side the spaces are output for stretching to the length specified in the field of the dynamic texts. R stands for right-aligned text and thus for the left side. With L, it is exactly the other way around. | |
| ilen | Determines the length with which the fields for info are read, left-aligned. If the field is 0 or empty, the function section is skipped. | ||
| db | **Separated by commas** Number of seconds searched backwards for a dynamic booking error. | If a dynamic booking error is triggered, this refers to a new line in the funktion\_texte. The original 4 fields (gruppe, sprache, hersteller\_id and satza) are queried again, regardless of whether one or more of the criteria could not be found. This means that even if the sentence type, for example, was not available in the language langu\_iso, the new check still starts with this. Dynamic booking errors can take the form of double bookings, plausibility checks, booking sequences and replacement bookings. **Attention:** This function can be used to configure an endless loop that is not intercepted by the dmgr function! | |
| ppc | **Regex field** **Separated by commas** One or more record types that trigger the dynamic posting error. A leading exclamation mark negates the field. | ||
| pps | **Regex field** **Separated by commas** Describes all postings that should be held against the check. The triggering posting must also be represented. | ||
| ppe | **Separated by commas** Reference to the record type in the field satza, with which the program should continue when the trigger occurs. | ||
| statv | **Separated by commas** Has two fields that provide the text for a clock-in and clock-out response when tracking status. Can only be used in connection with a sapsatza P01 or S*NN*. With P10, the status is checked for a flat rate of 10 hours in the past, but a P01 booking is also transferred to SAP for this. With S*NN*, *NN* indicates the number of hours until the reset. In this case, a P10 or P20 booking is also transferred to SAP. | ||
| anhang | Defines a fixed booking attachment, which is set if the booking does not have its own booking attachment. | ||
| anhang\_flag | anab, costc, extwa, saldo | Defines how the booking attachment is to be interpreted. **anab** Causes the attachment to be written to the att\_abs\_reason field in hrcc1upteven01. **costc** Causes the attachment to be written to the costc field in hrcc1upteven01. **extwa** This is only defined, but does not yet fulfill any function. **saldo** If this flag is set, an integer is expected as a booking attachment. This number then selects the respective field from the columns antwort and info, separated by semicolons. If the number is larger than answers and infos are defined, the last field is used. | |
| 24x7 | **OBSOLET** Overrides the time profile check. | ||
antwort | info | iform | ilen | |
|---|---|---|---|---|
| R1 | 0 | Returns a simple “R1” to the terminal. By setting ilen to 0, the function skips reading hrcc1dnbalan01 and formatting the values, thus saving processing time. | ||
| R1Hello | name | L | 20 | Outputs a booking confirmation, a greeting, and the name from hrcc1dnperso01 left-aligned, limited to 20 characters. It is important to ensure that the correct number of spaces is inserted after the greeting to obtain a line break. The length specified in ilen does not influence the response! |
| R40 | info1,info2,info3 | R | 8 | First outputs an “R40” and then outputs the fields info\_1, info\_2 and info\_3 from hrcc1dnbalan01, fixed to 8 characters, right-aligned. |
| R1Hello,Balance: | name,info\_1 | L | 20 | First “R1Hello” is displayed, then the name (20 characters long, left-aligned), the text “Balance: ” and finally the info\_1 field from hrcc1dnbalan01. Again, make sure that the number of spaces in the column antwort is correct so that the texts are properly indented on the terminal. |
| R40 | info1,info2,info3;info4,info5,info6 | R | 8 | If the anhang\_flag is set to saldo, an integer is expected in the booking attachment. This determines which of the fields separated by semicolons is selected. If the integer is greater than the number of fields, the last field is selected. In this example, if the value is 2, the only available field in antwort and the second (i.e. info4-6) would be used. |
satza | db | ppc | pps | ppe | |
|---|---|---|---|---|---|
| BT | 60 | BT | BT | @ | Checks in the last 60 seconds against itself in a BT and thus triggers a simple double booking block. |
| B1 | 36000 | B1 | B\[12\] | @ | In the last 10 hours, checks B1 bookings against all B1 and B2 bookings. This is a plausibility check. If the last booking is B1, a double booking block is triggered. |
| A1 | 36000 | !B1 | B\[123\] | B1 | Checks whether the last booking from B1, B2 and B3 is not B1 and then refers to B1. This is a replacement booking that could be checked at a turnstile entrance. |
| A1 | 36000 | B\[23\] | B\[123\] | B1 | Same check as in the example above, only without negation. |
| A1 | 36000,36000 | BS,!B1 | B\[ES123\],B\[123\] | BE,B1 | First, BS (break start) is checked against BS, BE (break end), B1, B2 and B3. If a break start was last posted, the system now checks for a break end. It then checks again to see if another absence exists, as in the previous example. If this is the case, the system checks for B1. If none of these apply, it remains an A1 booking. **Important:** The db field must contain two values, otherwise the other fields in ppc, pps and ppe are not checked. |
| A1 | 84000 | !\[AB\]\[023\] | X | An A1 booking may only be made if an A0, A2, A3, B0, B2, or B3 booking has been made in advance. If this is not the case, error X will be displayed. |
satza | sapsatza | antwort | info | ilen | statv |
|---|---|---|---|---|---|
| BT | P01 | R1 | statv, name | 20 | Guten Tag , Auf Wiedersehen |
An Active Directory can also be used for employee logins. For employee logins, it is not necessary to create each user manually. This is only required for administrator logins.
### Lists of rolls Roles are used to assign JaniWeb permissions to the user. Drag one or more roles from the right-hand list *All Roles* to the left-hand list *Assigned Roles*. Use the menu item [Settings > Roles](https://manual.drakos.de/books/janiweb-j92/page/roles) to define roles. --- ##### TIPS By assigning a site, you can determine which configuration should be used to display the fields in the menu items *Persons* or *Visitors*. # Roles **Use the menu item *Roles* to define the permissions that can be assigned to users via roles. A distinction is made between permissions for the individual menus and permissions for data.** [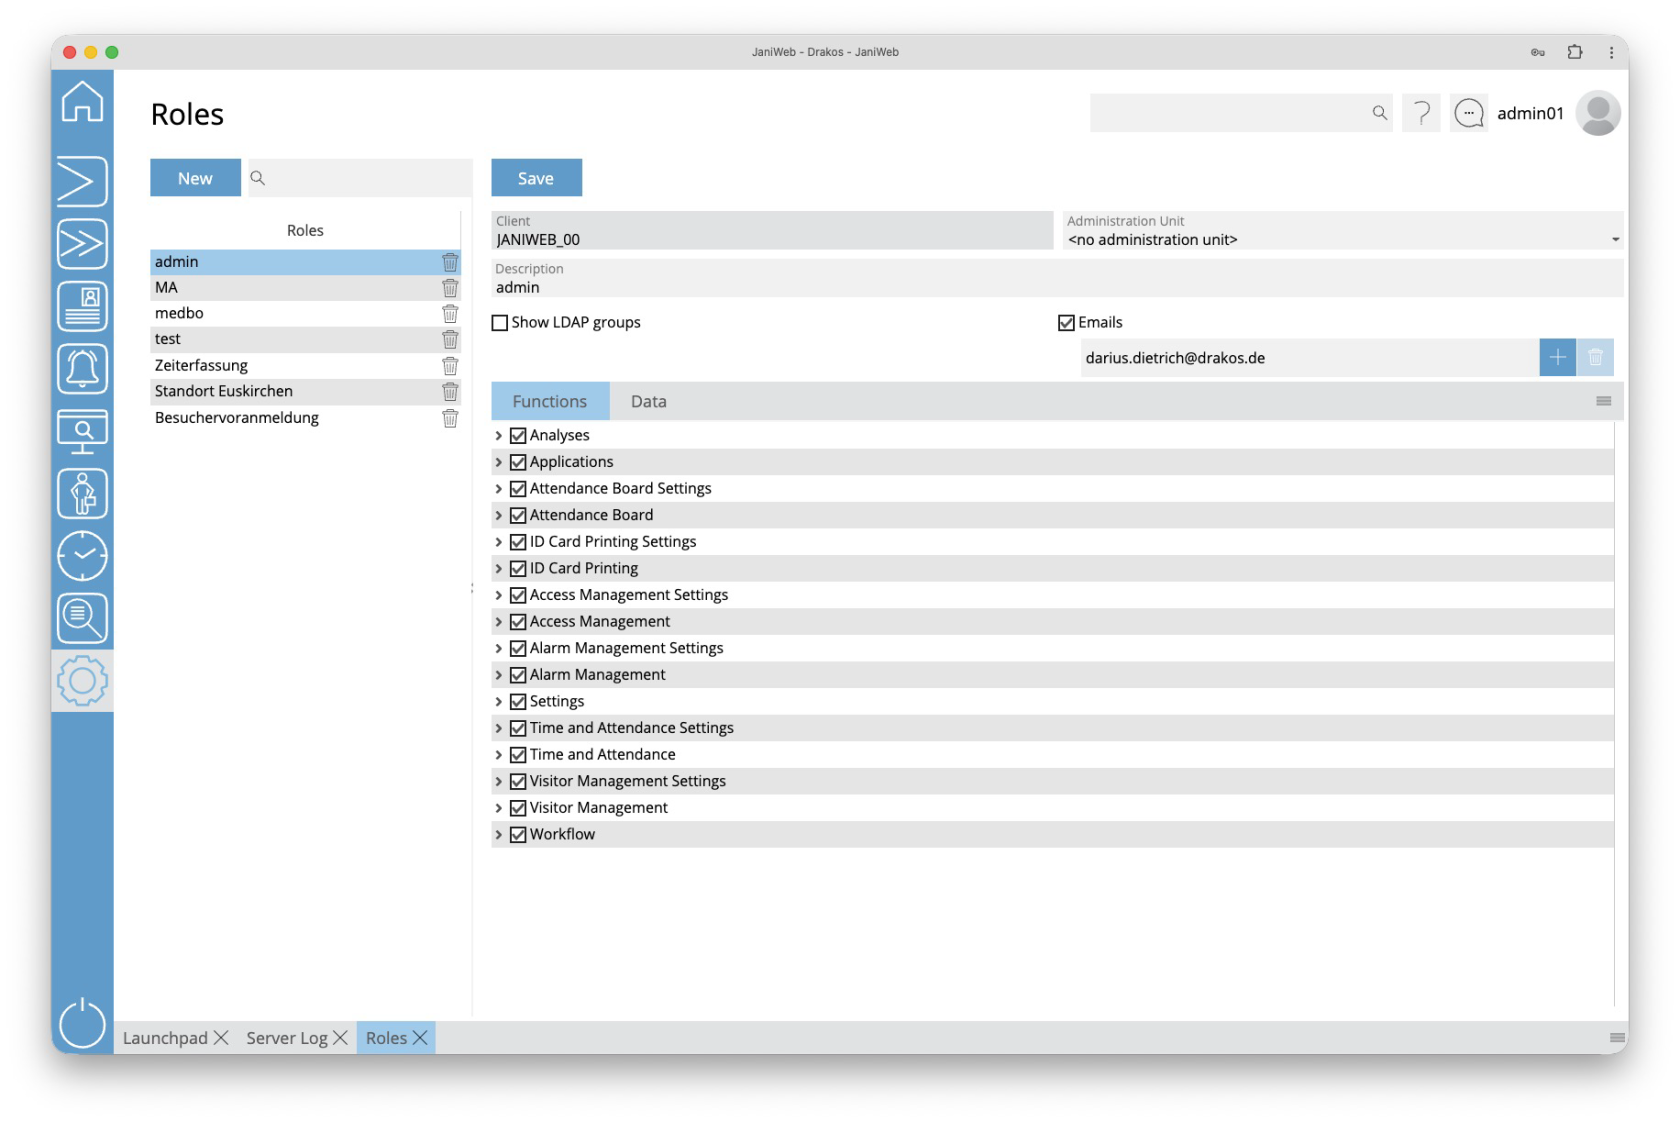](https://manual.drakos.de/uploads/images/gallery/2026-02/XfCimage.png) ## List of rolls The list contains the rolls already created. - Select an entry to view details. - Use the corresponding trash icon to remove a roll.**Attention:** Roles assigned to users can also be removed. These users will then no longer have the permissions from the corresponding role.
### Button *New* 1. Press *New* to create a new role. 2. Enter a meaningful *Description*. 3. If the role is to affect employee logon permissions, activate the option *Employee Role*. 4. Press *Save*. ### Detail area Specify additional details and the permissions for the role. - *Show LDAP groups:* Select this option if the role should map permissions for LDAP users. Then add the corresponding LDAP group(s) using the plus icon. Enter the complete Distinguished Name (DN). - *Emails*: Add Emails for Users which should also use the Admin-Login via SSO. - *Employee Role:* An employee role has fewer permissions than other roles. For example, people with this role cannot create or change devices and do not have access to settings. An employee role is automatically assigned to the people who are assigned on the tab *Data* under *Employee Groups* and activated in the column *Permissions*. It is possible to create different employee roles for parts of the employees to unlock different functions. #### Tab *Functions* This is where you define the access rights for the menu. - Select the menu items in the menu structure for which you want to grant access rights. - If menu items allow you to *Change* data, a checkbox with the same name appears. Select this option if you want the role to be able to change this data. #### Tab *Data* This is where you define the permissions for accessing data, subdivided according to the data’s affiliation. The parent permission is always provided by the client associated with the data. If the client does not have this permission, the data is read-only, even if the child data has permission. - Select an element in the column *Permission type*. - Select the checkbox in the column *Permission* for each item you want to grant permission for. - Select the checkbox in the column *Change* if you want the role to allow modification of this data. - Use *Employee Groups* to restrict the permission to display personnel master records. Only the personnel master records of the person groups that are activated in the column *Permissions* are displayed. --- ##### TIPS If a role should have permission for all newly created data of a type, activate the element *All new \[data type\]*. # Administration Units **You can use this menu option to create *Administration Units*. Administration units allow you to group objects according to their affiliation, so that you can assign permissions for several objects at once.** [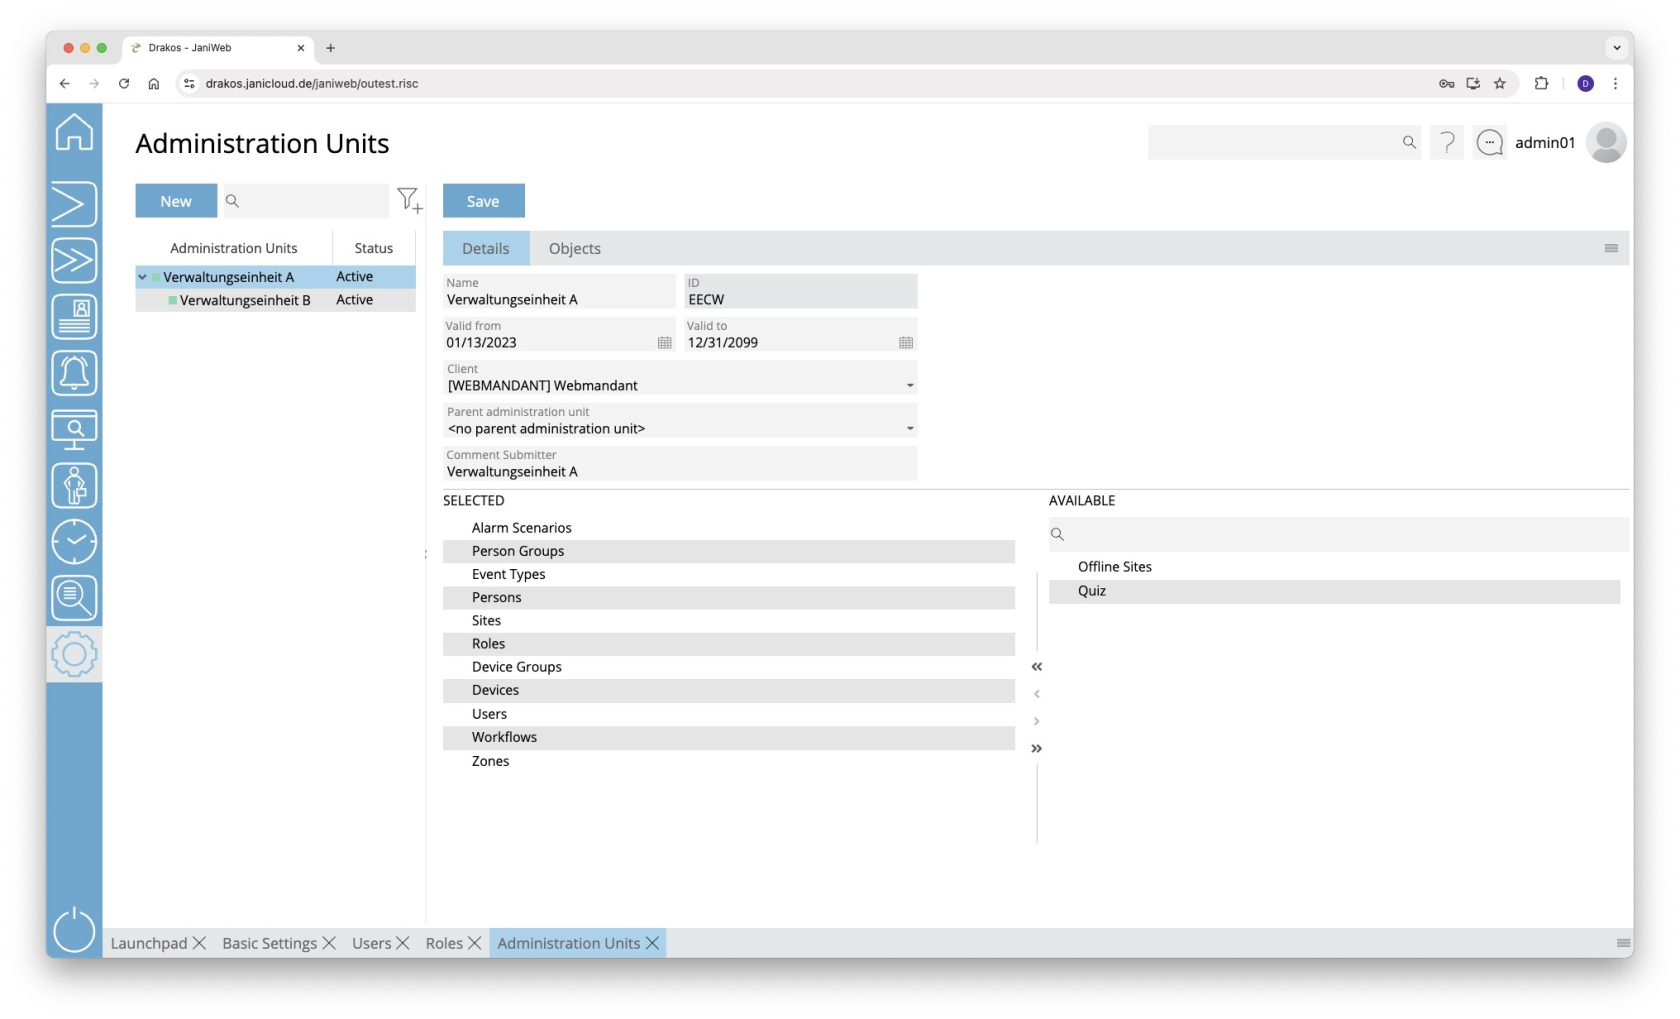](https://manual.drakos.de/uploads/images/gallery/2025-10/07ximage.png) ## List of administration units The list contains the already created administration units. ### Button *New* Press *New* to create a new administration Unit. Enter a *Description* and any additional information, and press *Save*. ### Tab *Details* Use the lists in the lower area to define which object types the administration unit can contain. - Drag the required elements from the right-hand list *Available* to the left-hand list *Selected.* - Press *Save* to confirm. ### Tab *Objects* The objects linked to the administration unit appear here. --- ##### TIPS Administration units can be structured hierarchically. This means that you can assign one administration unit to another. To do this, select the parent administration unit in the details. For example, you can first create a top-level administrative unit for the entire site. Then you can create subordinate administrative units for parts of the site. As soon as you assign a permission for a top-level administrative unit, the objects of the lower-level administrative units are included. # Jobs **The menu item *Jobs* allows you to manage the actions (cron jobs) that JaniWeb automatically executes in the background at certain intervals.** [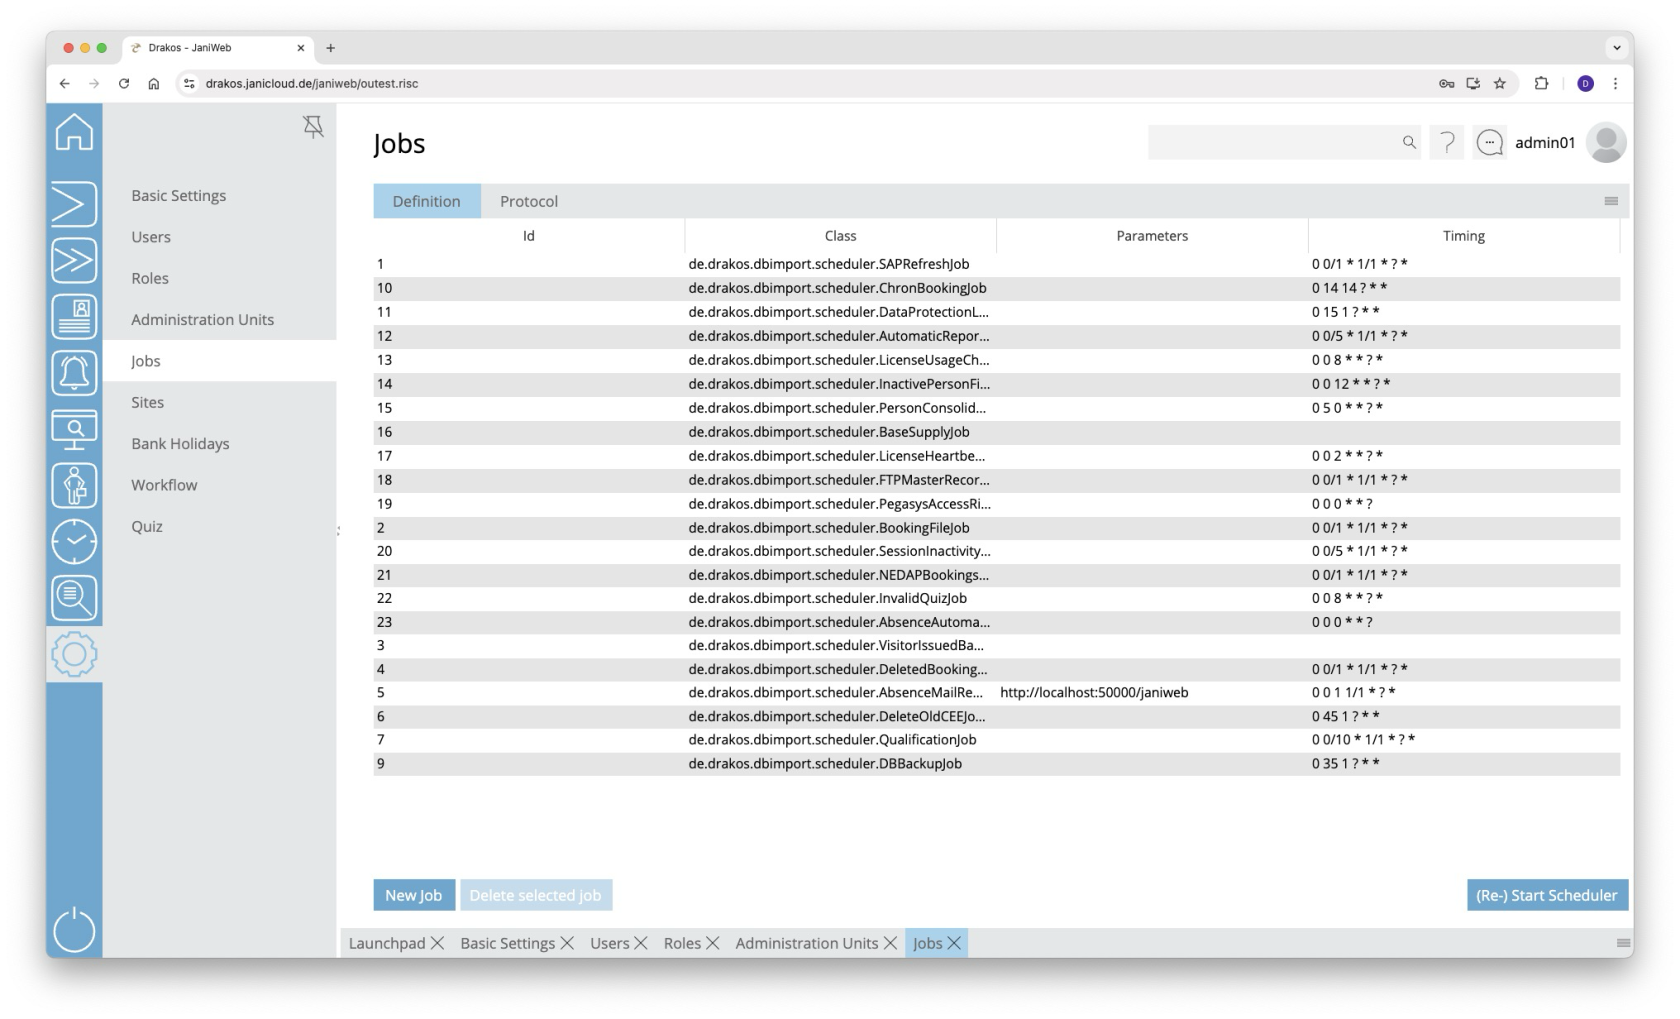](https://manual.drakos.de/uploads/images/gallery/2025-10/N7eimage.png) ## Tab *Definition* The list contains all the jobs that have already been created. Double-click on an entry to change the definition of the job. ### Button *New Job* Press *New Job* to create a new job. Enter the function to be called in the field *Class*. Enter when the task is to be executed in the field *Timing*. For details, see the section [*Time format*](https://manual.drakos.de/link/259#bkmrk-zeitsteuerung-richti) below. ### Button *Start Scheduler* After you have changed an existing job or created a new one, you must restart the scheduler. To do this, press *Start Scheduler*. ## Tab *Protocol* Here you can display a list of the jobs that have been executed. 1. Enter a start time. 2. (Optional) Enter an end time (*To*). 3. (Optional) Select a status to narrow the list. 4. Press *Show executed jobs*. ## Overview of the jobs| **Job** | **Description** |
| de.drakos.dbimport.scheduler.SAPRefreshJob | Import master data |
| de.drakos.dbimport.scheduler.AutomaticReportJob | Send automated reports |
| de.drakos.dbimport.scheduler.LicenseUsageCheckerJob | Check license usage |
| de.drakos.dbimport.scheduler.InactivePersonFinderJob | Check inactive personnel records |
| de.drakos.dbimport.scheduler.PersonConsolidationJob | Consolidate personnel master data import |
| de.drakos.dbimport.scheduler.BaseSupplyJob | Master data calculation for basic supply |
| de.drakos.dbimport.scheduler.LicenseHeartbeatJob | Heartbeat for pay-per-use license |
| de.drakos.dbimport.scheduler.FTPMasterRecordJob | Dormakaba master data distribution |
| de.drakos.dbimport.scheduler.PegasysAccessRightsCheckerJob | Check Pegasys authorizations |
| de.drakos.dbimport.scheduler.BookingFileJob | Export booking data |
| de.drakos.dbimport.scheduler.SessionInactivityCheckJob | Check session |
| de.drakos.dbimport.scheduler.DeletedBookingsFileJob | Export deleted bookings |
| de.drakos.dbimport.scheduler.AbsenceMailReminderJob | Reminder of absences in workflow |
| de.drakos.dbimport.scheduler.DeleteOldCEEJobRecordsJob | Cleanup CCEEJobExecutionProtocol |
| de.drakos.dbimport.scheduler.QualificationJob | Check permissions based on qualifications |
| de.drakos.dbimport.scheduler.DBBackupJob | Backup database |
| de.drakos.dbimport.scheduler.ChronBookingJob | Archive booking data |
| de.drakos.dbimport.scheduler.NEDAPBookingsJob | NEDAP bookings |
| de.drakos.dbimport.scheduler.DataProtectionLogicJob | Data protection audit |
| de.drakos.dbimport.scheduler.AbsenceRejectedByLeadingSystemJob | Sends E-Mails to inform about absences which were rejected by leading system. |
| de.drakos.dbimport.scheduler.InvalidQuizJob | Sends E-Mails to inform about quiz, which will get inactive soon. |
| de.drakos.dbimport.scheduler.AutomaticVisitStatusJob | Sets status for visits according bookings done by visitors at devices. |
| de.drakos.dbimport.scheduler.AbsenceAutomaticApprovalJob | Automatically approves absences after a certain period. |
Alternatively, you can also define the respective workflow for individual absence types in the module *[Time and Attendance > Settings > Tab Absence](https://manual.drakos.de/link/236#bkmrk-abwesenheit)*.
--- ##### TIPS A [Workflow Report](https://manual.drakos.de/books/janiweb/page/workflow) allows you to track all approvals. # Quiz **Using the *Quiz* menu item, you manage the quizzes in your system. Here you can create new quizzes or modify the details of existing ones.** [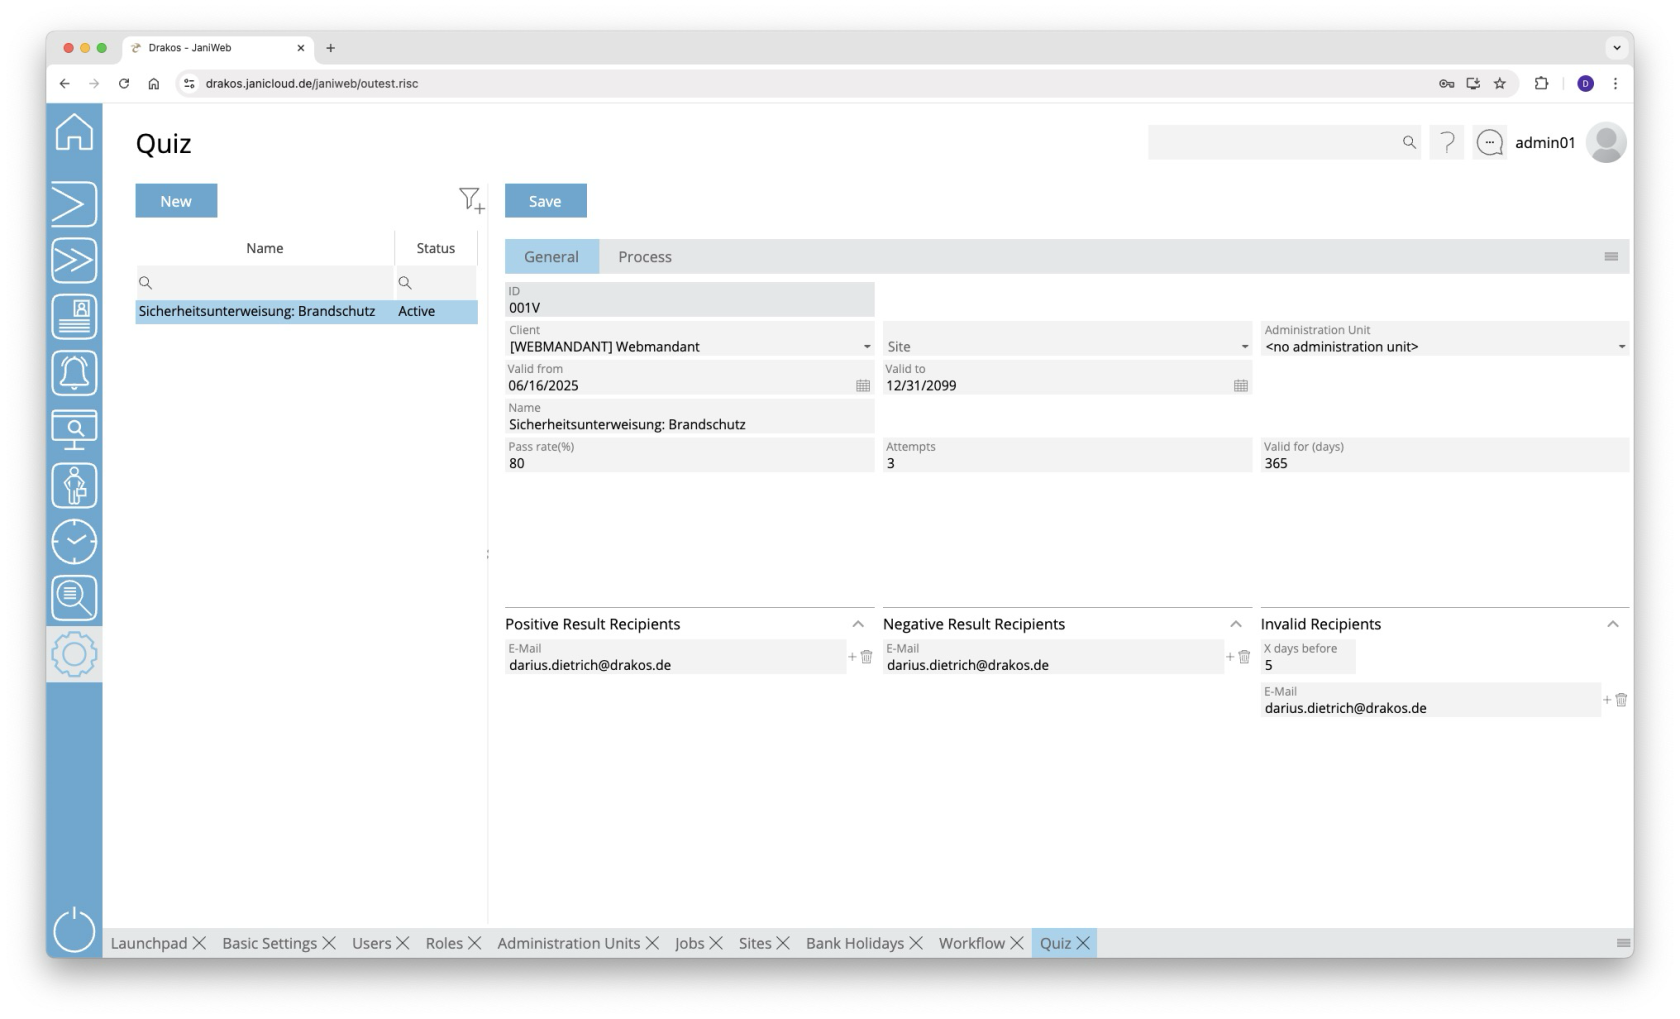](https://manual.drakos.de/uploads/images/gallery/2025-10/H1Timage.png) ## List of Quizzes The list contains the quizzes that have already been created. Select a quiz to display details. The list offers the following options: - **Filter by client, site and status:** Click on the filter icon. Select the client, site or status (Active, Active in the future, Inactive) for which quizzes should be displayed. Changes are visible immediately. - **Search in columns:** Enter text or numbers in the search field (magnifying glass symbol) of a column to search by name or status. The entries have an immediate effect: The list only shows hits. ## Button *New* Press *New* to create a new quiz. Enter the required information about the quiz on the *General* tab and press *Save*. ## Button *Copy* You can copy an existing quiz to use as a basis for a new quiz. Click *Copy* at the top to make the desired changes. Then click *Save*. ## Tab *General* This is where you enter and edit data such as name, client and validity for the quiz. Use the *Pass rate (%)* field to specify the percentage of questions that must be answered correctly for the quiz to be considered passed. The *Attempts* field specifies how often the quiz may be repeated in the event of a failed attempt. The *Validity (days)* field specifies how long the quiz remains valid after it has been passed. In the *Positive result recipients* area, you can enter e-mail addresses that are automatically notified when the quiz is passed. In the *Negative result recipients* area, you can enter e-mail addresses that will be notified if the quiz is not passed. In the *Invalid recipients* area, you can define e-mail addresses that will be notified before the quiz expires. The *X days before* field determines how many days before expiry the e-mail is sent. ## Tab *Process* With a quiz, you have the option of creating training courses, such as a safety briefing. These can be integrated into the pre-registration process for visitors, for example. On this tab, you use slides to define the procedure for such a training course. - **Insert slide:** Drag the required modules in the desired order into the area of the respective location or press the button with the + to select the corresponding slide in the following dialog. - **Reorder slides:** Drag the slides to the desired location. - **Edit slides:** Use the *edit icon* to specify details for the respective slide. - **Remove slides:** Use the recycle *bin icon* to remove a slide from the sequence. #### The slides at a glance ##### Introduction slide - **Define title and text:** Enter a title and text to be displayed on the slide. Use the *Translate* button to enter the title and text in the desired languages. - **Insert image:** - Use the *Upload image* button to add an image that will appear on the slide. Save your entries using the *Save* button. ##### Preparatory slide The preparatory slides are intended to convey the knowledge that will be tested in the subsequent questions and answers slides. - **Define title and text:** Enter a title and text to be displayed on the slide. Use the Translate button to enter the title and text in the desired languages. - **Insert image or video:** - Use the *Upload image* button to add an image that will appear on the slide. - Alternatively, you can embed a YouTube video: Click on *Set link* and enter the YouTube link in the respective language field. Save your entries using the *Save* button. ##### Question and Answer Use this slide to define a question with the corresponding answer options. - **Define title and question:** Enter a title and a question that will be displayed on the slide. Use the *Translate* button to enter the title and question in the desired languages. - **Insert image or video:** - Use the *Upload image* button to add an image that will appear on the slide. - Alternatively, you can embed a YouTube video: Click on *Set link* and enter the YouTube link in the respective language field. - **Define answers:** - Define the answer options from which users should choose. - Mark which answer(s) are correct in the *Correct* column. Multiple selection is possible. - Use *Add* to add further answer options. - Use the *recycle bin* icon to delete individual answers. - Each answer can be designed as text, image or a combination of both. → Add images with *Add image*, texts with *Translate*. - **Display options:** - **Random order answers:** The answer options are sorted randomly each time the quiz is called up. - **Horizontal order:** Determines whether the answers are displayed horizontally or vertically. Save your entries using the *Save* button. ##### End slide - **Define title and text:** Enter a title and text to be displayed on the slide. Use the *Translate* button to enter the title and text in the desired languages. - **Insert image:** - Use the *Upload image* button to add an image that will appear on the slide. Save your entries using the Save button.