Time and Attendance
- Overview Bookings
- Overview Bookings Companies
- Persons
- Team Calendar
- Web Terminal
- Workflow
- Time Sheet
- Settings
- Employees Overview
Overview Bookings
The menu item Overview Bookings allows you to view time bookings (clock-in/out events). You can also edit bookings, add new bookings and display the working times resulting from the bookings.
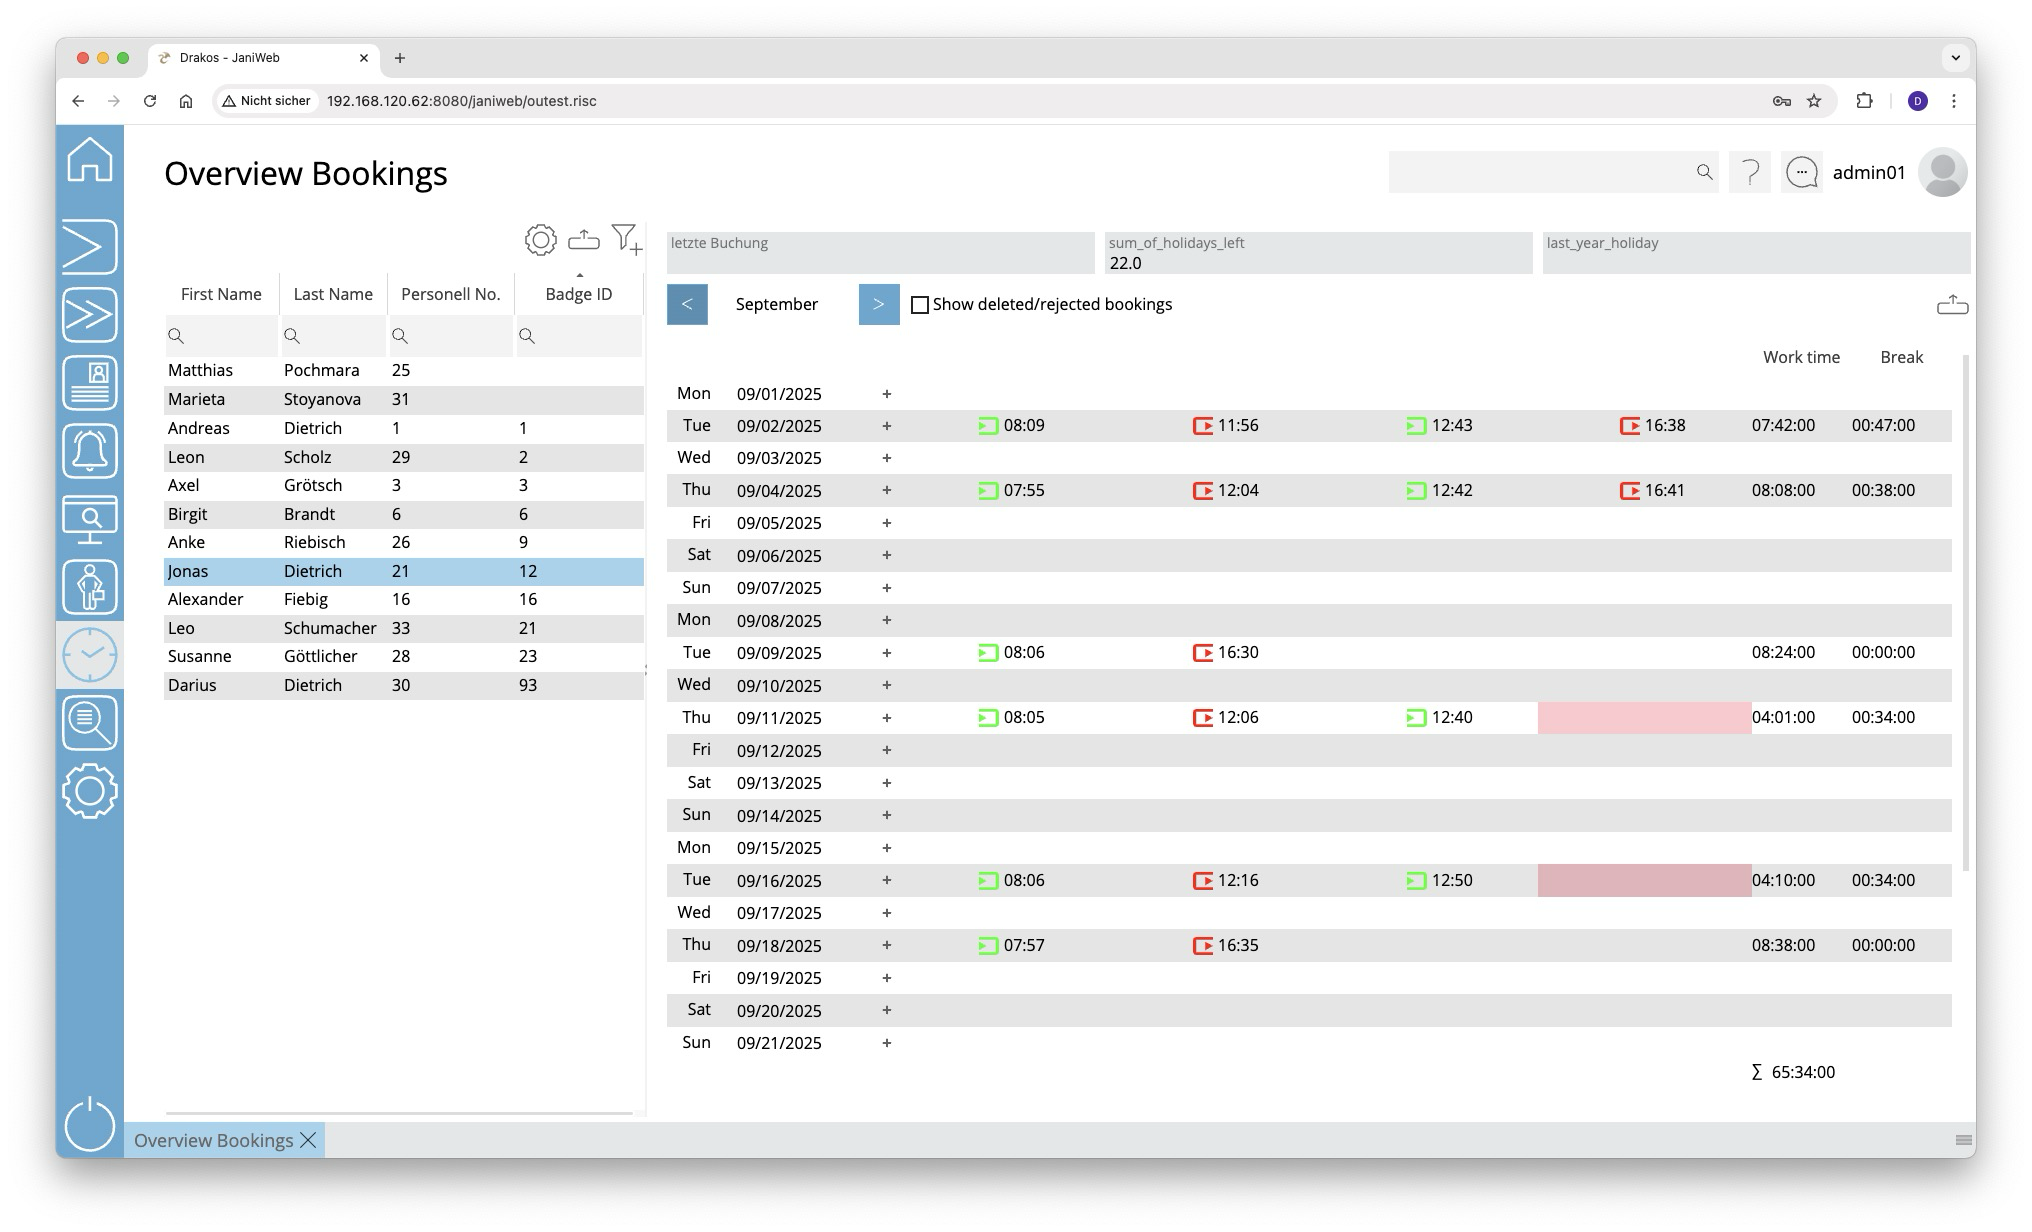
List of persons
The list contains all persons for whom time bookings are available. Select a person to view details.
The list offers the following options:
- Select columns to display: Press the gear icon. Select which columns you want to display and in which order. Arrange the columns using the mouse or the arrow icons. Press Apply to adopt the changes.
- Filter by client and status: Press the filter icon. Select the clients and the status (Active, Active in future, Inactive) for which persons should be displayed. Changes are visible immediately.
- Search in columns: Enter text or numbers in the search field (magnifying glass icon) of a column to search for names, personnel numbers, or other criteria. The entries take effect immediately: the list only displays hits.
Tip: Search for substrings. You can find “Spencer-Churchill” with “spe”, “chur” or “hill”. The search is not case sensitive. - Export the entire list: Press the download icon. Select the format in which you want to export the list. The export files are downloaded or displayed depending on the browser/operating system settings.For details on the available export formats, see the General > Export Formats chapter of this manual.
Detail area
This is where the time bookings for the selected month appear. You have the following options:
- Change period: Use the arrow icons at the top to jump to the previous/next month.
- Include deleted bookings: Select Show deleted/rejected bookings to also display such bookings.
- Add time bookings: To create a new time event, double-click in an empty field or press the plus icon and select New booking. Then select the desired booking type, enter the time and press Save to confirm.
- Add absences: To create a new absence, double-click in an empty field or click the plus icon and select New absence. Enter a period and press Save to confirm. You can recognize absence bookings by the calendar icon next to the date. Double-click the icon to display details of the absence.
If a workflow is set up for creating a booking, the status of the request is indicated by a colored background:
- Yellow: The request has not yet been approved.
- Green: The request has been approved.
Empty fields with a red background indicate an error in the sequence of bookings. This can occur, for example, if there is an incorrect sequence of attendance and absence bookings.
Column Working Time
The working time resulting from the time bookings for the day in question appears here. The total monthly working time is shown at the end of the list.
Column Break deduction
The break time appears here, which is either calculated from the break bookings or from defined working time rules. If the booked times fall short of the required break time, the break time of the working time rule(s) automatically appears here together with a clock icon.
Working time rules are specified in Settings > Working Time Report.
Exporting the booking overview
You can export the booking overview. To do so, follow these steps:
- Press the Download icon above the booking overview.
- Select a period:
- Enter the start and end date in the From and To fields, or
- select a calendar week in the Week field, or
- select a calendar month in the Month field.
- Press Show Results to load the overview.
- Press the Download icon again and select the desired export format (Excel or PDF).
Overview Bookings Companies
This menu item gives you an overview of the recorded working times of all persons assigned to a specific company.
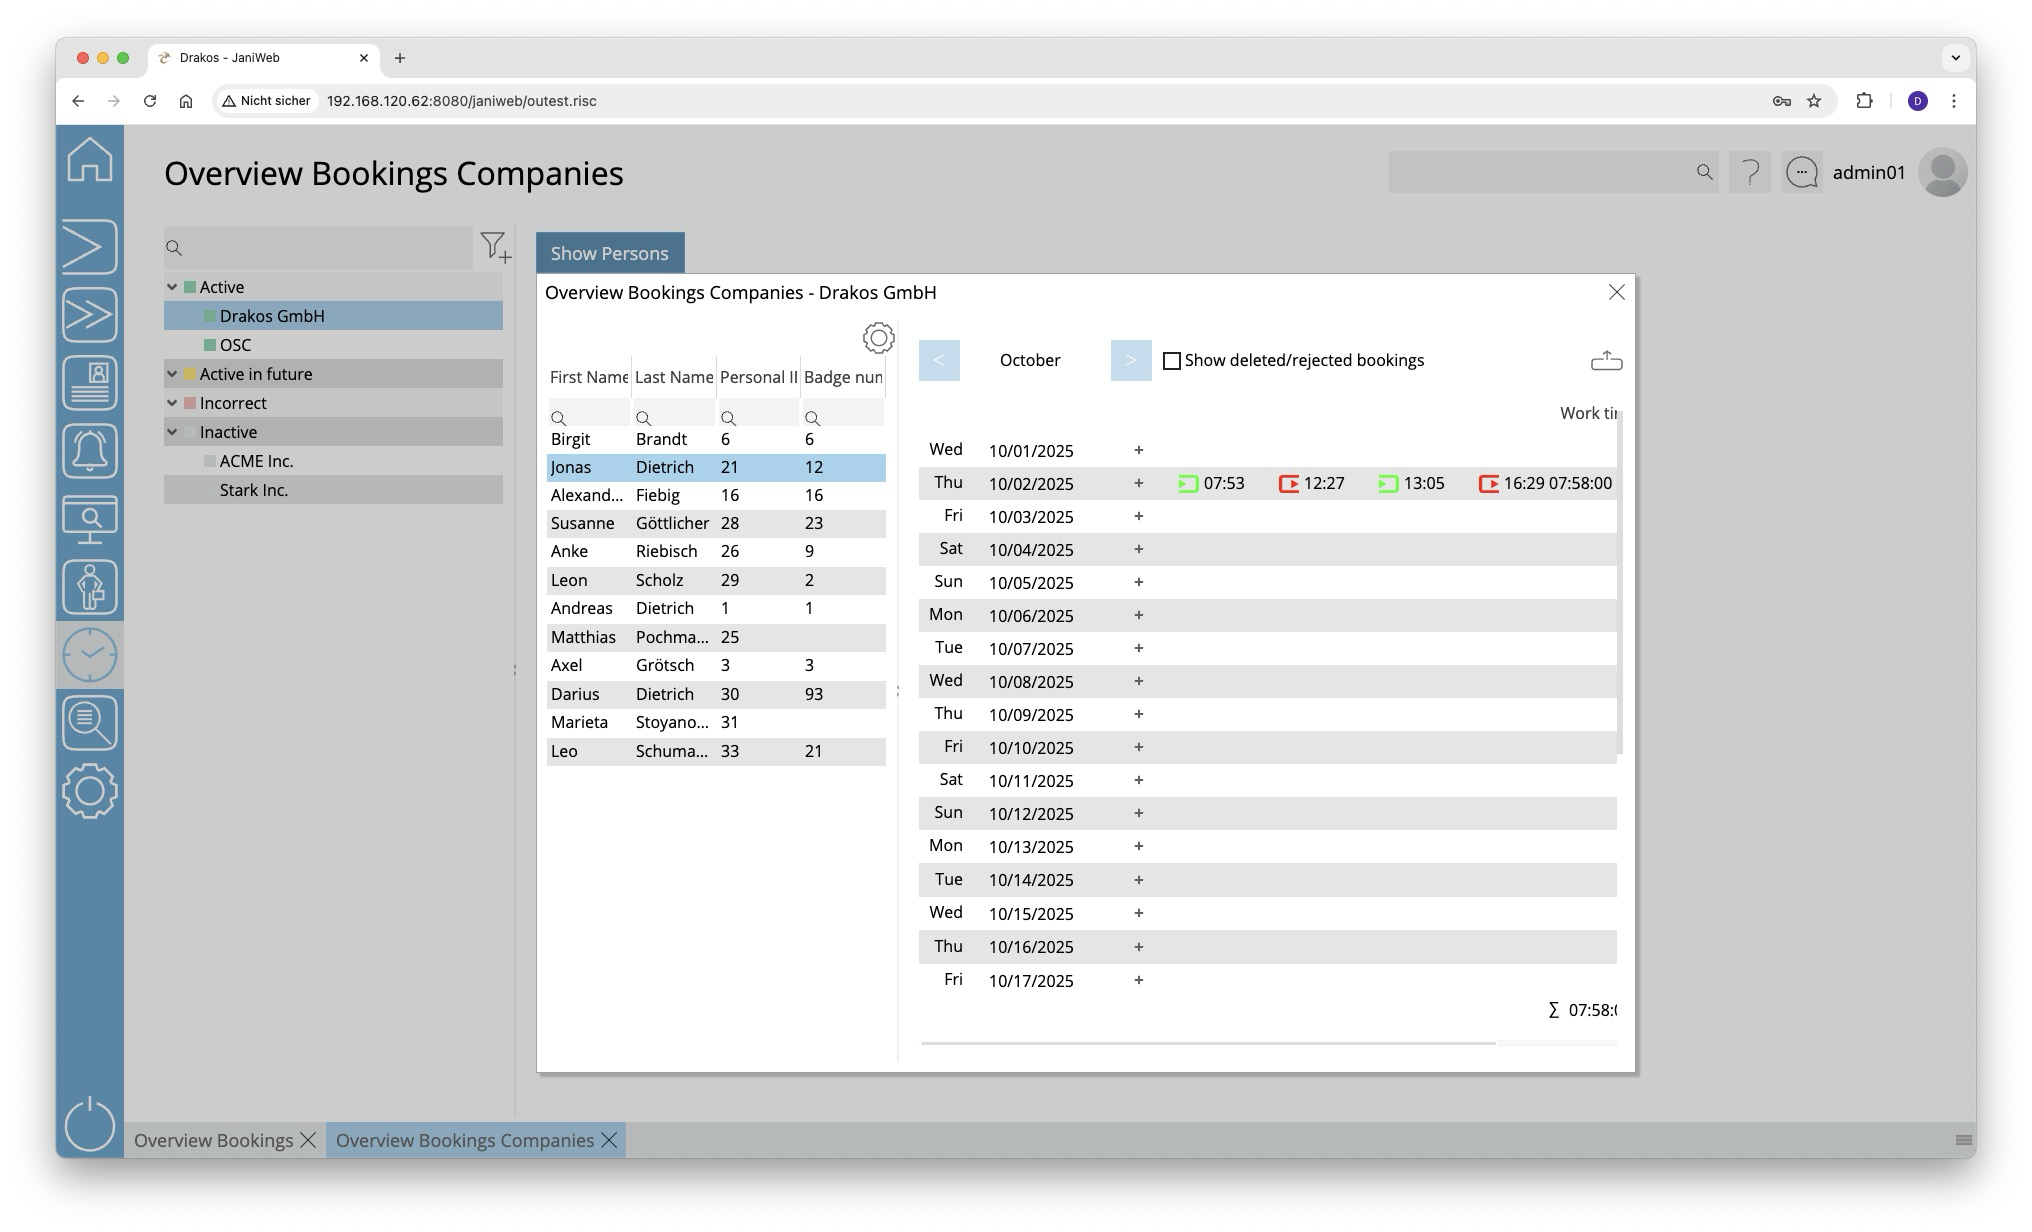
List of companies
The list contains the companies already created, sorted by their current status (Active, Active in future, Incorrect, Inactive). It offers the following options:
- Search: Enter text or numbers in the search field (magnifying glass icon) at the top to search for companies. The entries take effect immediately: the list only displays hits. The search is not case sensitive.
- Filter: Press the filter icon. Select the criteria for which you want to display companies. Changes are visible immediately.
Select a company to view the recorded working times for the current month.
Detail area
List of booked working times
The list on the left contains all working times that were recorded for this company in the selected period. Use the arrow buttons above the list to select a different month.
List of persons
The list on the right contains all persons for whom working times were recorded in the selected period, along with the total hours worked.
Button Show Persons
Press this button to view the individual bookings for a person. A pop-up window appears. Select a person from the left-hand list. The time bookings for the person in the selected period will appear on the right.
Exporting the booking overview
You can export the booking overview. To do so, follow these steps:
- Press the Download icon above the booking overview.
- Select a period:
- Enter the start and end date in the From and To fields, or
- select a calendar week in the Week field, or
- select a calendar month in the Month field.
- Press Show Results to load the overview.
- Press the Download icon again and select the desired export format (Excel or PDF).
Persons
You can manage the persons within the Time and Attendance module using the menu item Persons. Here you can also define supervisors for employees or specify substitudes for supervisors.
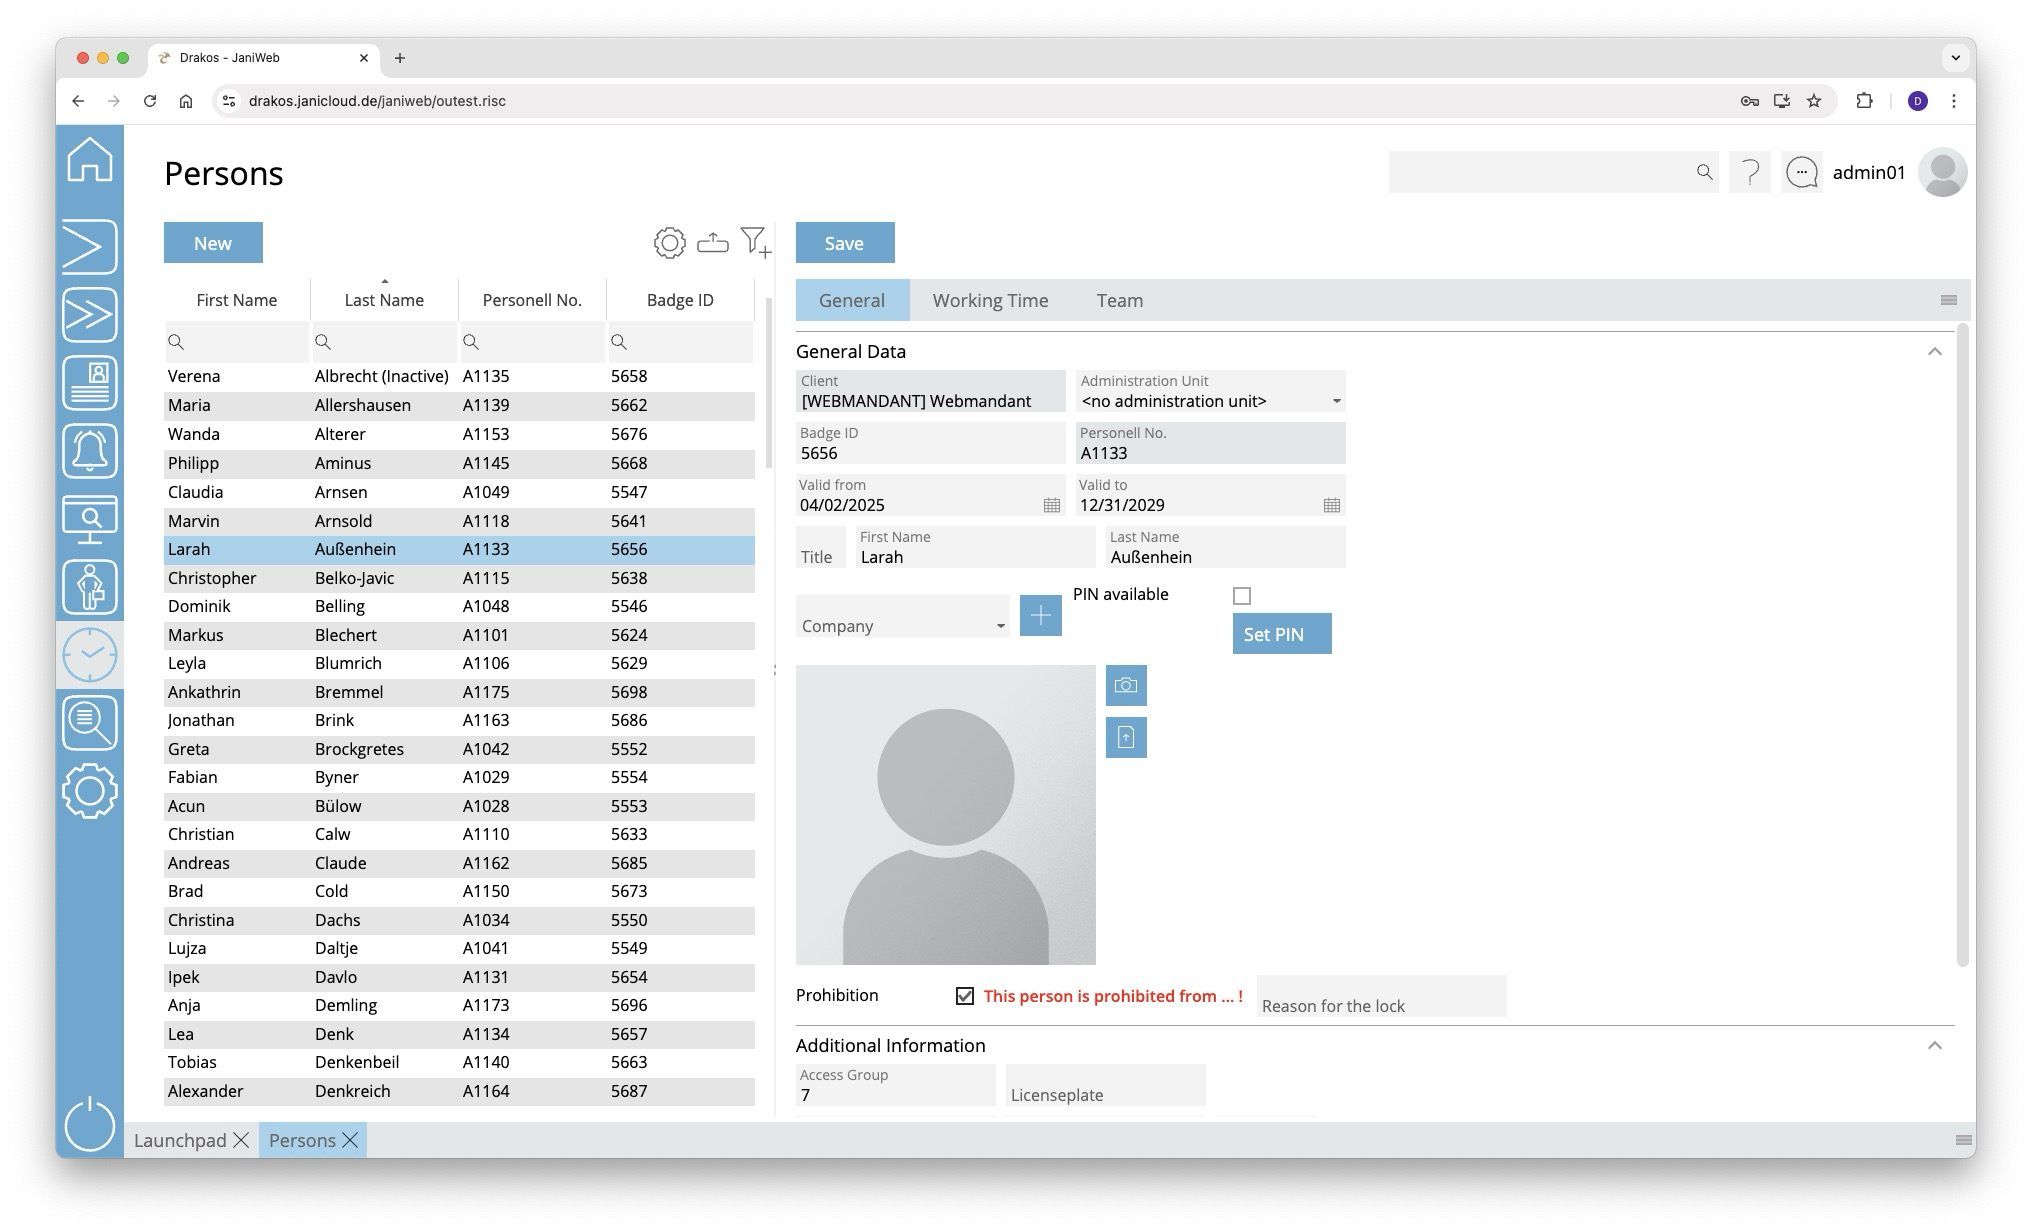
List of persons
The list contains the persons that have already been created. Select a person to view details.
The list offers the following options:
- Select columns to display: Press the gear icon. Select which columns you want to display and in which order. Arrange the columns using the mouse or the arrow icons. Press Apply to adopt the changes.
- Filter by client and status: Press the filter icon. Select the clients and the status (Active, Active in future, Inactive) for which persons should be displayed. Changes are visible immediately.
- Search in columns: Enter text or numbers in the search field (magnifying glass icon) of a column to search for names, personnel numbers, or other criteria. The entries take effect immediately: the list only displays hits.
Tip: Search for substrings. You can find “Spencer-Churchill” with “spe”, “chur” or “hill”. The search is not case sensitive. - Export the entire list: Press the download icon. Select the format in which you want to export the list. The export files are downloaded or displayed depending on the browser/operating system settings.For details on the available export formats, see the General > Export Formats chapter of this manual.
Button New
Press New to create a new person. Enter the required information about the person on the tab General Data and press Save.
Tab General Data
This is where you store and edit personal data. You can individually define which fields and areas are available here via Settings > tab General.
Personal data that is transferred from external systems (e.g. SAP) cannot be changed here. They must be edited in the respective source system.
Tab Working Time
- Leave: Enter the annual holiday for the person.
- Holiday Calendar: Select a holiday calendar for the person. This calendar will be considered in the Team Calendar for this person.
Tab Team
Select the Supervisor for the person. This determines the person to whom workflow requests for bookings and absences are forwarded. The supervisor is authorized to process such requests in the menu item Workflow.
In addition, supervisors can designate up to three Substitudes for themselves. During the substitution period, all workflow requests are also forwarded to the supervisor’s substitude.
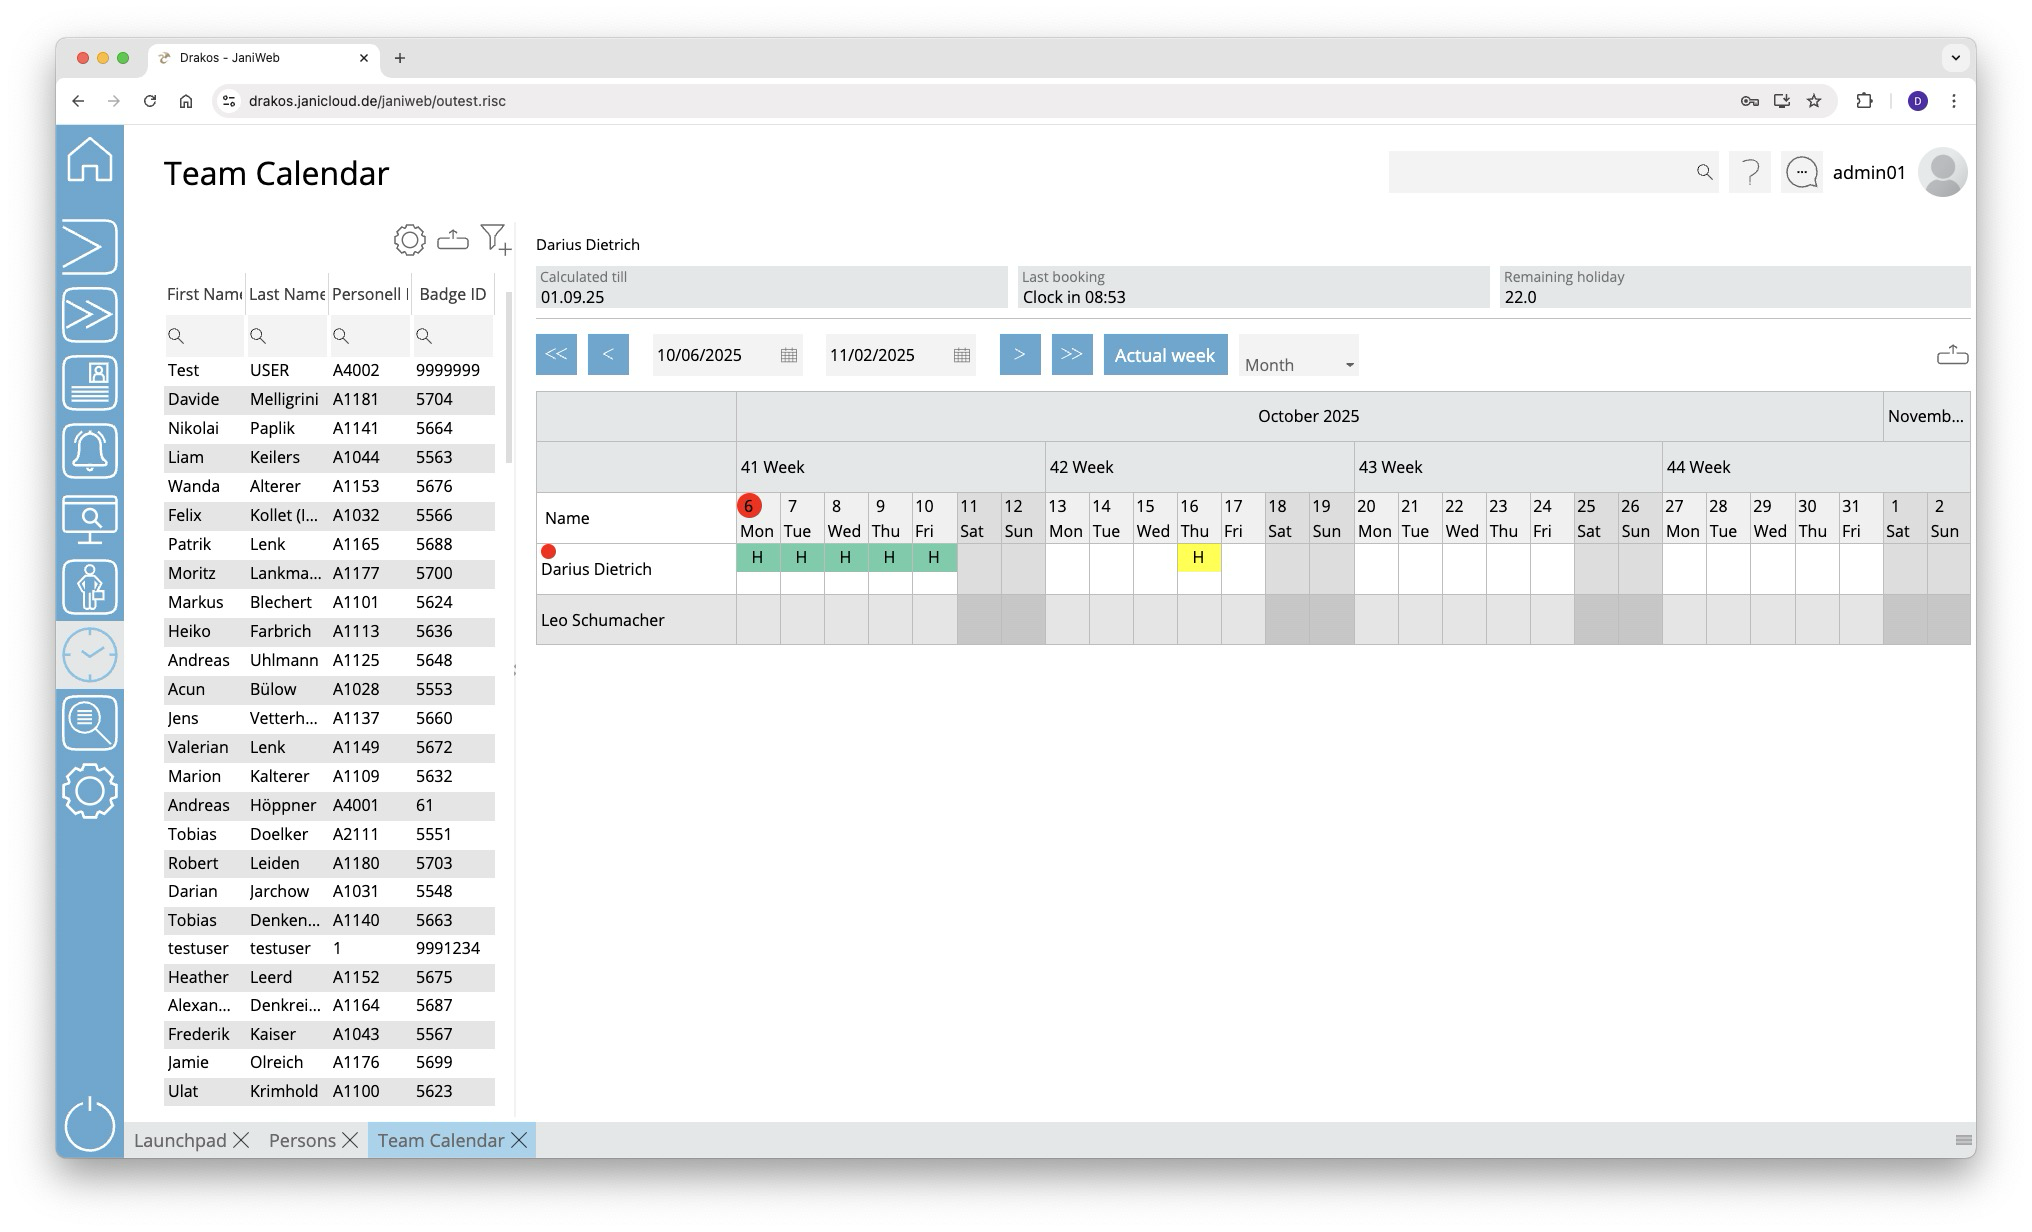
Team Calendar
The menu item Team calendar provides an overview of absences in your team and the option to edit them.
List of persons
The list contains the persons that have already been created. Select a person to view details.
The list offers the following options:
- Select columns to display: Press the gear icon. Select which columns you want to display and in which order. Arrange the columns using the mouse or the arrow icons. Press Apply to adopt the changes.
- Filter by client and status: Press the filter icon. Select the clients and the status (Active, Active in future, Inactive) for which persons should be displayed. Changes are visible immediately.
- Search in columns: Enter text or numbers in the search field (magnifying glass icon) of a column to search for names, personnel numbers, or other criteria. The entries take effect immediately: the list only displays hits.
Tip: Search for substrings. You can find “Spencer-Churchill” with “spe”, “chur” or “hill”. The search is not case sensitive. - Export the entire list: Press the download icon. Select the format in which you want to export the list. The export files are downloaded or displayed depending on the browser/operating system settings.For details on the available export formats, see the General > Export Formats chapter of this manual.
The list of persons is only visible when you log in as an administrator. When you log in as an employee, only your own team calendar is visible.
Calendar view
Use the arrow icons and selection fields to select a period. Within the calendar, you have the following options:
Create new absence
- Right-click in the field of the desired day and select Create new absence.
- Select a type under Absence.
- Enter the desired period using the From and To fields.
- Press Save.
The absence appears in the team calendar together with an abbreviation for the type (e.g. “FLT” for flextime).
Remove an absence
- Double-click on the absence. The details are displayed.
- Press Delete. A confirmation dialog appears.
Absences are marked by a colored background as follows:
- Green: absence approved
- Yellow: approval pending
- Red: absence rejected
- Blue: approval to delete pending
You can manage requests for absences in the menu item Workflow.
Exporting the team calendar
You can export the team calendar. To do so, press the Download icon above the team calendar and select the desired export format (Excel or PDF).
Web Terminal
The Web Terminal allows you to enter time bookings via a browser.
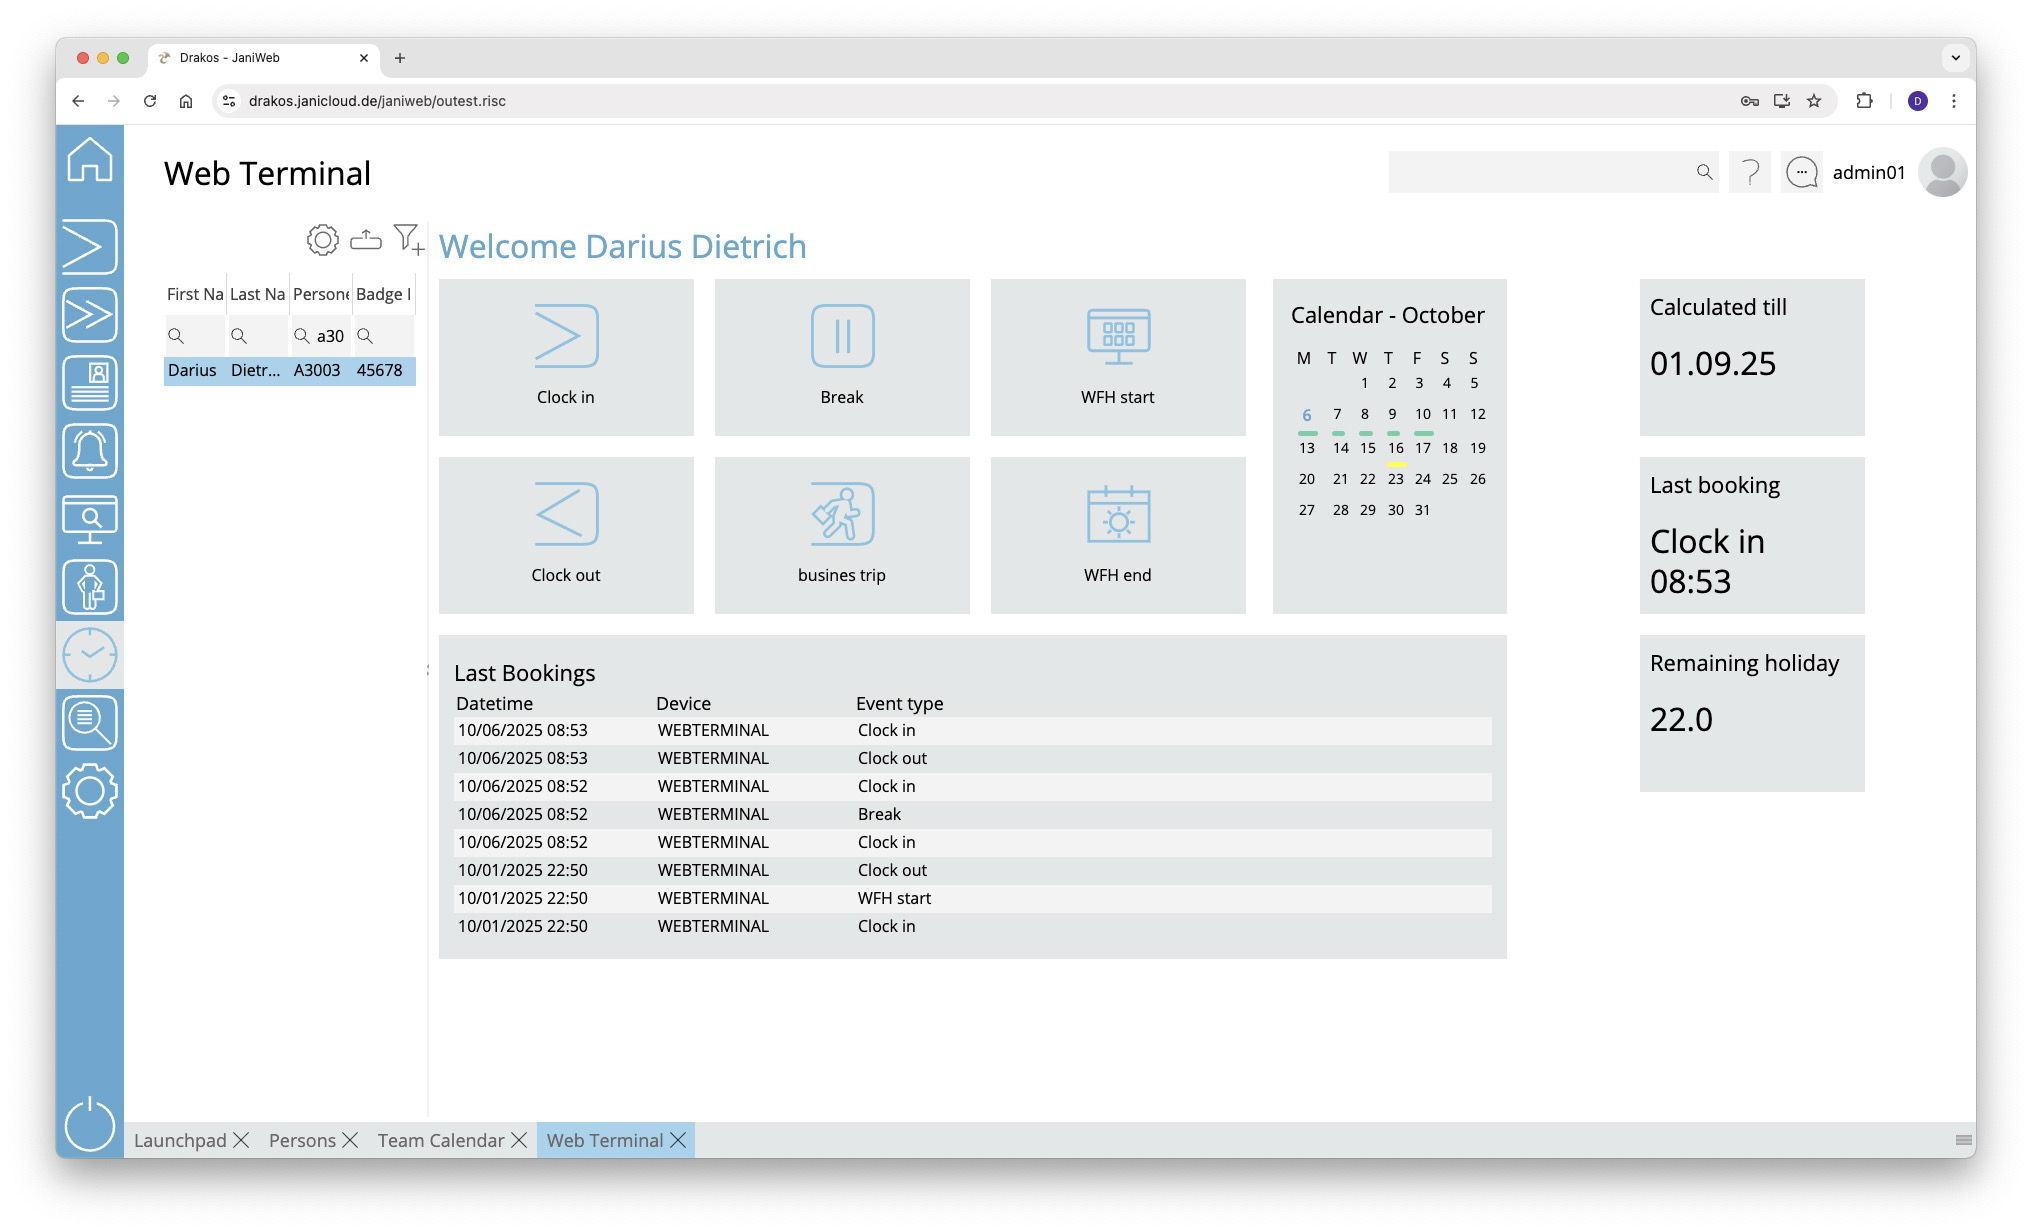
List of persons
Select the person you want to display the web terminal for.
The list offers the following options:
- Select columns to display: Press the gear icon. Select which columns you want to display and in which order. Arrange the columns using the mouse or the arrow icons. Press Apply to adopt the changes.
- Filter by client and status: Press the filter icon. Select the clients and the status (Active, Active in future, Inactive) for which persons should be displayed. Changes are visible immediately.
- Search in columns: Enter text or numbers in the search field (magnifying glass icon) of a column to search for names, personnel numbers, or other criteria. The entries take effect immediately: the list only displays hits.
Tip: Search for substrings. You can find “Spencer-Churchill” with “spe”, “chur” or “hill”. The search is not case sensitive. - Export the entire list: Press the download icon. Select the format in which you want to export the list. The export files are downloaded or displayed depending on the browser/operating system settings.For details on the available export formats, see the General > Export Formats chapter of this manual.
Buttons for bookings
Press the corresponding button to create a new booking. A colored message appears in the message area:
- Green: Booking successful
- Red: Booking failed
Status messages appear in the message area at the bottom of the screen.
You can specify which buttons are available here in the menu item Settings, tab Web Terminal.
Workflow
You can use the menu item Workflow to view the status of your workflow requests for time tracking and permissions. As a supervisor or a supervisor’s deputy, you can also edit workflow requests directly.
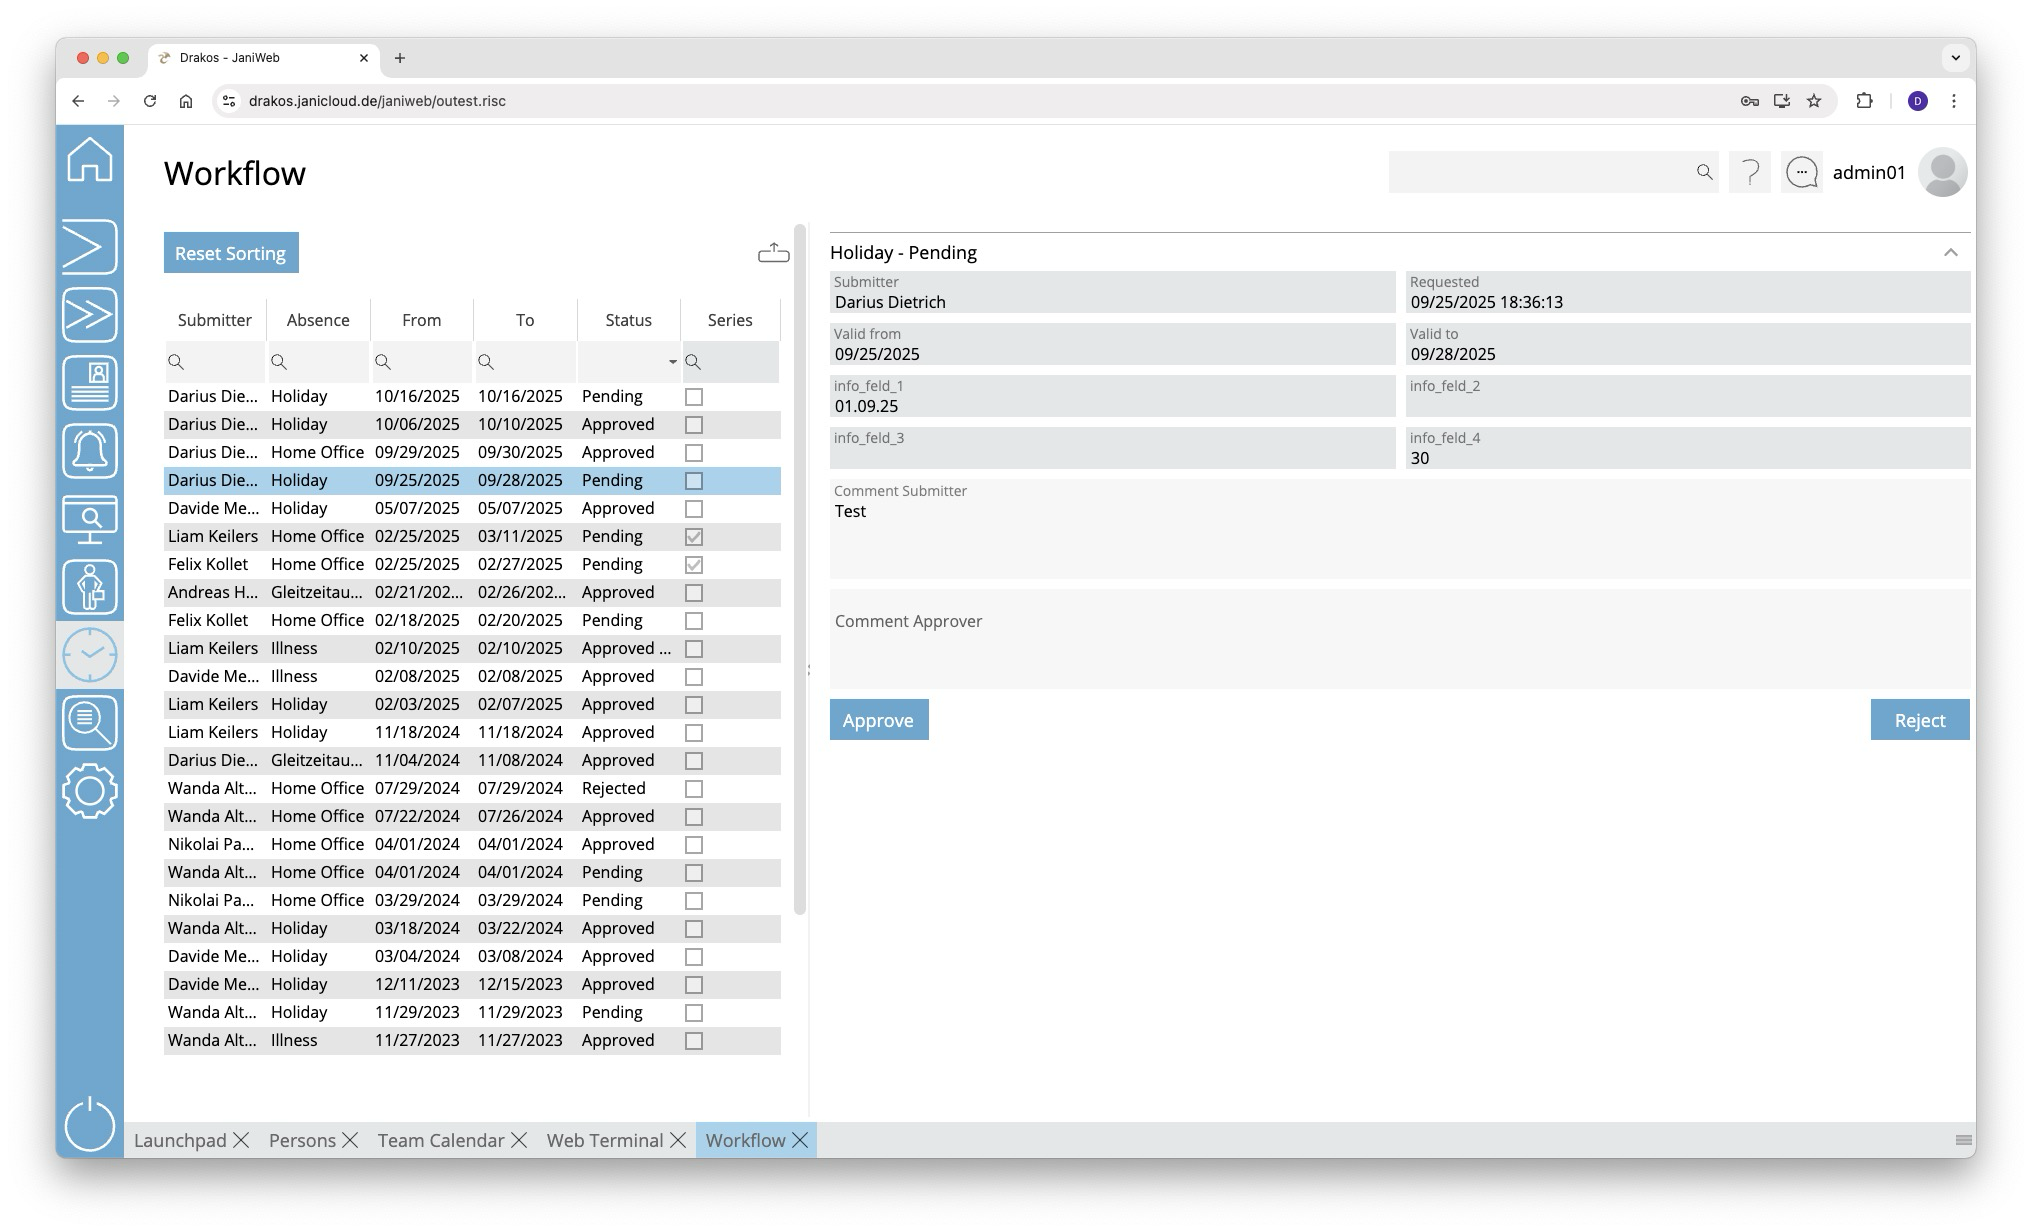
List of workflow requests
The list contains your active workflow requests. Select an entry to view details.
- In the text field Comment Approver, enter a comment that will be displayed to the requester.
- Press Approve to approve the request.
- Press Decline to decline the request.
The list offers you further options:
- Sorting by column: Click on a column header to sort the entries in ascending or descending order by this column.
- Search: Enter text or numbers in the search field (magnifying glass icon) at the top to search for entries. The entries take effect immediately: the list only displays hits. The search is not case sensitive.
- Filter by status: Open the list field in the Status column. Select the criteria for which you want to display entries. A set filter is saved and remains in place even after you log out. Press Reset Sorting to reset the filter and sorting.
- Export the entire list: Press the download icon. Select the format in which you want to export the list. For details on the available export formats, see the General > Export Formats chapter of this manual.
Time Sheet
This menu item allows you to view and print time sheets from third-party systems such as SAP. As a supervisor, you also have access to the time sheets of the employees assigned to you.

Select the person for whom a time sheet is available. Click Print to print the file.
The list of persons is only visible when you log in as an administrator. When you log in as an employee, only your own time sheet is visible.
Settings
Use the menu item Settings to make all the settings relevant for time tracking.
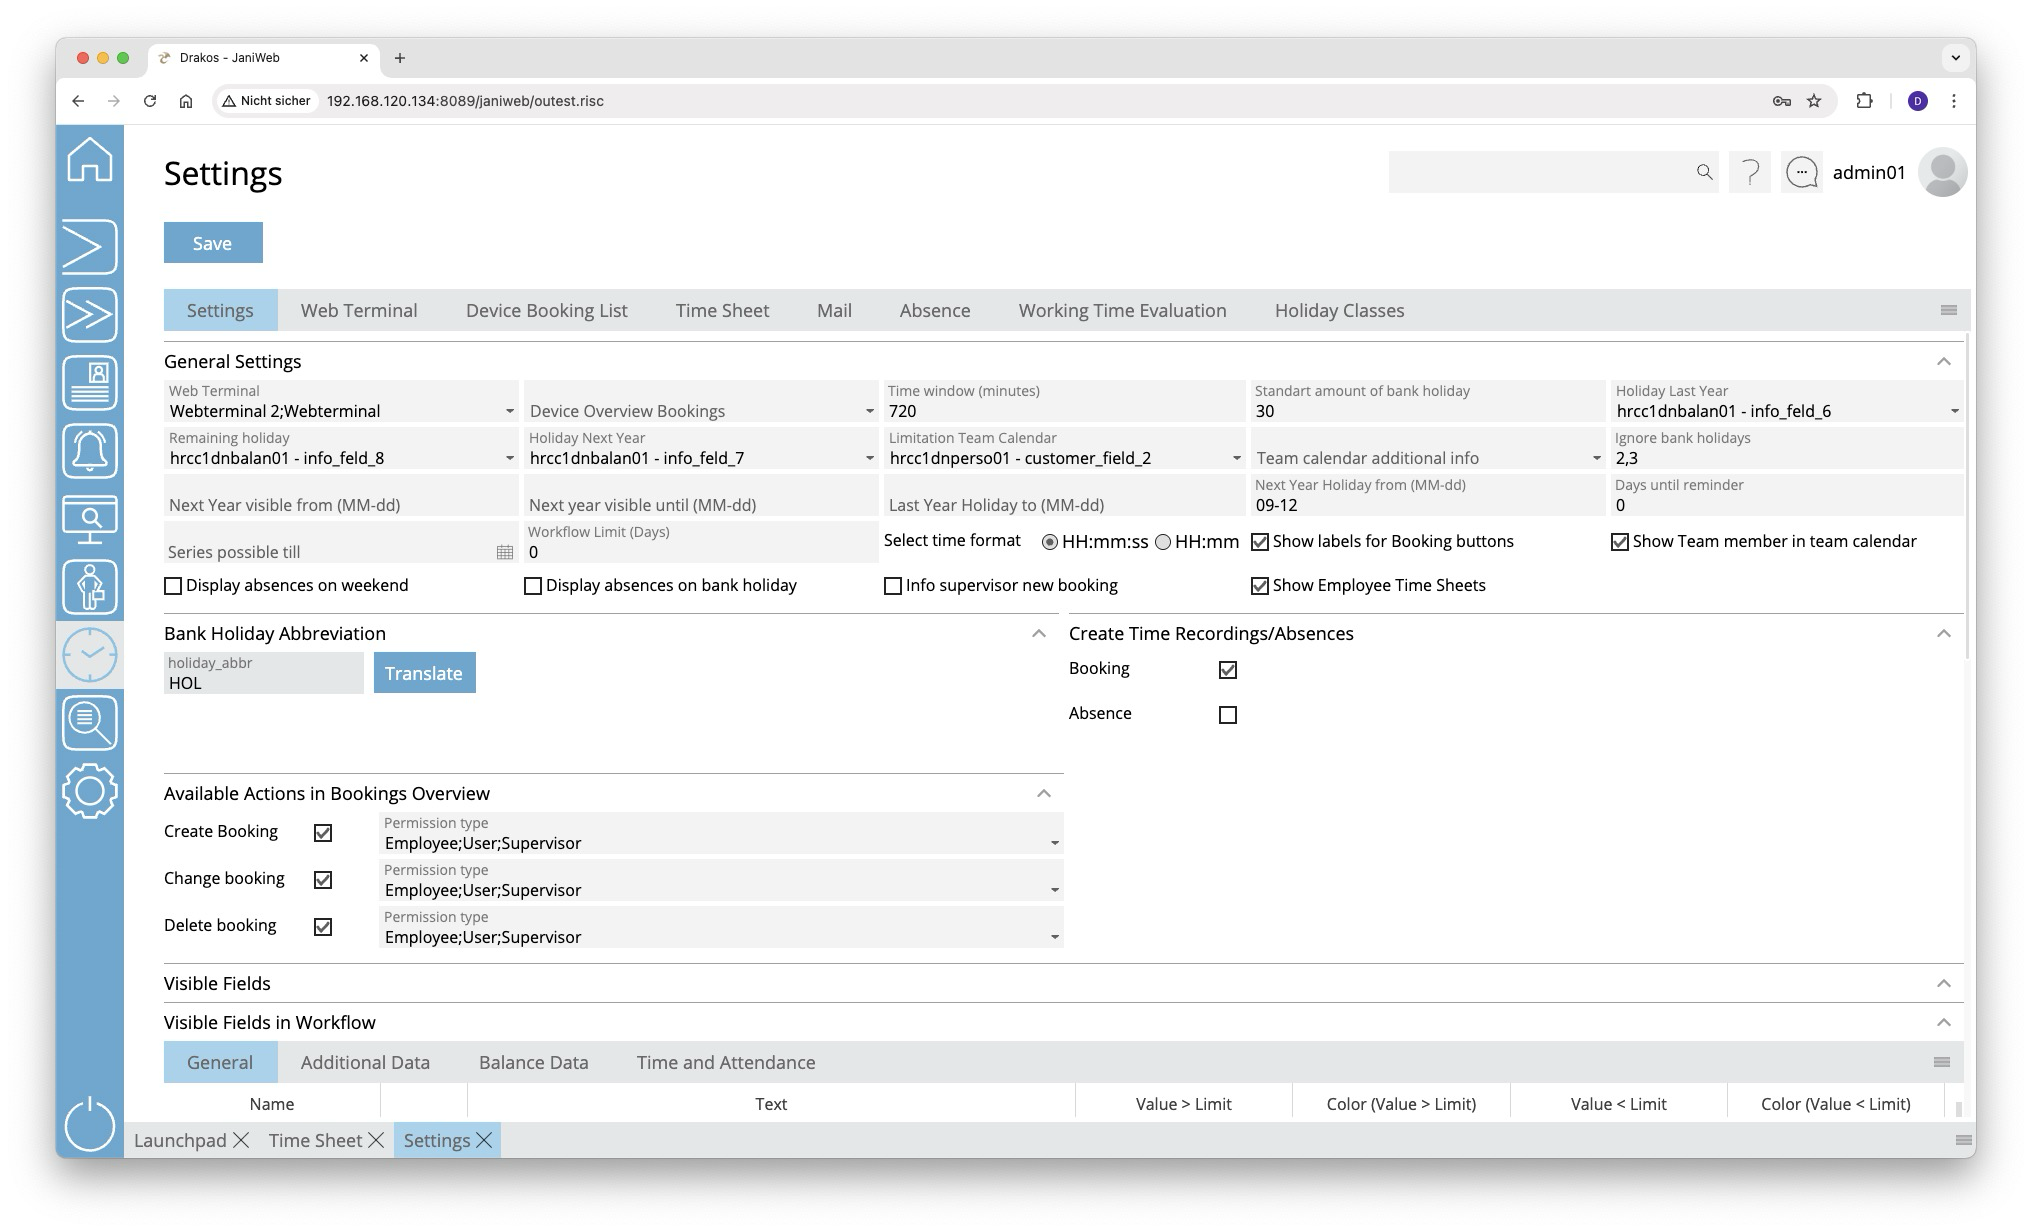
Tab Settings
Area General Settings
- Web Terminal: Select devices that should serve as a web terminal.
- Device Overview Bookings: Select the device with which bookings are created that users create manually via the menu item Overview Bookings (for example, to add a booking).
- Time window (minutes): Specify the time span within which pairs of clock-in/clock-out bookings are used to calculate working hours.
- Holiday Last Year: Select the database field that contains the holiday entitlement that was transferred from the previous year to the current year.
- Remaining holiday: Select the database field that contains the total holiday entitlement. The holiday for the current year is calculated as follows:
Holiday current year = remaining holiday – holiday last year – holiday next year. - Holiday Next Year: Select the database field containing the holiday entitlement for the coming year.
- Ignore bank holidays: Specify the holiday classes (separated by commas) that should not be displayed in the Team Calendar and should therefore not be used for the holiday calculation.
- Next year visible from (MM-dd): Specify the day from which the team calendar should be visible for the next year.
- Next year visible until (MM-dd): Specify the day until the team calendar should be visible for the next year.
- Holiday last year until (MM-dd): Define the day until employees can take holiday from the previous year.
- Holiday next year from (MM-dd): Define the day from which employees can plan holiday for the next year.
- Days until reminder: Enter the number of days after which a reminder E-Mail is automatically sent to the supervisor if they have not responded to an absence request.
- Show Team Member in Team Calendar: Activate this option if you want team members to be displayed in the Team Calendar.
- Information on rejected applicationts by leading system: If this option is selected, employees and supervisors are informed about requests that have been rejected by the leading system.
- Display absences on weekend: Activate this option if you want absences to be displayed at the weekend as well and included in the holiday calculation.
- Info supervisor new booking: Activate this option to inform the manager when an employee makes a late booking via the menu item Overview Bookings.
- Show Employee Time Sheets: Activate this option if you want to allow supervisors to view their employees’ time sheets (including time sheets from SAP).
-
Team calendar additional info: Here you can select a database field that will be displayed in addition to the person’s name in the menu item Team Calendar.
-
Limitation Team Calendar: Select a database field here to further limit a team (a team consists of all persons who have the same supervisor).
-
Series possible until: Enter a date here if you want to restrict the period in which employees can create series of absences.
-
Select time format: Here you can specify whether the times are displayed in hours:minutes:seconds or just in hours:minutes in the Overview Bookings.
-
Show labels for Booking buttons: Activate this option to display the labels for the booking buttons in the Web Terminal menu in addition to the buttons themselves.
- Enable New Absence button: If this option is selected, a New Absence button will be displayed in the Team Calendar, which can be used to create absences without having to right-click or press and hold (on touch devices).
Area Abbreviations for Bank Holidays
Specify the abbreviations that are displayed for holidays in the menu item Team Calendar.
Area Create Time Recordings/Absences
Activate the corresponding option if you want to allow users to perform Booking Actions and/or Absences via the menu item Overview Bookings.
Area Available Actions in Overview Bookings
Use this area to define which persons can create, change or delete bookings via the menu item Overview Bookings. Persons are distinguished by:
- Employee: Employee via the employee login.
- User: Administrator via the admin login.
- Supervisors: Employee who are a supervisor via the employee login.
Area Visible Fields
Specify here which additional information (e.g. balances) should be displayed in the various menu items. The fields Value > Limit, Color (Value > Limit) and Value < Limit, Color (Value < Limit) allow you to highlight values above or below a limit in color.
Tab Web Terminal
Specify the booking buttons for the Web Terminal here. First, select the web terminal for which you want to edit the settings from the Web Terminal drop-down menu.
- Button Add: Press Add to add a booking button. It will appear at the end of the list.
- Column Event type: Select the type of booking for which the button is to be used.
- Column Icon: If you want to display an icon other than the default one, press Upload and select a graphic file.
- Column Visible: Select whether the button should be visible.
- Booking Type: Shows whether the booking marks the person as present or absent (this is particularly important for calculating working hours in the Overview Bookings menu item).
- Row: Here you can specify the row in which the booking button should appear in the web terminal.
- Column: Here you can specify the column in which the booking button should appear in the web terminal.
Area Visible Fields
Specify here which additional information (e.g. balances) should be displayed in the various menu items. The fields Value > Limit, Color (Value > Limit) and Value < Limit, Color (Value < Limit) allow you to highlight values above or below a limit in color.
Tab Device Booking List
Dormakaba devices allow persons to view a list of their most recent bookings using a booking. Specify the appearance of this list here.
- Days past: Here you can specify the number of days for which bookings should be displayed.
- Timeout: Specify after how many seconds the list should automatically disappear (privacy protection).
- Dark mode: Activate this option if you want the booking list to be displayed in a dark mode.
Area Visible Columns
Specify which information should be included. Activate the corresponding options.
Area Visible Event Types
Specify which bookings should be displayed. Activate the corresponding options.
Tab Time Sheet
JaniWeb can display time statements from an SAP system in the menu item Time Sheet. On this tab page, you specify whether these time statements should be accessed via the file interface or the SOAP interface.
Enable SOAP: Activate this option to enable the SOAP interface. The fields SOAP URL, SOAP User and SOAP Password also appear. Enter the required data.
Client, Path, File extension: Specify the information for the file interface. One path can be configured for each client.
Tab Mail
Enter an additional text to be included in E-Mails that are sent automatically when creating/approving/rejecting holiday requests.
Tab Absence
Use this tab to manage the various types of absences.
List of absence types
The list contains all the absence types that have already been created. Select an entry to view details.
Button New
Press New to create a new absence type. Enter the Description, Client, Validity and any other required data. To set the label, press Translate. Enter the names for the respective languages and press Save.
- Days future / Days past: Specify how many days in the future or in the past the absence can be created.
- Absence reason SAP: Select the relevant absence type from SAP here. This link is important for transferring the absences to SAP.
- Workflow Past / Workflow Future: Select a workflow for the absence type here. You can define workflows under the menu item Workflow.
- Abbreviation: Define an abbreviation that will be displayed in the Team Calendar for this absence type.
- To define the name for an abbreviation, click Translate. Enter the names for the respective languages and press Save.
- Contingent: Choose whether to check a contingent when an absence is created.
- No check: The created absence is not checked.
- Holiday: The created absence is checked against the holiday contingent.
- Other: Choose this option in order to select a database field in the Contingent field, against which the absence is checked when it is created. Enter the Unit (days, hours or minutes) for the value of the database field. You can also set a Limit that is checked when the absence is created. This prevents the absence from being created if the value of the contingent is above or below the set limit.
- Comment mandatory: Users must enter a comment when creating an absence.
- Upload Documents: Users are allowed to upload documents when creating an absence.
- Supervisor must approve: Activates the workflow for approval by the supervisor.
- Notify supervisor: When an absence is created, the supervisor is automatically notified.
- Supervisor approves delete: Activates the workflow for approval by the supervisor when deleting an absence.
- Notify supervisor on delete: When deleting an absence, the superior is automatically notified.
- With time: Users can specify a time in addition to the date when creating an absence.
- Show in team calendar: The absence appears in the team calendar.
- Allow series: Users may create an absence as a recurring series.
- Not selectable: Absences cannot be selected in the team calendar.
- Supervisor can create: The supervisor can create absences for their employees.
- Employee can create: Employees can create absences themselves.
- Incognito: The abbreviation of the absence type is not visible to team members.
- Automatic Approval: If this setting is enabled, you can specify in the Days field how many days without a response from the responsible person will result in the absence being automatically approved.
- Flexitime: Once this setting is configured for an absence, only persons with a specific value in the 'zterf' (database table: hrcc1dnperso01_data_relation) field can create this absence from the team calendar.
Tab Working Time Report
Here you define which booking types are used for calculating the working hours in the Overview Bookings (top list). You can also create working time rules for the automatic deduction of break times (bottom list).
List of booking types
- Button Add: Press Add to add a booking type. The entry appears at the end of the list.
- Column Event type: Select the booking type to be included in the report.
- Column Device: Select the devices for which bookings are to be reported.
- Column Icon: If you want to display a different icon than the default icon in the report, press Upload and select a graphic file.
- Booking Type: Shows whether the booking is considered as Present or Absent (this is particularly important for calculating working hours).
List of working time rules
- Button Add: Press Add to add a new working time rule. It will appear at the end of the list.
- Column Description: Enter a meaningful name.
- Column Working time limit (minutes): Enter the time in minutes from which the break time is automatically deducted if there are no break bookings of sufficient duration (i.e. the person has not had a long enough break).
- Column Automatic deduction (minutes): Enter the break time in minutes that is automatically deducted.
Tab Holiday Classes
Here you specify the time valuation for various holiday classes to ensure that holiday is calculated correctly.
- For full-day holidays, enter the number 1 in the Value field.
- For holidays that are considered half days (such as Christmas and New Year’s Eve in Germany, for example), enter 0.5.
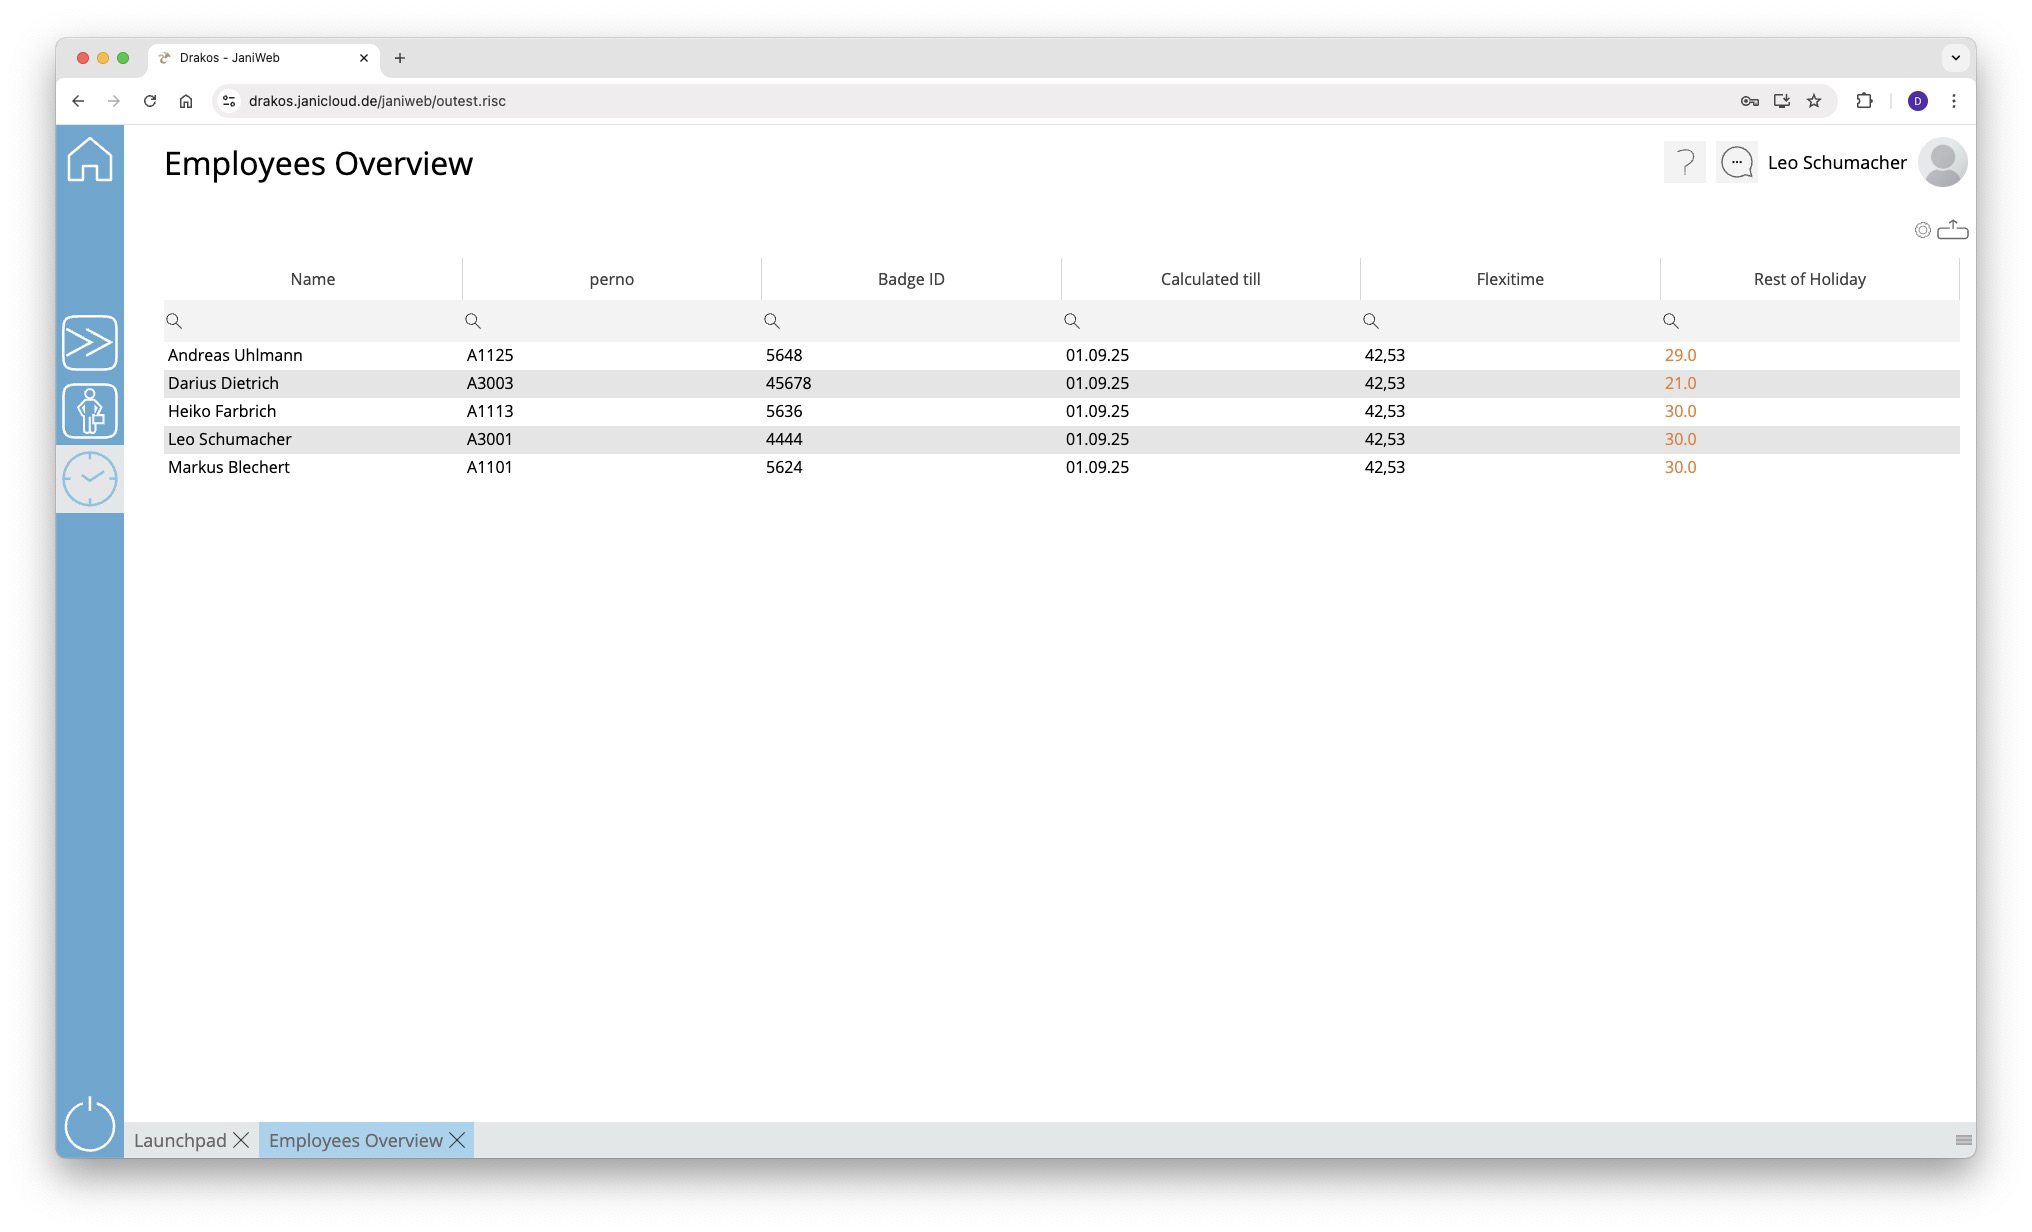
Employees Overview
In the Employees Overview menu, you can view the balances for employees for whom you are the supervisor.
This menu item is only available if you have logged in as an employee. This menu item is not available if you are logged in as an admin.