JaniWeb
Online help for JaniWeb
- General
- Access Management
- Persons
- Person Groups
- Lock Persons
- Block List
- Permissions
- Time Models
- Devices
- Device Groups
- Control Profiles
- Companies
- Mass Change
- Qualifications
- Settings
- Workflow
- Badge Printing
- Alarm Management
- Zone List
- Person Search
- Evacuation Manager
- Monitoring
- Image Comparison
- Alarm Scenarios
- Site Map
- Settings
- Attendance Board
- Visitor Management
- Time and Attendance
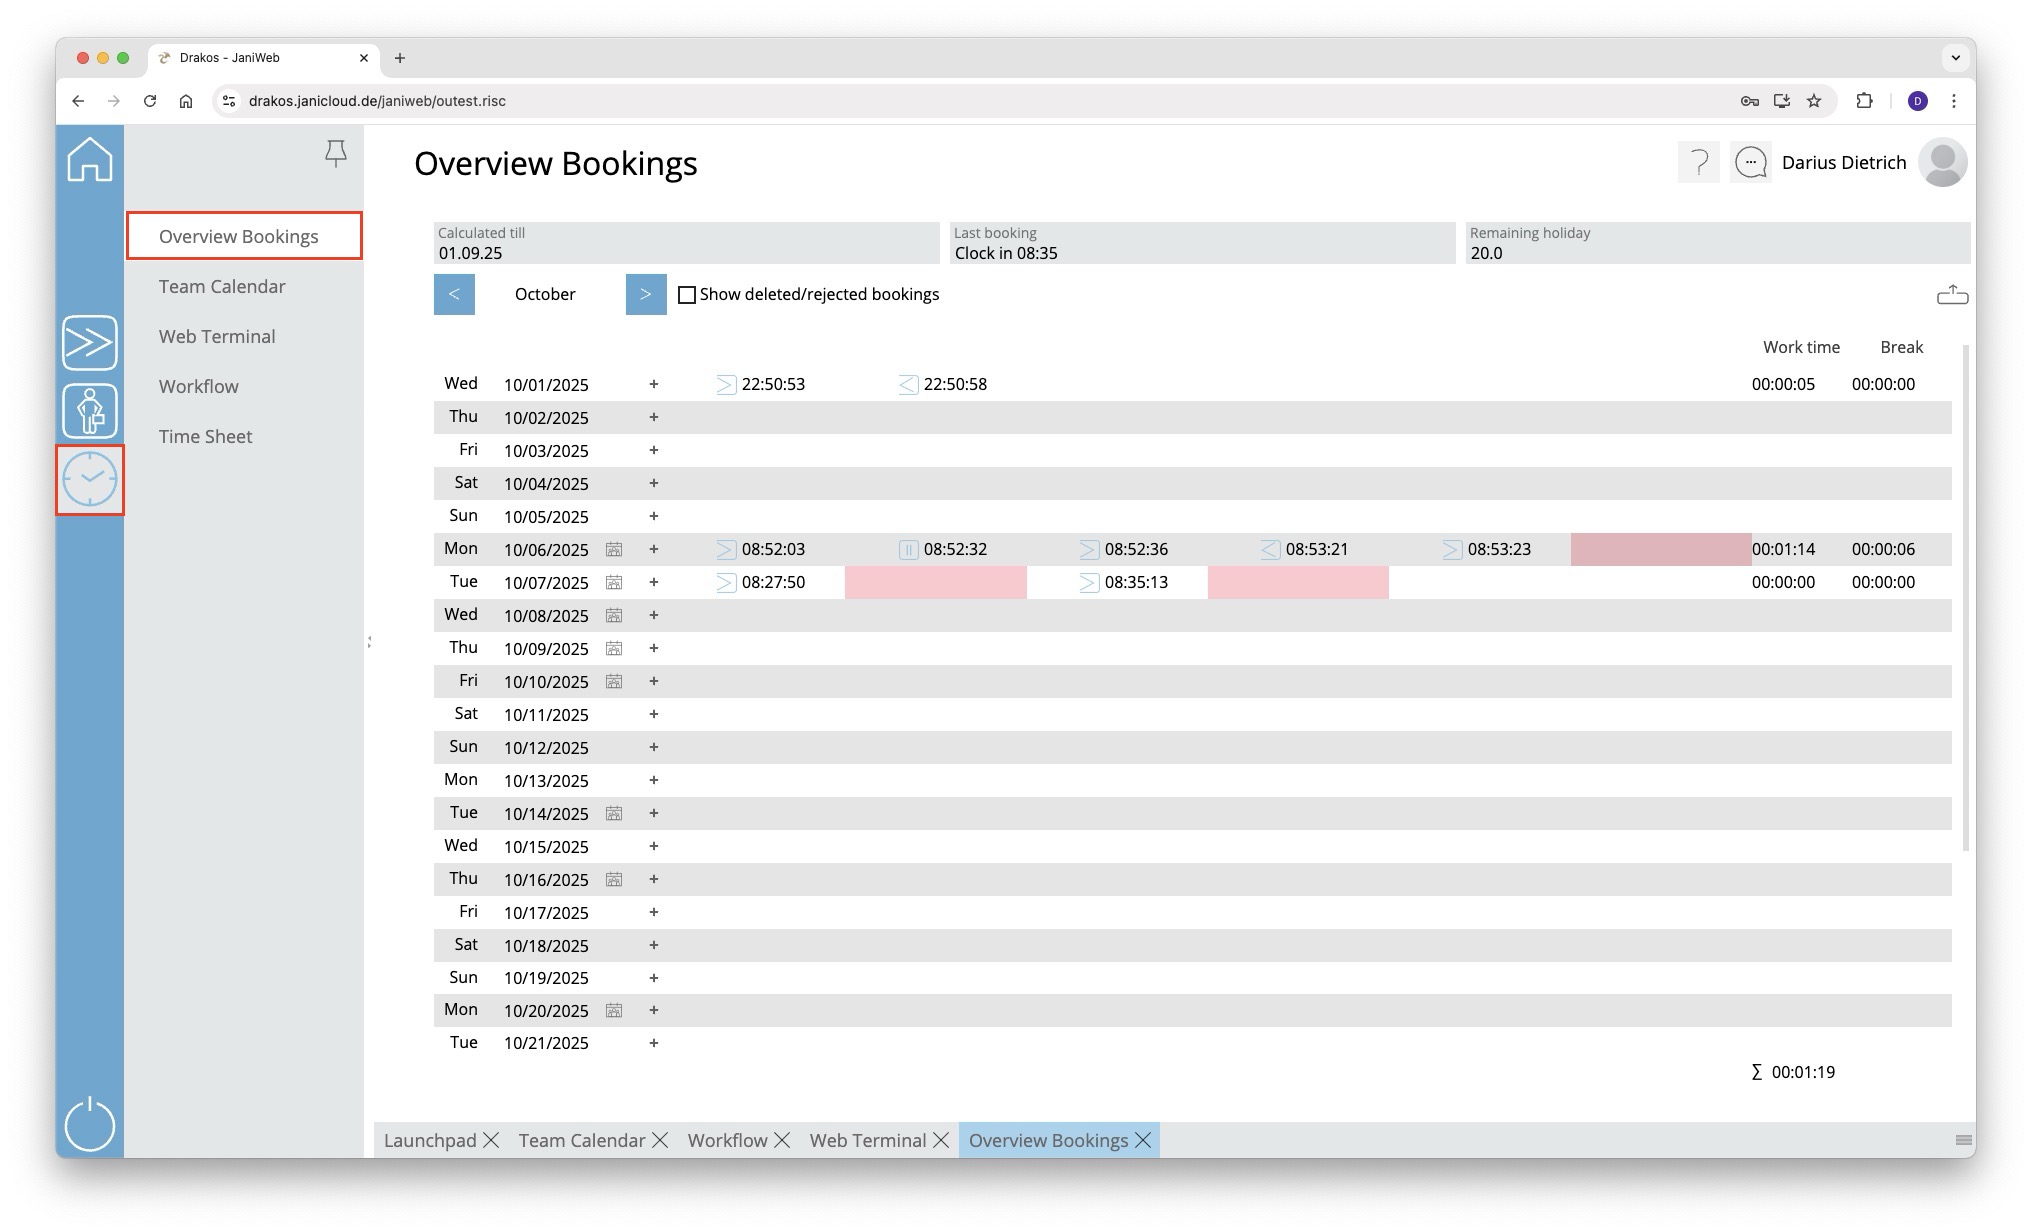
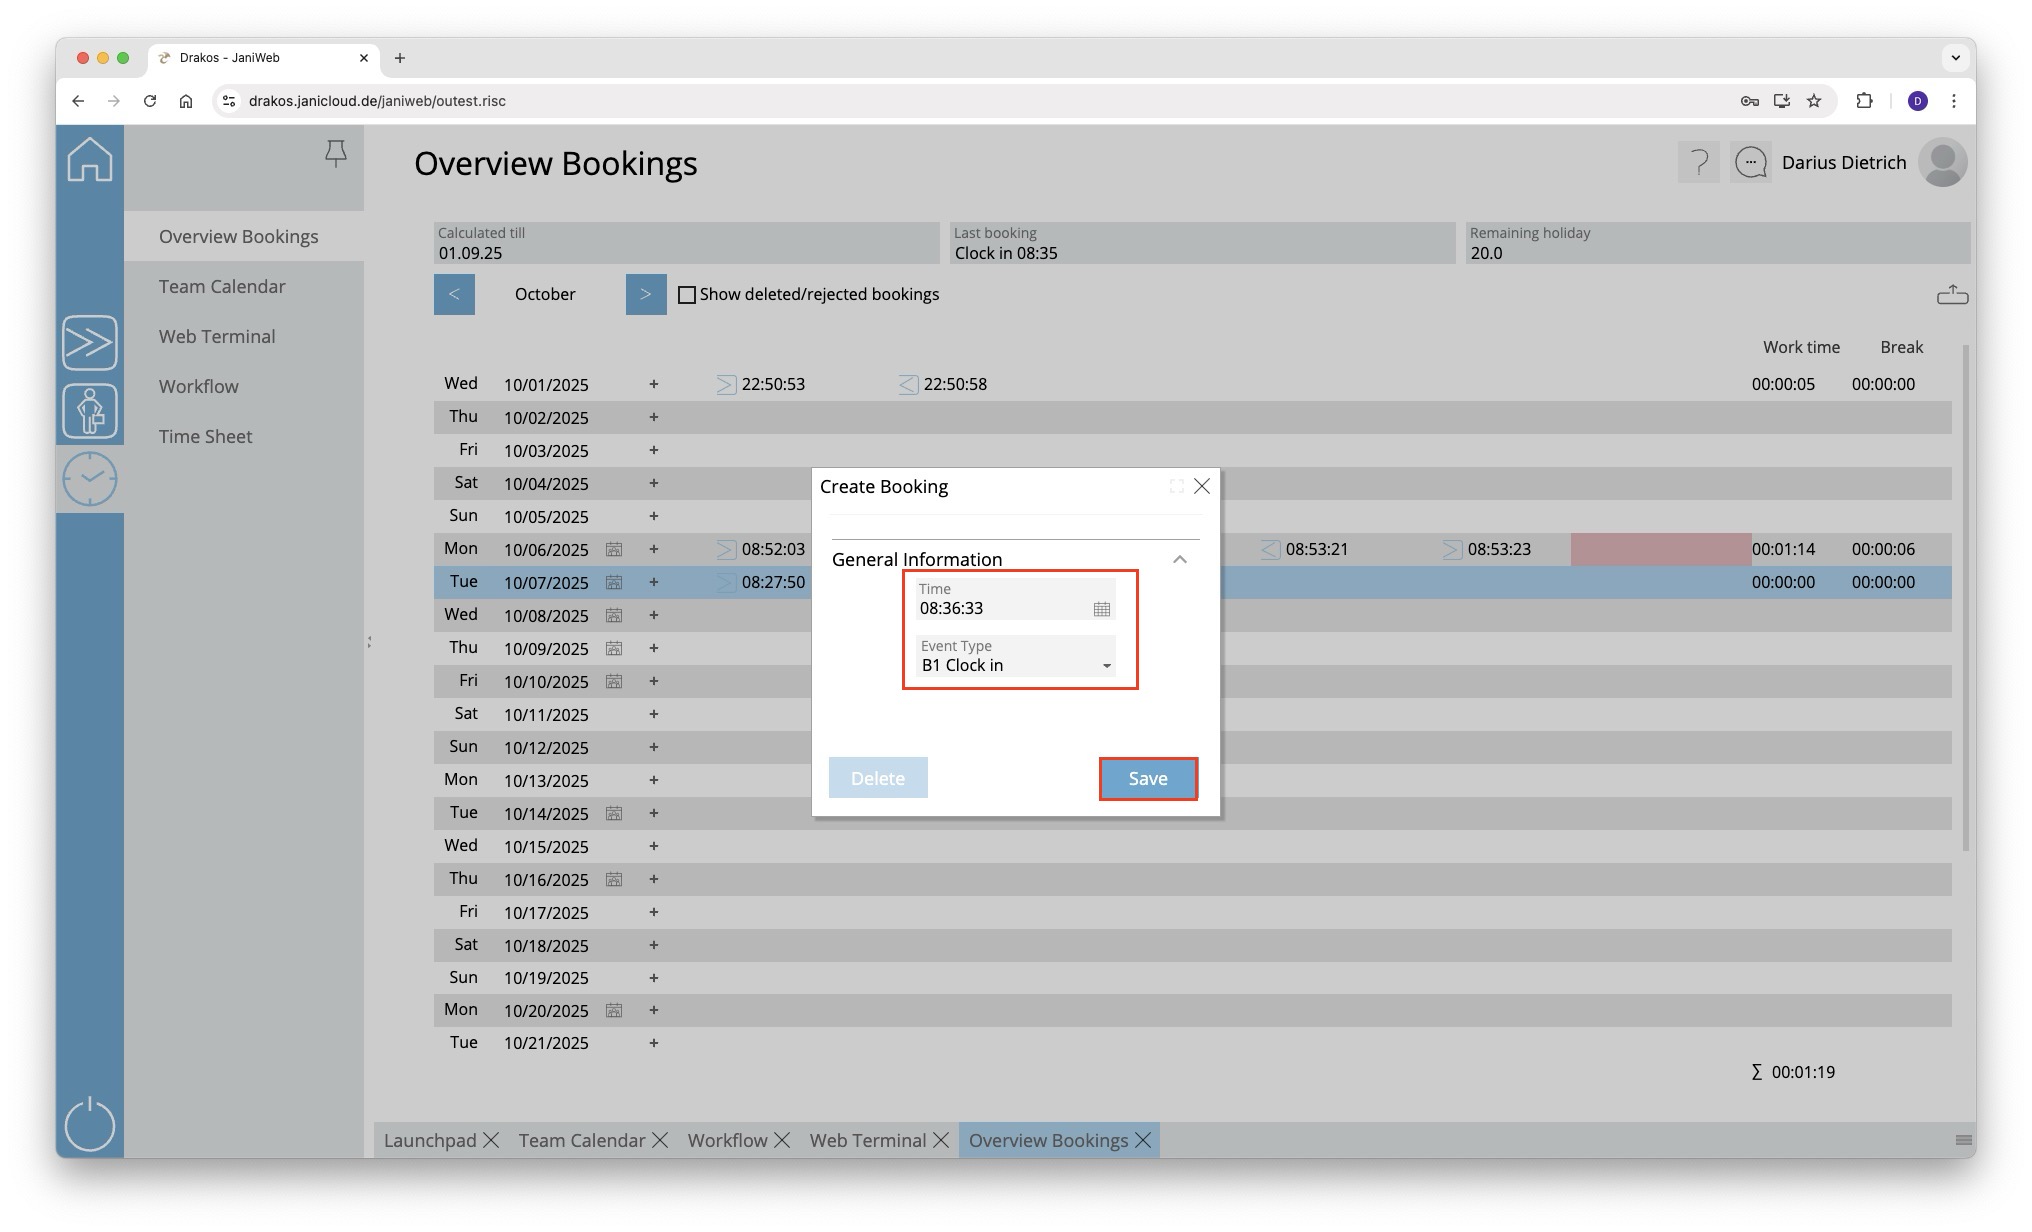
- Overview Bookings
- Overview Bookings Companies
- Persons
- Team Calendar
- Web Terminal
- Workflow
- Time Sheet
- Settings
- Employees Overview
- Analyses
- Permissions
- Bookings
- Booking Sequence Check
- Time and Attendance
- Replacement Badges
- Change Log Persons
- Persons
- Unused Badges
- Visits
- Presence
- Absences
- Qualifications
- Alarm Scenarios
- Workflow
- Scan for Bookings
- GDPR Users
- GDPR Persons
- Security Log
- Employee Logins
- Server Log
- Zone Lists
- Quiz Report
- Device Events
- Settings
- Instructions
General
Login
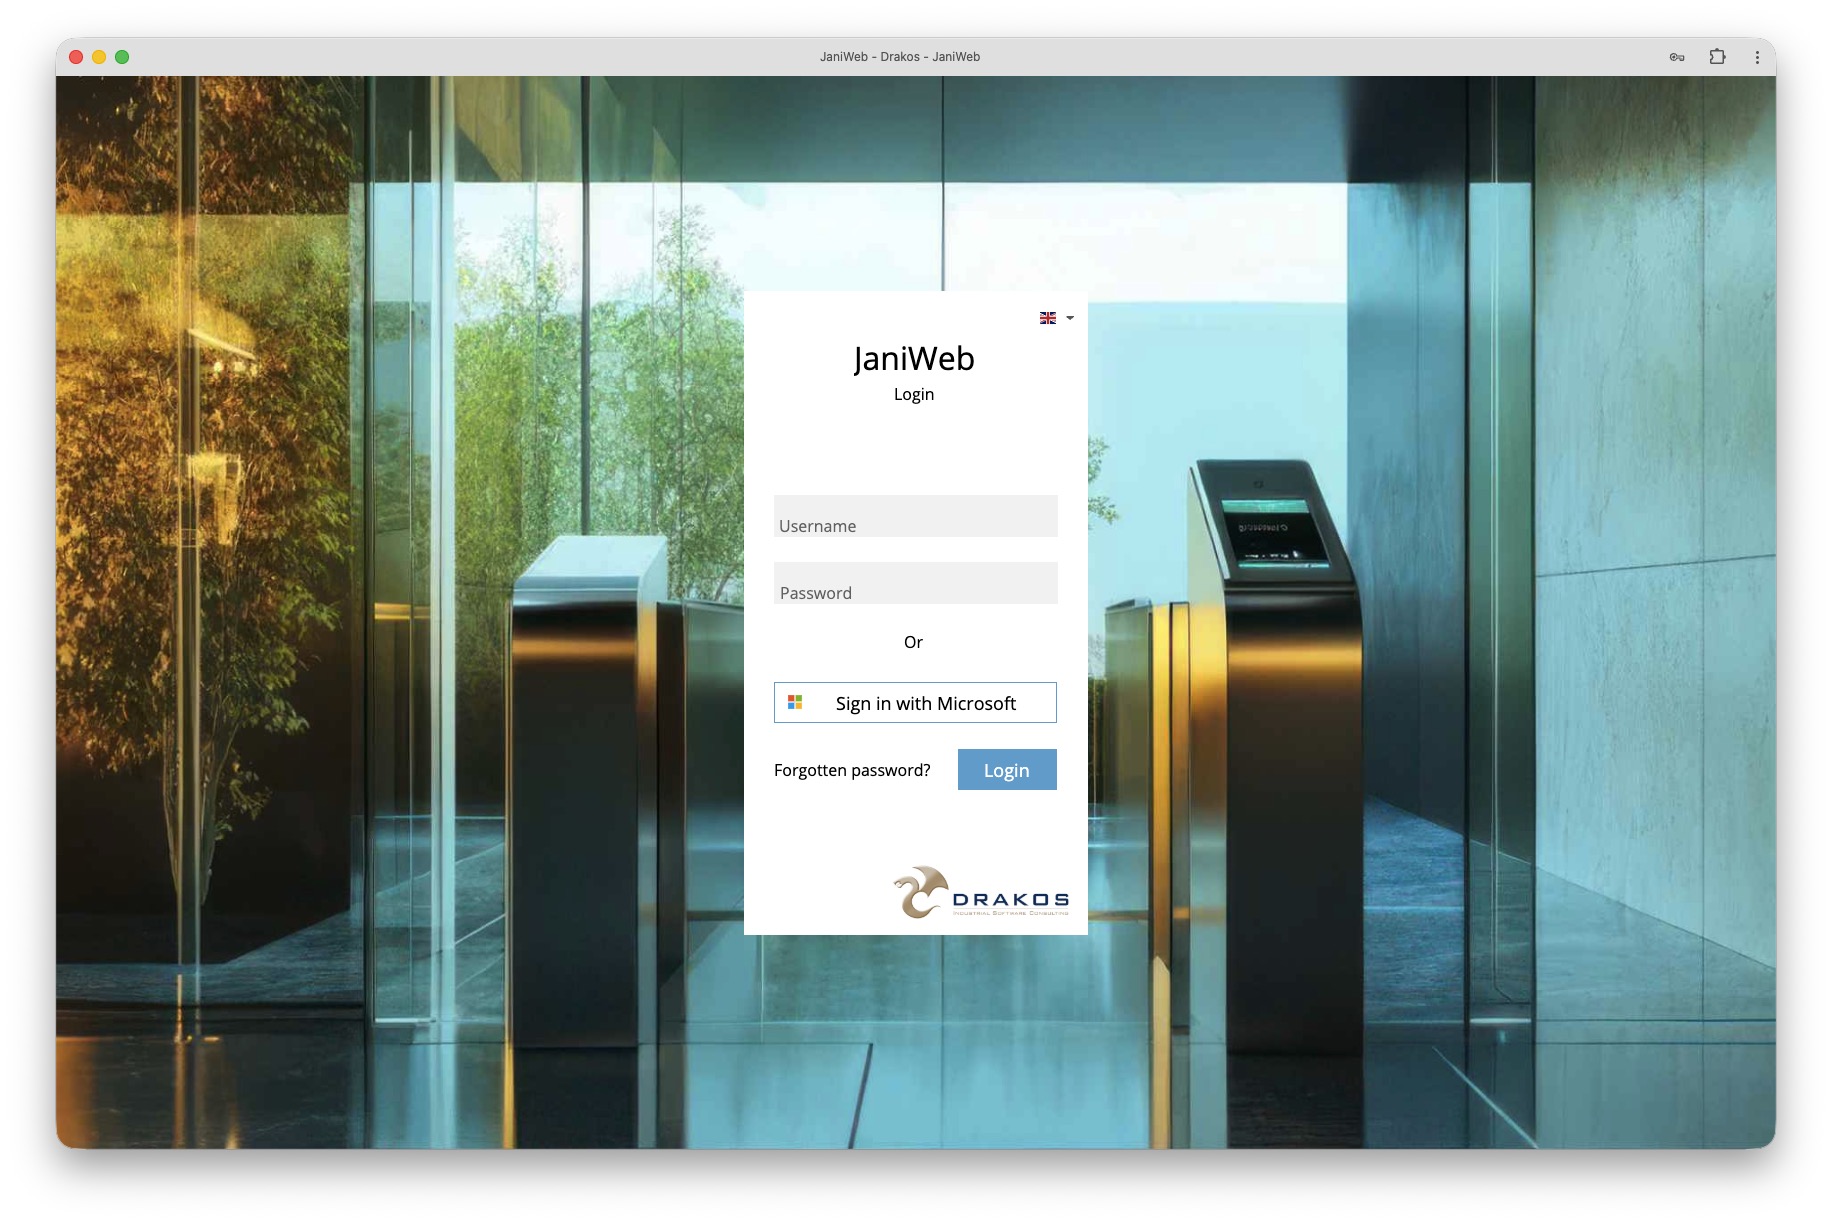
Log in
- Enter your username and your password.
- Press Login.
- Use the Sign in with Microsoft button to sign in via Single-Sign-On.
Forgot password
- If you have forgotten your password, press Forgot password.
- Enter the email address that is linked to your user account.
- You will then receive an email with instructions on how to reset your password.
Change language
To change the language of the user interface, press the flag in the top right-hand corner and select the desired language.
General Structure
Navigation
The main menu is located on the left-hand side of the application. Here you can switch between the different modules. The Home button in the top left-hand corner takes you back to the Launchpad at any time. When you select a module, the corresponding submenu opens to the right of the main menu. Select a menu item to display the corresponding area of the application on the right-hand side.
At the bottom you will find a tab bar that displays your most recently opened menu items. From here you can:
- Bring menus back to the foreground by clicking on the corresponding tab.
- Close menus by clicking on the X in the respective tab.
It is also possible to open several menu items at the same time:
- To do this, drag a tab to the top half of the application.
- A red area indicates where you can place the menu item.
In this way, you can edit several menu items at the same time and switch between them flexibly.
You will find the Logout icon in the bottom left-hand corner. Press it to log out of the application.
Search
Use the search bar at the top right of the application to search for specific devices or persons. You can also find entire menus and jump directly to them.
Online help
The question mark icon takes you directly to the application’s online help.
User menu
The user menu is also located in the top right-hand corner. Here you will find
- Info: Shows you the current version of the application, the database and the Tomcat.
- Settings: Opens your user-specific settings.
- Change language: You can change the language of the application via the flag button by selecting a language from the list field.
- Log out: Use this item to log out of the application.
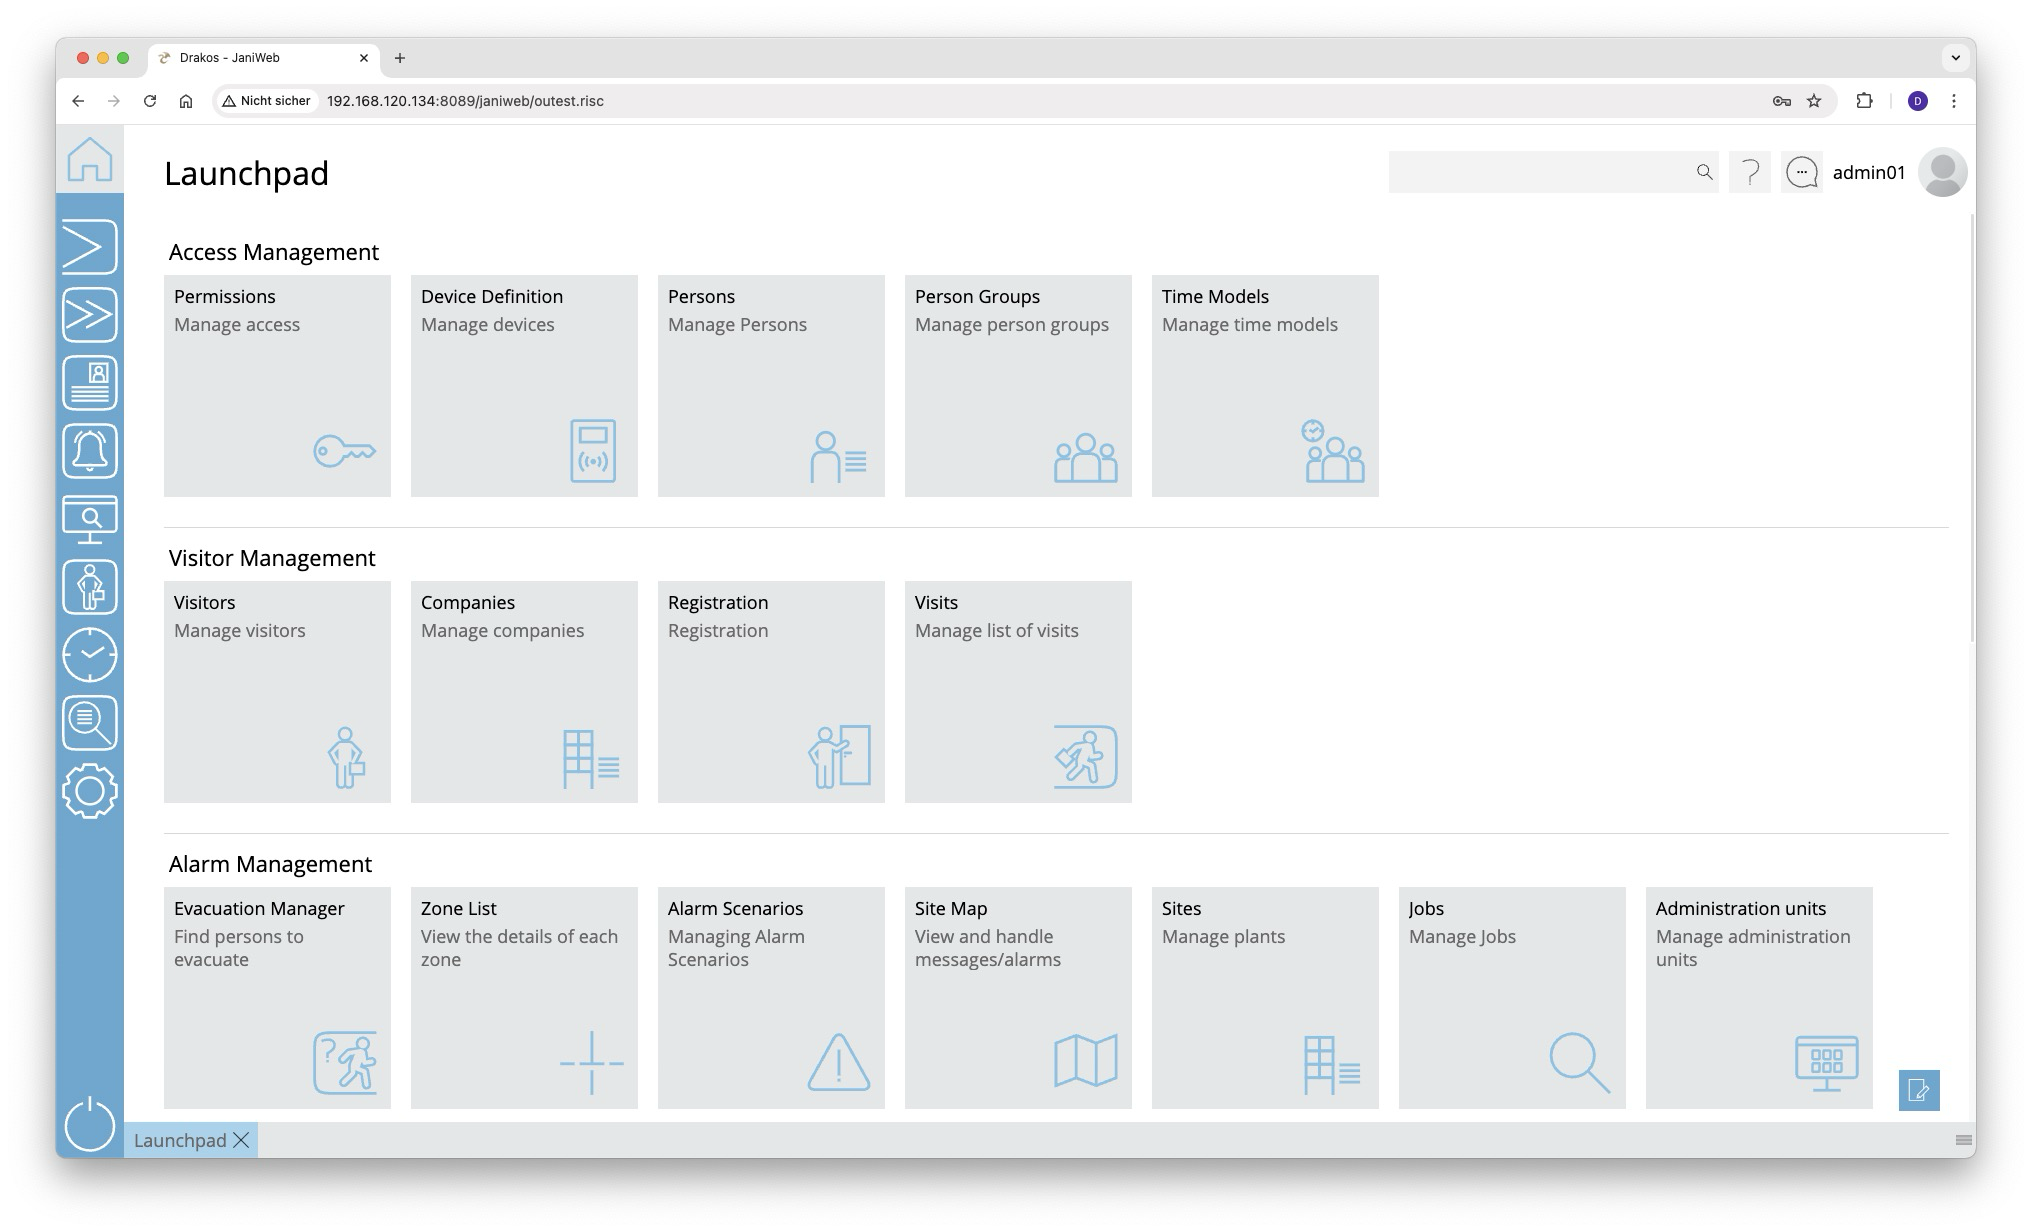
Launchpad
After logging in, you will be taken directly to the Launchpad, which can be customized. Here you can save your most frequently used menus as favorites, sort them into different sections and access them directly from the Launchpad.

Customizing your Launchpad
- Start editing: Press the pencil icon in the bottom right corner.
- Create sections: Press New Section, name it as you like in order to structure your favorites.
- Add favorites: Open the desired submenu and drag a menu item to a section on the Launchpad. The menu items appear there as tiles.
- Save: Press Save to save your changes.
Your personalized Launchpad will now load every time you log in.
Tips
- You can customize the areas and favorites entirely according to your preferences. Here are two ideas:
- Create areas for software modules (e.g. Devices, Reports).
- Divide menus into functions and settings.
- It’s worth adding frequently used Reports as favorites.
- Since favorites can be changed at any time, you can try out different variants to find the best way to organize them.
User Menu
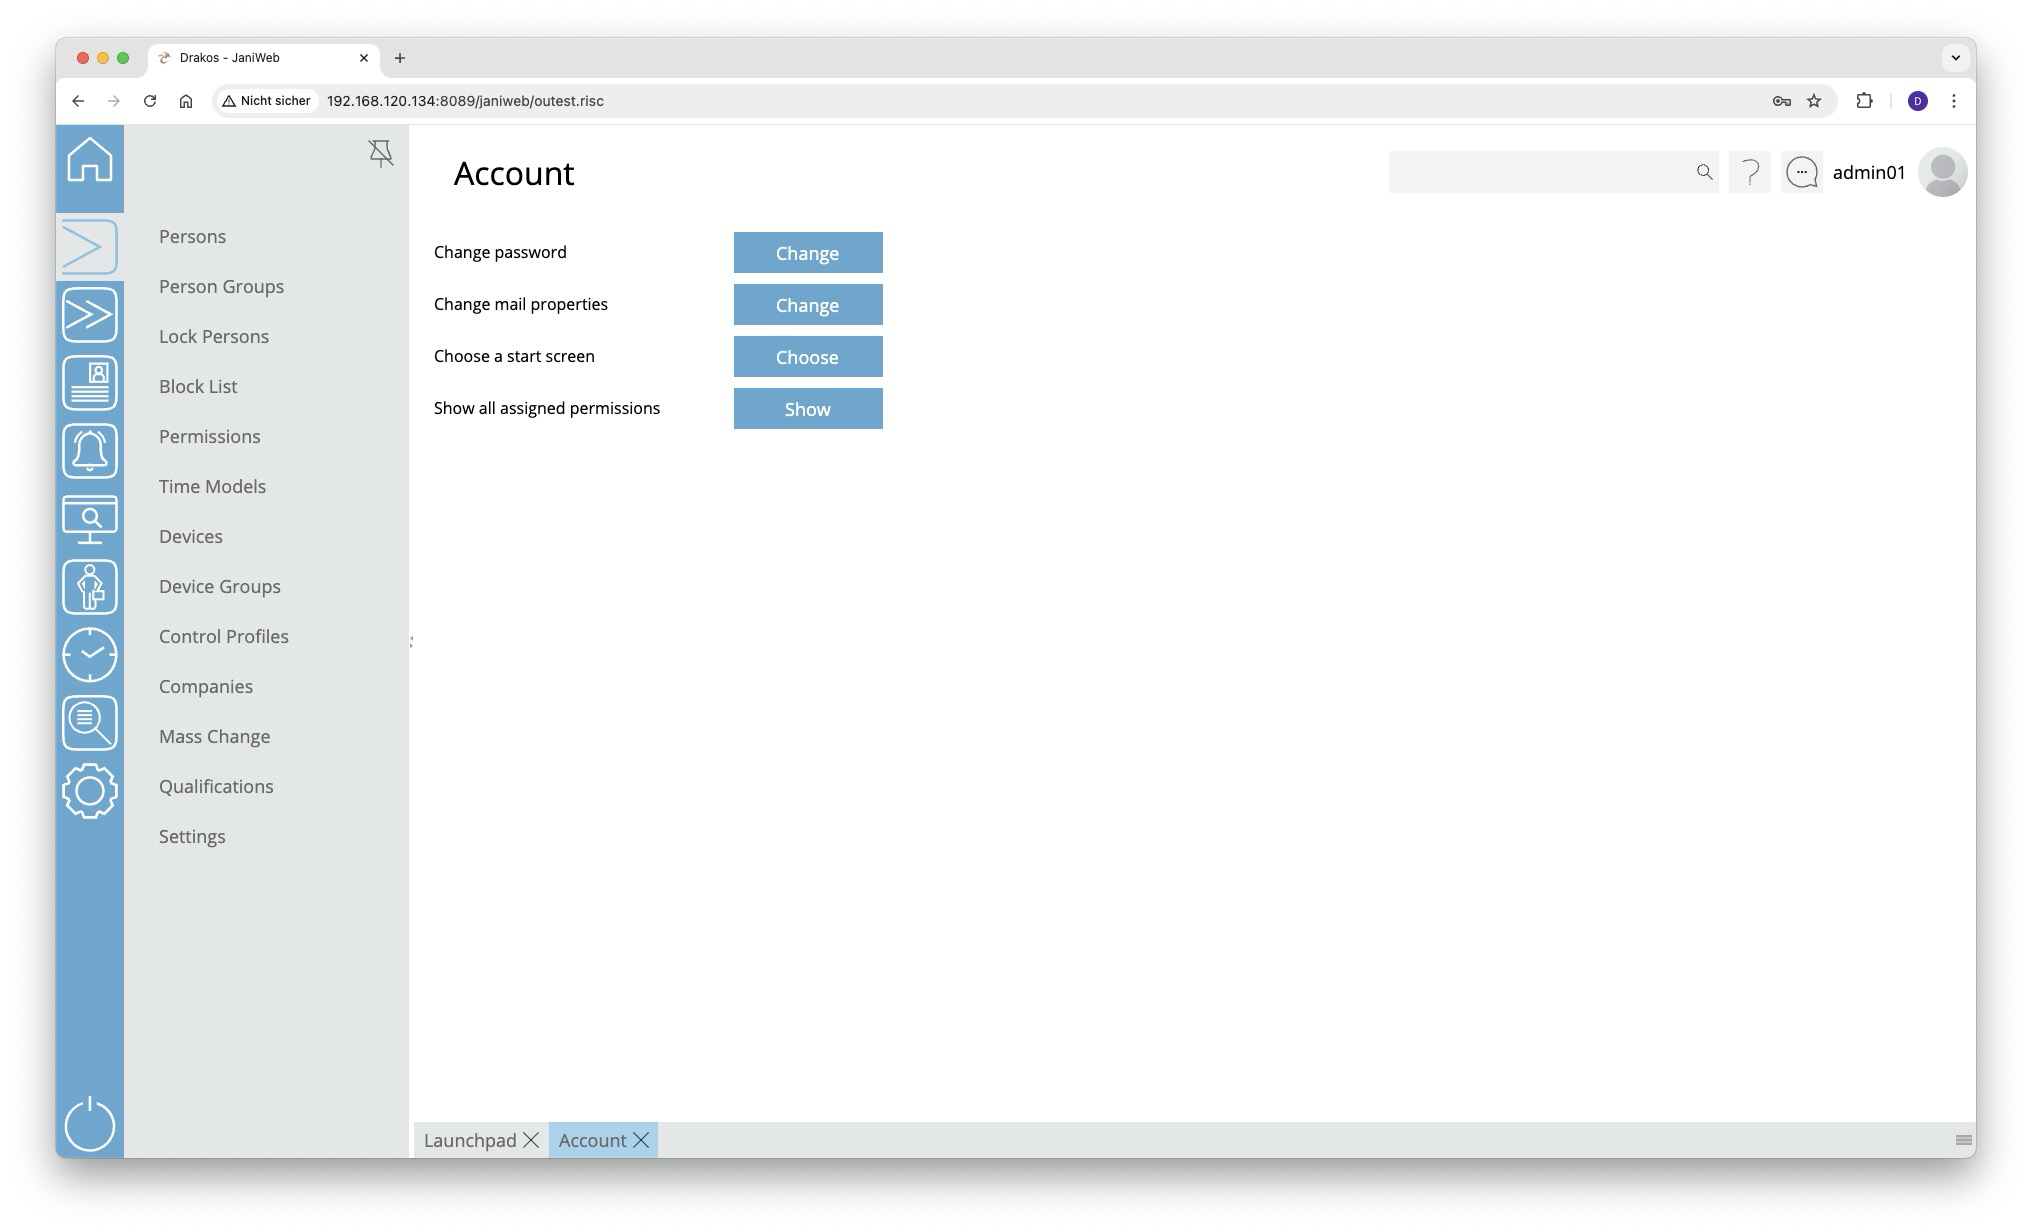
Change password
- Press Change next to Change password.
- Set your new password and save the change.
Change email address
- Press Change next to Change mail properties.
- Enter your new email address and save the change.
Specify start menu
You can select a menu that opens automatically after logging in:
- Press Choose next to Choose a start screen.
- Select the desired menu item.
If nothing is selected here, the Launchpad opens by default after logging in.
Show permissions
To view your permissions within the application, press Show next to Show all assigned permissions.
Set deputy
As a supervisor, choose up to three deputies for yourself. During the substitution period, all workflow requests are also forwarded to the supervisor’s deputy.
This option is only available if you have logged in as an employee and are a supervisor.
Disable team calendar limitation
The team display can be limited by further criteria in the settings. Enable this option to remove such restrictions.
This option is only available if you have logged in as an employee.
Show only direct employees
If this option is activated, you as a supervisor will only see the persons from the team for which you are the supervisor. Furthermore, you cannot see members of the team you are a member of yourself.
This option is only available if you have logged in as an employee and are a supervisor.
Incognito mode
If this option is activated, you will not be visible to other members of your team in the team calendar, and you will not see members of your team in the team calendar.
This option is only available if you have logged in as an employee.
Export Formats
Export lists
Lists in JaniWeb for which a download icon is displayed can be exported in various formats. The export files are downloaded or displayed depending on the settings of the browser / operating system. The following formats are available:
Creates a document in PDF format.
Tip: To print the pages, select the options “Automatically rotate pages” and “Fit into print area” in your PDF viewer.
CSV
Creates a file in CSV format (comma-separated values). The individual columns are enclosed in inverted commas and separated by semicolons.
XML
Creates a file in XML format. Rows are enclosed in <row> tags, columns in <cell> tags.
HTML
Creates a file in HTML format. The list is formatted as a simple table without styles.
Excel
Creates a file in Microsoft Excel format. This format can also be opened with many other spreadsheet programmes.
Clipboard
Copies the list to the computer clipboard. The individual columns are separated by tabs. Use this format to paste the list directly into an application such as Excel.
Custom Reports
You can freely configure each of the Analyses available in JaniWeb and save them under a custom name. This means that you do not have to redefine the parameters each time.
Saved reports
- appear in the menu and can be accessed directly from there,
- can be placed as a tile on the Lauchpad.
The following elements are available for each report:
Button Save Query Configuration
Press Save Query Configuration to save the report under a name of your choice.
Option Periodic sending
Select the option Periodic sending to send the report regularly by email.
- Enter one or more email recipients.
- Select the desired file format for the analysis (PDF, Excel or CSV).
- Set the time interval for automatic sending.
- e.g. every hour

- e.g every day 12:30 o'clock

- e.g. every Monday 8:00 AM o'clock

- e.g. every hour
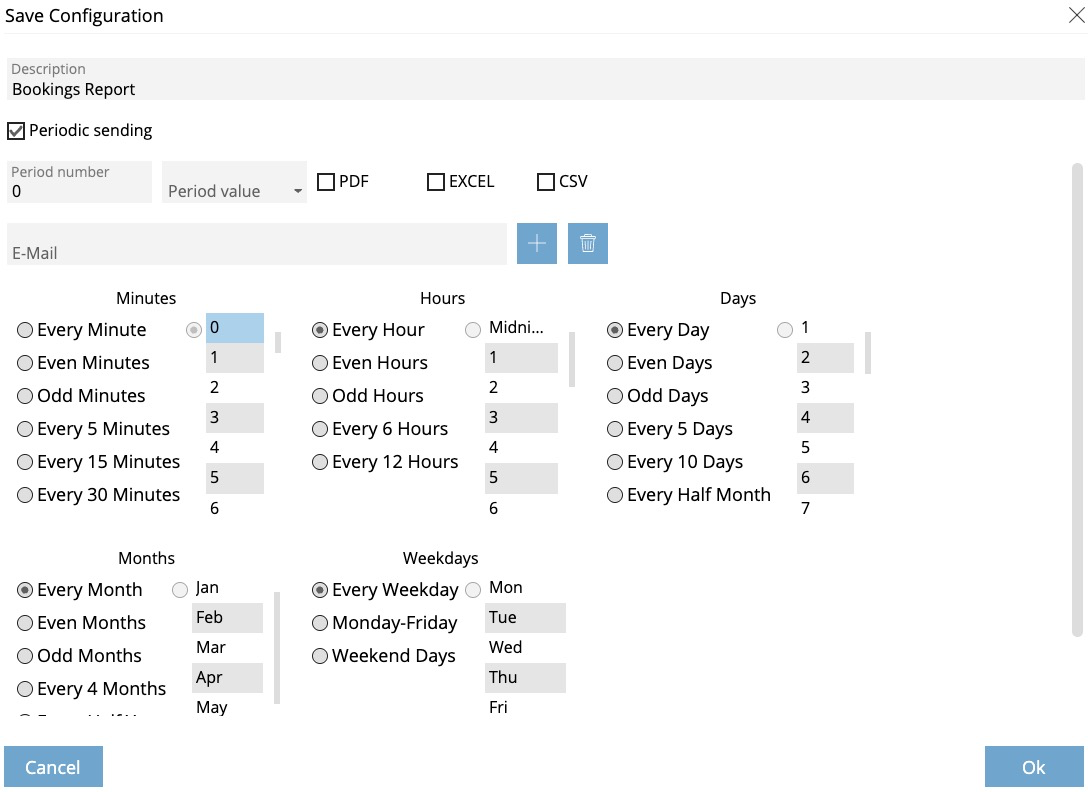
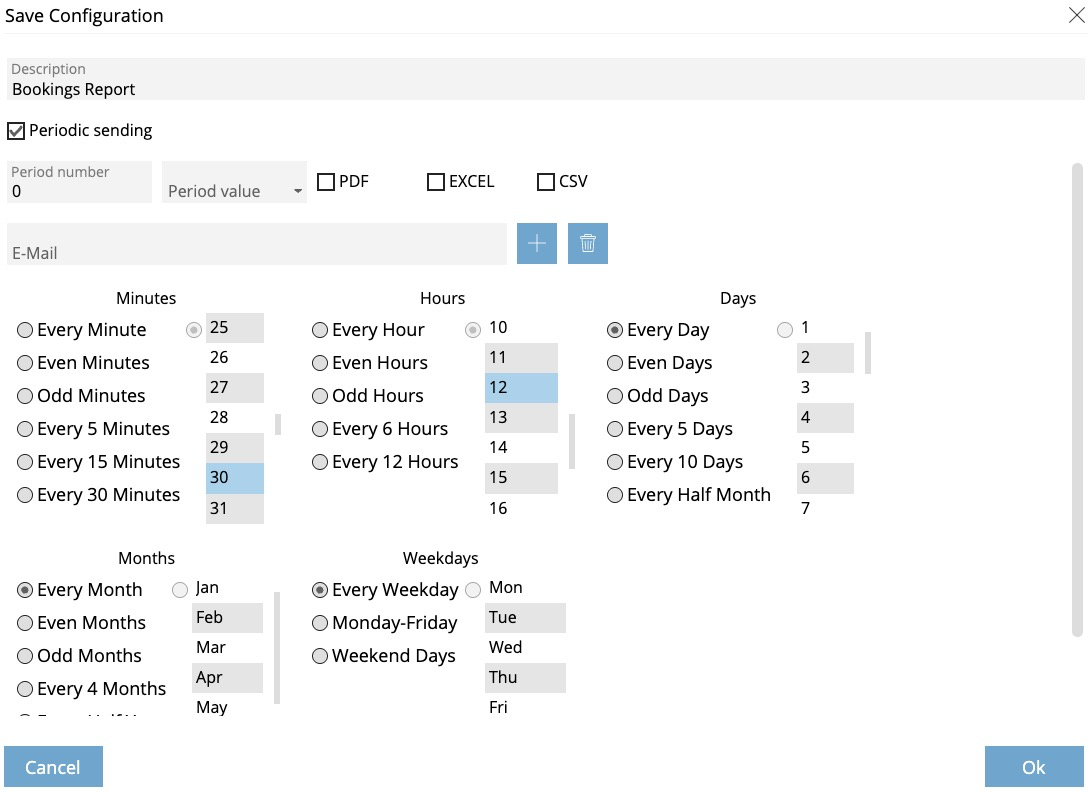

Button Delete Query Configuration
Press Delete Query Configuration to delete the saved report.
Button Edit Query Configuration
Press Edit Query Configuration to save the report under a different name. You can also change the settings for periodic sending by email. Press Ok to apply the changes.
Access Management
Persons
The Persons menu item allows you to manage the personnel in your system. Here you can create new persons or change details of existing persons.
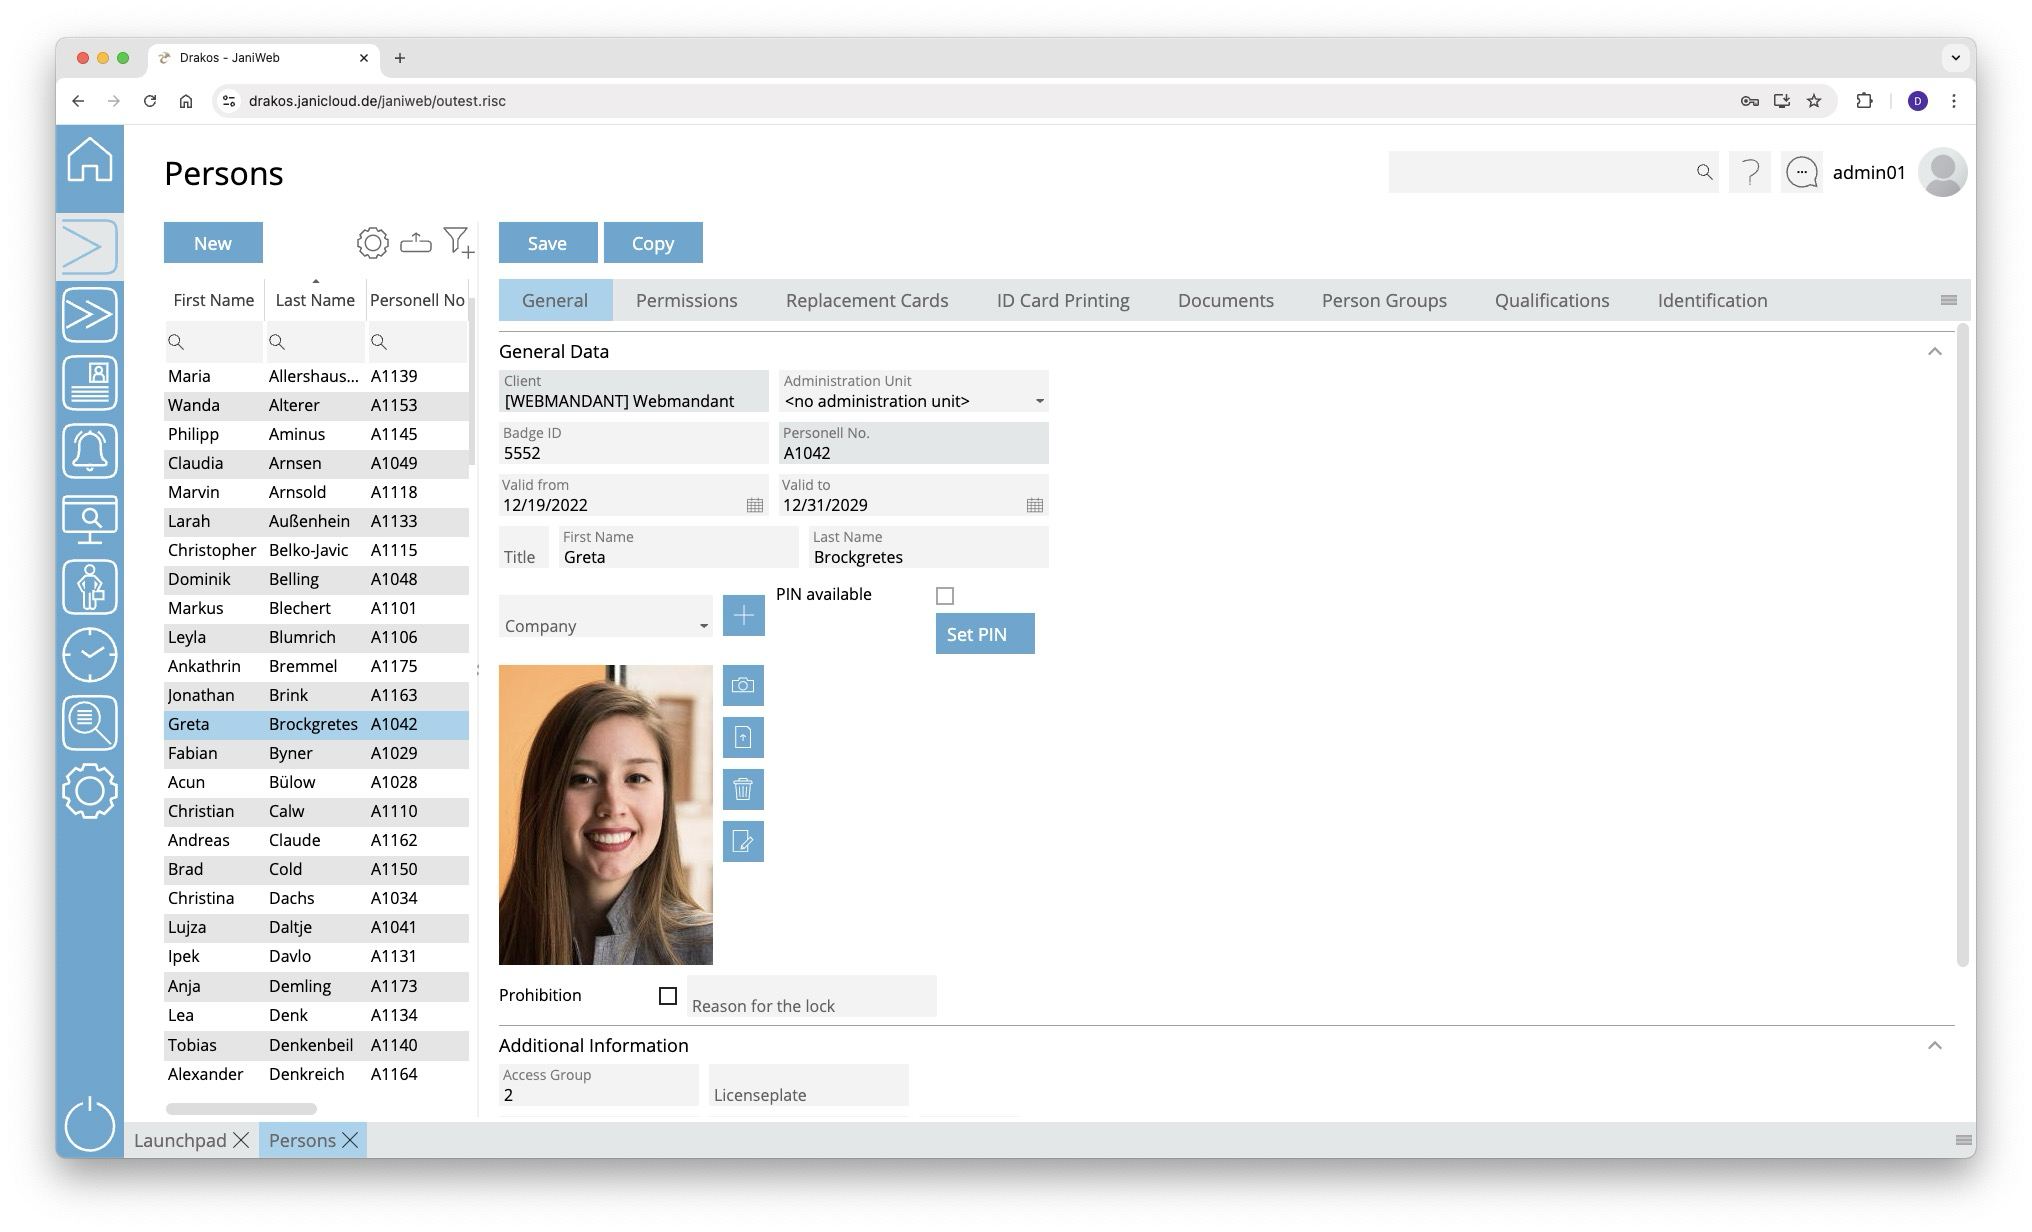
List of persons
The list contains the persons that have already been created. Select a person to view details.
The list offers the following options:
- Select columns to display: Press the gear icon. Select which columns you want to display and in which order. Arrange the columns using the mouse or the arrow icons. Press Apply to adopt the changes.
- Filter by client and status: Press the filter icon. Select the clients and the status (Active, Active in future, Inactive) for which persons should be displayed. Changes are visible immediately.
- Search in columns: Enter text or numbers in the search field (magnifying glass icon) of a column to search for names, personnel numbers, or other criteria. The entries take effect immediately: the list only displays hits.
Tip: Search for substrings. You can find “Spencer-Churchill” with “spe”, “chur” or “hill”. The search is not case sensitive. - Export the entire list: Press the download icon. Select the format in which you want to export the list. The export files are downloaded or displayed depending on the browser/operating system settings.For details on the available export formats, see the General > Export Formats chapter of this manual.
Button New
Press New to create a new person. Enter the required information about the person on the tab General Data and press Save.
Tab General Data
This is where you store and edit personal data. You can individually define which fields and areas are available here via Settings > tab General.
Personal data that is transferred from external systems (e.g. SAP) cannot be changed here. They must be edited in the respective source system.
Tab Permissions
Here you can grant (Add Device Group / Add Device) or revoke (Remove Group / Remove Device) permissions for a person.
The lists on the tabs Add Group / Add Device provide an overview of all permissions linked to the person. The column Origin indicates where the permission comes from. For example, it could have been passed on to the person via a person group or transferred from the Janitor system.
If the tabs Delete Device or Delete Group contain a device or device group, access via this device or device group is not possible. This also applies if a permission for the device or device group has been granted on the tab Add Device or Add Device Group.
A tick after the title of a tab indicates that there is data within the tab.
Workflow Permissions
This feature is optional and not available in every installation.
If assigning a device or device group is associated with a workflow, the permission becomes active only after the decision-maker approves the workflow request.
If you select a device or device group that has a workflow, a dialog box appears. This prompts you to enter values for the time model and the validity of the permission. You also have the option of leaving a comment for the decision-maker.
You can create multiple workflow requests at once. To send them, press Save.
Workflow requests are indicated by different colors:
You can extend the validity of approved permissions. To do this, press Extend. Then select new validity dates and create another workflow request.
Tab Replacement Badges
Here you can issue up to three replacement IDs for one person. Only one ID can be active at a time.
- Press Issue Badge.
- Select an ID from the list or enter the number manually. IDs marked in red are already assigned.
You can define the number range for replacement IDs individually for each location via the menu item Settings.
Tab Badge Printing
This feature is optional and not available in every installation. Depending on the version, it may also be available in the main menu.
This tab allows you to print badges with the person’s information. You can define the layouts for printing badges via the menu item Badge Printing > Settings.
Tab Documents
Here you can link documents to the personnel master record. To upload new documents, drag the file(s) into the area provided. Or press Upload Documents and select the desired files on your computer.
Tab Person Groups
Here you can see to which person groups the selected person is assigned. You can manually add or exclude person groups. Manual adjustments overwrite the automatic assignment based on the person’s criteria.
Manual adjustments are marked accordingly:
- Manually assigned: The person group is highlighted in green and the note manually assigned is added.
- Manually excluded: The group of persons is highlighted in yellow and the note manually excluded is added.
You can remove manual adjustments at any time using the trash can icon.
Tab Qualifications
Qualifications enable you to unlock permissions for the selected person. Use the menu item Qualifications to specify which qualifications can be selected here.
Tab Identification
Here you can manage the various media that a person can use to identify themselves on a device. To add a new identification medium, press Add.
- Identification: Enter the value for the medium in this column (e.g. “F DD 193E” for a license plate).
- Type: Select the type of identification in this column (e.g. license plate).
- Valid from / Valid to: Define a validity period for the medium.
- Prohibition: In this column, you can block individual identification media.
- Reason for ban: You can enter a comment here as a reason for the ban.
- To remove an identification medium, use the trash icon.
Press Save to save the entries.
TIPS
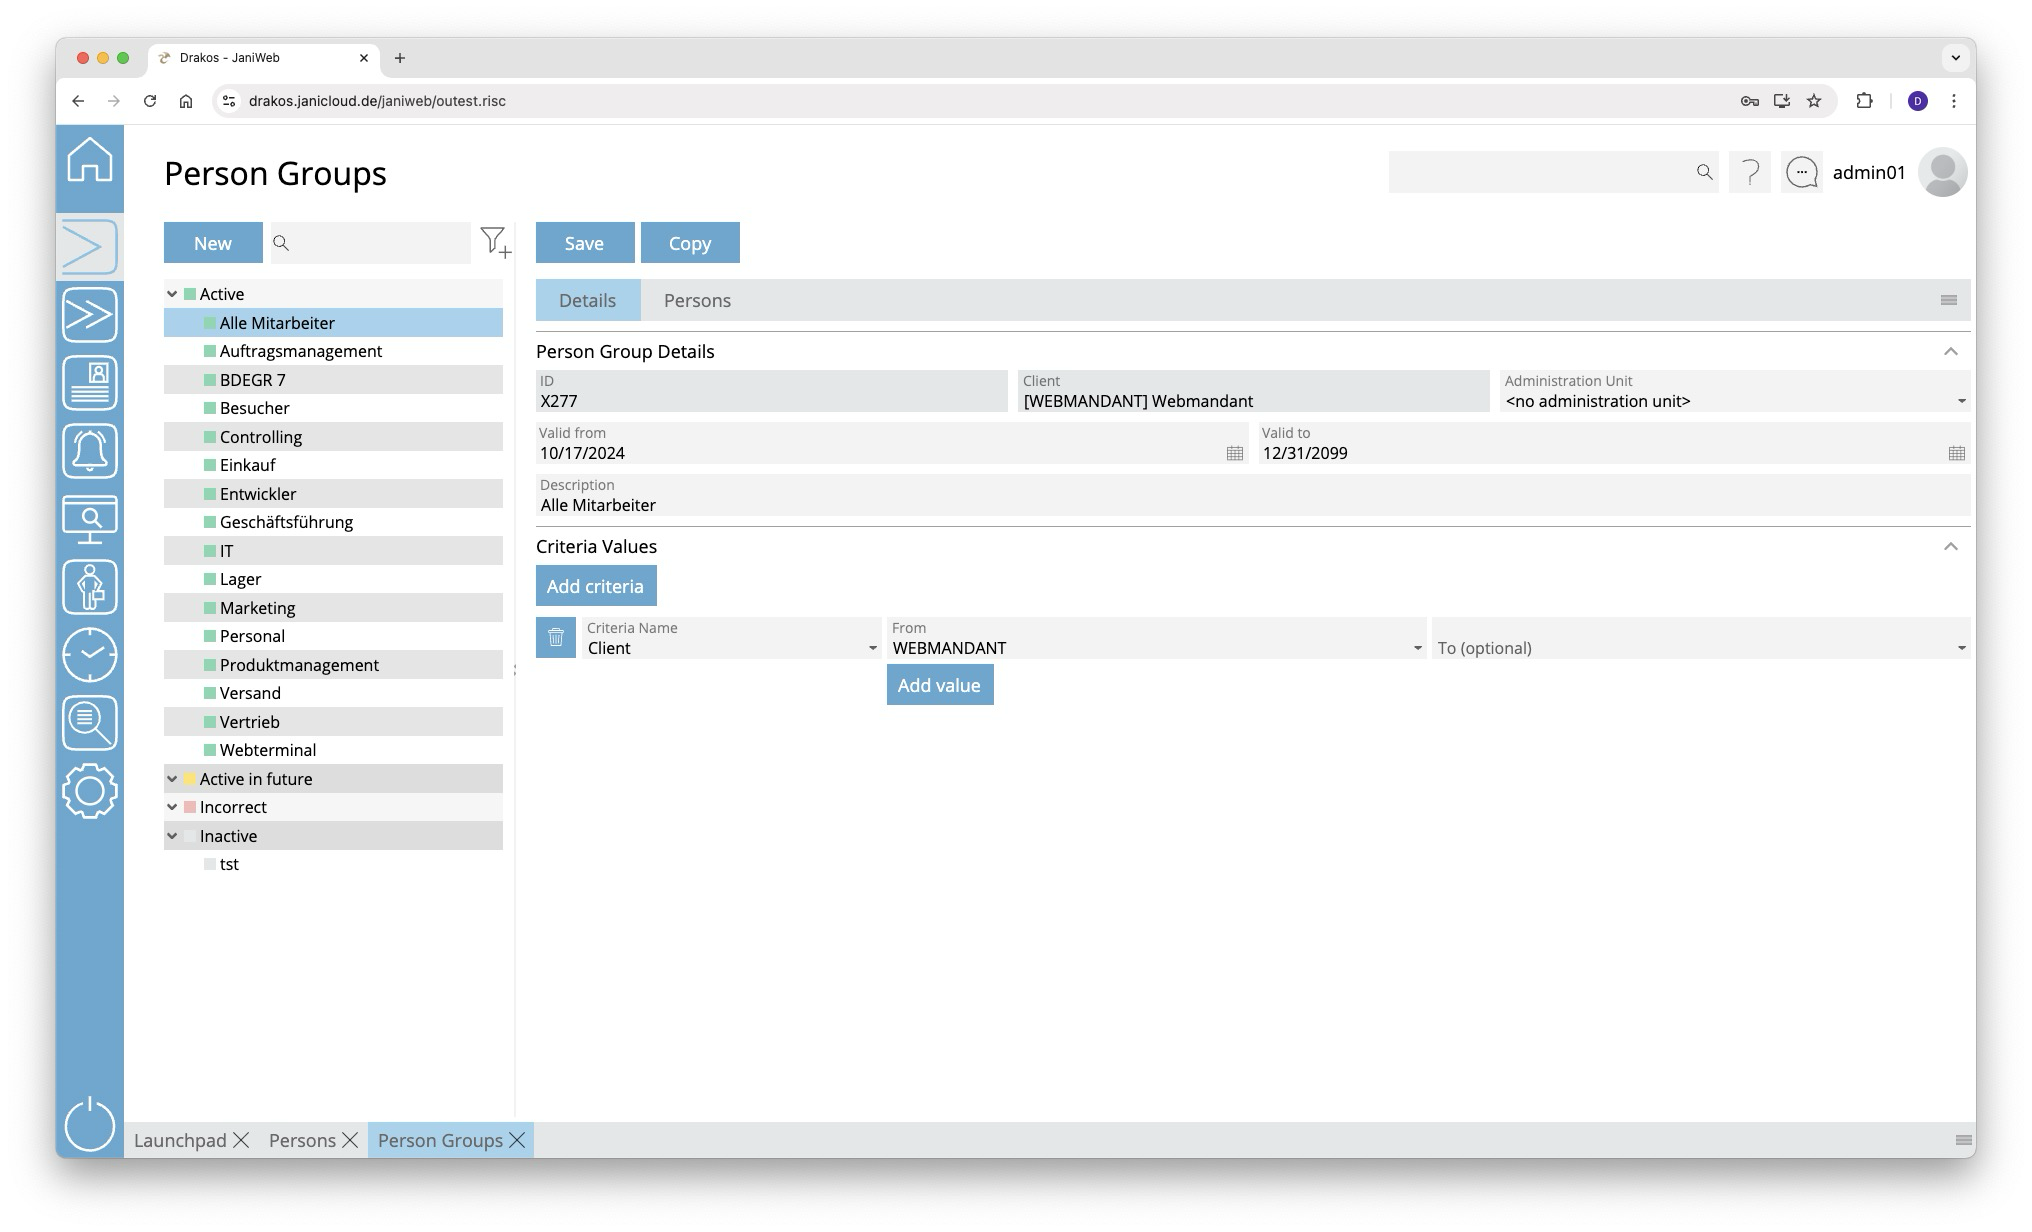
Person Groups
You can use the menu item Person Groups to group staff according to departments or other criteria.
List of person groups
The list contains all person groups already created, grouped by their status. Select a person group to view details.
The list offers the following options:
- Search: Enter text or numbers in the search field (magnifying glass icon) at the top to search for groups. The entries take effect immediately: the list only displays hits. The search is not case sensitive.
- Filter: Press the filter icon. Select the criteria for which you want to display groups. Changes are visible immediately.
Button New
Press New to create a new person group. Enter a description, a validity period, and a client, and press Save.
Tab Definition
Area Person Group Details
Define the details of the person group, such as the label and validity period.
Area Criteria Values
Specify the criteria according to which the person group is formed. To add a new criterion:
- Press Add criteria.
- Select the required criterion from the list field.
- Enter a single value (From) or a range of values (From–To).
- To set additional values for the same criterion, press Add value.
Logic of criteria and values
- The values within the same criterion are linked logically by OR (one match is sufficient).
- Different criteria are linked logically by AND (all criteria must be met).
Tab Persons
The list displayed here contains all persons who belong to the selected person group. Persons in this list have either been assigned automatically based on criteria or added manually.
- Press Add to add a person to the group independently of their criteria.
- Use the trash icon to remove a person from the group independently of their criteria.
Furthermore, the list offers the following options:
- Select columns to display: Press the gear icon. Select which columns you want to display and in which order. Arrange the columns using the mouse or the arrow icons. Press Apply to adopt the changes.
- Search in columns: Enter text or numbers in the search field (magnifying glass icon) of a column to search for names, personnel numbers, or other criteria. The entries take effect immediately: the list only displays hits.
Tip: Search for substrings. You can find “Spencer-Churchill” with “spe”, “chur” or “hill”. The search is not case sensitive. - Export the entire list: Press the download icon. Select the format in which you want to export the list. The export files are downloaded or displayed depending on the browser/operating system settings. For details on the available export formats, see the General > Export Formats chapter of this manual.
TIPS
Lock Persons
The menu item Lock Persons allows you to block and unblock badges en masse based on certain criteria.
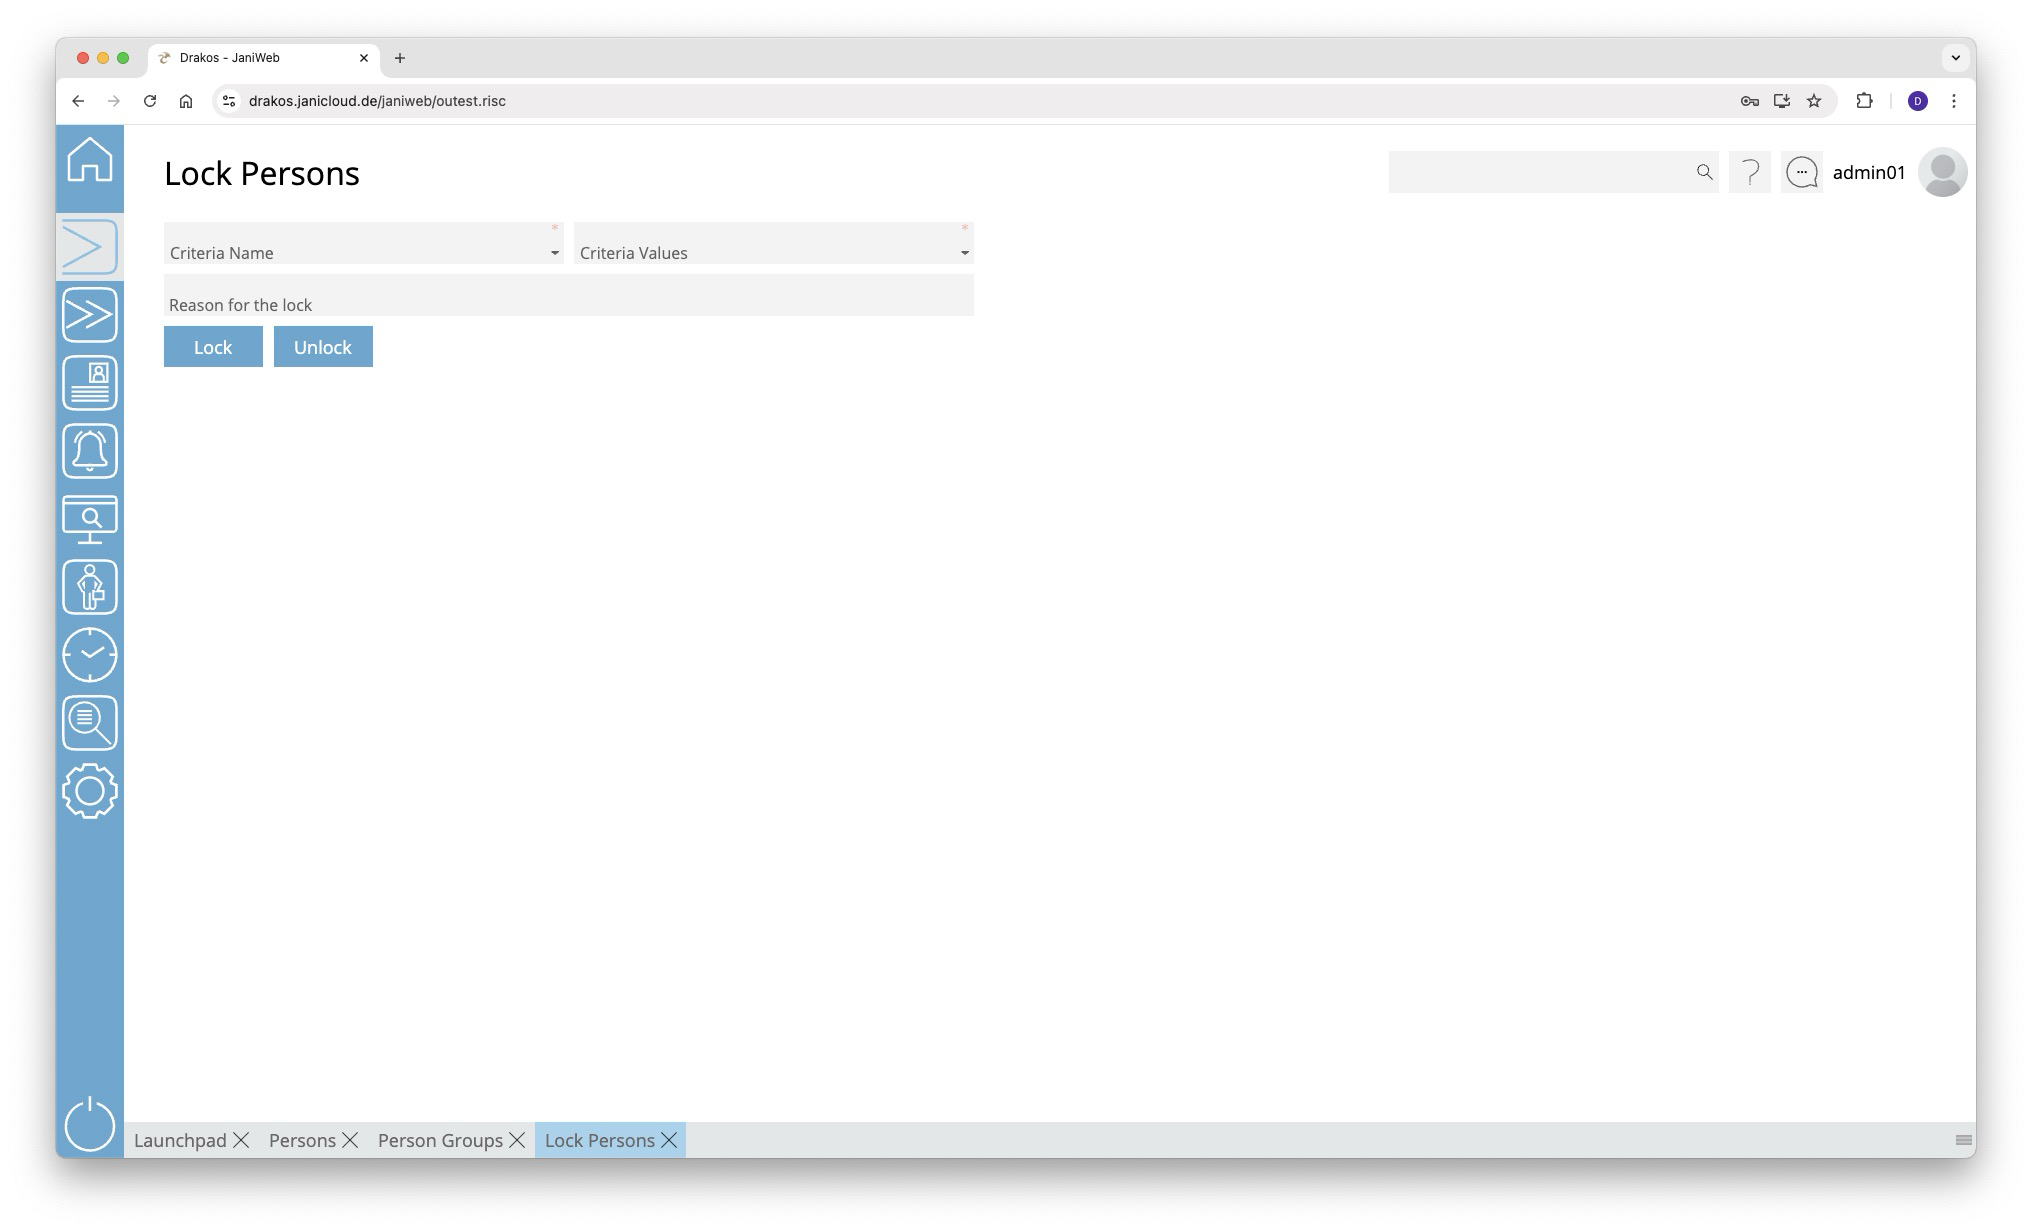
Locking persons
- Select a criterion from the list field (e.g. badge number or PDC group).
- Select a value from the Criteria Values drop-down list.
- (Optional) Enter a reason for the ban in the field Reason for the lock.
- Press Lock to lock the person(s).
Unlocking persons
Follow steps 1 and 2 above and press Unlock.
Block List

Permissions
Use the menu item Permissions to grant individual persons or entire groups of persons permissions for certain devices or device groups.
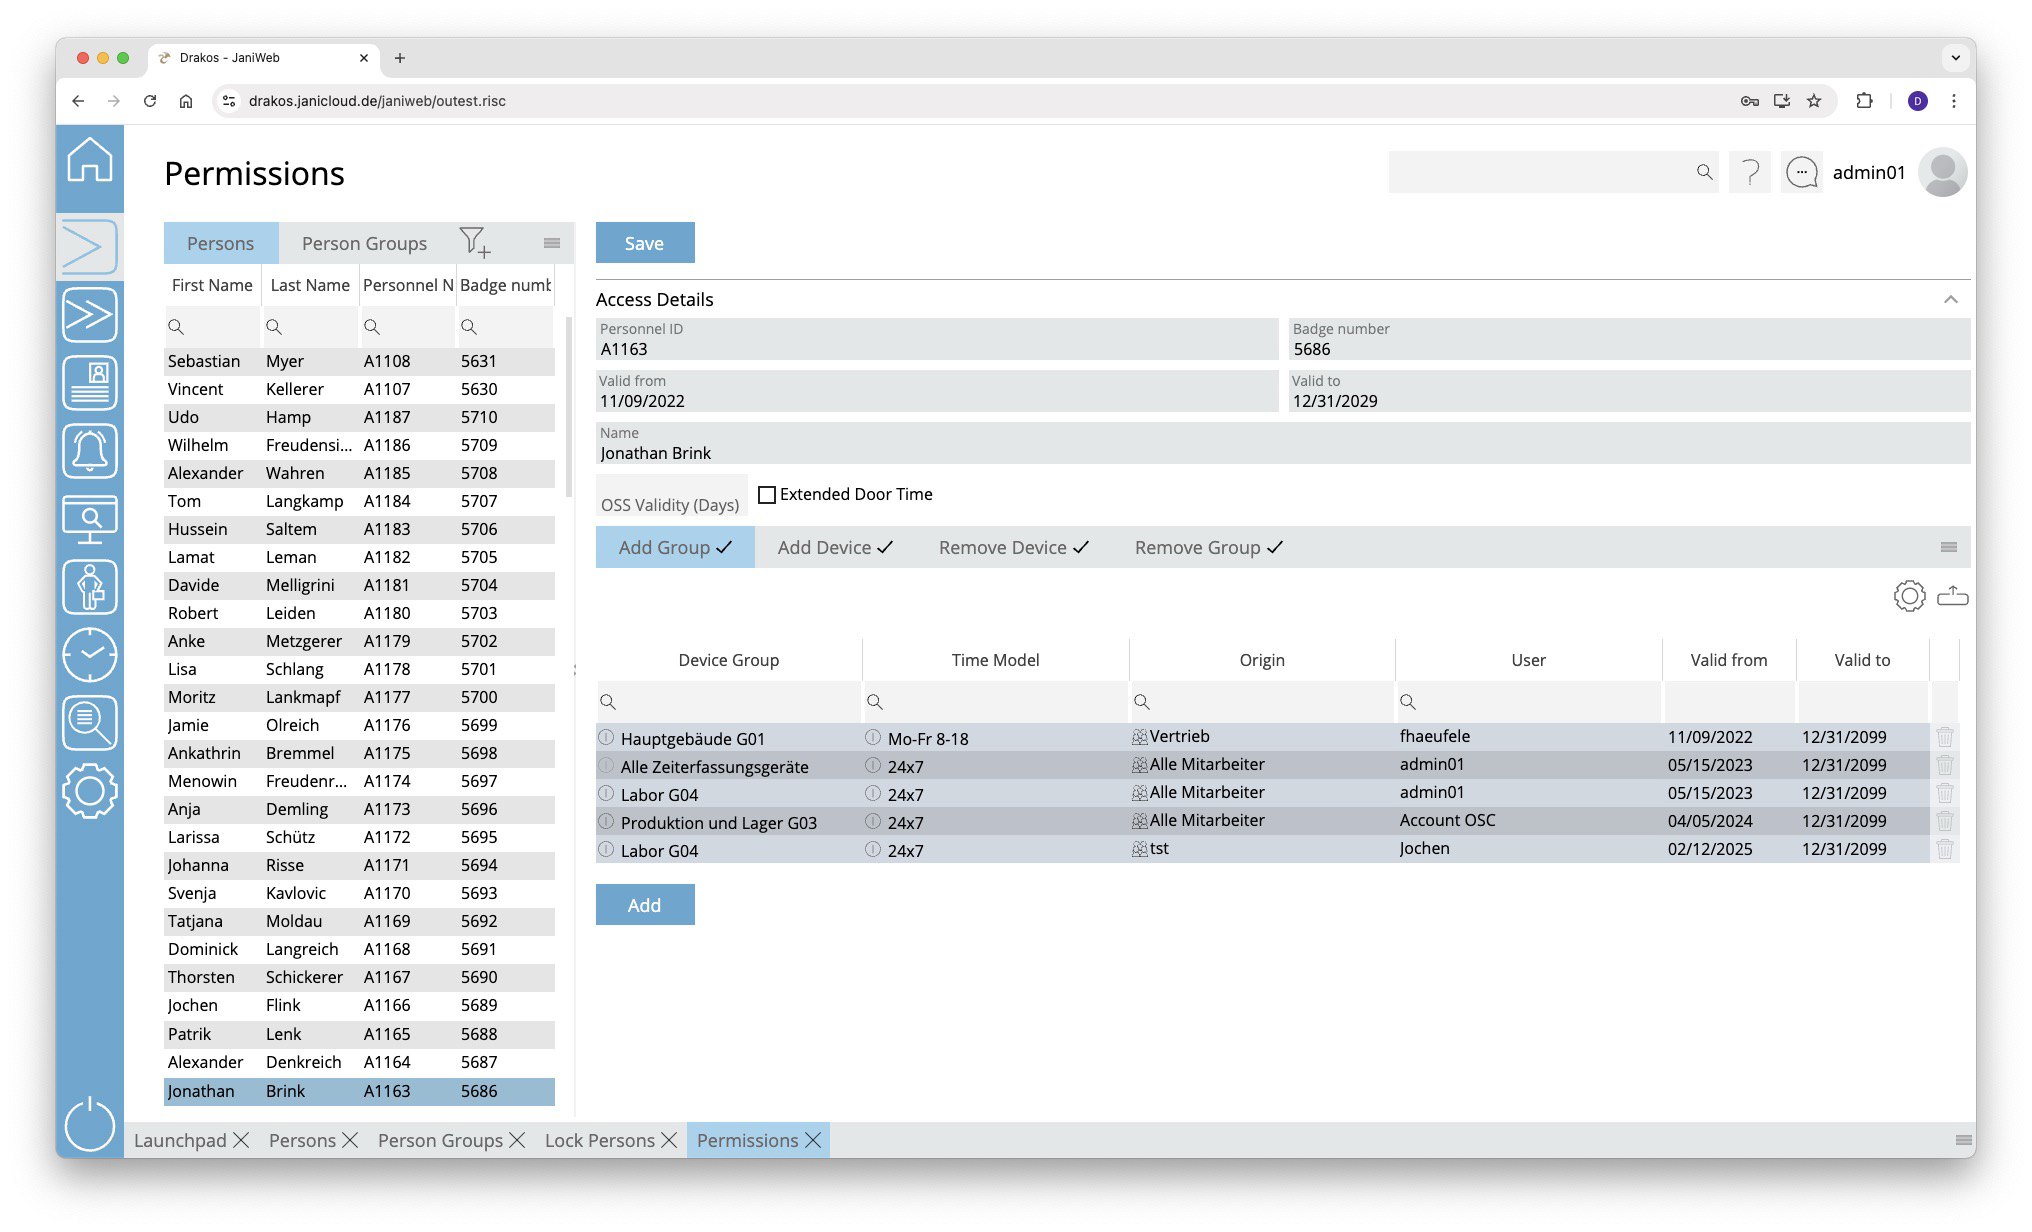
List of persons and groups of persons
Select a person or group of persons from the list on the corresponding tab page to display the existing permissions.
Tabs Add Group / Add Device
Here you can grant the selected person/group of persons permissions to use certain device groups or devices. To add another device group or device to the list:
- Press Add.
- Select a Device Group or a Device.
- Select the desired Time Model.
- Set a validity period.
- Press Save.
A tick after the title of a tab indicates that there is data within the tab.
Tabs Remove Device / Remove Group
These lists are used to remove permissions for certain device groups or devices.
Example: Anna B. belongs to the group of persons called “laboratory technicians”. This group of persons has permission for the device group “laboratory”. However, Anna is not allowed to enter a particular laboratory. Add the access device for this laboratory to the Remove Device list.
To add further device groups or devices to the list, follow the steps in the previous section. However, a time model cannot be selected here.
If the tabs Remove Device or Remove Group contain a device or device group, access via this device or device group is not possible. This also applies if a permission for the device or device group has been granted on the tabs Add Device or Add Group.
A tick after the title of a tab indicates that there is data within the tab.
Workflow Permissions
This feature is optional and not available in every installation.
If assigning a device or device group is associated with a workflow, the permission becomes active only after the decision-maker approves the workflow request.
If you select a device or device group that has a workflow, a dialog box appears. This prompts you to enter values for the time model and the validity of the permission. You also have the option of leaving a comment for the decision-maker.
You can create multiple workflow requests at once. To send them, press Save.
Workflow requests are indicated by different colors:
You can extend the validity of approved permissions. To do this, press Extend. Then select a new validity period and create another workflow request.
TIPS
The column Origin indicates where the permission comes from. For example, the permission might have been inherited by the person, or it might have been granted by the system Janitor.
Time Models
Use this menu item to manage time models for access permissions. By linking a time model to a device group or a single device, you determine the times at which they may be used.
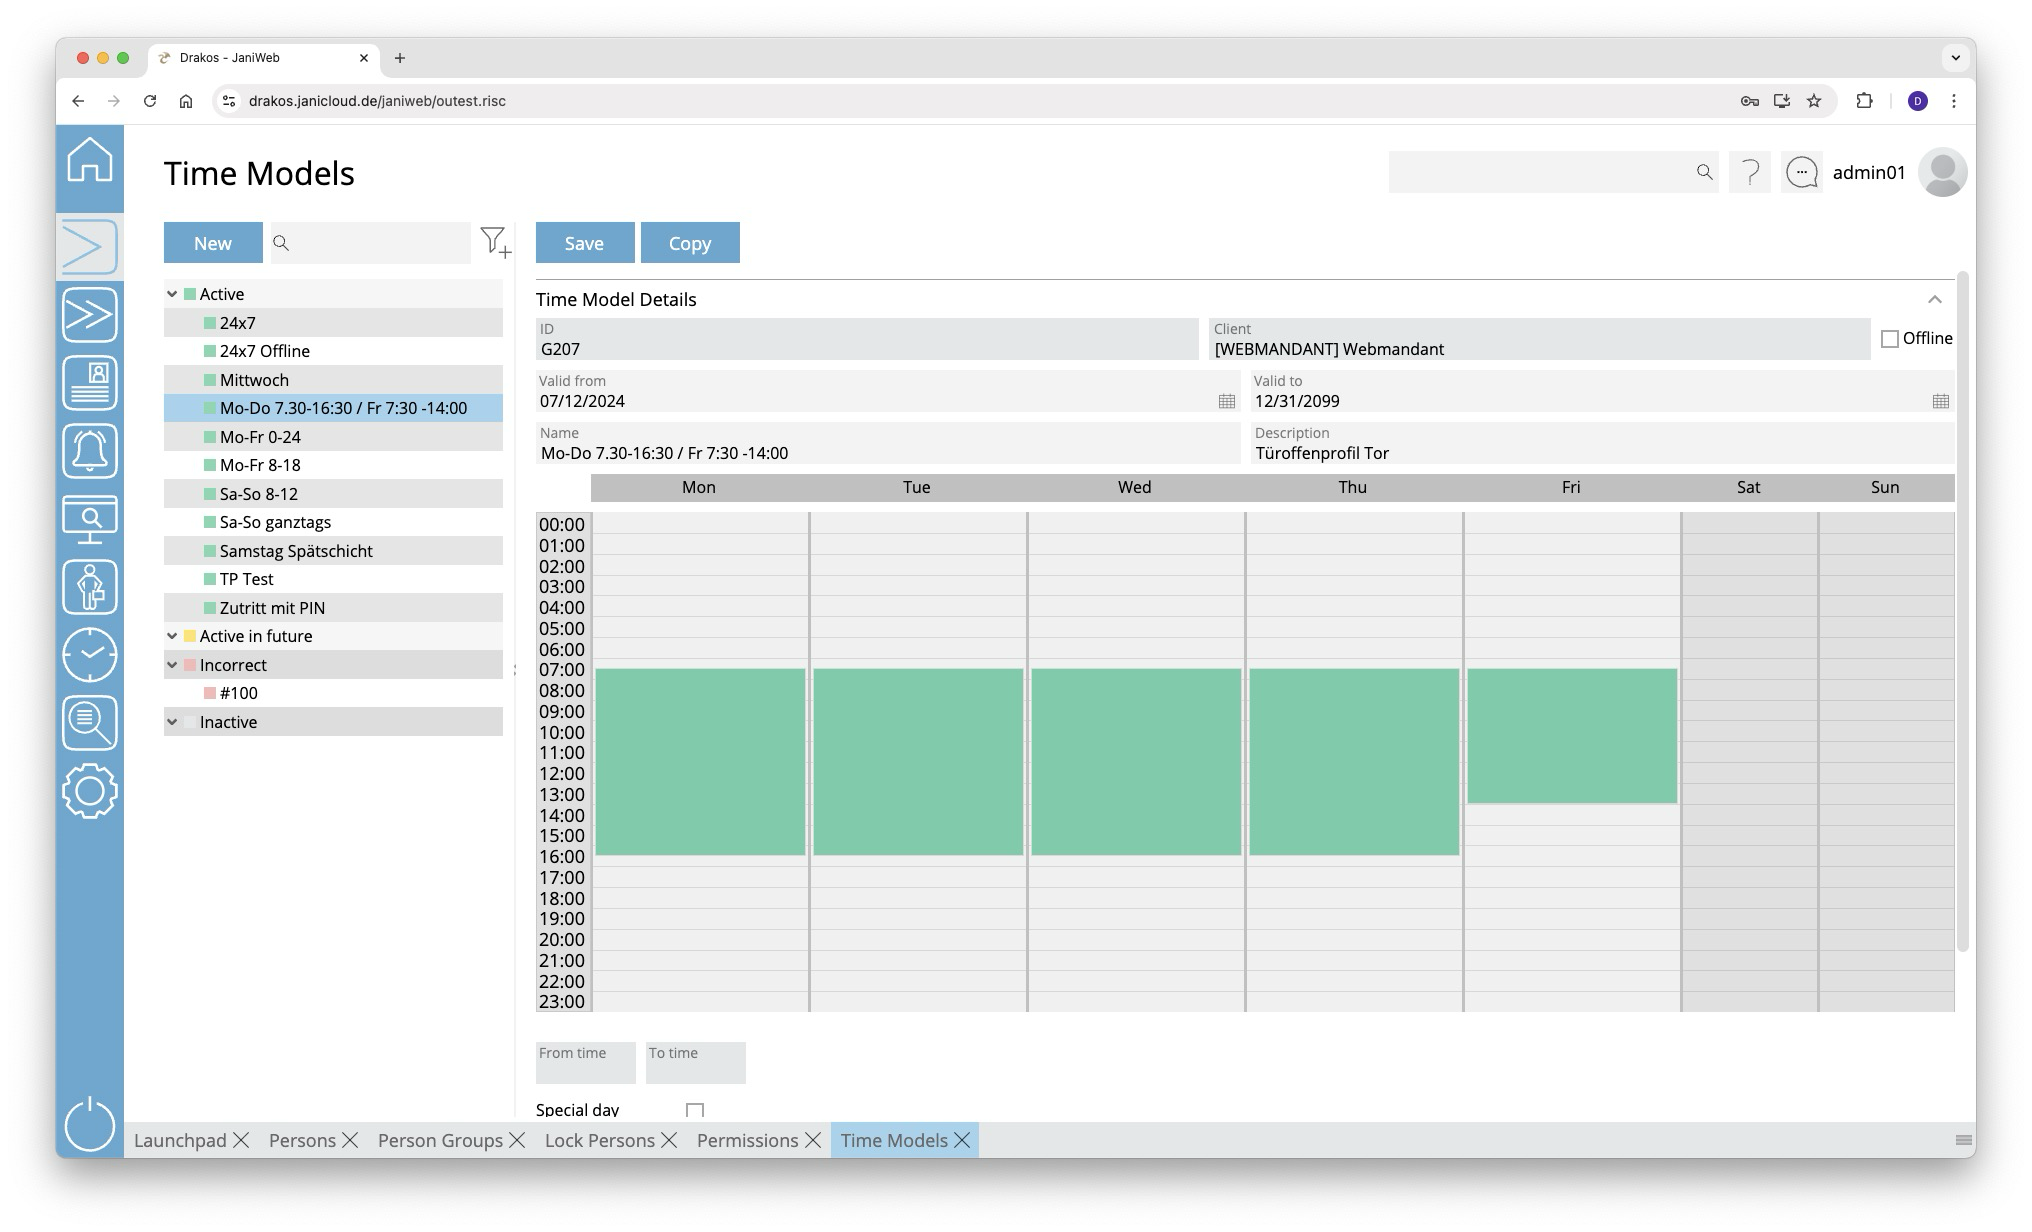
List of time models
The list contains the time models that have already been created. Select a time model to display its properties.
Button New
Press New to create a new time model.
- Entering basic data: Enter a description, select the client and define the validity period.
-
Editing the weekly overview: To define the periods during the week when access should be allowed, proceed as follows:
-
Right-click on the desired day and select New time period. A green marker appears.
-
Drag the marker with the mouse or enter the start and end times in the From time and To time fields.
-
Repeat the steps for all other periods and days that should be included in this time model.
-
- Specify access options:
- Holiday Classes: This is where you determine the bank holidays on which access should be allowed. If a check mark is set, this time model applies to holidays that belong to the holiday class. If no check mark is set, this time model does not apply to any holidays.
- PIN required: Select whether access should only be possible with a PIN.
- PIN in master record: Select whether the PIN should be transmitted together with the master record.
- Save: Press Save to save your entries.
Button Copy
You can copy an existing time model to use as a basis for a new time model. Click Copy at the top to make the desired changes. Then click Save.
Option Offline
If the Offline option is set, the ID must be selected from the list. Also you can choose the Validation duration. Offline time models can only be assigned to offline components or offline device groups.
TIPS
It is possible to create multiple time periods per day.
- Delete a time period: To remove a time period, right-click it and select Delete.
- Copying a period: To copy a period to the clipboard, right-click on it and select Copy.
- Inserting a period: To insert a copied period on a different day of the week, right-click on the desired day and select Paste.
Devices
This menu item allows you to manage the devices for access control and time tracking and to query their status.
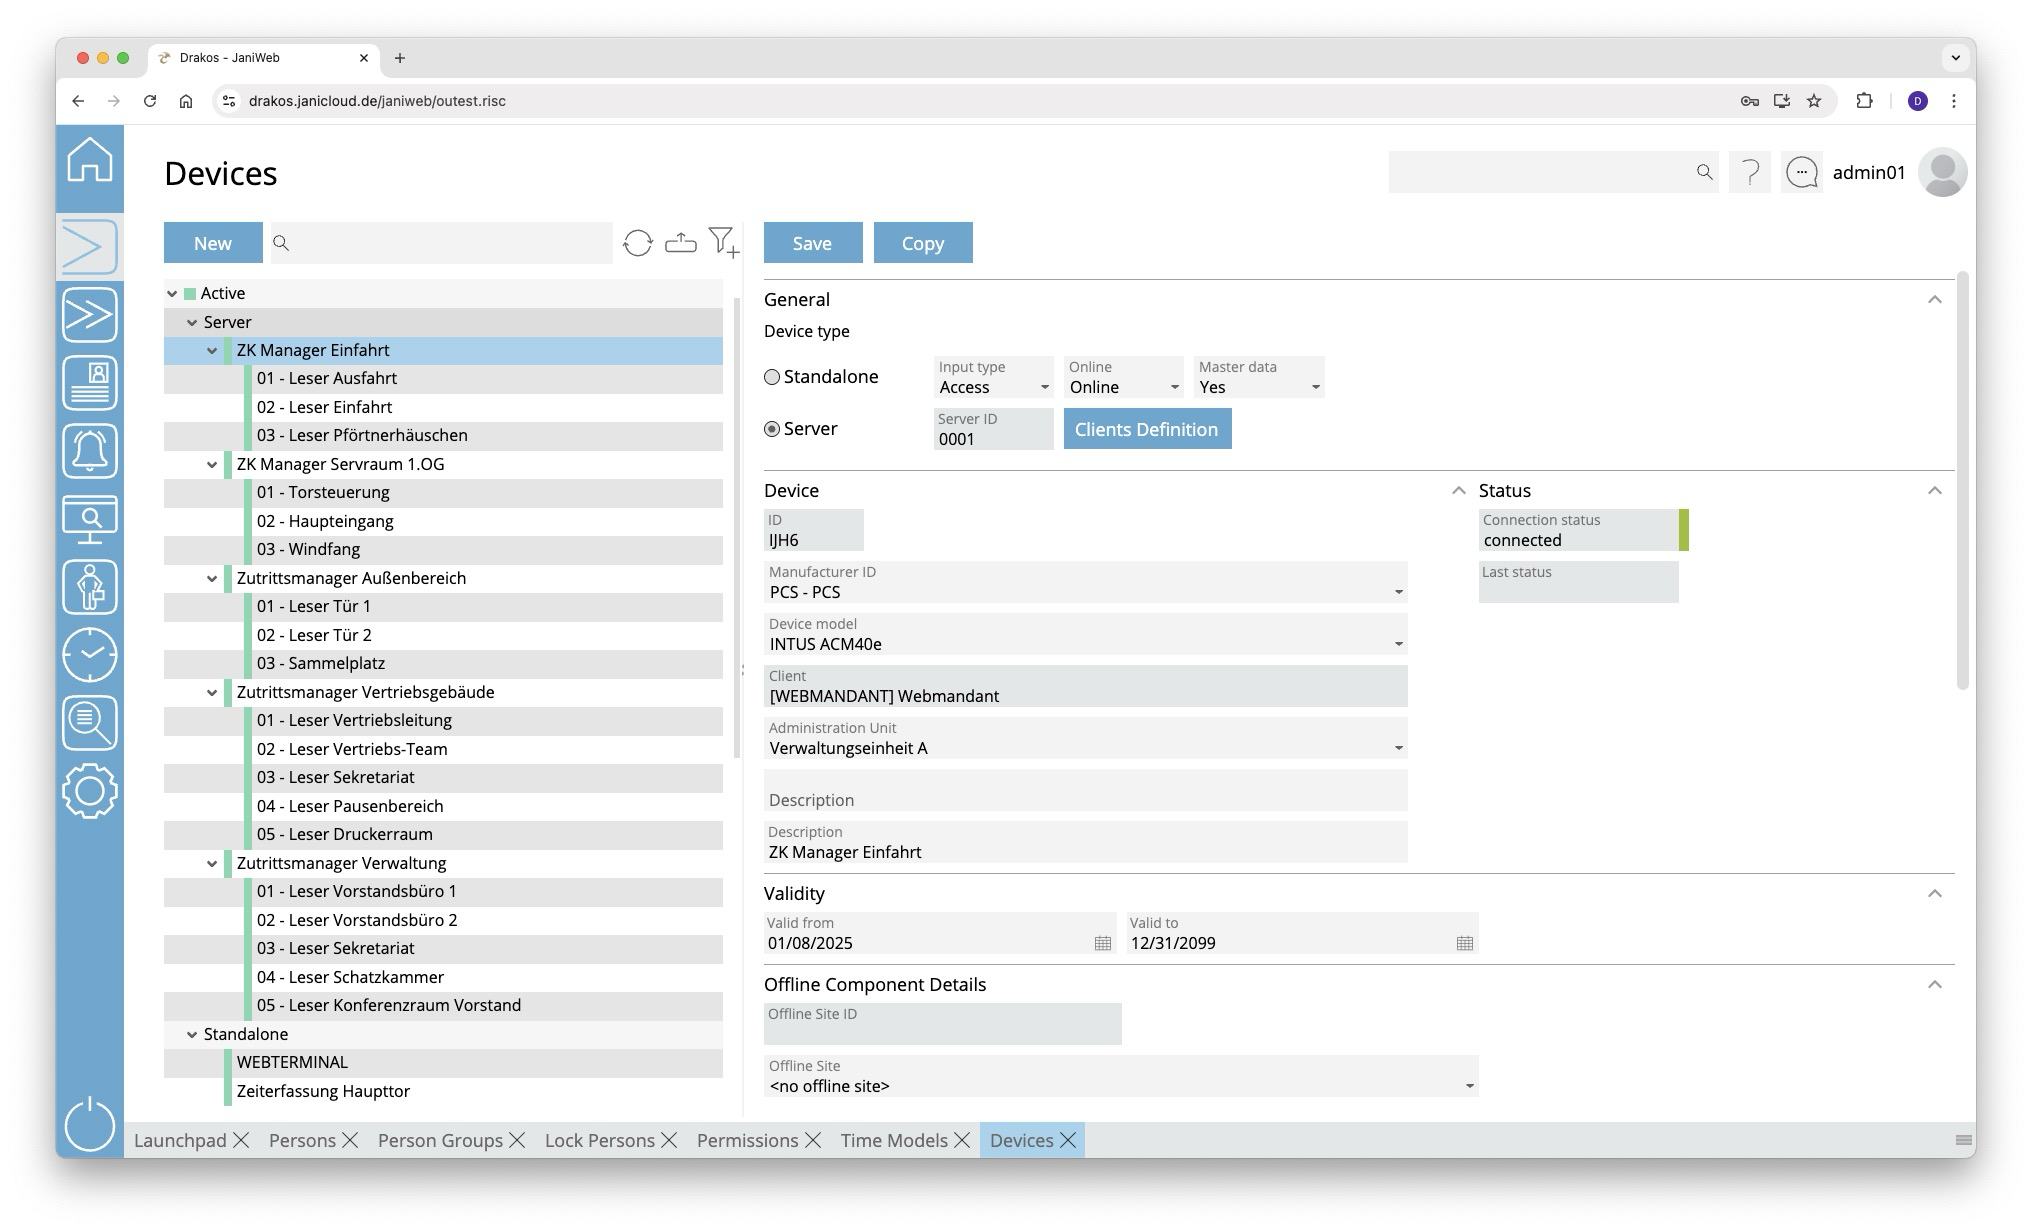
List of devices
The list contains the devices that have already been created, sorted by device type. Select a device to view details.
The list offers the following options:
- Search: Enter text or numbers in the search field (magnifying glass icon) at the top to search for devices. The entries take effect immediately: the list only displays hits. The search is not case sensitive.
- Filter: Press the filter icon. Select the criteria for which you want to display devices. Changes are visible immediately.
- Refresh: Press Refresh to update the list of devices and their status information. This can be useful for troubleshooting, for example.
- Export the entire list: Press the download icon. Select the format in which you want to export the list. For details on the available export formats, see the General > Export Formats chapter of this manual.
In addition to the tree view, you also have the option of displaying the terminals as a table. This allows you to display additional information, such as the IP address of the devices, in the list.
Button New
Press New to create a new device. Enter the required information and press Save.
Area General
- Select whether the device is a Standalone device, a Server or an Offline component.
- Specify whether the device is used for Time recording, Access or plant data collection (PDC).
Button Clients Definition
- Press this button to assign and configure a sub-reader for an access server.
- Make sure to select the correct Client Position for sub-readers.
Area Status
In the Connection status field, you can see the connection status of the device. This can have the following statuses:
- connected - the device is connected
- disconnected - the connection to the device is disconnected
- unknown - the status of the device is unknown
The time at which a status was last transmitted is shown in the Last status field.
The Device status field shows the mode the device is in. The following modes are possible:
- online - the device expects an online response from the device communication
- offline - the device accepts bookings and checks the internal memory to see whether it is an authorised or unauthorised booking
- autonomous - the device does not expect a connection to the device communication and saves the bookings in the temporary memory
The Last master record download field indicates the time at which the device was last supplied with master data. (only available for devices from the manufacturer Dormakaba)
The Master record log button can be used to check which master data has been sent to the device. (only available for devices from the manufacturer Dormakaba)
Area Device
Enter the basic information about the device.
- Select a Manufacturer ID and a Client.
- Enter a Description and additional information for the device.
Area Validity
Define the period during which the device should be active.
Area Cardlink
In the Validation field, specify the offline site for which the device writes validation records to the ID cards.
In the Update field, specify the offline site for which the device writes update records to the ID cards.
Area Network
Specify the network settings required for the device.
Area Options
- Location: Enter a location for the device.
- Time zone: If you are managing devices in different time zones, make sure that the correct time zone is selected.
- Holiday Calendar: Select the appropriate bank holiday calendar for the device.
Area Offline Component Details
Select the Offline Site to which the component belongs. (You can create offline sites under Settings > Tab Offline Components.)
Parameters for offline components (manufacturer Dormakaba)
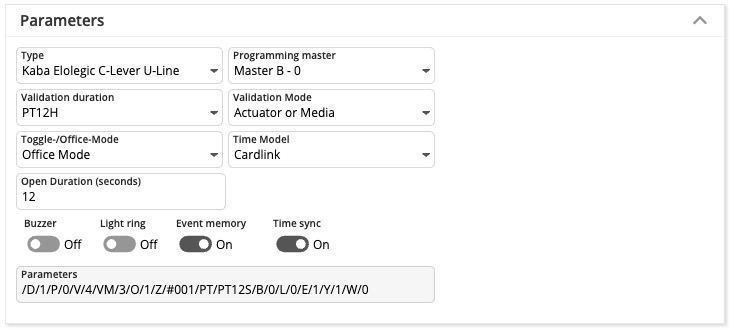
Attention: After changing the parameters, the offline component must be rewritten with the programmer.
- Type: Here you define the type of offline component.
- Programming master: Use this setting to define the programming master for the offline component.
- Validation duration: Determines the validation duration. (Validation durations you can define into Settings menu)
- Days: P[number of days]D (example: P7D for seven days)
- Hours: PT[number of hours]H (example: PT1H for one hour)
- Fixed time: HH:MM:SS (example: 12:00:00 for daily at 12 o’clock)
- Validation Mode: Defines the validation mode.
- Toggle-/Office-Mode: Activates Office Mode/ Day Night Mode.
- Off: The door can only be opened with an authorized booking.
- Office Mode: The first authorized booking on the offline component within the selected time model opens the door. A subsequent authorized booking closes the door again. The door remains open until the authorized time has expired and then closes again.
- Day Night Mode: Automatic unlocking of offline components in a defined time model.
- Time Model: Defines the time model in which Office Mode/ Day Night Mode applies.
- Open Duration (seconds): Specify how long the offline component opens the door after a successful booking.
- Buzzer: Switches the buzzer on or off.
- Light ring: Switches the light ring on or off.
- Event memory: Determines whether bookings are saved to the component or not.
- Time sync: Activates or deactivates the time sync.
Parameter offline components
| Switch | Meaning | Values |
| /B/ | Summer |
|
| /L/ | Light ring |
|
| /E/ | Save events |
|
| /Y/ | Sync time |
|
| /M/ | EM_MSG | |
| /V/ | Period |
|
| /D/ | Type |
0=198, Kaba Elolegic digital cylinder U-Line |
| /O/ | Mode |
|
| /Z/ | OMZPS | |
| /W/ | Offline site |
|
| /P/ | Program master number |
|
Area Device Group Assignment
The device groups to which the device is assigned are displayed in this area.
Button Apply Devices
If applying changes is required, the button is highlighted in yellow.
TIPS
- Press Copy at the top to create a copy of the selected device, including its properties.
- The current network connection status and other device status messages appear in the Status area.
Device Groups
Use this menu item to create device groups. Device groups make it easier to manage devices and assign permissions. We recommend always grouping devices, especially for larger installations.
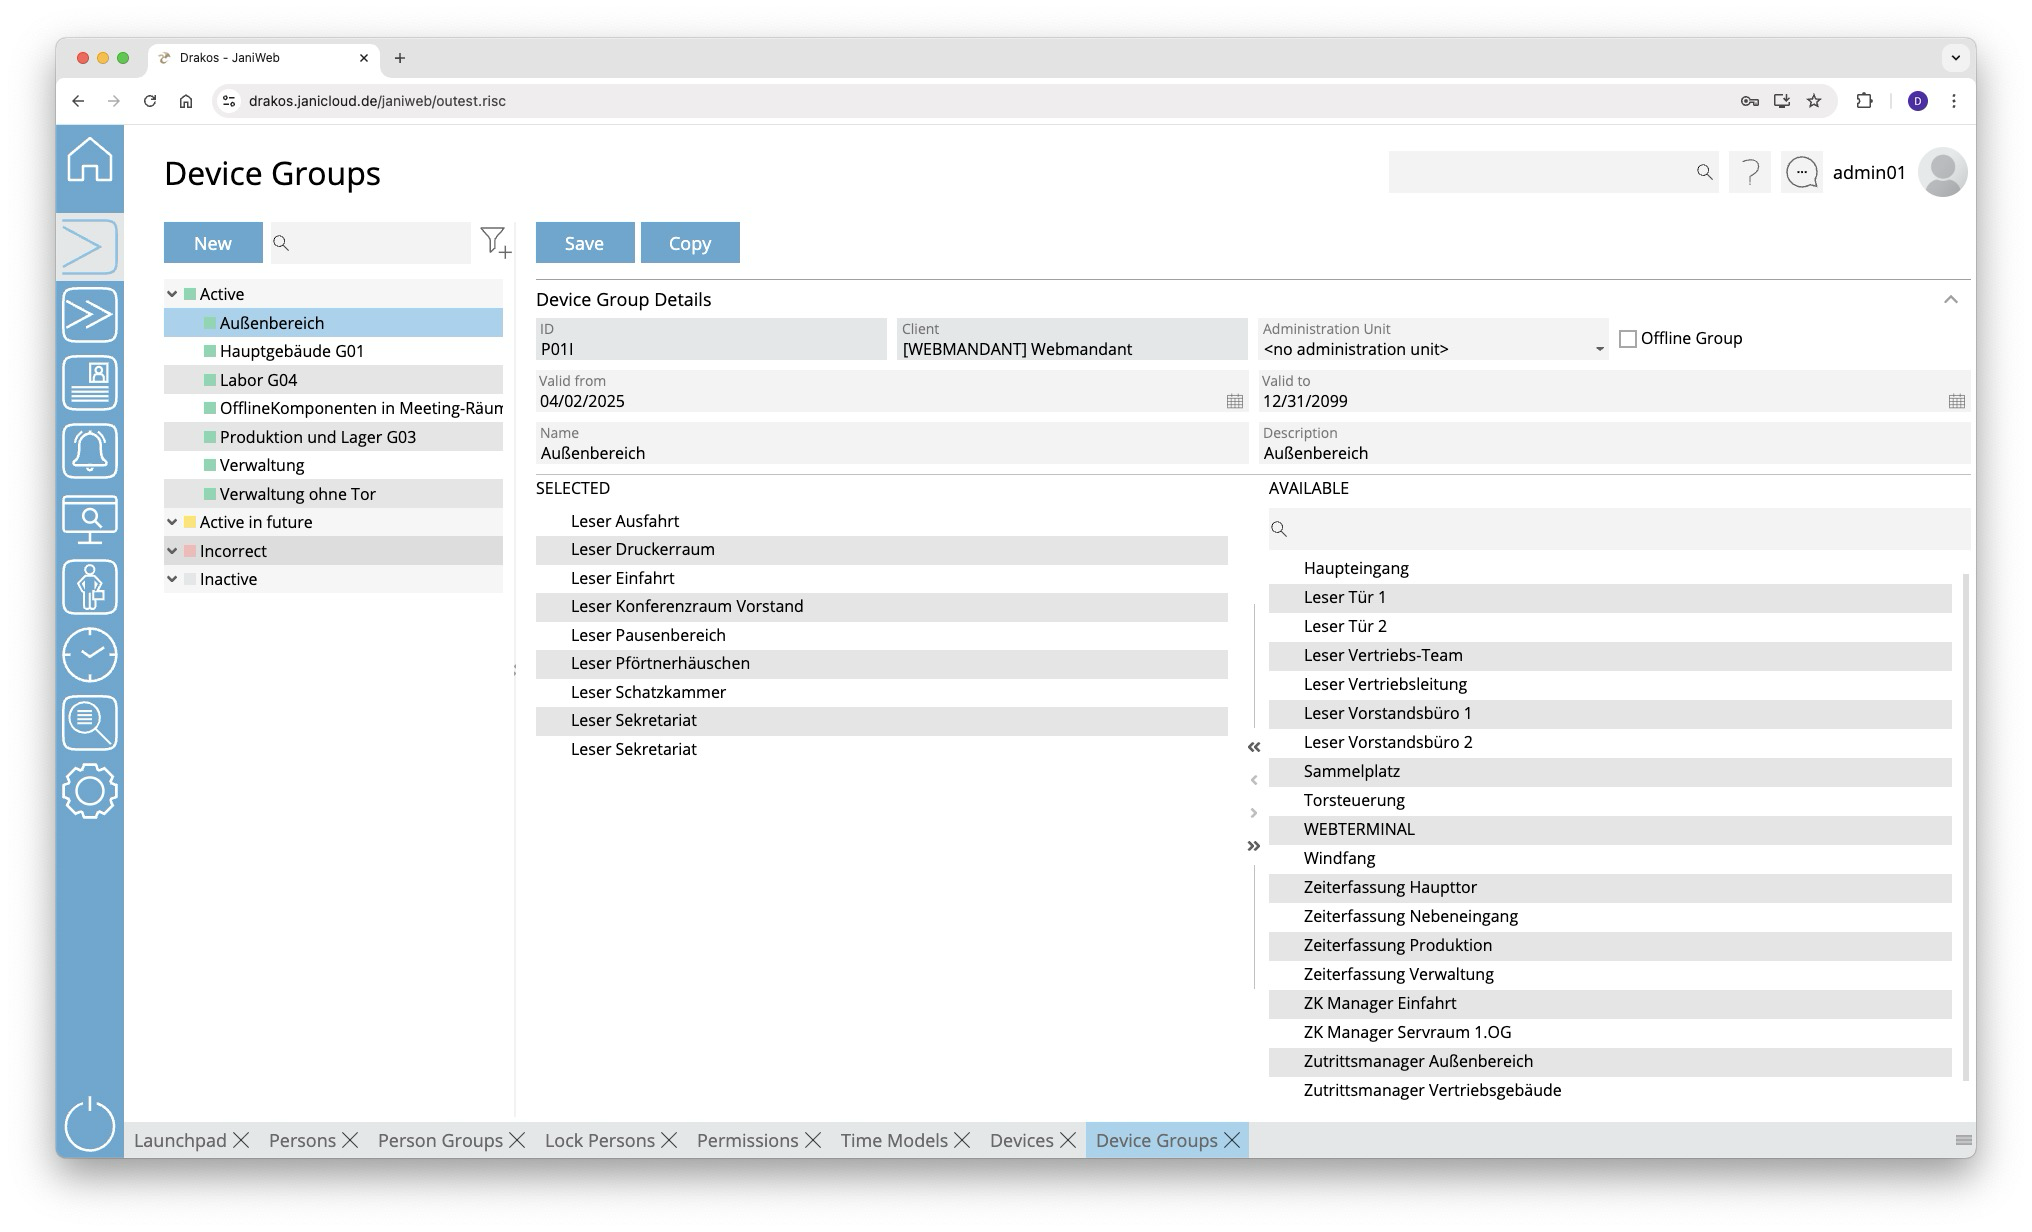
List of device groups
The list contains the groups that have already been created. Select a group to view details.
The list offers the following options:
- Search: Enter text or numbers in the search field (magnifying glass icon) at the top to search for groups. The entries take effect immediately: the list only displays hits. The search is not case sensitive.
- Filter: Press the filter icon. Select the criteria for which you want to display groups. Changes are visible immediately.
Adding/removing devices
To add or remove devices from a group, select the group from the list.
- Add: Drag the devices from the right-hand list (Available) to the left-hand list (Selected).
- Remove: Drag the devices from the left-hand list (Selected) to the right-hand list (Available).
You can also select several devices and move them at the same time. As an alternative to using the mouse, use the arrows between the windows.
Devices can belong to multiple groups at the same time.
Attention: If you change the assignment of an offline component to an offline device group, the affected component must be rewritten with the programmer.
Button New
- Press New to create a new device group.
- Enter a Description, select a Client and define a validity period (Valid from – Valid to).
- Select whether it is an Offline Group (a group of offline components). As soon as this option is selected, only offline devices appear in the Available list.
- Add devices to the group as described above.
TIPS
Control Profiles
Use the menu item Control Profiles to link time models to devices to determine when access through the respective door should be possible.
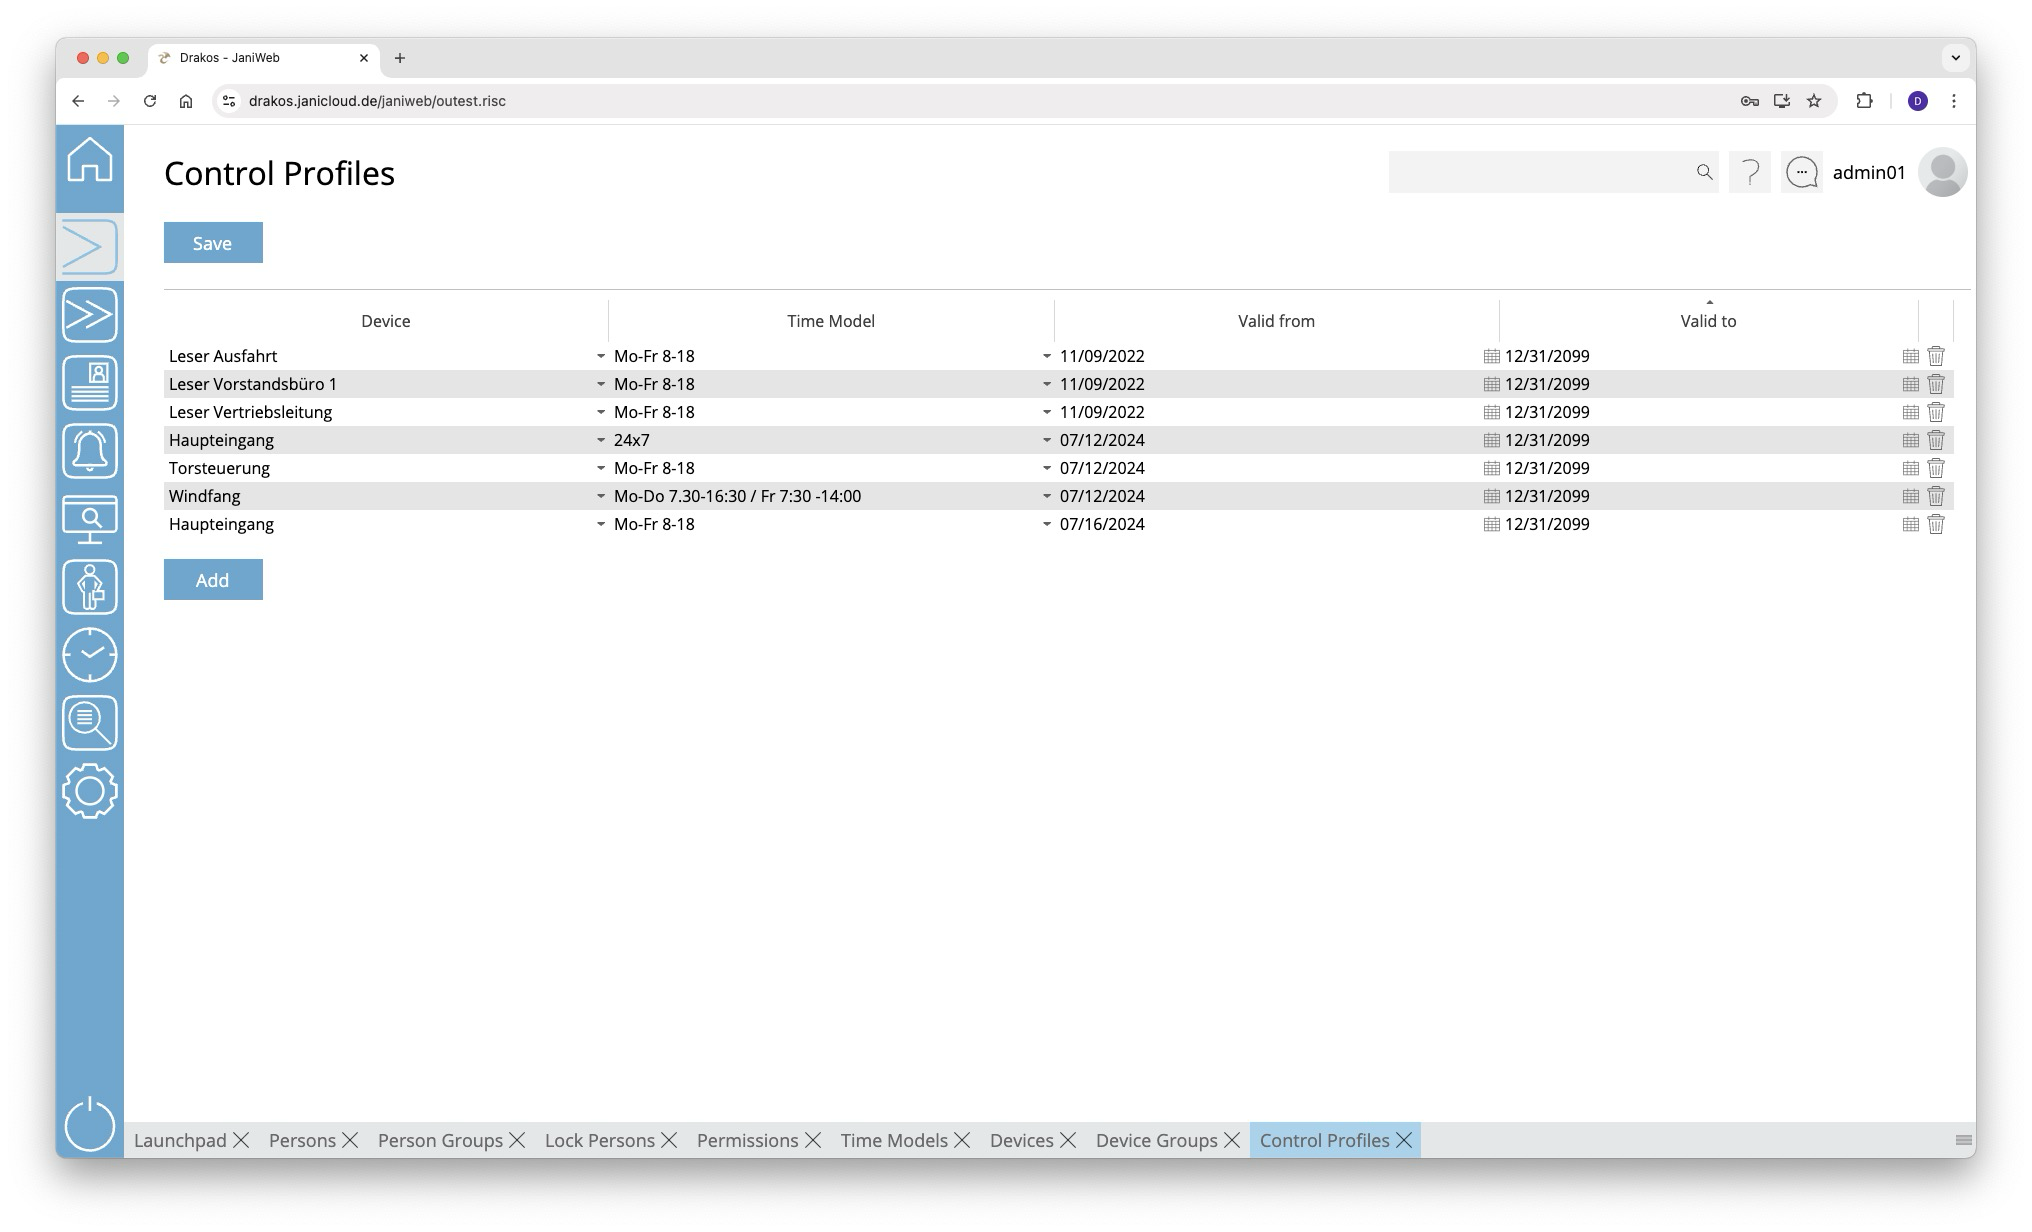
List of control profiles
The list contains the control profiles that have already been created. You have the following options here:
- Changing a control profile: Select a different time profile for the desired device and press Save.
- Adding a control profile:
- Press Add. An empty entry will appear at the end of the list.
- Select a device in the Device column
- Select the desired time model in the Time Model column.
- Press Save.
- Removing a control profile: Press the trash icon to remove a profile. A confirmation dialog will appear.
When a control profile has been created for a device, the doors associated with it will remain open during the time period specified in the assigned time model.
It is possible to create multiple control profiles for a device.
TIPS
Control profiles can also only be effective for a certain period of time. Use the Valid from and Valid to columns for this purpose.
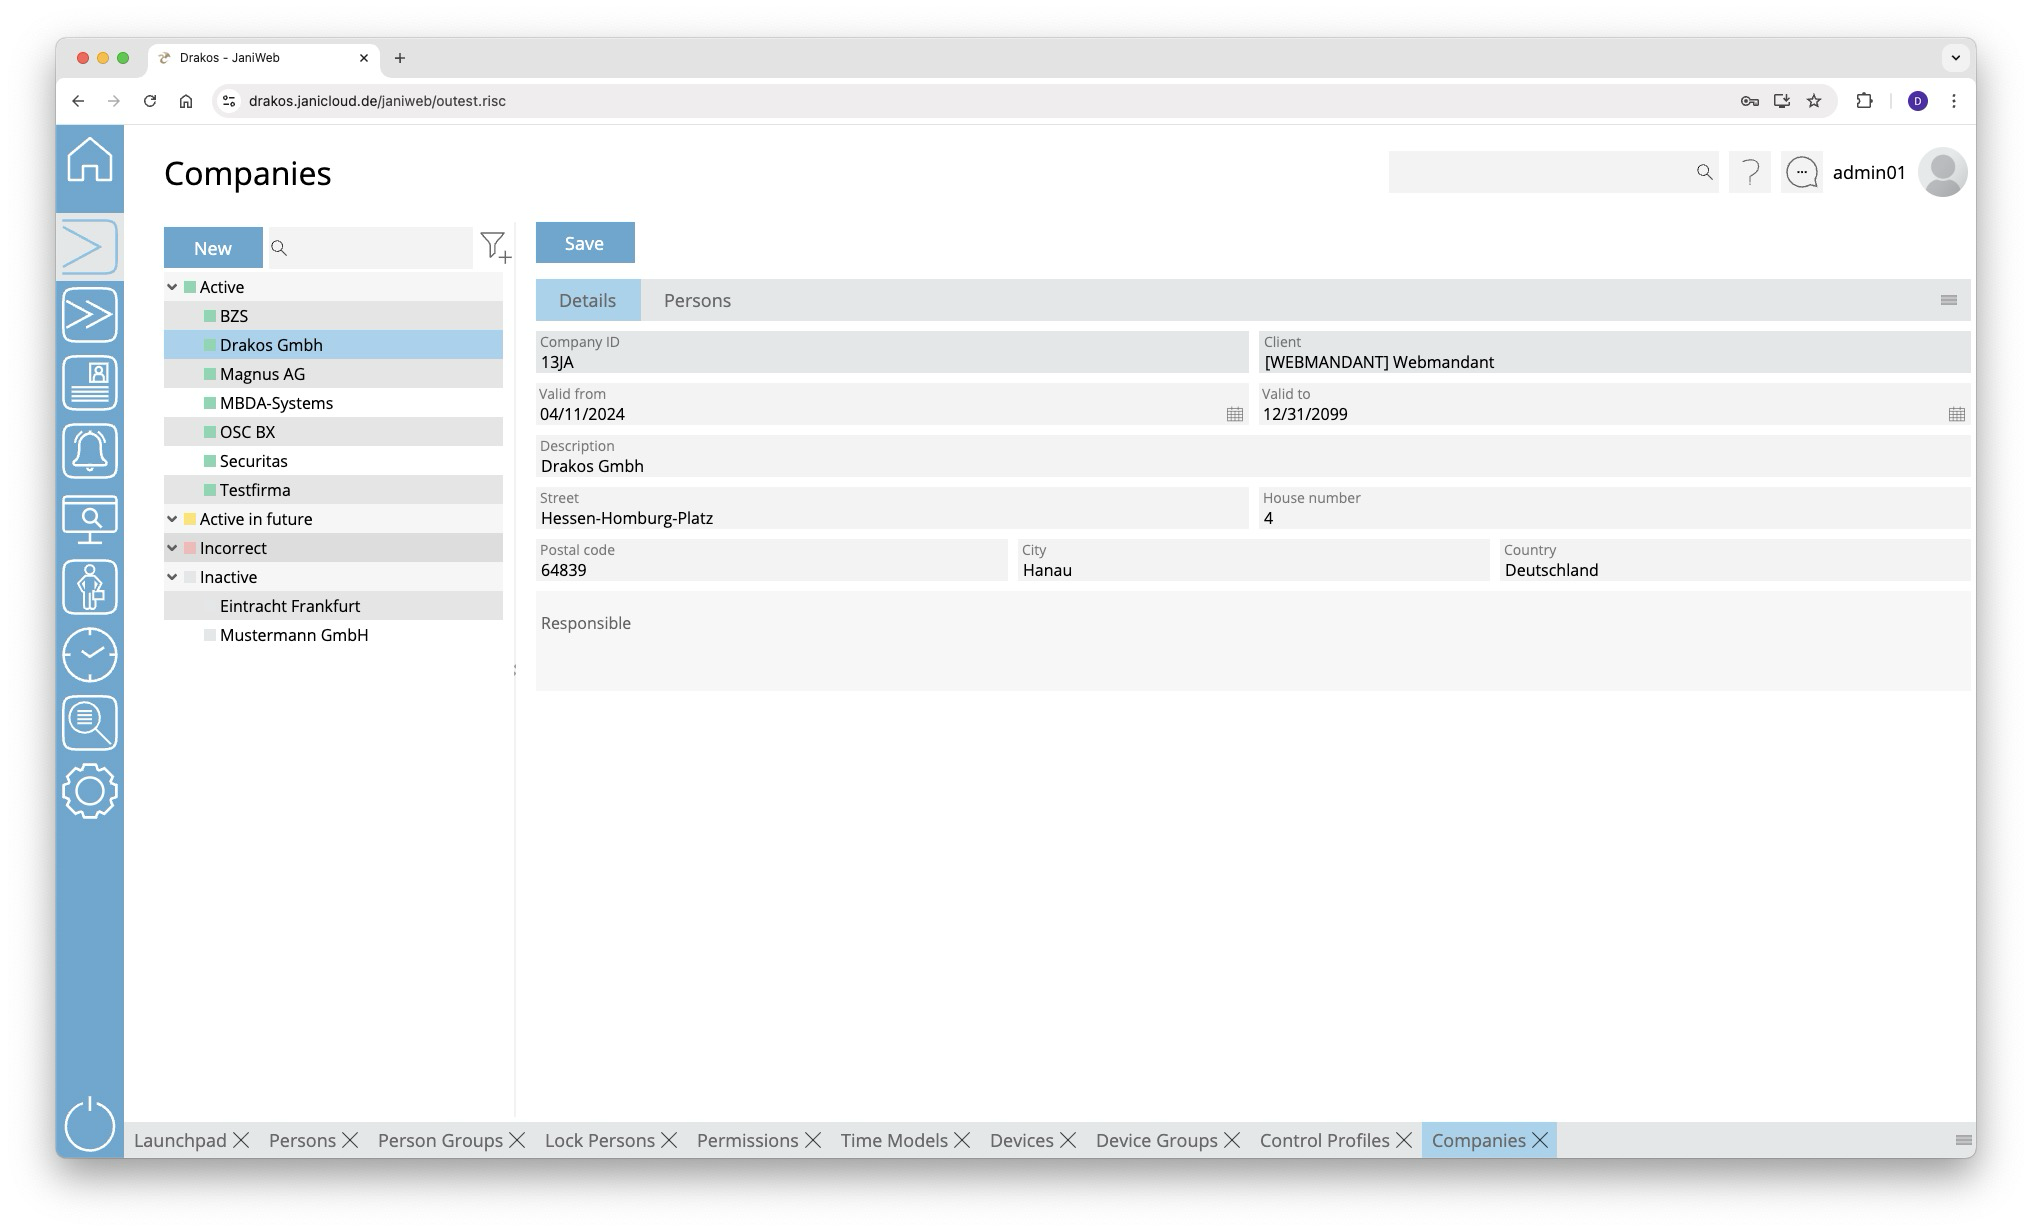
Companies
Use the menu item Companies to manage companies. Companies created here can be assigned to persons or visitors via the menu items Persons or Visitors.

List of companies
The list contains the companies already created, sorted by their current status (Active, Active in future, Incorrect, Inactive). Select a company to view details.
The list offers the following options:
- Search: Enter text or numbers in the search field (magnifying glass icon) at the top to search for companies. The entries take effect immediately: the list only displays hits. The search is not case sensitive.
- Filter: Press the filter icon. Select the criteria for which you want to display companies. Changes are visible immediately.
Button Save
You can change the details of the selected company. Press Save to save the changes.
Button New
Press New to create a new company. Enter the required information for the company on the tab Details and press Save.
Tab Persons
The tab Persons provides an overview of which persons are assigned to the respective company.
TIPS
- Filter: Use the filter icon to filter by status (active, inactive, etc.).
- Export: Use the export icon to export the list of assigned persons.
Mass Change
You can edit or delete multiple persons at the same time using the Mass Change menu item.
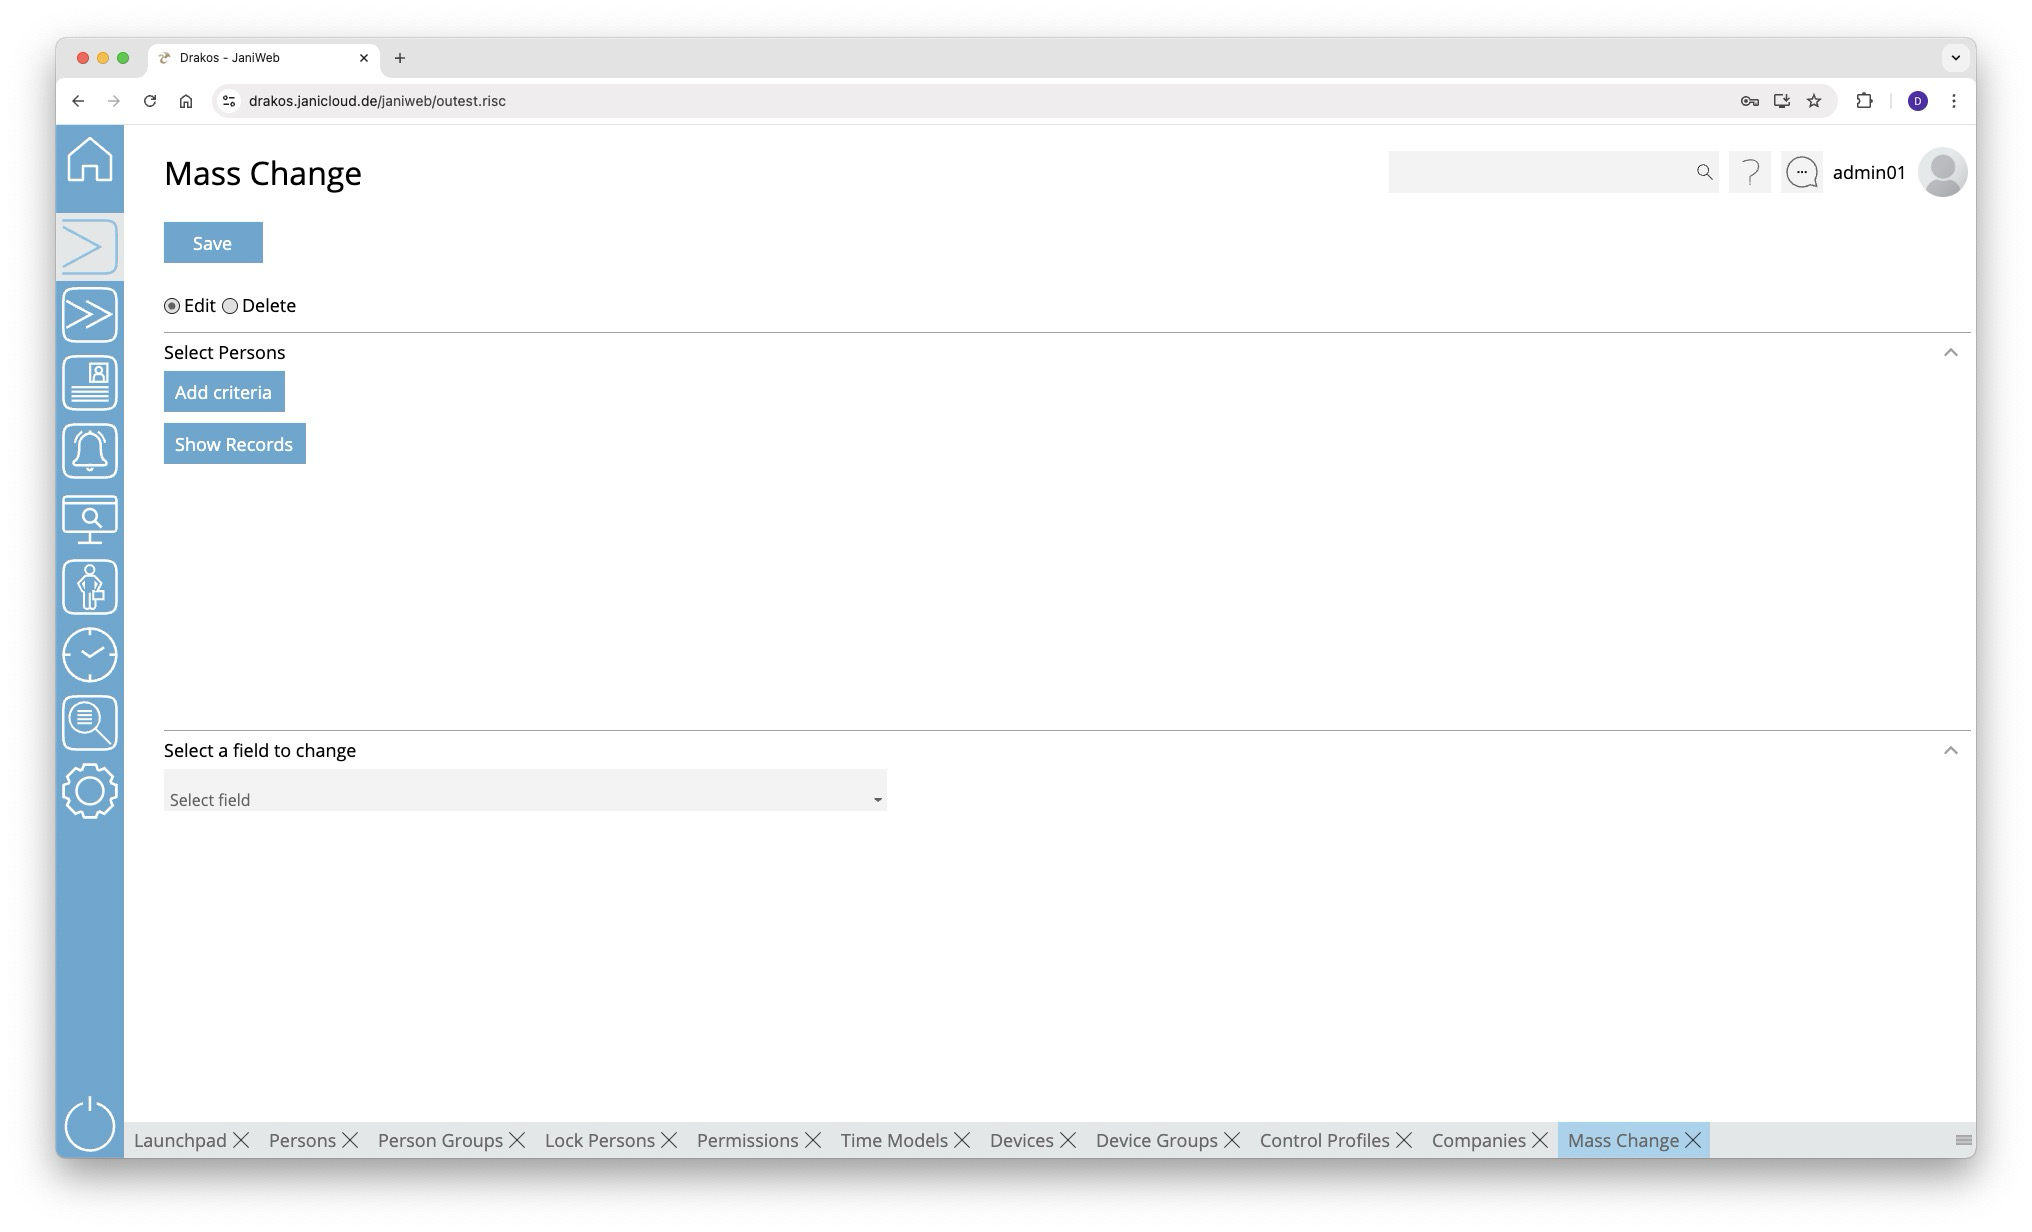
Radio buttons Change/Delete
Select whether you want to use the mass change to Change or Delete.
Area Select Persons
Enter the criteria for selecting the persons to be changed or deleted.
- Press Add criteria.
- Select the required criterion from the list field.
- Press Add value.
- In the From field, select a single value or use both fields to specify a range. You can also specify multiple values for the same criterion (Add value).
- (Optional) Add another criterion with value(s).
Press Show Records to display the master records selected for change or deletion.
Logic of criteria and values
- The values within the same criterion are linked logically by OR (one match is sufficient).
- Different criteria are linked logically by AND (all criteria must be met).
Area Select a field to change
This area appears if you have selected Change at the top.
- Select the field whose value you want to change.
- Enter the new value.
- Press Save to execute the mass change. A confirmation dialog appears.
Area Delete permissions/master records
This area appears if you have selected Delete at the top.
- Select what you want to delete:
- Access permissions of the selected persons that have expired by a certain date:
Select Access permissions expired before. - Master records of the selected persons that have expired by a certain date (the master records are completely removed from the system):
Select Master records expired before.
- Access permissions of the selected persons that have expired by a certain date:
- Enter an expiration date.
- Press Save to remove the selected data.
Qualifications
The Qualifications menu item allows you to create profiles to which certain permissions are linked. By assigning such a qualification to persons, the persons automatically inherit the permissions of the qualification.
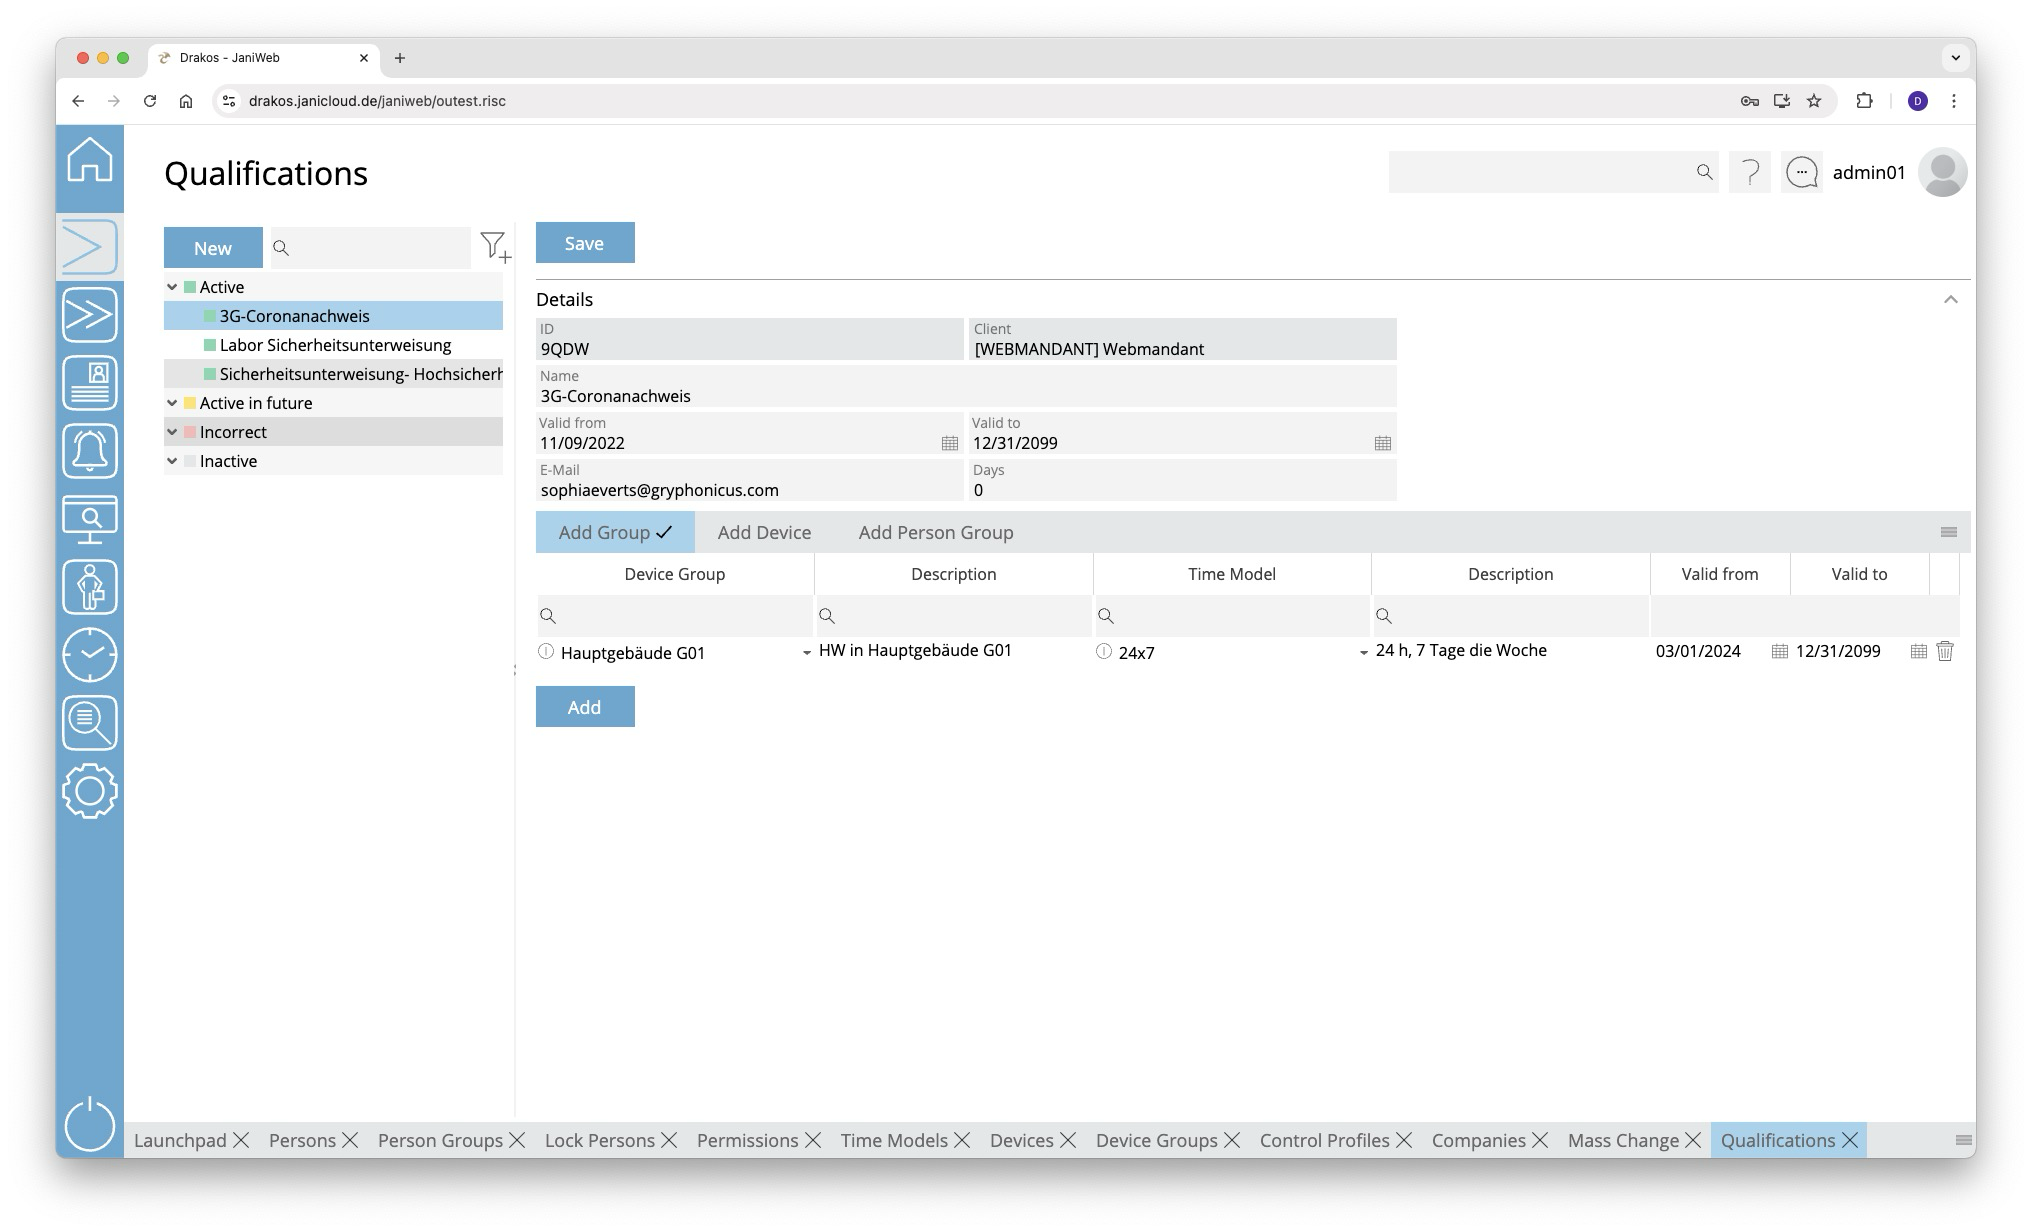
List of qualifications
The list contains the qualifications that have already been created. Select an entry to view details.
The list offers the following options:
- Search: Enter text or numbers in the search field (magnifying glass icon) at the top to search for qualifications. The entries take effect immediately: the list only displays hits. The search is not case sensitive.
- Filter: Press the filter icon. Select the criteria for which you want to display qualifications. Changes are visible immediately.
Button New
Press New to create a new qualification. Enter a description and additional information, and press Save.
Area Details
Define the general properties of the qualification here.
- Description: Enter a descriptive label for the qualification.
- E-Mail: Enter the E-Mail address to which a notification is to be sent when a qualification is about to expire.
- Days: Specify how many days before the qualification expires the E-Mail notification is to be sent.
Press Save to apply your changes.
Tabs Add Device Group / Add Device
Here you can link permissions for the use of certain device groups or devices to the selected qualification. To add another device group or device to the list:
- Press Add.
- Select a Device Group or a Device.
- Select the desired Time Model.
- Set a validity period.
- Press Save.
To remove a device group or device from the list, press the corresponding trash icon.
A tick after the title of a tab indicates that there is data within the tab.
Add person group tabs
Here you have the option of assigning a qualification to all persons in the added person groups at once.
- Click on Add.
- Select a person group.
- Specify a validity period.
- If the validity is not valid, persons in this group of people are denied access to the devices/device groups assigned to the qualification.
- Press Save.
To remove a person group from the list, press the corresponding trash can icon.
A tick after the title of a tab indicates that there is data within the tab.
TIPS
To assign a qualification to a person, select the person via the Persons menu item. Then select the desired skill on the Qualifications tab.
till Version 1.32.X - Permissions for devices / device groups that are assigned to a qualification can only be changed via the qualification. It is then no longer possible to create permissions for these devices or device groups in the usual way.
Settings
You can use the Settings menu option to make various settings (number ranges for replacement badges, fields for persons) for access management.
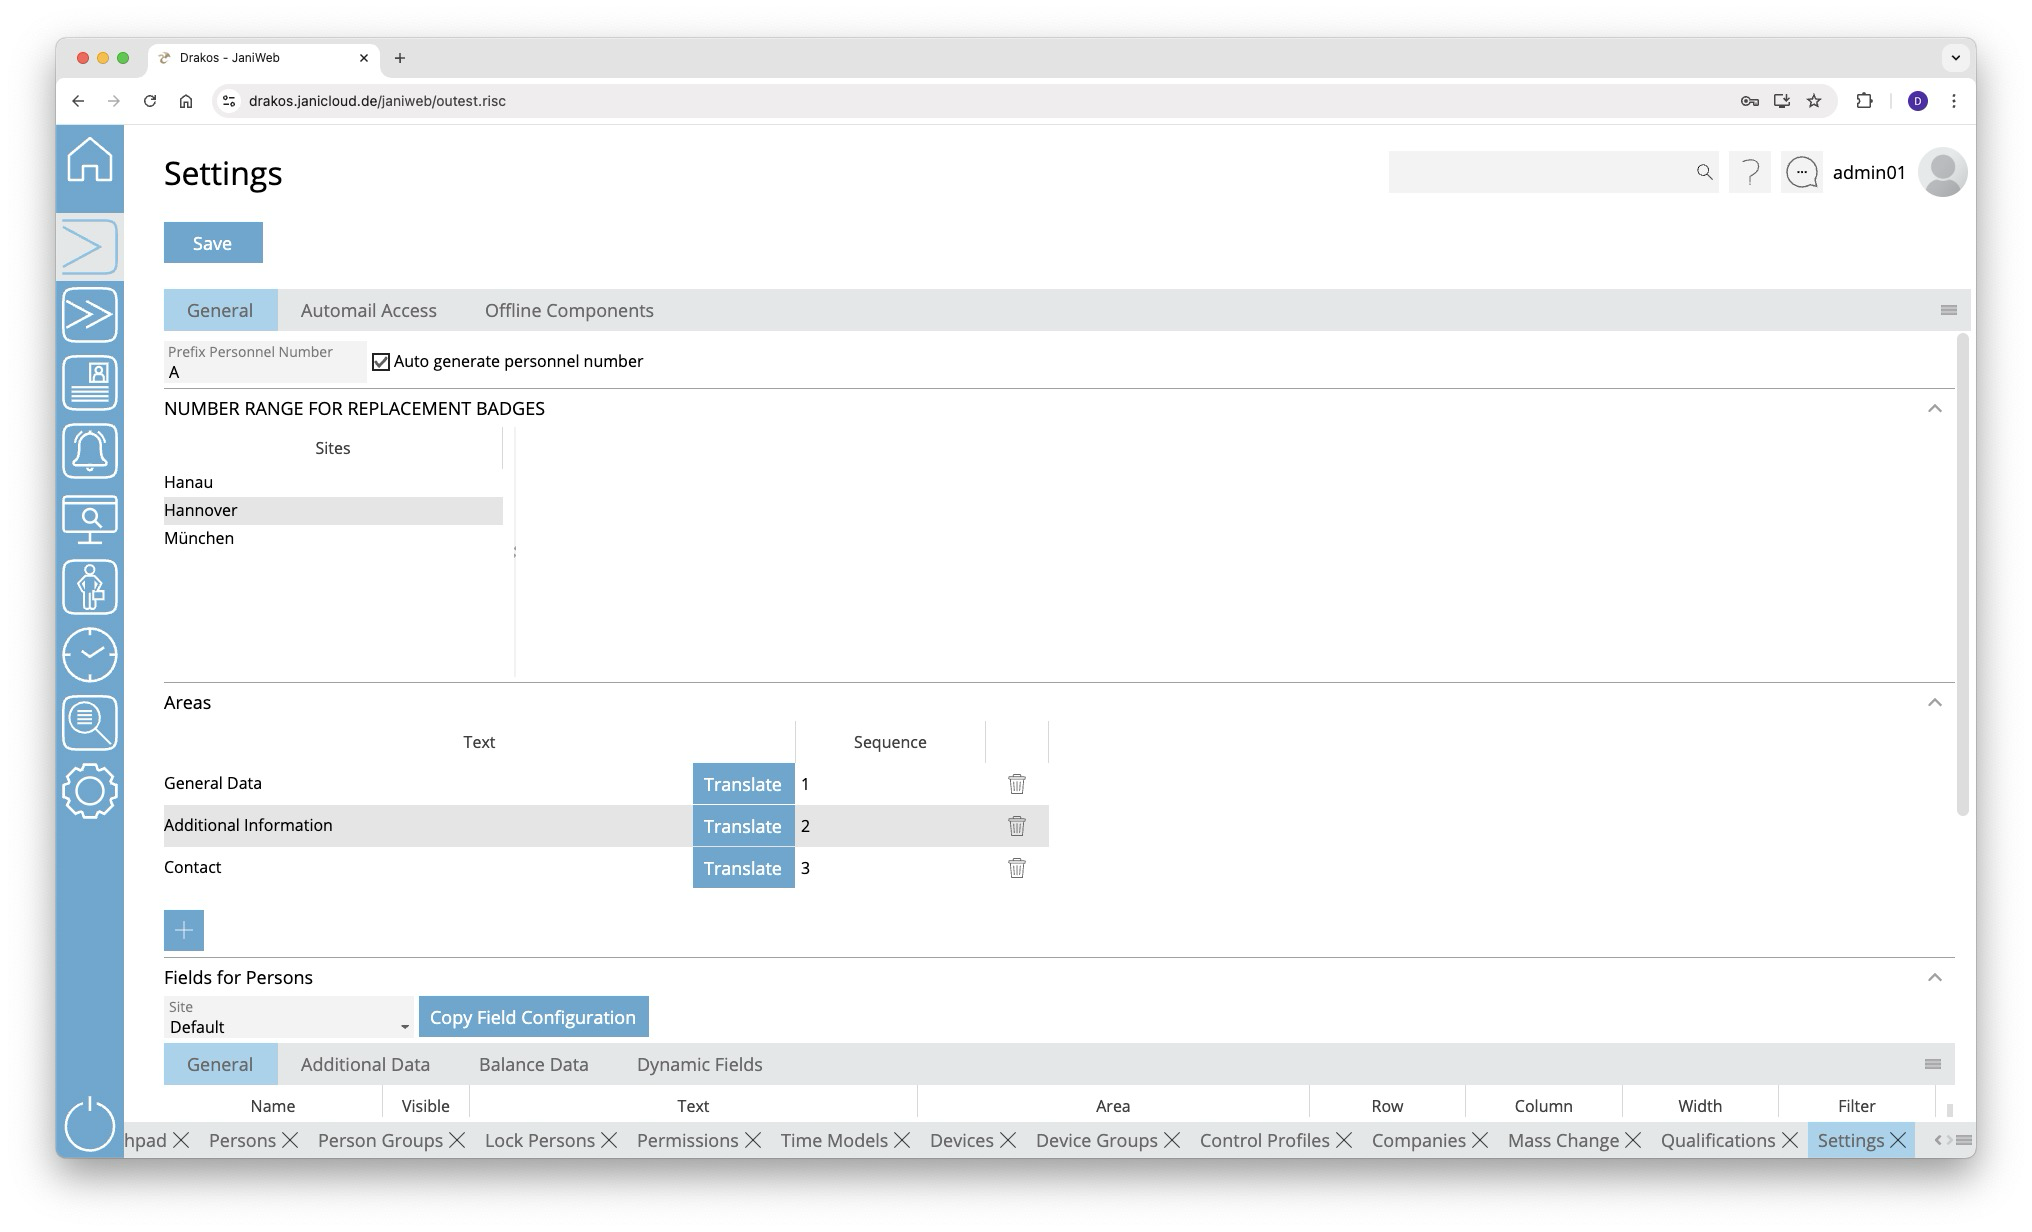
Button Save
Press Save to apply your changes.
Tab General
Here you determine whether personnel numbers should be created manually or automatically assigned by the system.
- Prefix Personnel Number: Enter a letter that is added as a prefix to the personnel number for automatically generated personnel master records.
- Auto generate personnel number: Select this option if you want the system to automatically assign personnel numbers when personnel master records are created.
Area Number Range for Replacement Badges
Here you define number ranges for issuing replacement badges. Create a separate definition for each site. You can either specify a range (From badge number / To badge number) for all replacement badges or create individual numbers under badges.
Area Areas
Here you determine which areas appear in the Persons menu item. When you select the visible fields for persons (Fields for Persons), you determine where the corresponding field is displayed by selecting one of the areas defined here.
To create a new area, perform the following steps:
- Press the plus icon (Add) to add a new entry.
- Press Translate.
- Enter the area description for the respective languages.
- Press Save.
Enter a number in the Order column to determine the order in which the areas are displayed.
When creating a new area, you must first save it before you can assign a field to it.
Area Fields for Persons
This is where you manage the fields for the Persons menu item.
List field Site
You can define the visibility and positioning of the fields separately for each site. Select the site for which the settings in this area should apply.
The fields displayed to the user depend on the site assigned to the user. If no site is assigned to a user, the settings for the Default site are used. To assign sites to a user, use the Settings in the main menu, menu item Users.
Tabs General Data / Additional Data / Balances
Specify which fields are visible (check box in the second column) and where they are positioned (Row, Column, Width).
To define the name for a field, press Translate. Enter the names for the respective languages and press Save.
In the Filter column, you can determine whether this field should be searchable in the list of persons.
Tab Dynamic Fields
Here you can define up to 20 dynamic fields. For each dynamic field, specify whether it should be a list field (drop-down), a date field, a checkbox or a free text field.
To define the name for a field, press Translate. Enter the names for the respective languages and press Save.
Button Copy Field Configuration
You can use this button to copy the field configuration from the currently selected site to another site. To do this, click the button and then select the site for which you want to copy the field configuration from the site drop-down menu. Confirm your selection with the Ok button.
Area Disable Editing XML Fields
Use the Disabled option to prevent users from changing field contents when printing badges, for example. When selected, the information from the master record is always used.
Area Name Subsystem Grouping
In this area, meaningful names can be assigned to the three-digit identifiers of the Subsystem Groupings. These names help users to assign persons to the correct Subsystem Grouping more easily and quickly. Use the + button to add new entries. Enter the three-digit identifier of the BDE group in the Subsystem Grouping column and enter the name using the Translate button in the Name column. Entries can be deleted using the bin button.
Tab Automail Access
Here you can define combinations of persons/person groups and devices/device groups that you want to be informed about by E-Mail as soon as they are assigned as permission by a user.
- Press Add to create a new entry.
- Select a person group or person.
- Select a device group or device.
- Enter the E-Mail address for the notification.
- Press Save.
Tab Offline Devices
This is where you define all settings for offline sites and their components (Cardlink, Pegasys and OSS).
Tab Offline Sites
Create the offline sites required for your offline components here. To assign components to sites, use the menu item Devices.
List of offline sites
The list contains all the offline sites that have already been created. Select an entry to view details.
Button New
Press New to create a new offline site. Enter the required information and press Save to confirm. You can now assign offline components to the offline site using the menu item Devices.
Button Delete
Click Delete to delete the selected offline site. A confirmation dialog will appear.
Tab General Data
Enter the required information for the selected offline site.
Area Cardlink, Area OSS
Specify the data for the relevant offline type.
Area Update Devices (OSS and Cardlink components only)
Add devices that should serve as update devices for the OSS and Cardlink offline site. People can use these devices to load their current permissions for OSS and Cardlink components on their badges.
Area Validation Devices (Cardlink components only)
Add devices that should serve as validation devices for the Cardlink offline site. People can use these devices to load their current permissions for Cardlink components on their badges.
Area Master Media (Cardlink components only)
Master media are used to configure Cardlink components so that they read badges correctly.
Button Download XML Files
This button allows you to download the XML files required for configuring Cardlink components.
This is especially useful if the programmer cannot be connected via the network.
Tab Cardlink Settings
Use the numbered fields to define different validation periods for Cardlink components. Use one of the following formats:
- Days: P[number of days]D (example: P7D for seven days)
- Hours: PT[number of hours]H (example: PT1H for one hour)
- Fixed time: HH:MM:SS (example: 12:00:00 for daily at 12 o’clock)
The validation duration 0 is set to forever and cannot be changed.
Other fields:
- Default validation duration: Define which validation duration should be used by default. Enter the number of the corresponding period (0–7).
- Validation priority: Enter the priority of the validation periods here (from highest to lowest priority, separated by commas).
Workflow
Workflow
The Workflow menu option lets you view the status of your workflow requests for time recording and permissions. As a supervisor or a supervisor’s deputy, you can also edit workflow requests directly.
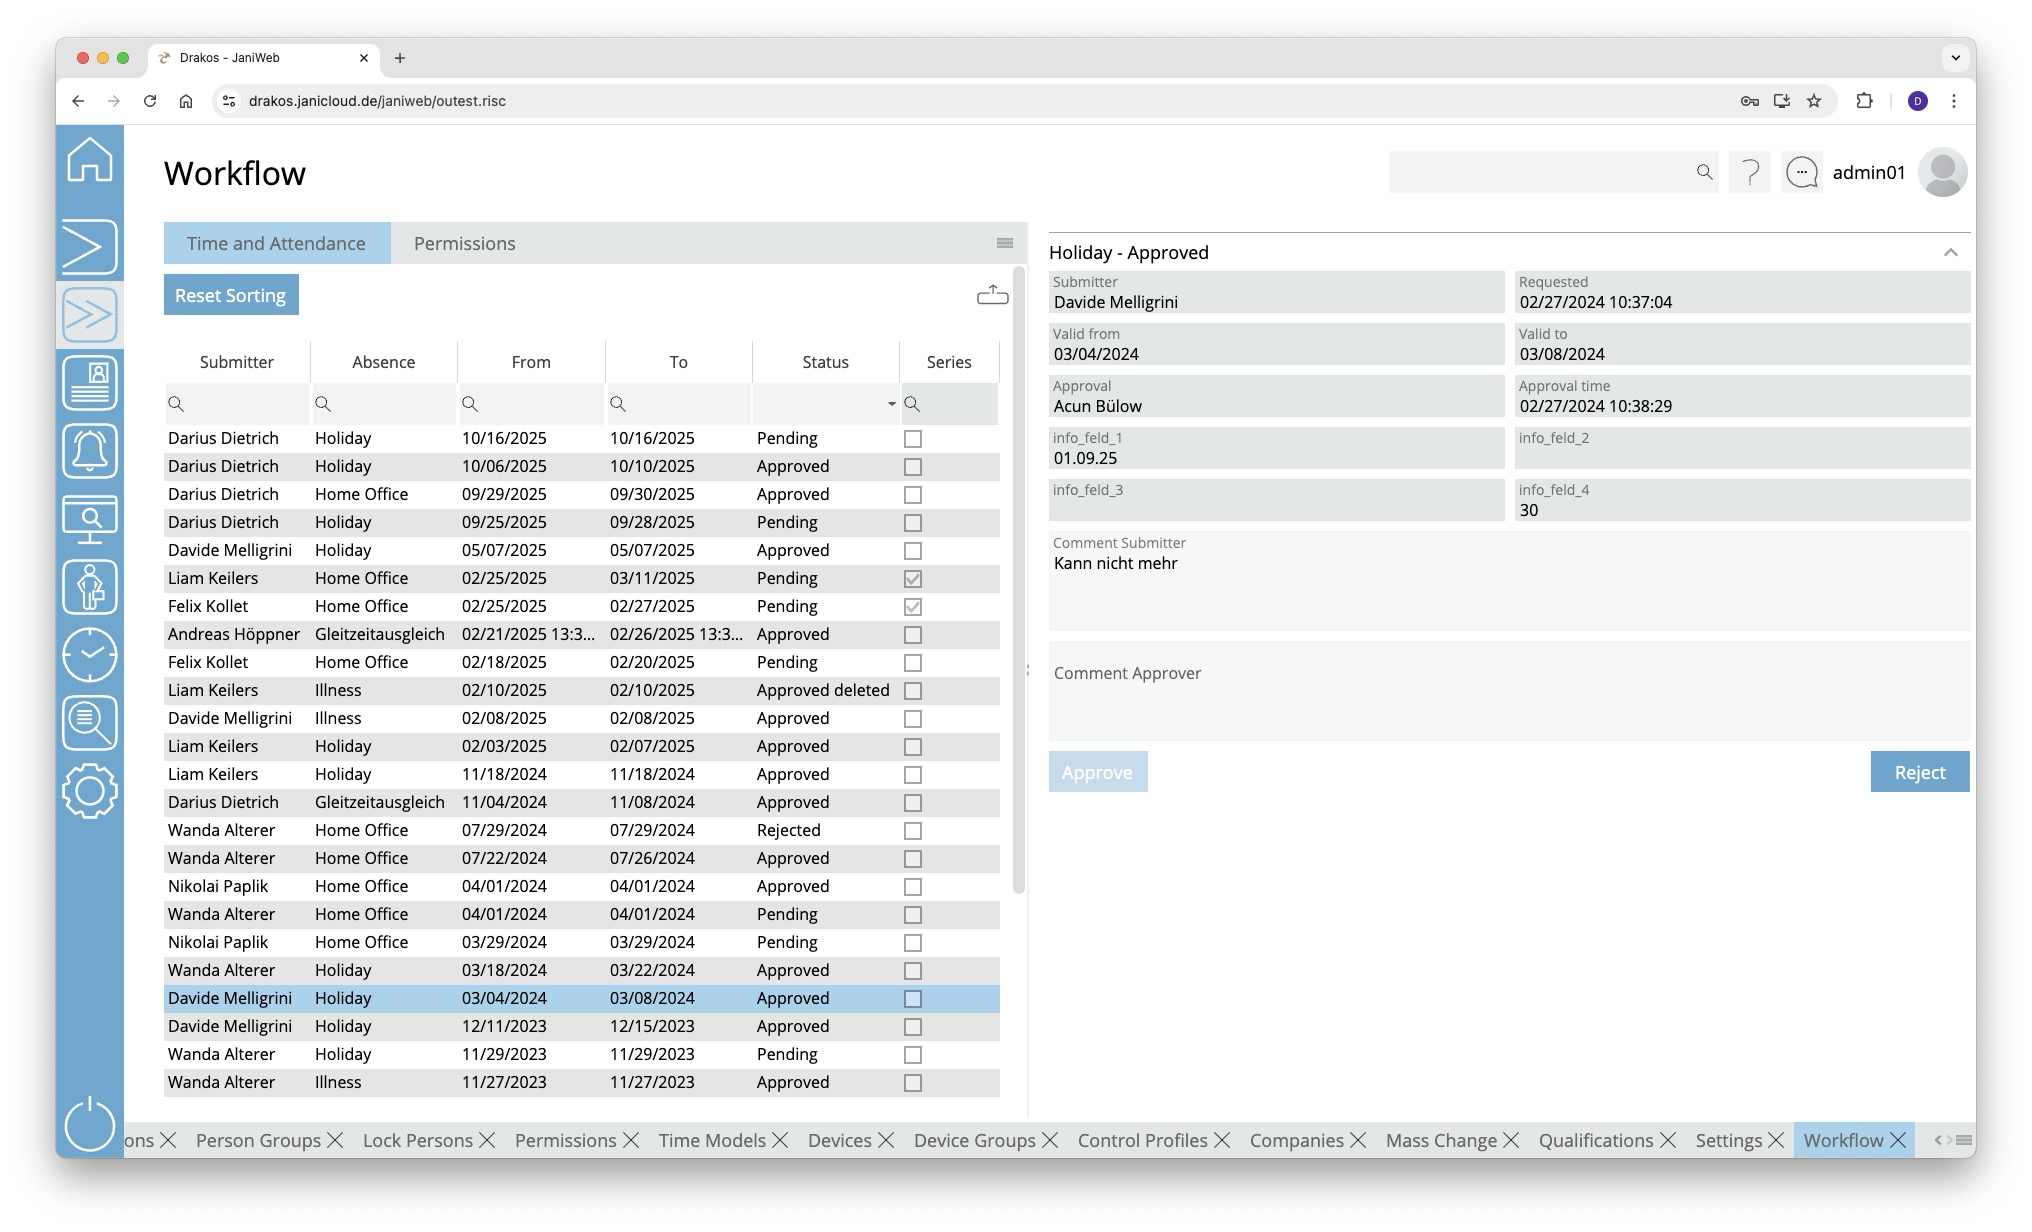
Lists of workflow requests
The lists on the tabs Time and Attendance (for time bookings and absences) and Permissions contain your active workflow requests. Select an entry to view details.
- In the text field Comment Approver, enter a comment that will be displayed to the requester.
- Press Approve to approve the request.
- Press Decline to decline the request.
For workflow requests regarding Permissions, as the supervisor or decision-maker you also have the option of adjusting the requested Time Model and/or the Validity period of the permission.
The lists offer you further options:
- Sorting by column: Click on a column header to sort the entries in ascending or descending order by this column.
- Search: Enter text or numbers in the search field (magnifying glass icon) at the top to search for entries. The entries take effect immediately: the list only displays hits. The search is not case sensitive.
- Filter by status: Open the list field in the Status column. Select the criteria for which you want to display entries. A set filter is saved and remains in place even after you log out. Press Reset Sorting to reset the filter and sorting.
- Export the entire list: Press the download icon. Select the format in which you want to export the list. For details on the available export formats, see the General > Export Formats chapter of this manual.
Badge Printing
The menu item Print allows you to print an badge for each person for whom you have permission.
List of persons
The list contains all persons for whom you have authorization. It offers the following options:
- Select columns to display: Press the gear icon. Select which columns you want to display and in which order. Arrange the columns using the mouse or the arrow icons. Press Apply to adopt the changes.
- Filter by client and status: Press the filter icon. Select the clients and the status (Active, Active in future, Inactive) for which persons should be displayed. Changes are visible immediately.
- Search in columns: Enter text or numbers in the search field (magnifying glass icon) of a column to search for names, personnel numbers, or other criteria. The entries take effect immediately: the list only displays hits.
Tip: Search for substrings. You can find “Spencer-Churchill” with “spe”, “chur” or “hill”. The search is not case sensitive. - Export the entire list: Press the download icon. Select the format in which you want to export the list. The export files are downloaded or displayed depending on the browser/operating system settings.For details on the available export formats, see the General > Export Formats chapter of this manual.
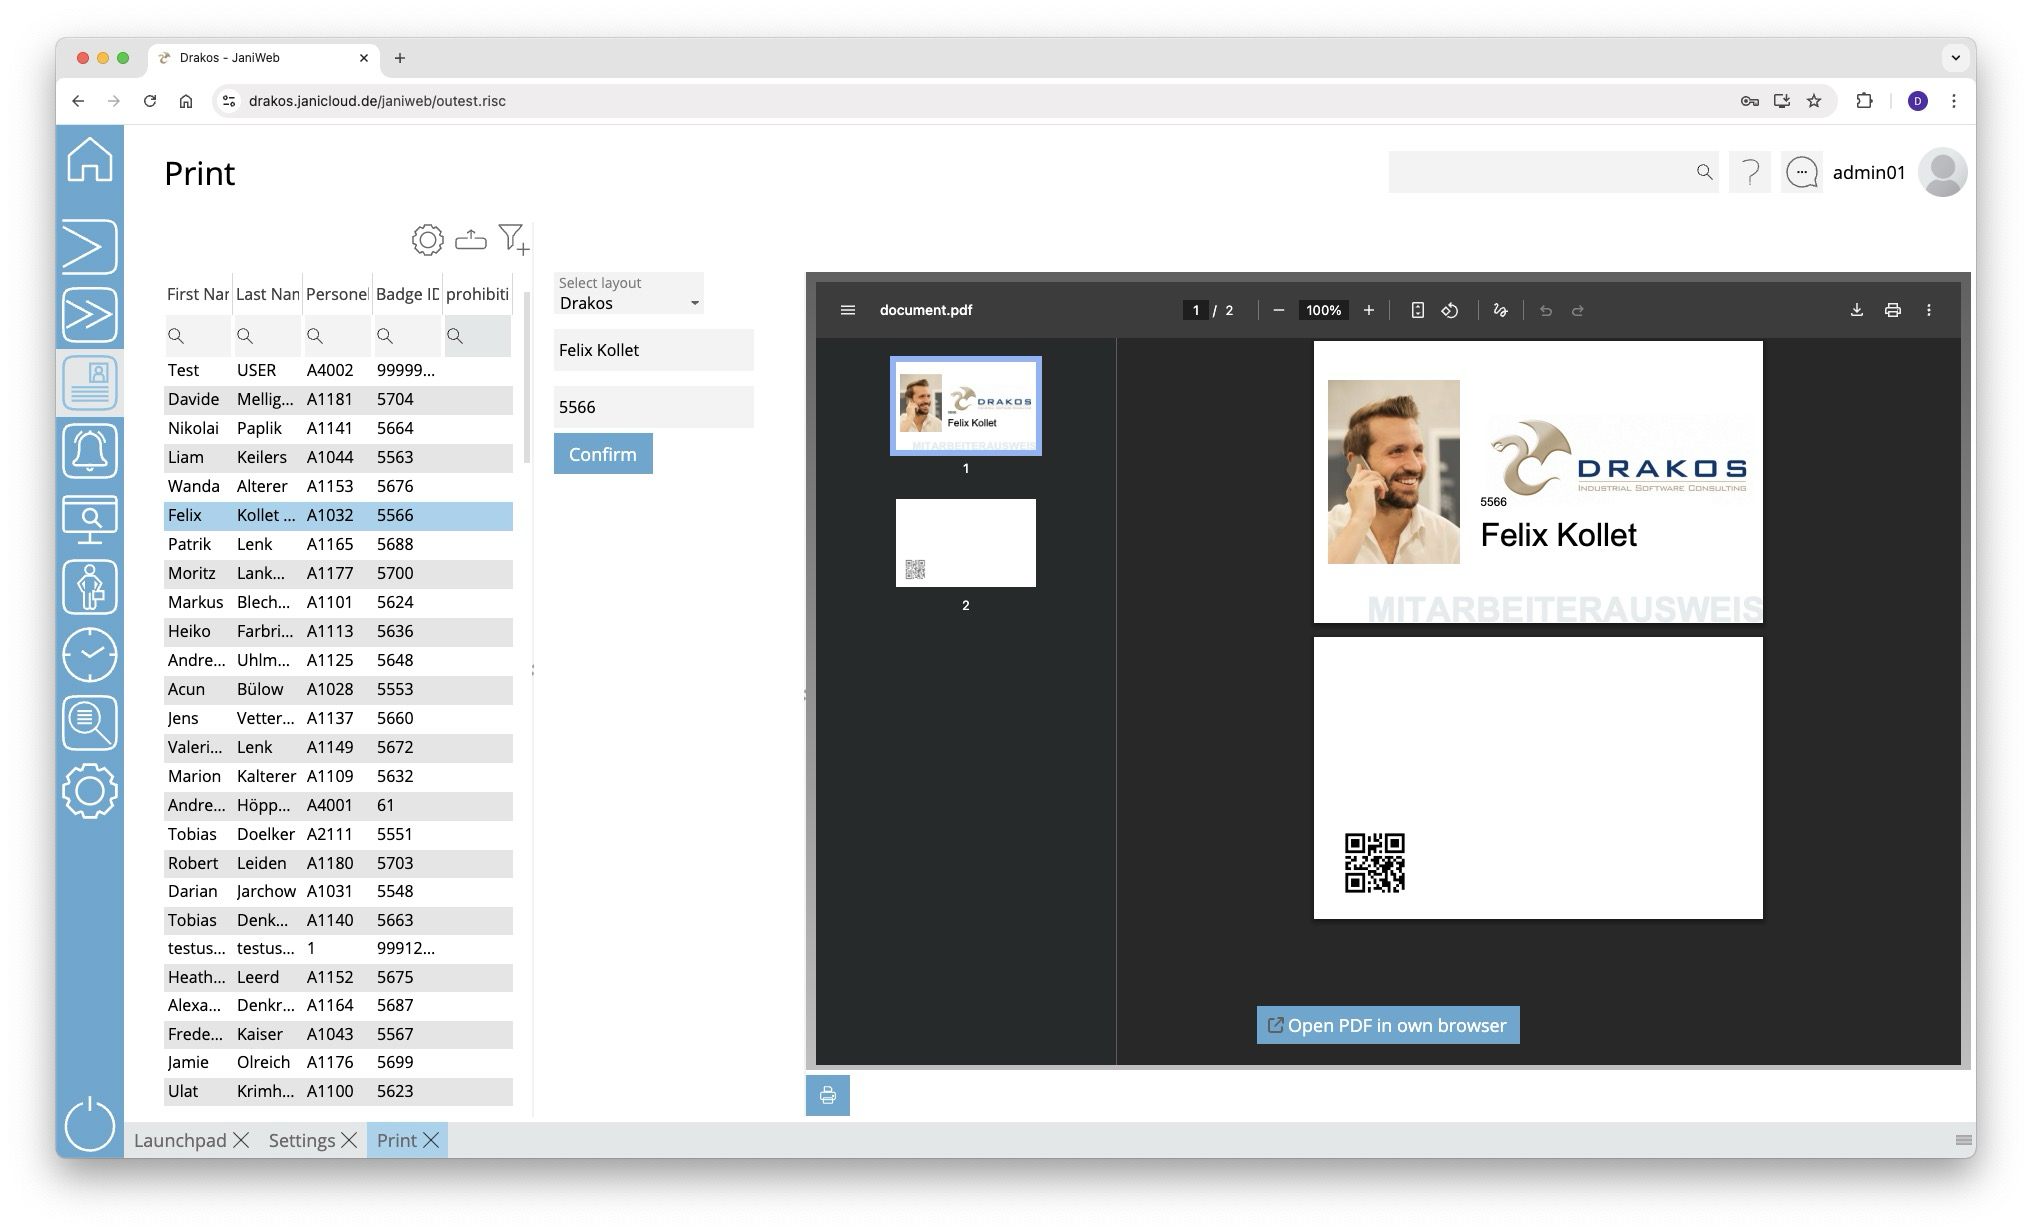
Select a person to preview the badge to be printed.
Detail area
You have the following options here:
- Select layout: Select a layout using the Select layout drop-down menu. The preview updates automatically.
- Customize information: Depending on the layout, various information can be customized before printing. Enter the desired text and press Apply.
- Print: Press Print to print the badge.
Settings
Use the menu item Settings to manage different layouts for badges.
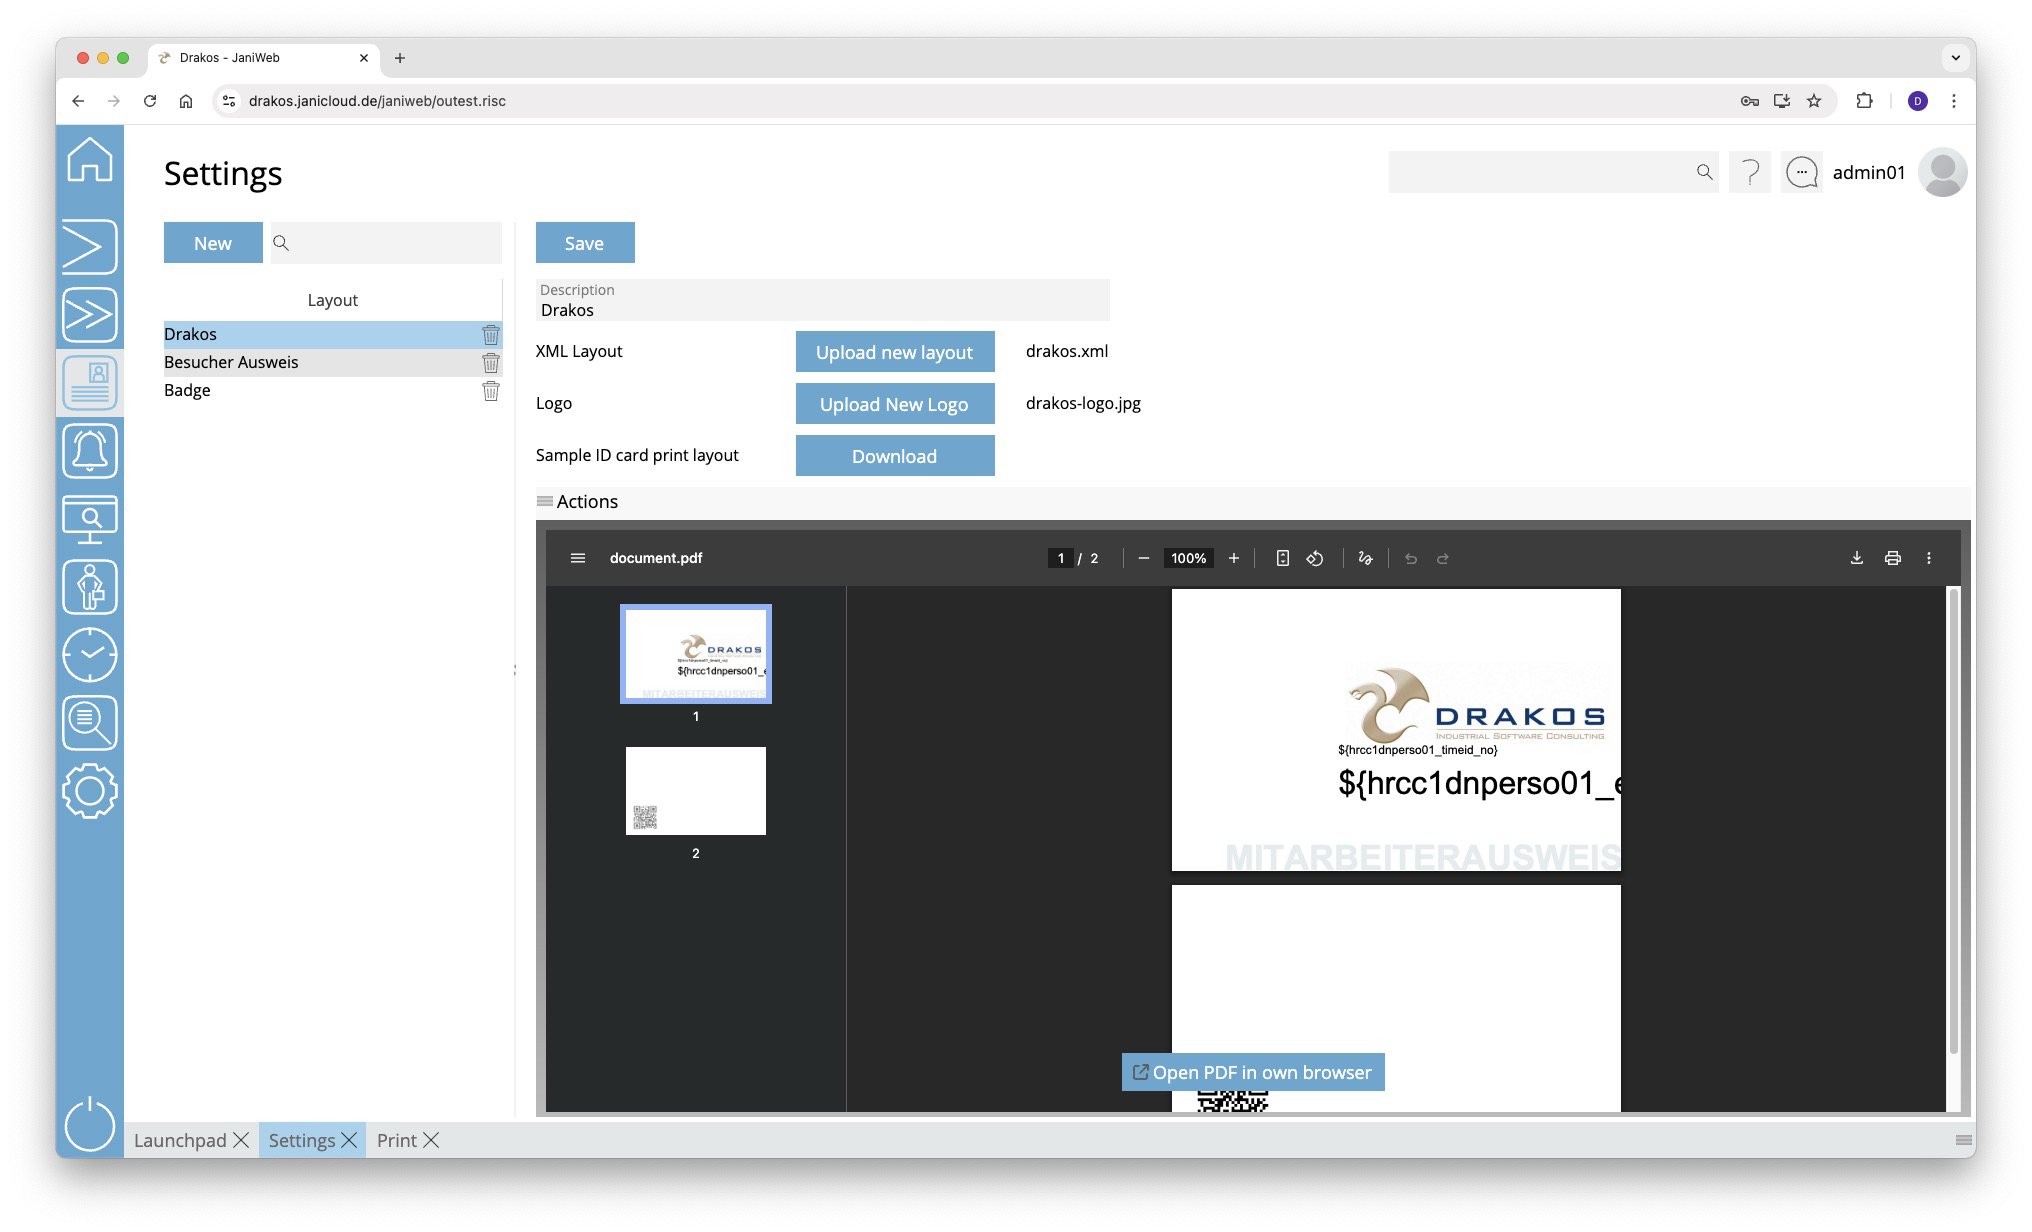
List of layouts
The list contains the layouts that have already been created. Select an entry to view details and a preview.
Button New
Press New to create a new layout.
Detail area
Specify the details for the selected layout.
- Description: Enter a descriptive label for the layout.
- Upload new layout: Press this button and select a suitable layout file on your computer.
- Upload new Logo: Press this button and select a suitable logo file on your computer.
- Site: Select the site for which the layout is relevant.
- Save: Press this button to save changes.
You can find an example badge layout here: SampleBadgePrintLayout.xml
TIPS
To create the layout, get in touch with your contact person at Drakos.
Alarm Management
Zone List
In the Zone List you can see which persons are in the respective zone.

List of zones
The list contains all existing zones. Safe Zones are highlighted in blue. The right-hand column shows the Alarm Status of the zone and the number of persons in the zone. If a zone has sub-zones, the number in brackets indicates how many persons are in the main zone only.
Buttons for display format
Use the icons to the left of the zone list to choose between a tree structure and the site plan display.
Tree structure
- Select a zone to display a list of the persons in this zone.
- Right-click on a zone to change its Alarm Status manually. Site plan
Site plan
The site plan shows the devices contained in the zone with their spatial position. The name of the zone is also displayed together with its Alarm Status.
- Right-click on the name of the zone to change its Alarm Status manually.
- Right-click on a device to display or change its settings.
List of persons
Use the icons to the right of the list of persons to choose between a list view, a view with pictures of the persons and a tile view. You also have the following options:
- Select columns to display: Press the gear icon. Select which columns you want to display and in which order. Arrange the columns using the mouse or the arrow icons. Press Apply to adopt the changes.
- Search in columns: Enter text or numbers in the search field (magnifying glass icon) of a column to search for names, personnel numbers, or other criteria.
- Export the entire list: Press the download icon. Select the format in which you want to export the list. The export files are downloaded or displayed depending on the browser/operating system settings.For details on the available export formats, see the General > Export Formats chapter of this manual.
- Update list: Use the Refresh button to update the zone list. This also happens automatically every 15 seconds.
Person Search
The menu item Person Search gives you an overview of which persons are in which zone.
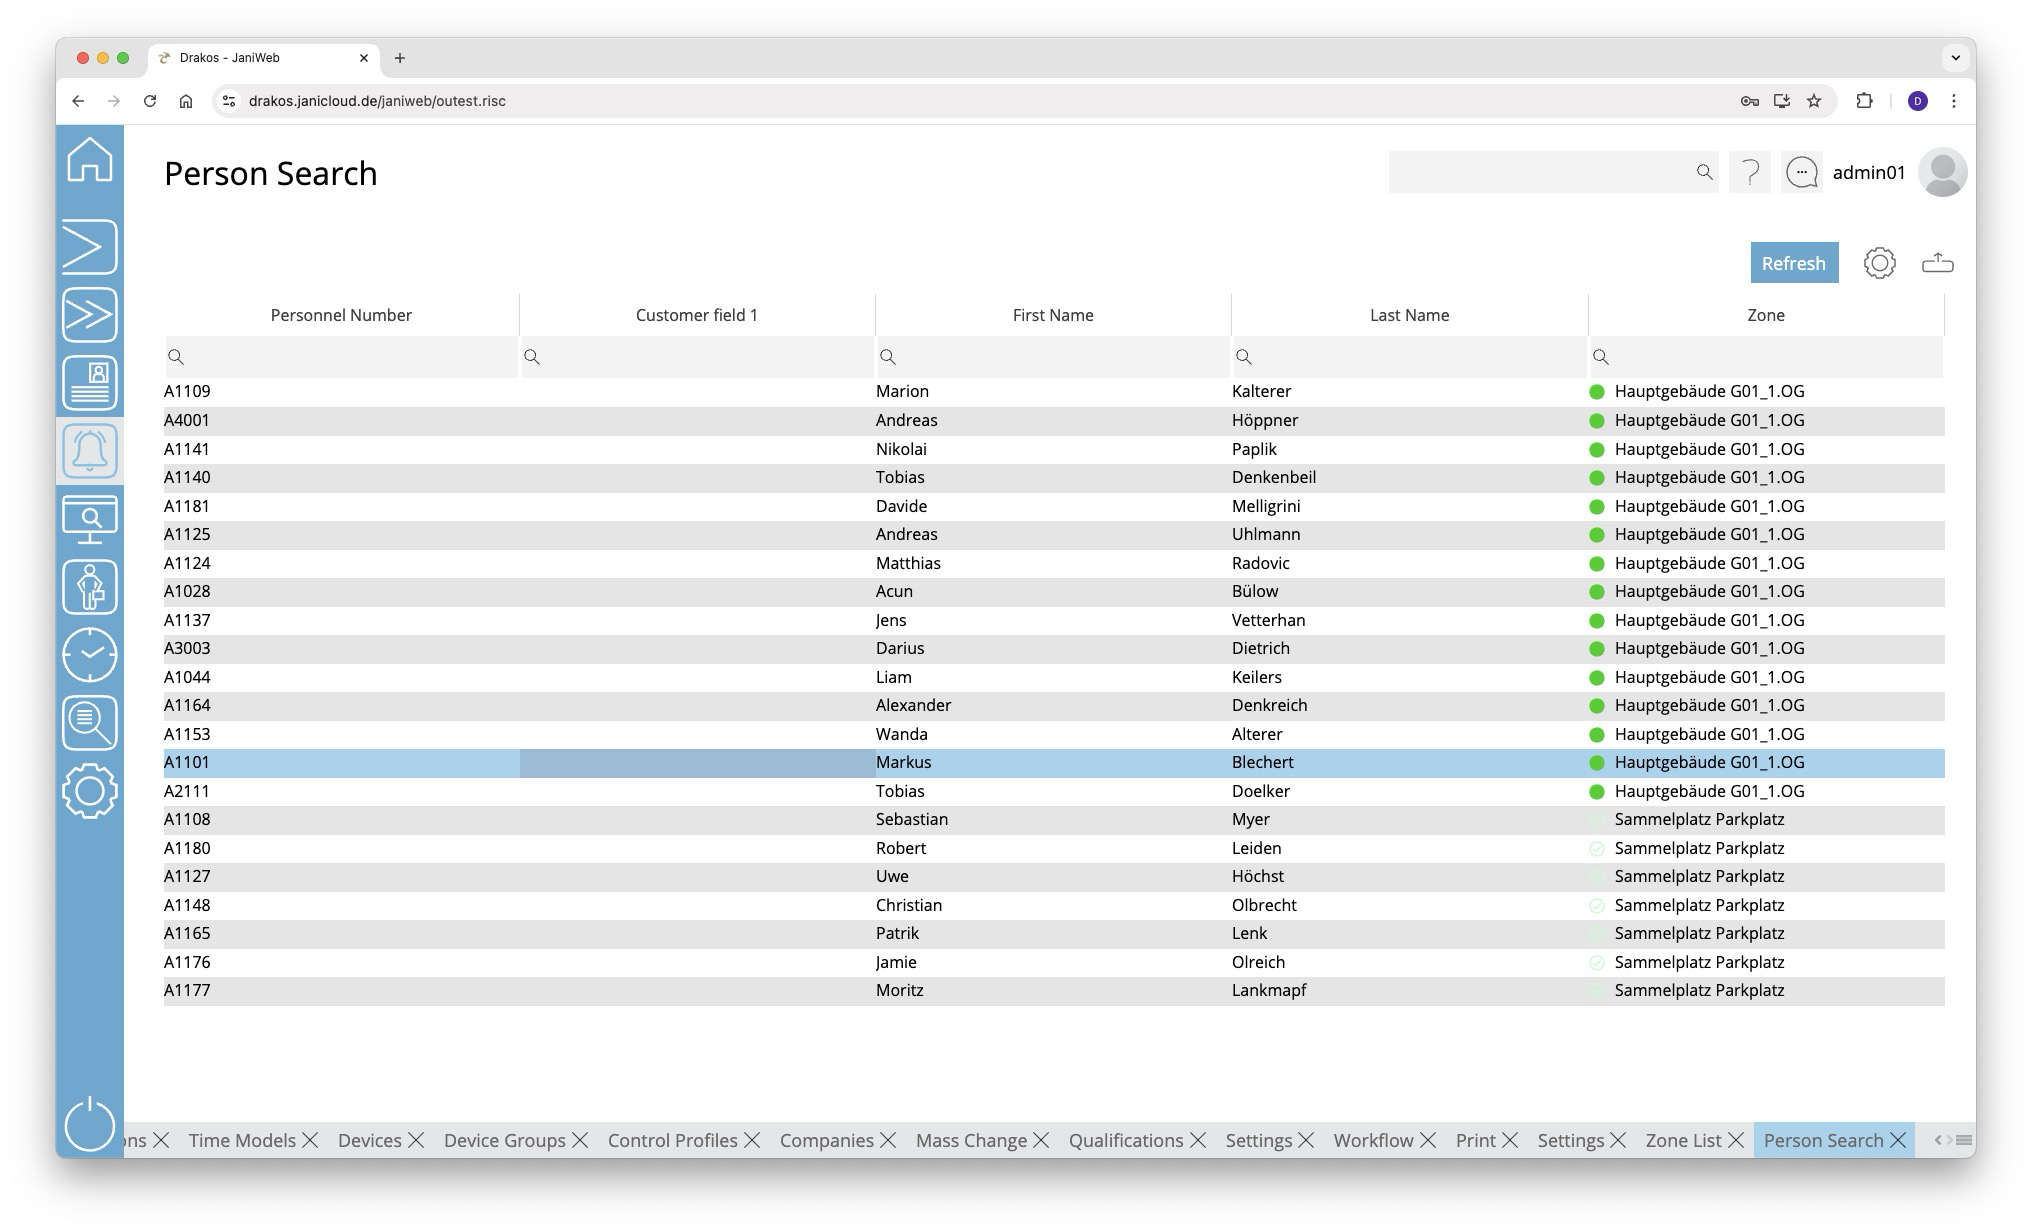
List of persons
The list contains all persons present together with the zone in which they are located. The Zone column shows the name of the zone as well as its alarm status.
You have the following options:
- Show details: Double-click in any column of the person. A pop-up window appears.
- Select columns to display: Press the gear icon. Select which columns you want to display and in which order. Arrange the columns using the mouse or the arrow icons. Press Apply to adopt the changes.
- Search in columns: Enter text or numbers in the search field (magnifying glass icon) of a column to search for names, personnel numbers, or other criteria. The entries take effect immediately: the list only displays hits.
Tip: Search for substrings. You can find “Spencer-Churchill” with “spe”, “chur” or “hill”. The search is not case sensitive. - Export the entire list: Press the download icon. Select the format in which you want to export the list. The export files are downloaded or displayed depending on the browser/operating system settings.For details on the available export formats, see the General > Export Formats chapter of this manual.
- Update list: Use the Refresh button to update the zone list. This also happens automatically every 15 seconds.
Evacuation Manager
The Evacuation Manager gives you an overview of persons who are currently logged into an unsafe zone. In the event of an alarm, employees may no longer be able to log out of their zone properly (no time, devices no longer working). You can use the evacuation manager to manually transfer persons from unsafe zones to a safe zone after you have checked their presence.
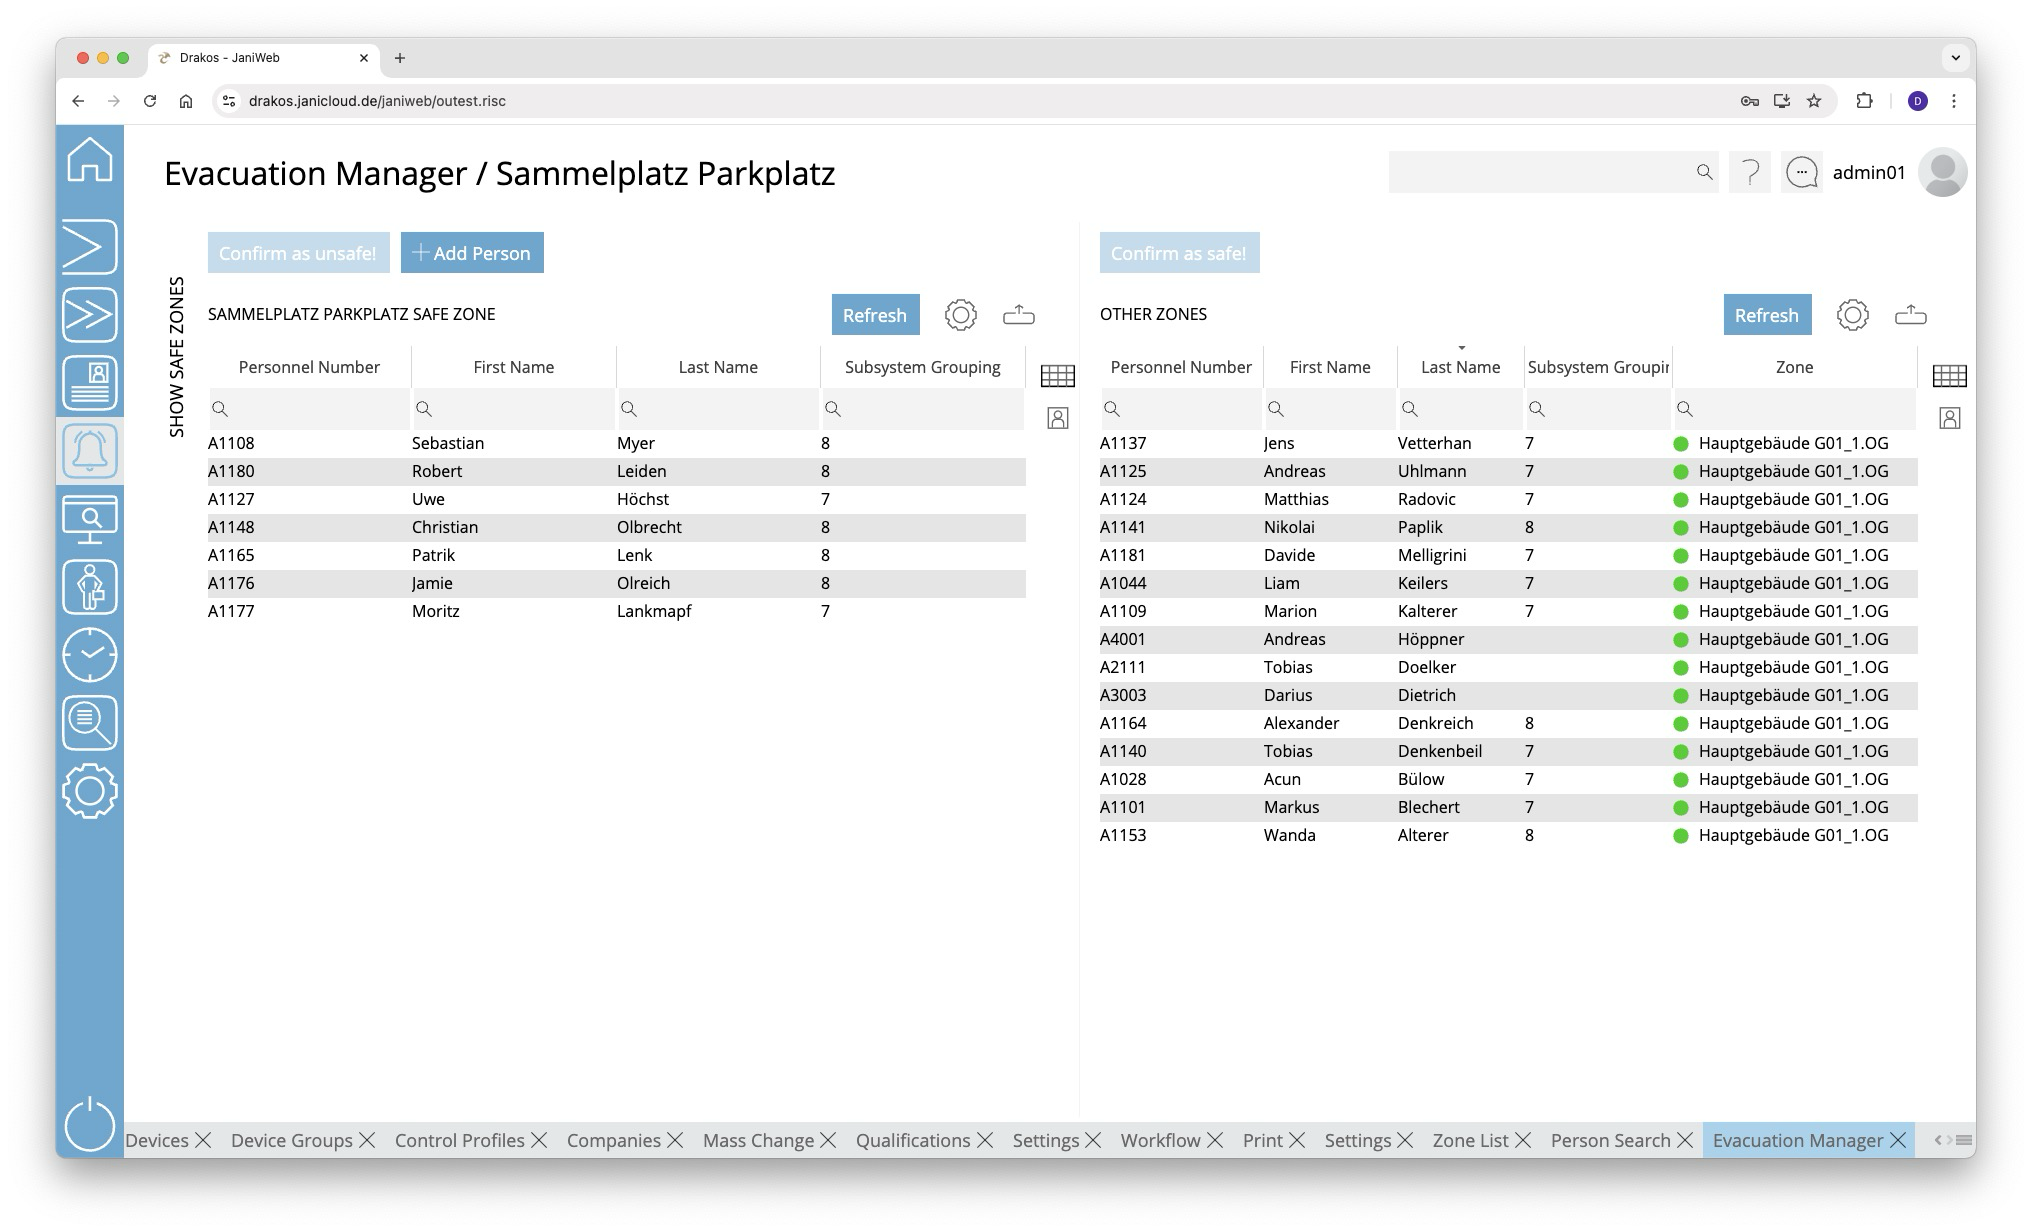
Lists Safe Zone / Other Zones
The list on the right contains all persons in unsafe zones. To book a person into a safe zone:
- Select the person(s) in the list of unsafe zones (multiple selection with CTRL or SHIFT).
- Press Confirm as safe!.
The persons now appear in the list on the left-hand side and are booked into the safe zone.
In the opposite case (e.g. due to an incorrect rebooking), proceed in the same way: Book people from the safe zone into the unsafe zone by selecting them in the left-hand list and then pressing the button Confirm as unsafe!. The persons will then reappear in the list of unsafe zones.
Buttons for display format
Use the icons to the right of the lists to select whether the persons are displayed in text form or with their photo.
Button Add Person
You can use the Add Person button to add persons who are not currently in a zone to the safe zone. To do this, click the button and then select the desired person(s) (multiple selection is possible). Confirm your selection with the Save button.
Further options with the lists
- Show details: Double-click in any column of the person. A pop-up window appears.
- Select columns to display: Press the gear icon. Select which columns you want to display and in which order. Arrange the columns using the mouse or the arrow icons. Press Apply to adopt the changes.
- Search in columns: Enter text or numbers in the search field (magnifying glass icon) of a column to search for names, personnel numbers, or other criteria. The entries take effect immediately: the list only displays hits.
- Export the entire list: Press the download icon. Select the format in which you want to export the list. The export files are downloaded or displayed depending on the browser/operating system settings.For details on the available export formats, see the General > Export Formats chapter of this manual.
- Update list: Use the Refresh button to update the zone list. This also happens automatically every 15 seconds.
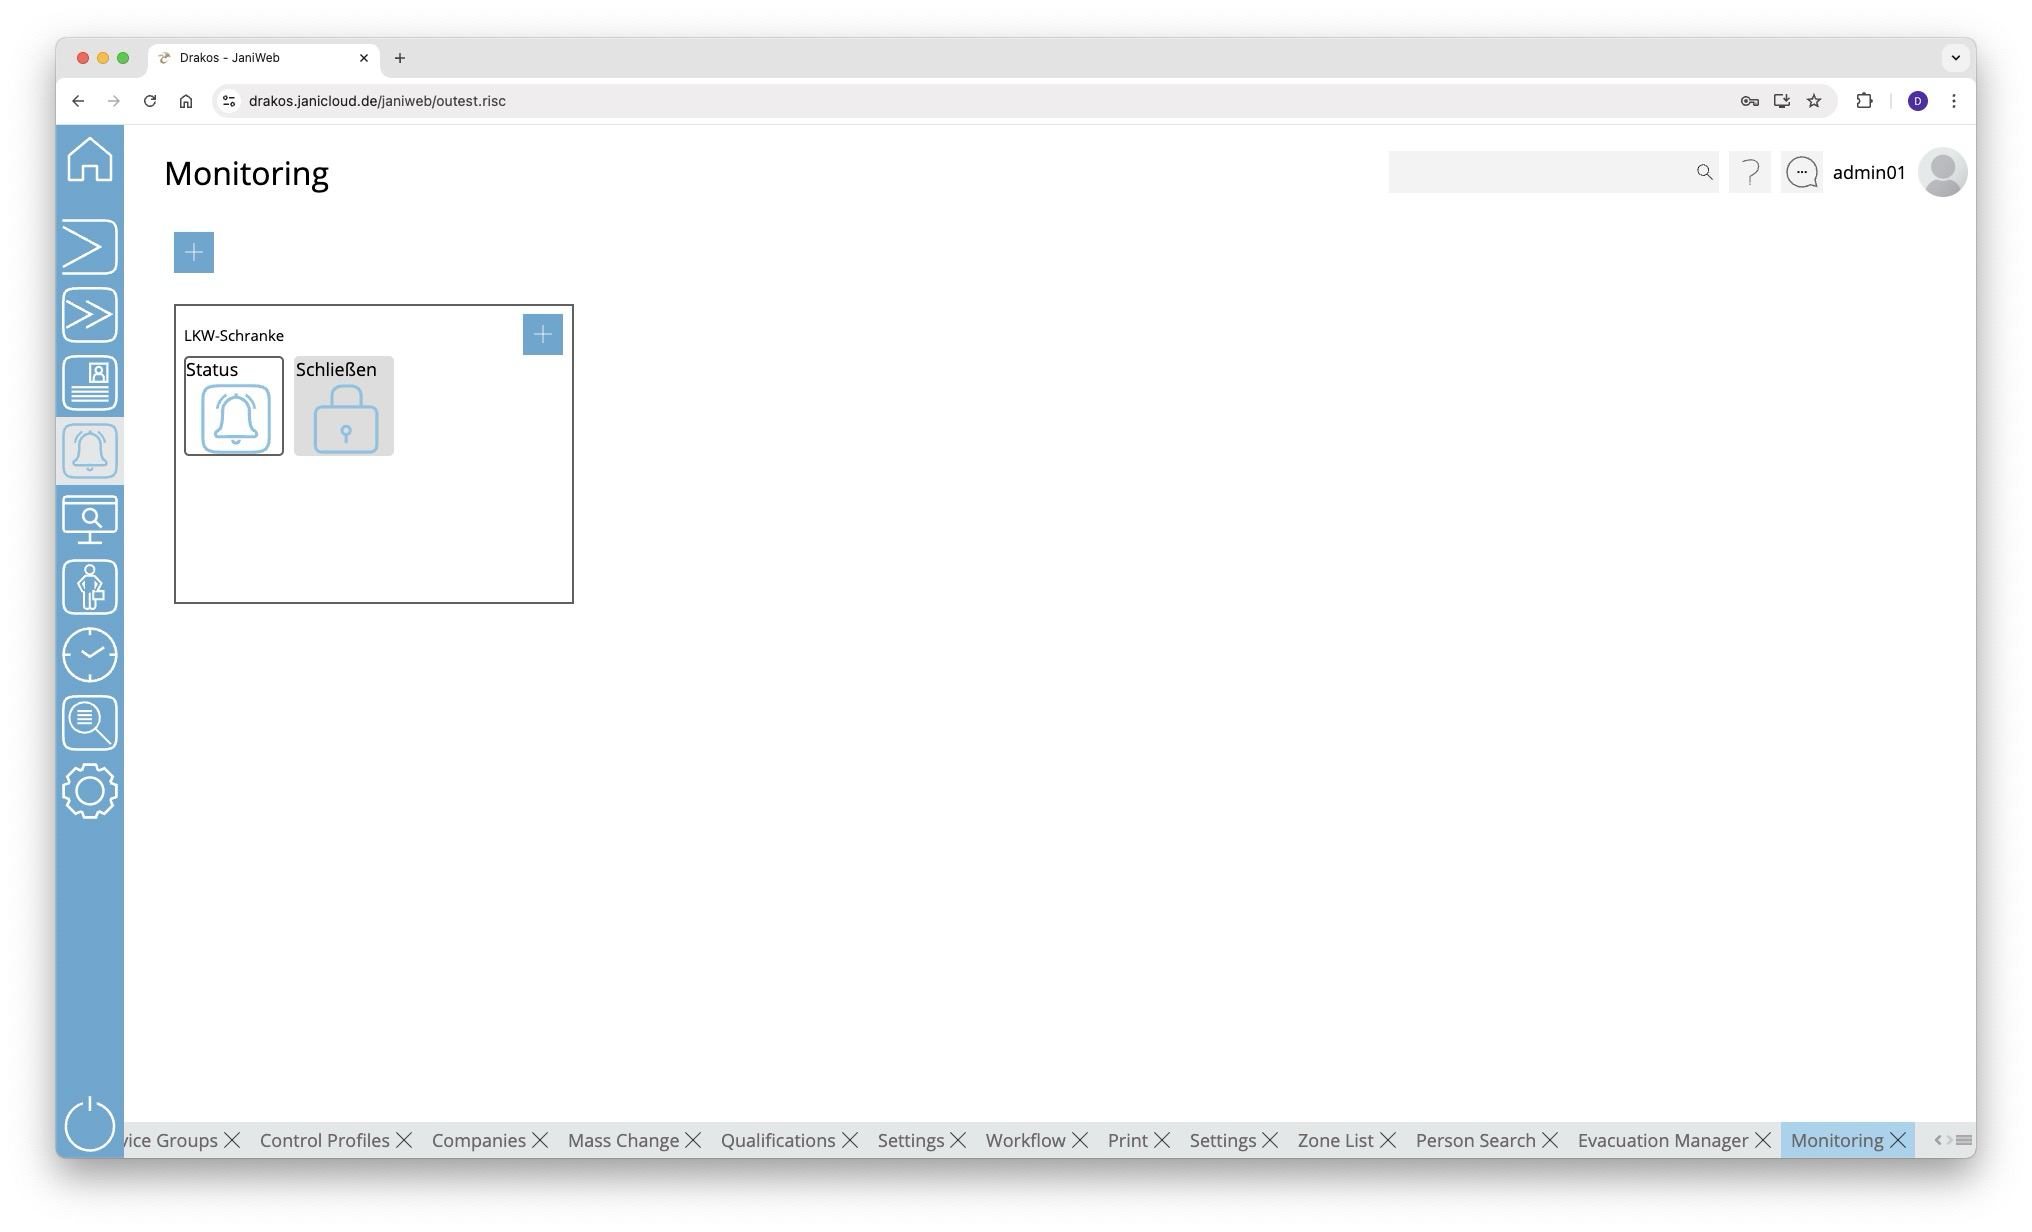
Monitoring
You can use the menu item Monitoring to create modules that contain different types of switches. Switches can display the status of a device or control it at the touch of a screen button.
Plus icon for modules
To create a new module:
- Press the plus icon.
- Then select a Site for the module. Modules are only visible for the current site.
- Enter a meaningful Name.
- Press Save.
Plus icon for switches
To create a new switch for a module:
- Press the plus icon within the module.
- Select the type of switch you want to create (Status, Control, Hybrid).
- Enter a meaningful name.
- Select the device that is to be mapped by the switch and define the required settings.
Switch types
Status
A switch of the type Status can represent up to four different states of the device in question.
- Offset: Select the position in the booking record that is to be checked for the status.
- Event Type: Select the booking type that is to define the status.
- StatusA to StatusD: Enter the required value for each status. You can use the Upload buttons to store a separate image for each status.
Press Save to apply the changes.
Control
A Control switch allows you to control a device.
- BPA9: Enter the data that should be sent to the device when the switch is pressed.
- Buttons Upload: Upload a suitable image for the switch.
Press Save to apply the changes.
Hybrid
A Hybrid switch can both control and display up to four statuses.
- BPA9: Enter the data that should be sent to the device when the switch is pressed.
- Offset: Select the position in the booking record that is to be checked for the status.
- Event Type: Select the booking type that is to define the status.
- StatusA to StatusD: Enter the required value for each status. You can use the Upload buttons to store a separate image for each status.
Press Save to apply the changes.
Delete or change a module/switch
Right-click on a switch or in a module and select Remove or Edit.
Image Comparison
The menu item Image Comparison shows the images of the persons who last made a booking at a specific terminal. In this way, you can ensure that the person making the booking matches the stored image.
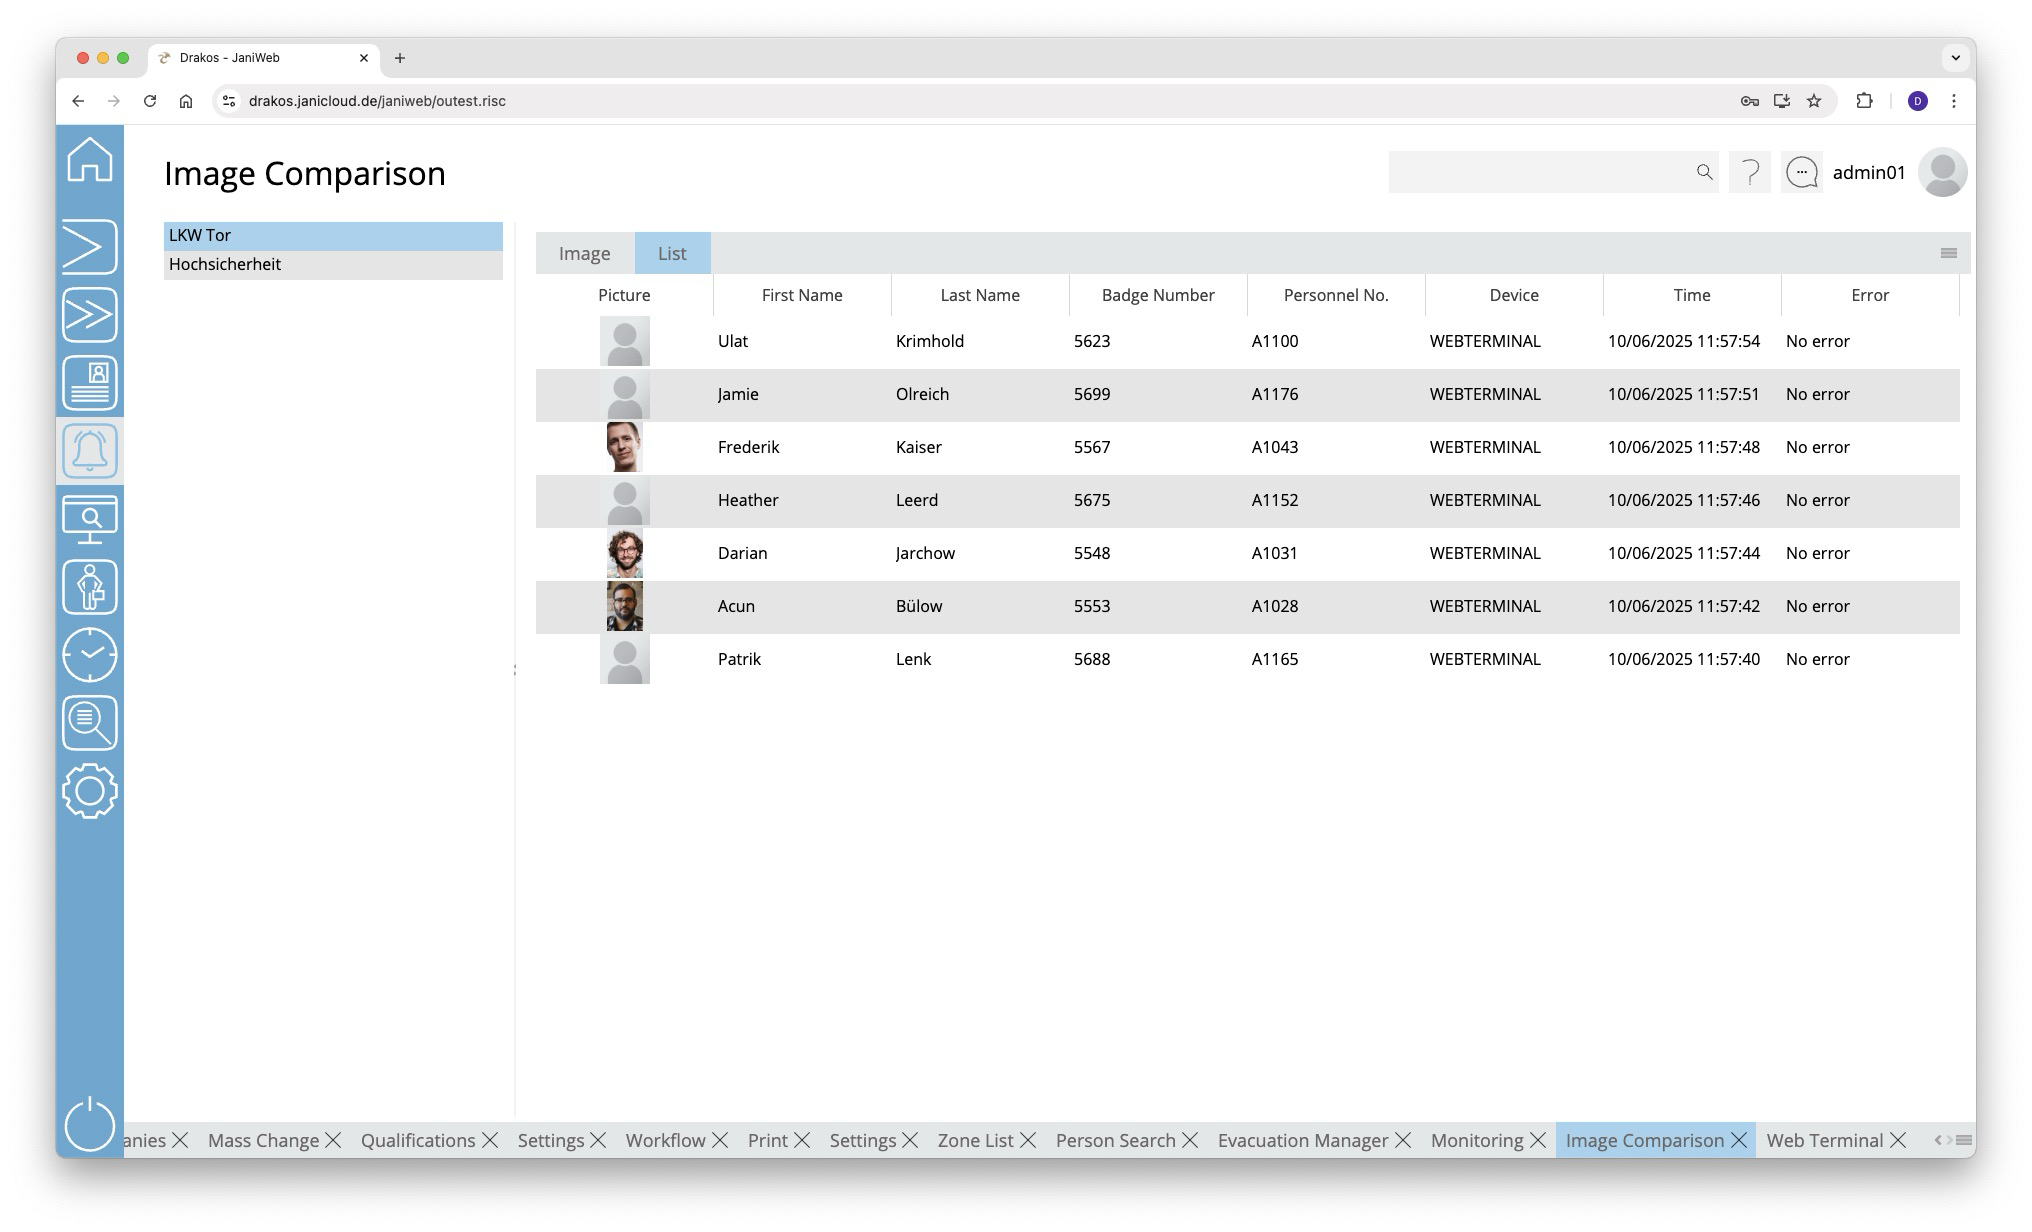
List of configurations
The list on the left-hand side contains the configurations created for image comparison. Select the entry for which you want to display images. Which configurations appear here is determined in the settings for alarm management.
Tab Image
Select this tab to display only the image for the last booking.
Tab List
Select this tab to display a continuous list of images for the bookings of the last hour.
Alarm Scenarios
Use the menu item Alarm Scenarios to define various events and the subsequent actions.
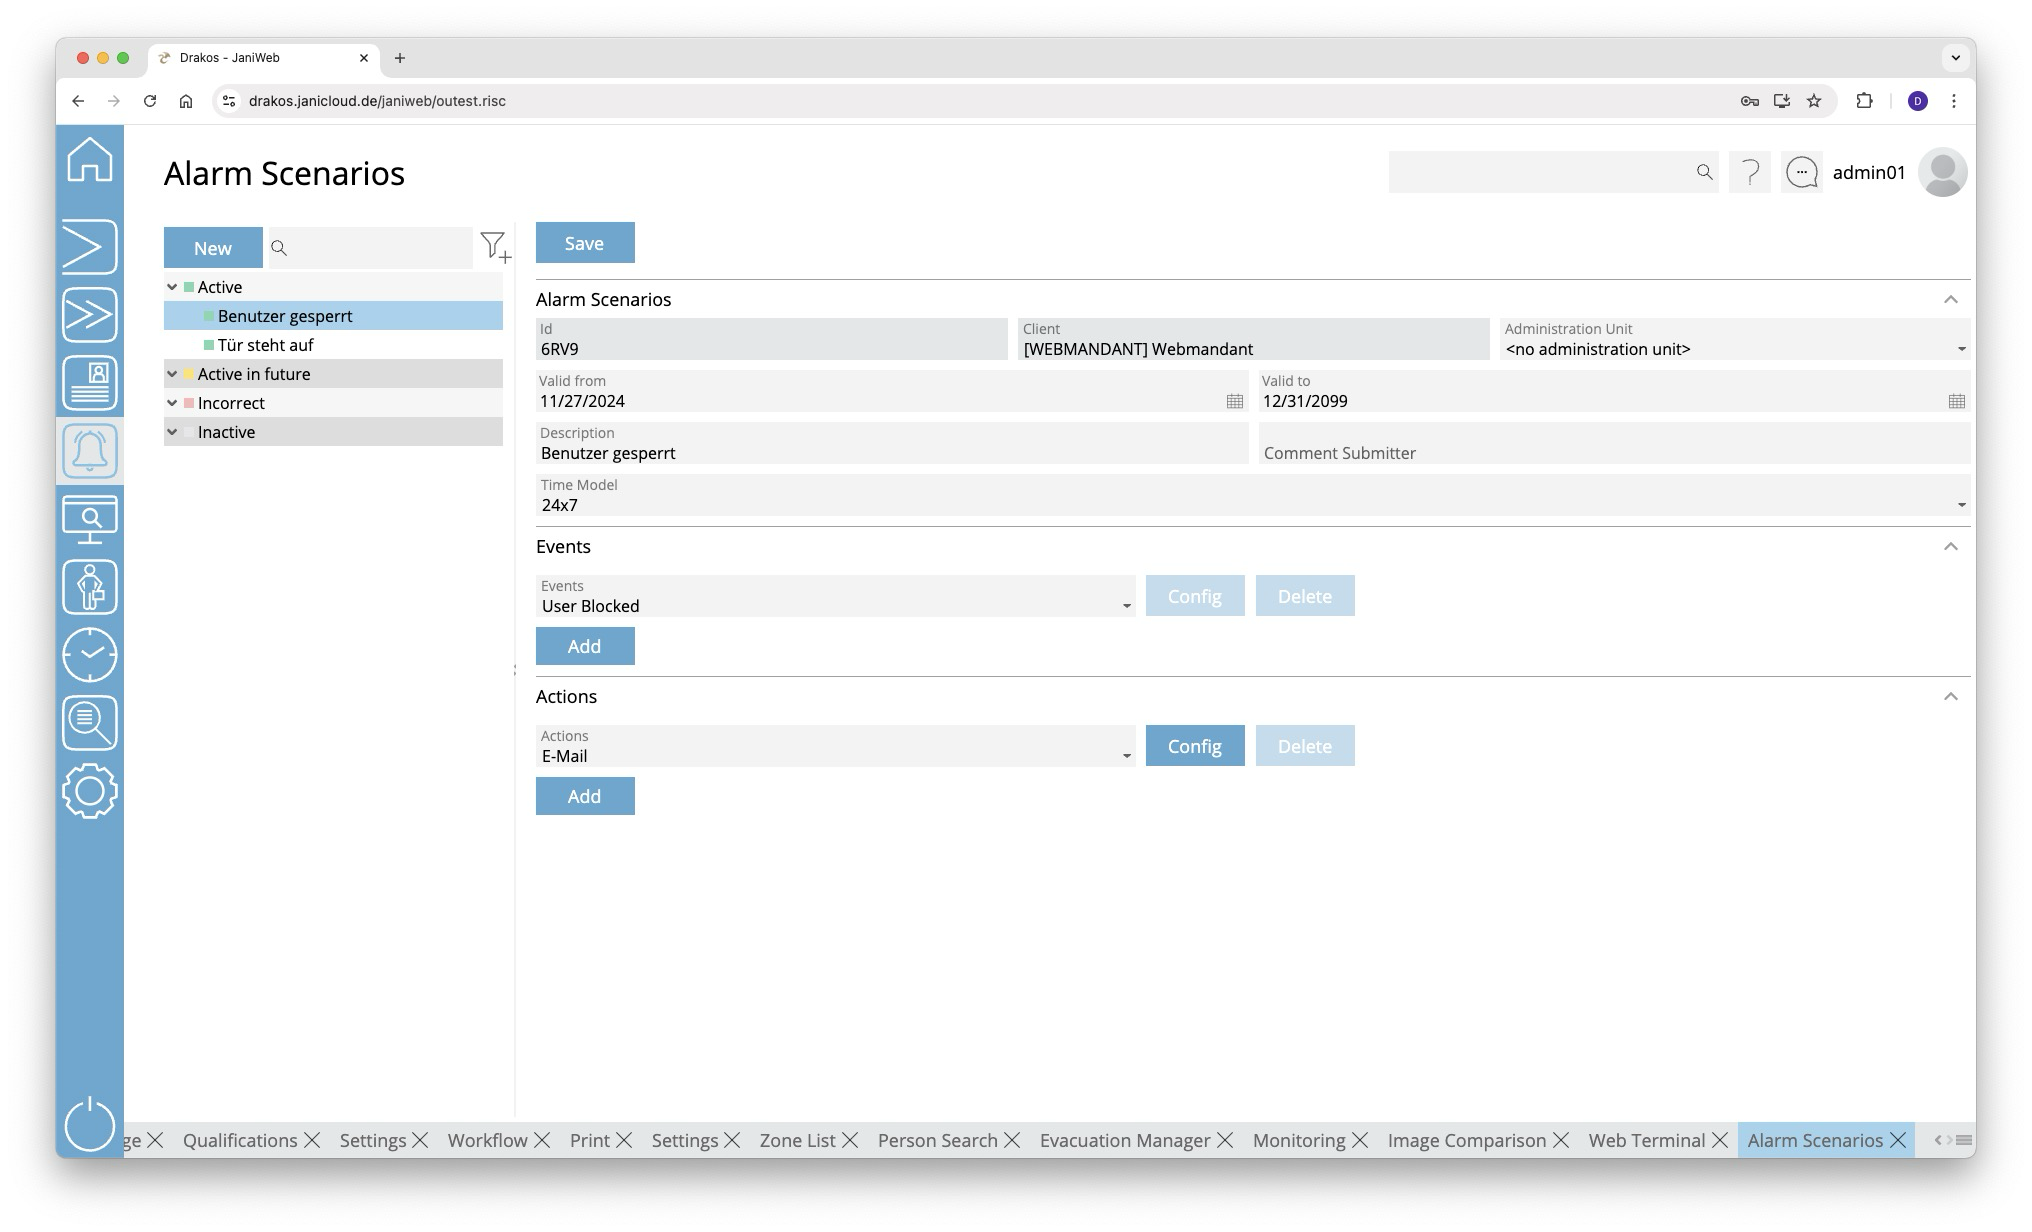
List of scenarios
The list contains all the alarm scenarios that have already been created. Select a scenario to view details.
The list offers the following options:
- Search: Enter text or numbers in the search field (magnifying glass icon) at the top to search for groups. The entries take effect immediately: the list only displays hits. The search is not case sensitive.
- Filter: Press the filter icon. Select the criteria for which you want to display groups. Changes are visible immediately.
Button New
- Press New to create a new alarm scenario.
- Enter a meaningful Description, select a Client and define a validity period (Valid from – Valid to).
- Select a Time Model during which the scenario should be active.
- Select the Events that should trigger actions. A scenario can include several events and actions.
- Select the Actions to be triggered when the events occur.
Button Save
Press Save to apply your changes.
Area Events
Define one or several events that trigger an action. Multiple events are linked logically by OR (one match is sufficient).
Button Add
Press Add to add another event.
Button Config
Press Config to set the details for the event.
The following events are available:
- User Blocked: A user is blocked.
- Block due to inactivity: A person is blocked because they have not been active for a longer period of time (e.g. no booking for a certain number of days).
- Block due to duplicate badge number: A duplicate badge number exists in the system (e.g. due to duplicate allocation via the web application and an ERP system).
- Failed login: A certain number of failed login attempts for the same user have been detected (unknown users can be excluded).
- Offline Component Battery Status: The battery level of an offline component is too low.
- OSS Configuration Error: OSS has not been configured correctly.
- OSS Event: An OSS event has occurred.
- OSS Block List Error: An error has occurred in the configuration of the OSS blocklist.
- Server Log: A specific system message has occurred.
Area Actions
Define one or more Actions here that are to be triggered when the defined events occur.
Button Add
Press Add to add another action.
Button Config
Press Config to specify details for the action.
You can configure automatically sent E-Mails (Mail action) as follows:
- Recipient: Enter the recipient’s E-Mail address. Press the plus icon to add further recipients.
- Subject, Body: Enter the desired text. Use the predefined variables by dragging them to the desired position in the body text or subject.
Press Save to save the E-Mail configuration.
Site Map

Settings
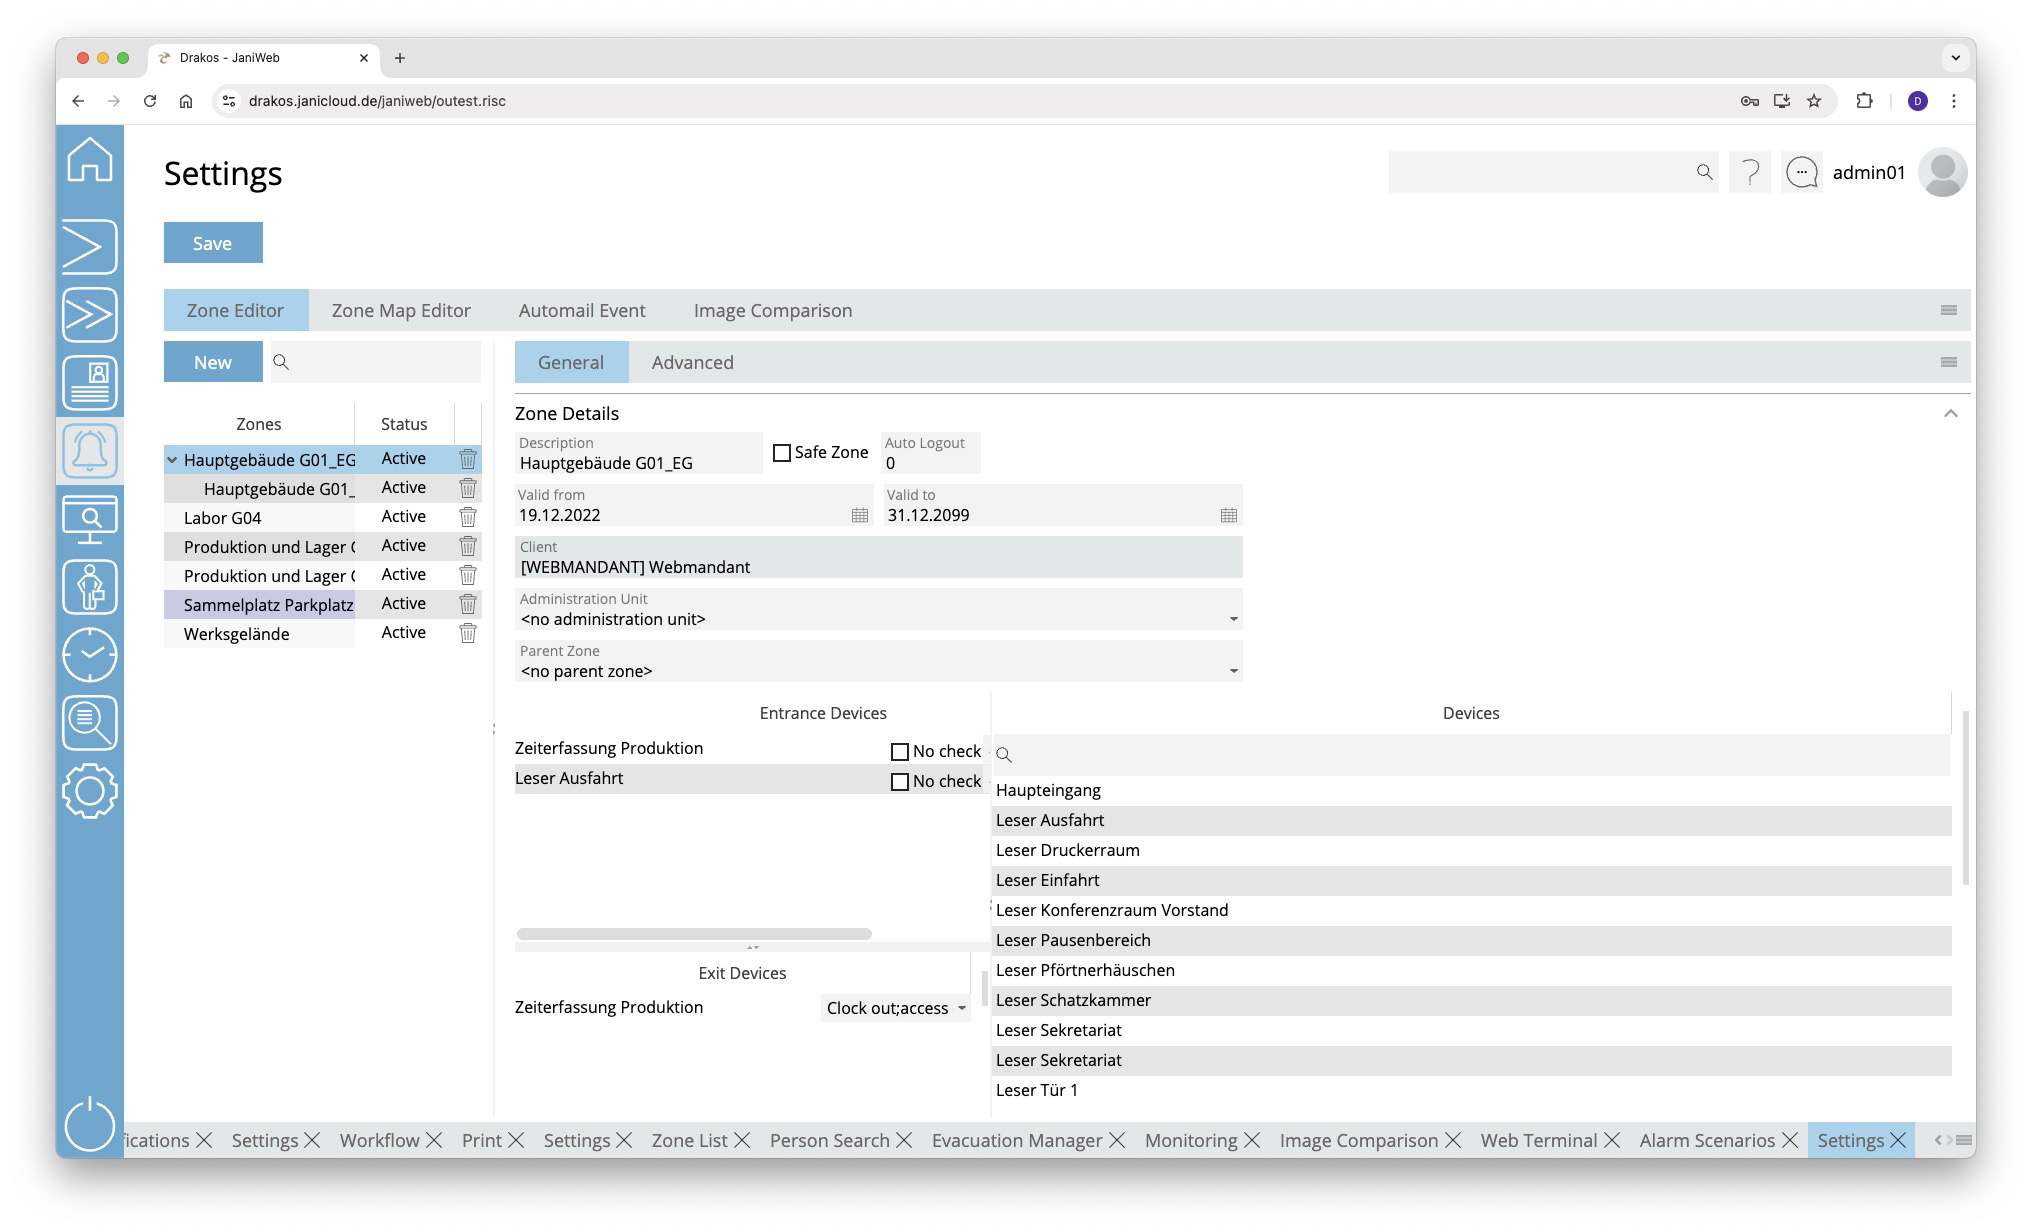
Use the menu item Settings to make various settings (zones, site plans, image comparison) for alarm management.
Button Save
Press Save to apply your changes.
Tab Zone Editor
This is where you manage the zones for alarm management.
List of zones
The list contains all zones that have already been created. Select an entry to view details.
Button New
Press New to create a new zone. Enter the required information.
Tab General
Define the general settings for the zone here.
- Description: Enter a meaningful name.
- Safe Zone: Select this option if it is a safe zone. Safe zones are highlighted in blue in the zone list and are relevant for evacuation (e.g. an outdoor assembly point).
- Auto Logout: Enter the number of minutes after which people should be automatically logged out of the zone. Leave the field empty if you do not want to use the auto-logout.
- Parent Zone: If it is a sub-zone, select the parent zone here.
- Show Link: Click this button to view the URL that allows you to access the zone list without logging in first. To do this, the client must be added to the whitelist in the Basic Settings menu.
- https://{janiweb-server}/janiweb/publiczone.risc?zoneId=1&view=list - displays the zone list as a list (default)
- https://{janiweb-server}/janiweb/publiczone.risc?zoneId=1&view=images - displays the list of zones with the photos of the persons
- https://{janiweb-server}/janiweb/publiczone.risc?zoneId=1&view=tiles - displays the zone list in tile view
Spatial definition of the zone
Select input and output devices to define a zone.
- Drag the desired devices from the list of all devices to the Entrance Devices or Exit Devices list.
- For each device, specify which booking types trigger the entry and exit of the zone.
- (Optional) Select No check if the device is to be excluded from the zone change control.
- Press Save to apply the changes.
Tab Advanced
Here you can define advanced settings for the zone.
Area Min/Max Number Persons
Here you can specify whether the zone should be designed for a certain number of persons. Specify one or more time models and enter the desired number of persons for Max and/or Min.
Area Anti-Passback
Select here how repeated access to the zone is to be managed.
Area Zone Change Control
Select here whether the change from one zone to another should be monitored. Drag the desired zone(s) from the Available list to the Selected list.
Tab Zone Map Editor
This is where you define the graphical representation of the zones. You can upload floor plans (or site plans) and place devices and zones on them.
Button Upload
Press Upload to upload a new floor plan. Select the desired file on your computer.
Button Delete
Press Delete to remove the selected floor plan.
List field Select plan
If you have uploaded several files (e.g. for different buildings or floors), select the floor plan you want to edit here.
Available zones / Devices
Select an available zone or an available device and drag the element to the desired position on the floor plan. Right-click the element for a device and select the corresponding device.
Zoom slider
Use this to select the zoom factor (20 to 140 percent) to reduce or enlarge the display.
Tab Automail Event
Here you can define booking events about which you are automatically informed by E-Mail.
Create one or more combinations of Event type, Error, Device / Device Group and Mail address, which will send a message to the specified E-Mail address when they occur. Press Add to create further events.
Tab Image Comparison
Here you can define settings for Image Comparison.
List of configurations
The list on the left-hand side contains the configurations created for image comparison. Select a configuration to show details.
Button New
Press New to create a new configuration for the image comparison. Enter the required information.
Detail area
- Description: Enter a descriptive label for the layout.
- Site: Select the site. The visibility of the configuration is determined by the site.
- Device: Select one or more devices for which the image comparison is to be enabled.
- Event type: Select the booking type(s) to be monitored.
- Display Duration: Enter how long images should be displayed (seconds).
- Additional Fields: Select here which database fields should appear in addition to the image.
- To define the name for a field, press Translate. Enter the names for the respective languages and press Save.
Attendance Board
Attendance Board
The menu item Attendance Board provides you with an overview of the attendance status of all or selected employees.
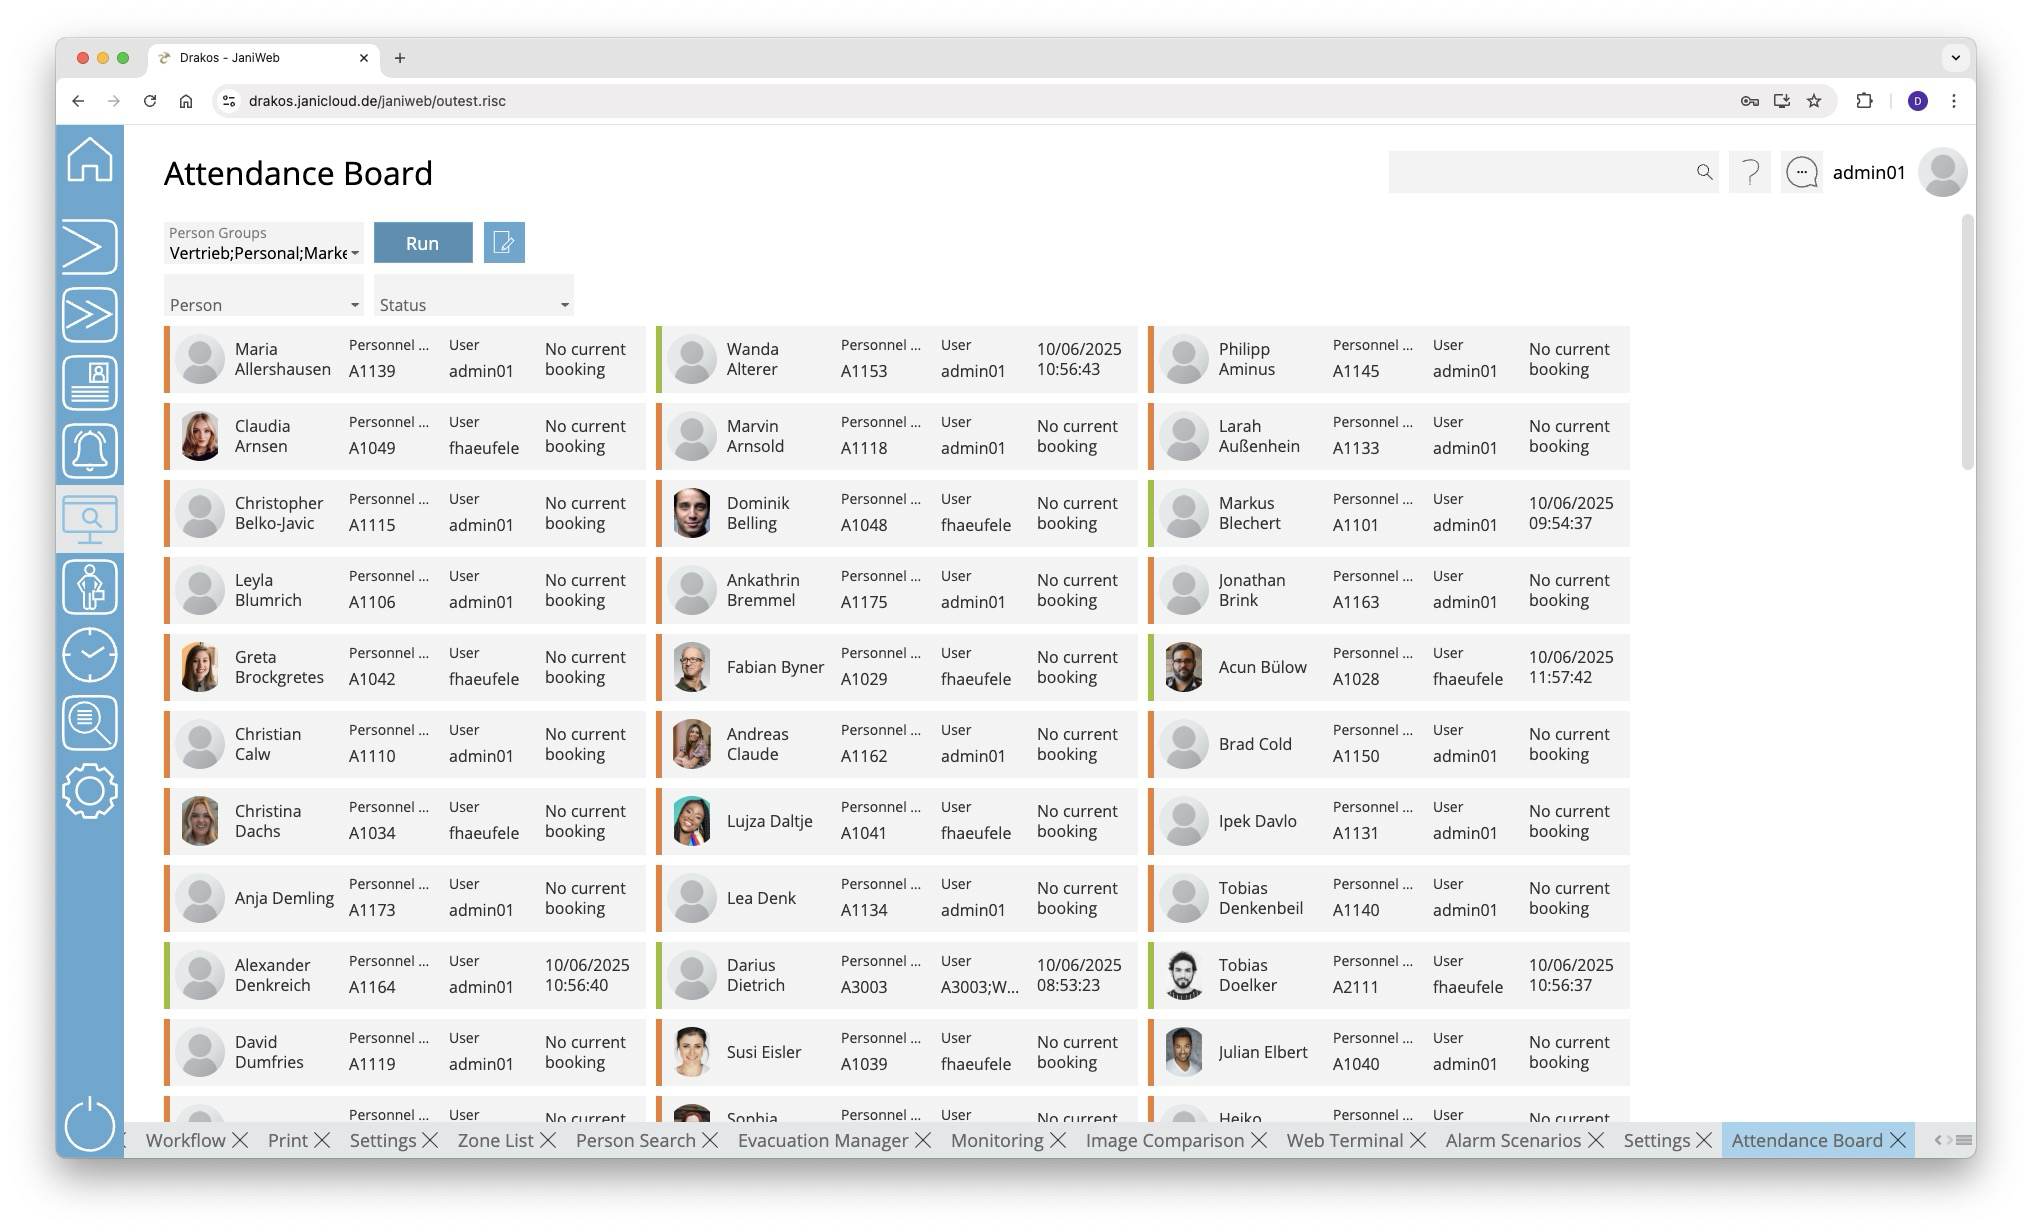
List field Person Groups
Select the person group(s) for which the attendance status should appear and press Run.
Button Run
Press Run to update the view according to the selected criteria.
Button Edit person group
Press this button to view the definitions of the person groups or to add a new person group. For more information on creating person groups, see the section Person Groups.
Filter displayed persons
Use the following fields to filter the persons displayed.
- Person: Select the person(s) you want to display.
- Status: Select which presence status you want to display. You can specify which options are available here in the Settings.
- Zone: Select the zone(s) for which you want the presence status to be displayed.
Press Run to refresh the view.
Settings
Use this menu item to specify Settings for the Attendance Board. You can also define various attendance statuses here, which are available as filters.
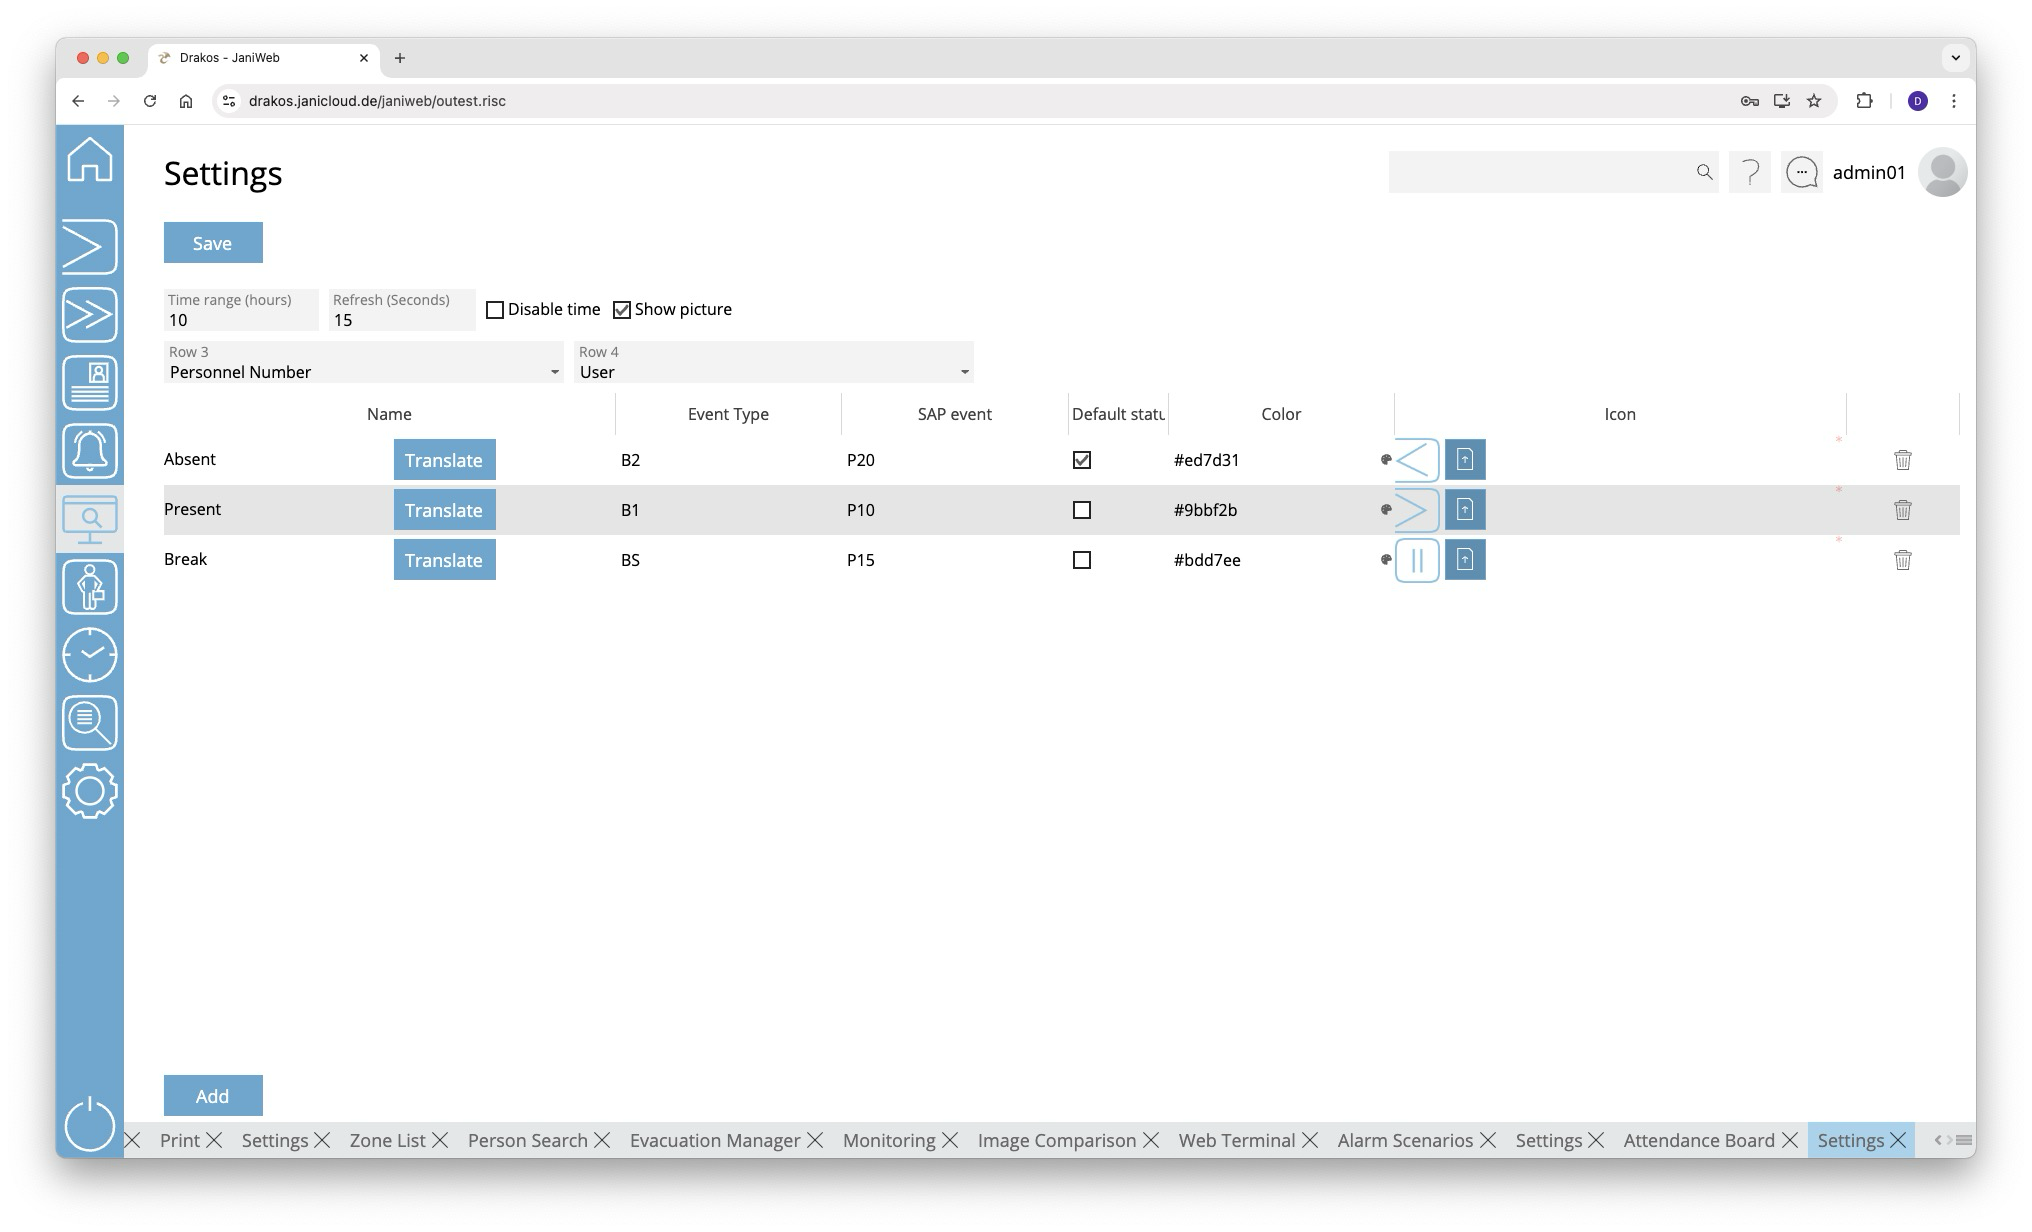
Button Save
Press Save to apply your changes.
General Settings
- Time range (hours): Specify here after how many hours the system should search for new booking events.
- Refresh (seconds): Specify here the time after which the display should refresh automatically.
- Row 3 / Row 4: Select additional information here that should appear on the tiles of the attendance board.
You can display the zone in which the person is currently located. To do this, select the Zone option in the Row 3 or Row 4 field.
List of presence statuses
The list contains the presence statuses that have already been created. To remove a status, press the trash icon. A confirmation dialog will appear.
Button Add
Press Add to create a new presence status. Enter the required data and press Save.
- Column Name: To specify a name, press Translate. Enter the names for the respective languages and press Save.
- Column Event type: Enter the abbreviation for the event (booking) type that leads to the status being displayed.
- Column SAP event: Enter the SAP event that causes the status to be displayed.
- Column Default status: Specify here whether this status should always be displayed if there is currently no booking for the person.
- Column Color: Specify the color in which the status appears in the attendance board. Press the color palette icon to open a color picker. Or enter the color directly as a hexadecimal color code.
- Column Icon: Press Upload to upload an icon for the presence status.
Visitor Management
Companies
Use the menu item Companies to manage companies. Companies created here can be assigned to persons or visitors via the menu items Persons or Visitors.
List of companies
The list contains the companies already created, sorted by their current status (Active, Active in future, Incorrect, Inactive). Select a company to view details.
The list offers the following options:
- Search: Enter text or numbers in the search field (magnifying glass icon) at the top to search for companies. The entries take effect immediately: the list only displays hits. The search is not case sensitive.
- Filter: Press the filter icon. Select the criteria for which you want to display companies. Changes are visible immediately.
- Export the entire list: Press the download icon. Select the format in which you want to export the list. For details on the available export formats, see the General > Export Formats chapter of this manual.
Button Save
You can change the details of the selected company. Press Save to save the changes.
Button New
Press New to create a new company. Enter the required information for the company on the tab Details and press Save.
Tab Persons
The tab Persons provides an overview of which persons are assigned to the respective company.
TIPS
- Filter: Use the filter icon to filter by status (active, inactive, etc.).
- Export: Use the export icon to export the list of assigned persons.
Visitors
You can manage visitors in the system via the menu item Visitors. Here you can create new visitors and assign them to a company that has been created under the menu item Companies.
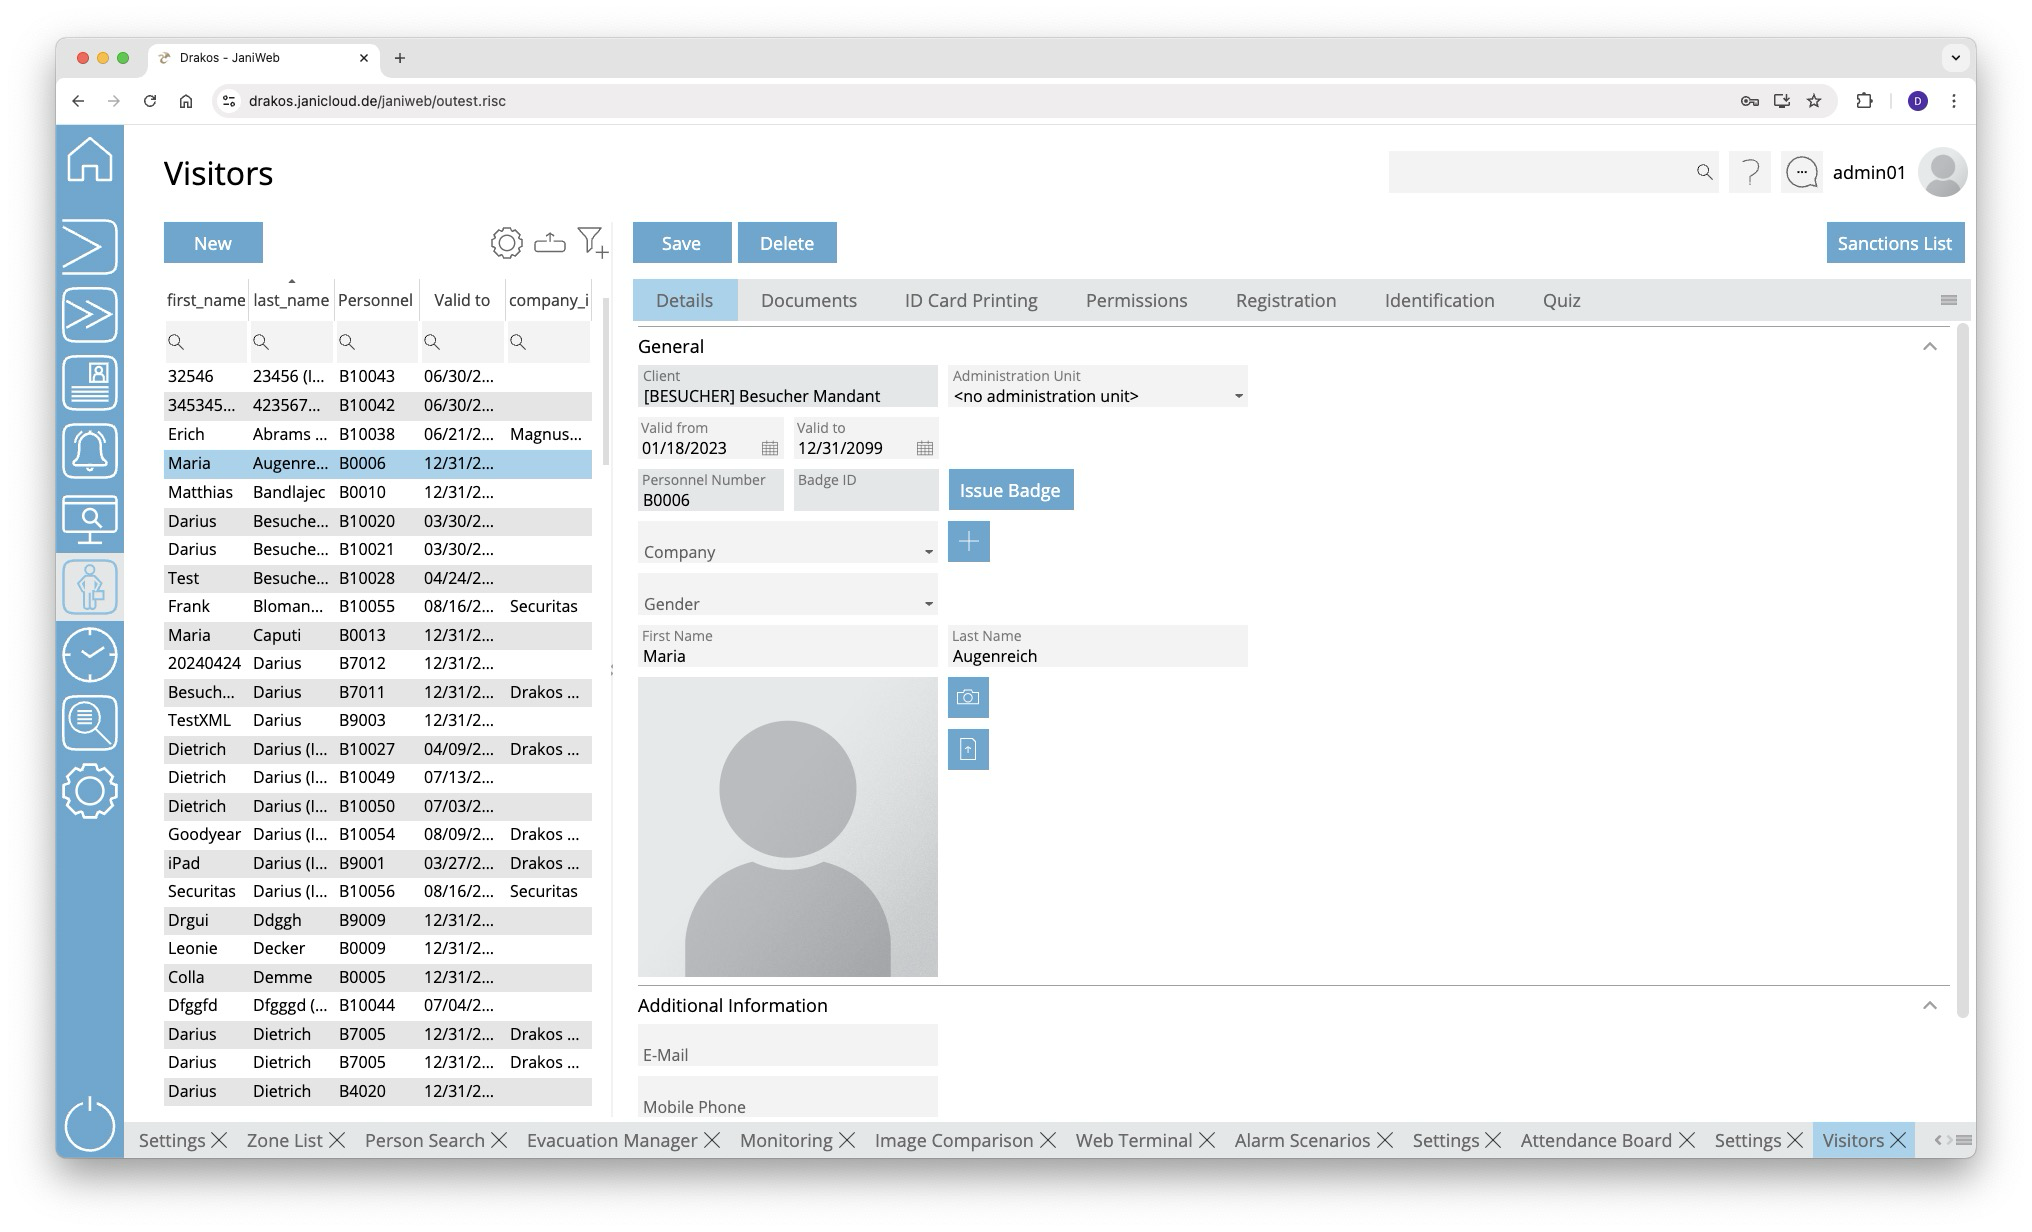
List of visitors
The list contains the visitors already created. Select a visitor to display details. The list offers the following options:
- Select columns to display: Press the gear icon. Select which columns you want to display and in which order. Arrange the columns using the mouse or the arrow icons. Press Apply to adopt the changes.
- Filter by client and status: Press the filter icon. Select the clients and the status (Active, Active in future, Inactive) for which visitors should be displayed. Changes are visible immediately.
- Search in columns: Enter text or numbers in the search field (magnifying glass icon) of a column to search for names, personnel numbers, or other criteria. The entries take effect immediately: the list only displays hits.
Tip: Search for substrings. You can find “Spencer-Churchill” with “spe”, “chur” or “hill”. The search is not case sensitive. - Export the entire list: Press the download icon. Select the format in which you want to export the list. The export files are downloaded or displayed depending on the browser/operating system settings.For details on the available export formats, see the General > Export Formats chapter of this manual.
Button New
Press New to create a new visitor. Enter the required information for the visitor on the tab Data and press Save.
Button Save
You can change the details of the selected visitor. Press Save to save the changes.
Button Delete
Press Delete to delete the selected visitor. A confirmation dialog will appear.
Tab Details
This is where you store and edit visitor-related data. You can individually define which fields and areas are available here via Settings > tab General.
Tab Documents
Here you can link documents to the personnel master record. This tab also contains the documents that the visitor is required to view and sign when self-registering.
Tab Badge Printing
This feature is optional and not available in every installation. Depending on the version, it may also be available in the main menu.
This tab allows you to print badges with the visitor’s information. You can define the layouts for printing badges via the menu item Badge Printing > Settings.
Tab Permission
Here you can grant (Add Group / Add Device) or revoke (Remove Device Group / Remove Device) permissions for the visitor. This tab also provides an overview of the access events linked to the visitor.
If the tabs Delete Device or Delete Group contain a device or device group, access via this device or device group is not possible. This also applies if a permission for the device or device group has been granted on the tabs Add Device or Add Group.
A tick after the title of a tab indicates that there is data within the tab.
Workflow Permissions
This feature is optional and not available in every installation.
If assigning a device or device group is associated with a workflow, the permission becomes active only after the decision-maker approves the workflow request.
If you select a device or device group that has a workflow, a dialog box appears. This prompts you to enter values for the time model and the validity of the permission. You also have the option of leaving a comment for the decision-maker.
You can create multiple workflow requests at once. To send them, press Save.
Workflow requests are indicated by different colors:
You can extend the validity of approved permissions. To do this, press Extend. Then select a new validity period and create another workflow request.
Tab Registration
Here you can directly register the selected visitor for a visit. To do this, enter all the required information and press Save. The visitor now appears in the Visits menu item under Upcoming.
Tab Identification
Here you can manage the various media that a person can use to identify themselves on a device. To add a new identification medium, press Add.
- Identification: Enter a value for the medium in this column (e.g. “F DD 193E” for a license plate).
- Type: Select the type of identification in this column (e.g. license plate).
- Valid from / Valid to: Define a validity period for the medium.
- Prohibition: In this column, you can block individual identification media.
- To remove an identification medium, use the trash icon.
Press Save to save the entries.
Tab Quiz
Here you can see which quizzes the selected visitor has passed or failed and how long the quiz remains valid if passed. If the visitor has failed the quiz and used up the maximum number of attempts, the Reset Attempts button allows you to reset the number in order to give the visitor another chance to take the quiz.
You can manually add a quiz using the Add button. This is indicated in the Passed/Not passed column by the addition of Manually added.
TIPS
You can specify which fields are displayed on the tab Registration via the menu item Settings for visitor management.
Registration
Use the menu item Registration to register the selected visitor directly for a visit.
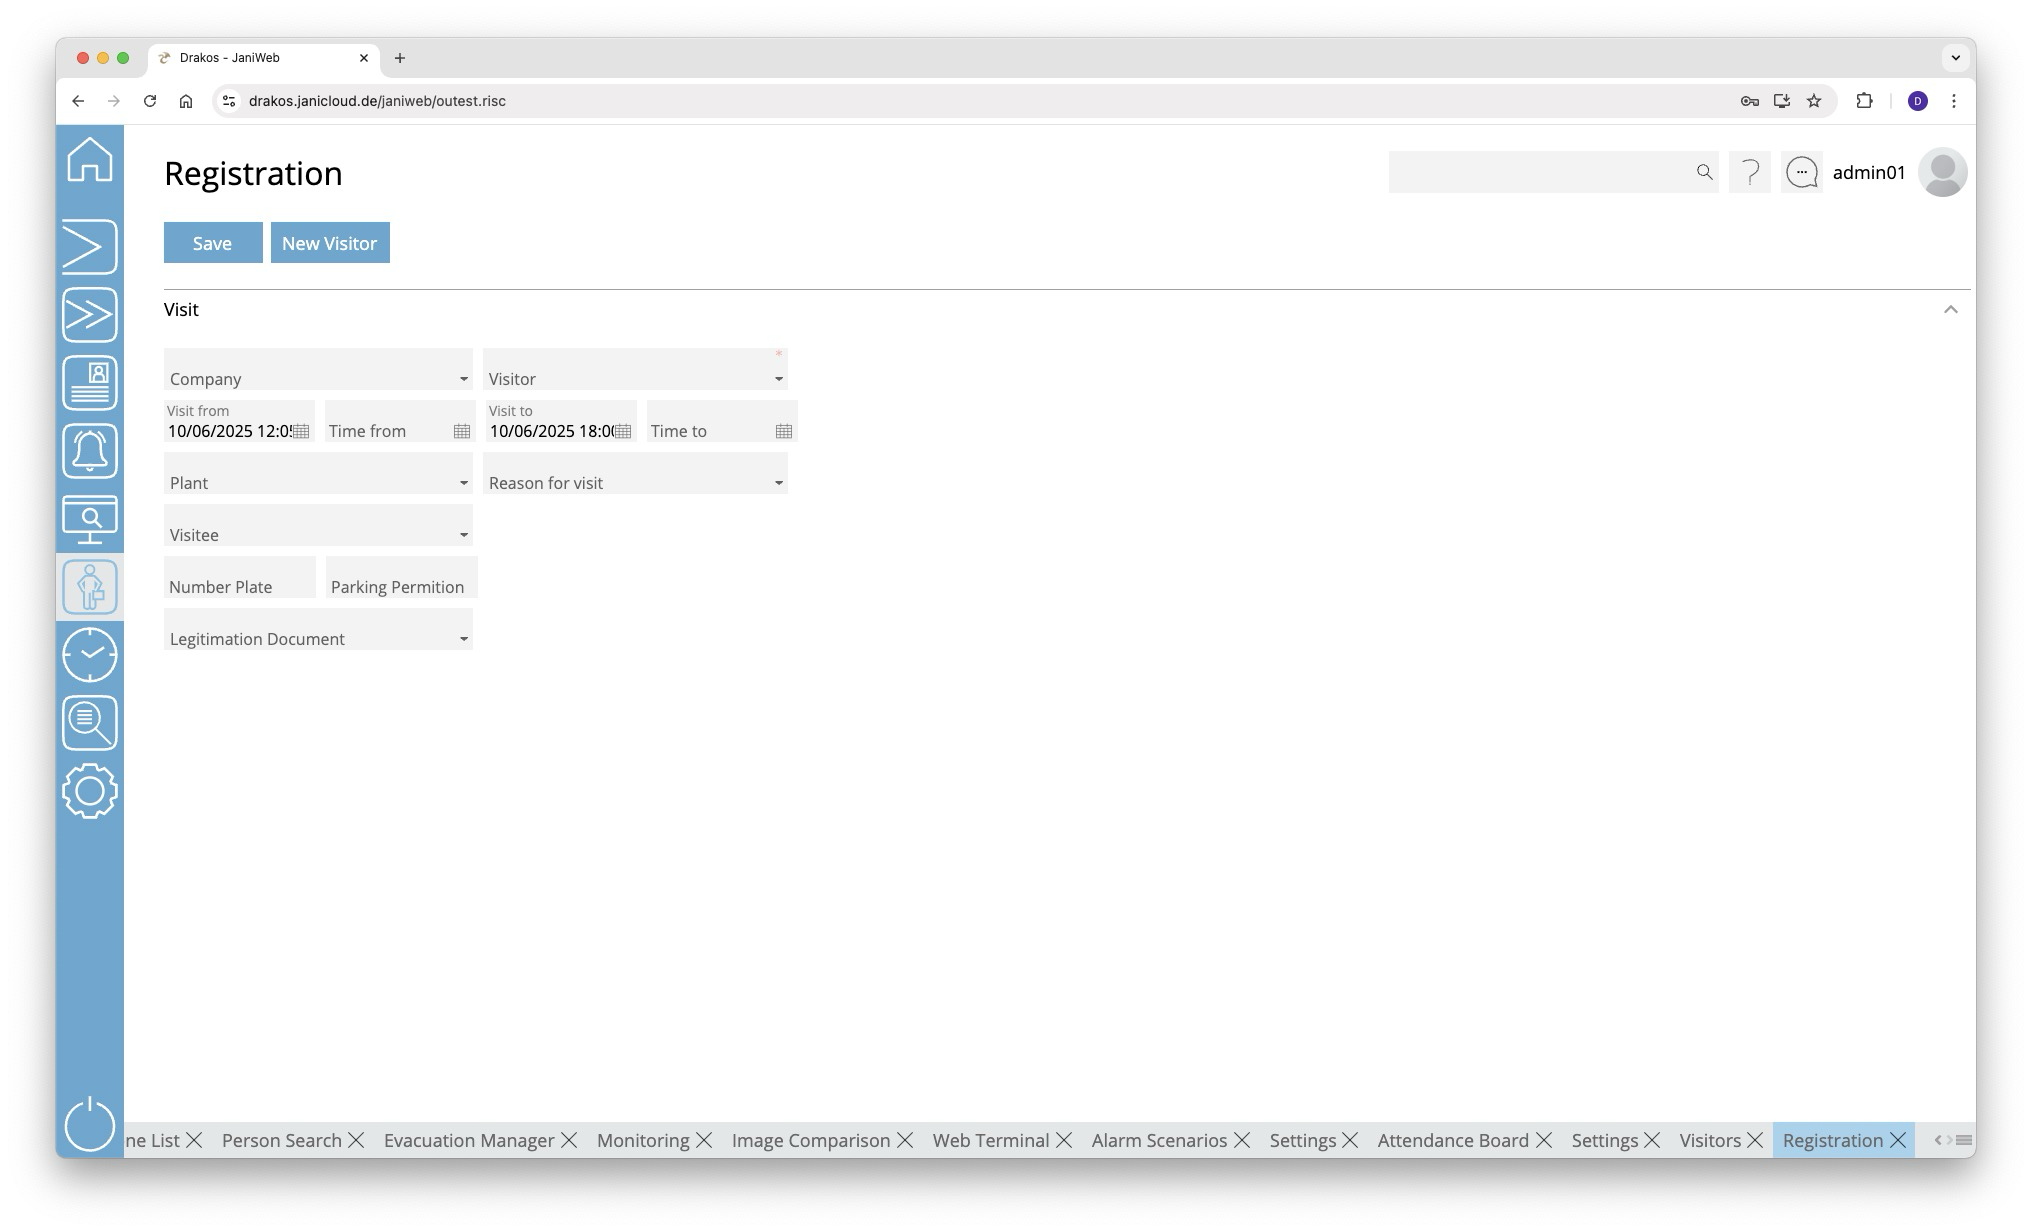
Enter all the required information and press Save. The registered visitor then appears in the Visits menu item under Upcoming.
If the visitor does not exist in the system, you can create them here. To do this, press New Visitor. Enter the required details and then press Save.
Register Visitor Groups
The Add Visitor Group button allows you to register a visitor group for a visit. After clicking the button, a window opens for creating the visitor group.

You can add existing visitors to the visitor group using the drop-down menu in the Choose Existing Visitor column. Alternatively, you can enter information for a new visitor in the First Name, Last Name, E-Mail and Company columns.
Use the Import as CSV button to import a visitor group from a CSV file. The structure of this CSV file can be found here.
Using the Download Example CSV button, you can download a sample CSV file. You can use it to understand the required structure of the CSV file.
You can remove existing entries from the visitor group using the Bin-Button.
Finish editing the visitor group by clicking the Save button.
TIPS
You can specify which fields are displayed on the tab Registration via the menu item Settings for visitor management.
Visits
The menu item Visits provides you with a list of all registered visits, sorted by Upcoming, Ongoing, Active and Inactive. Here you can create, edit, start or end visits.
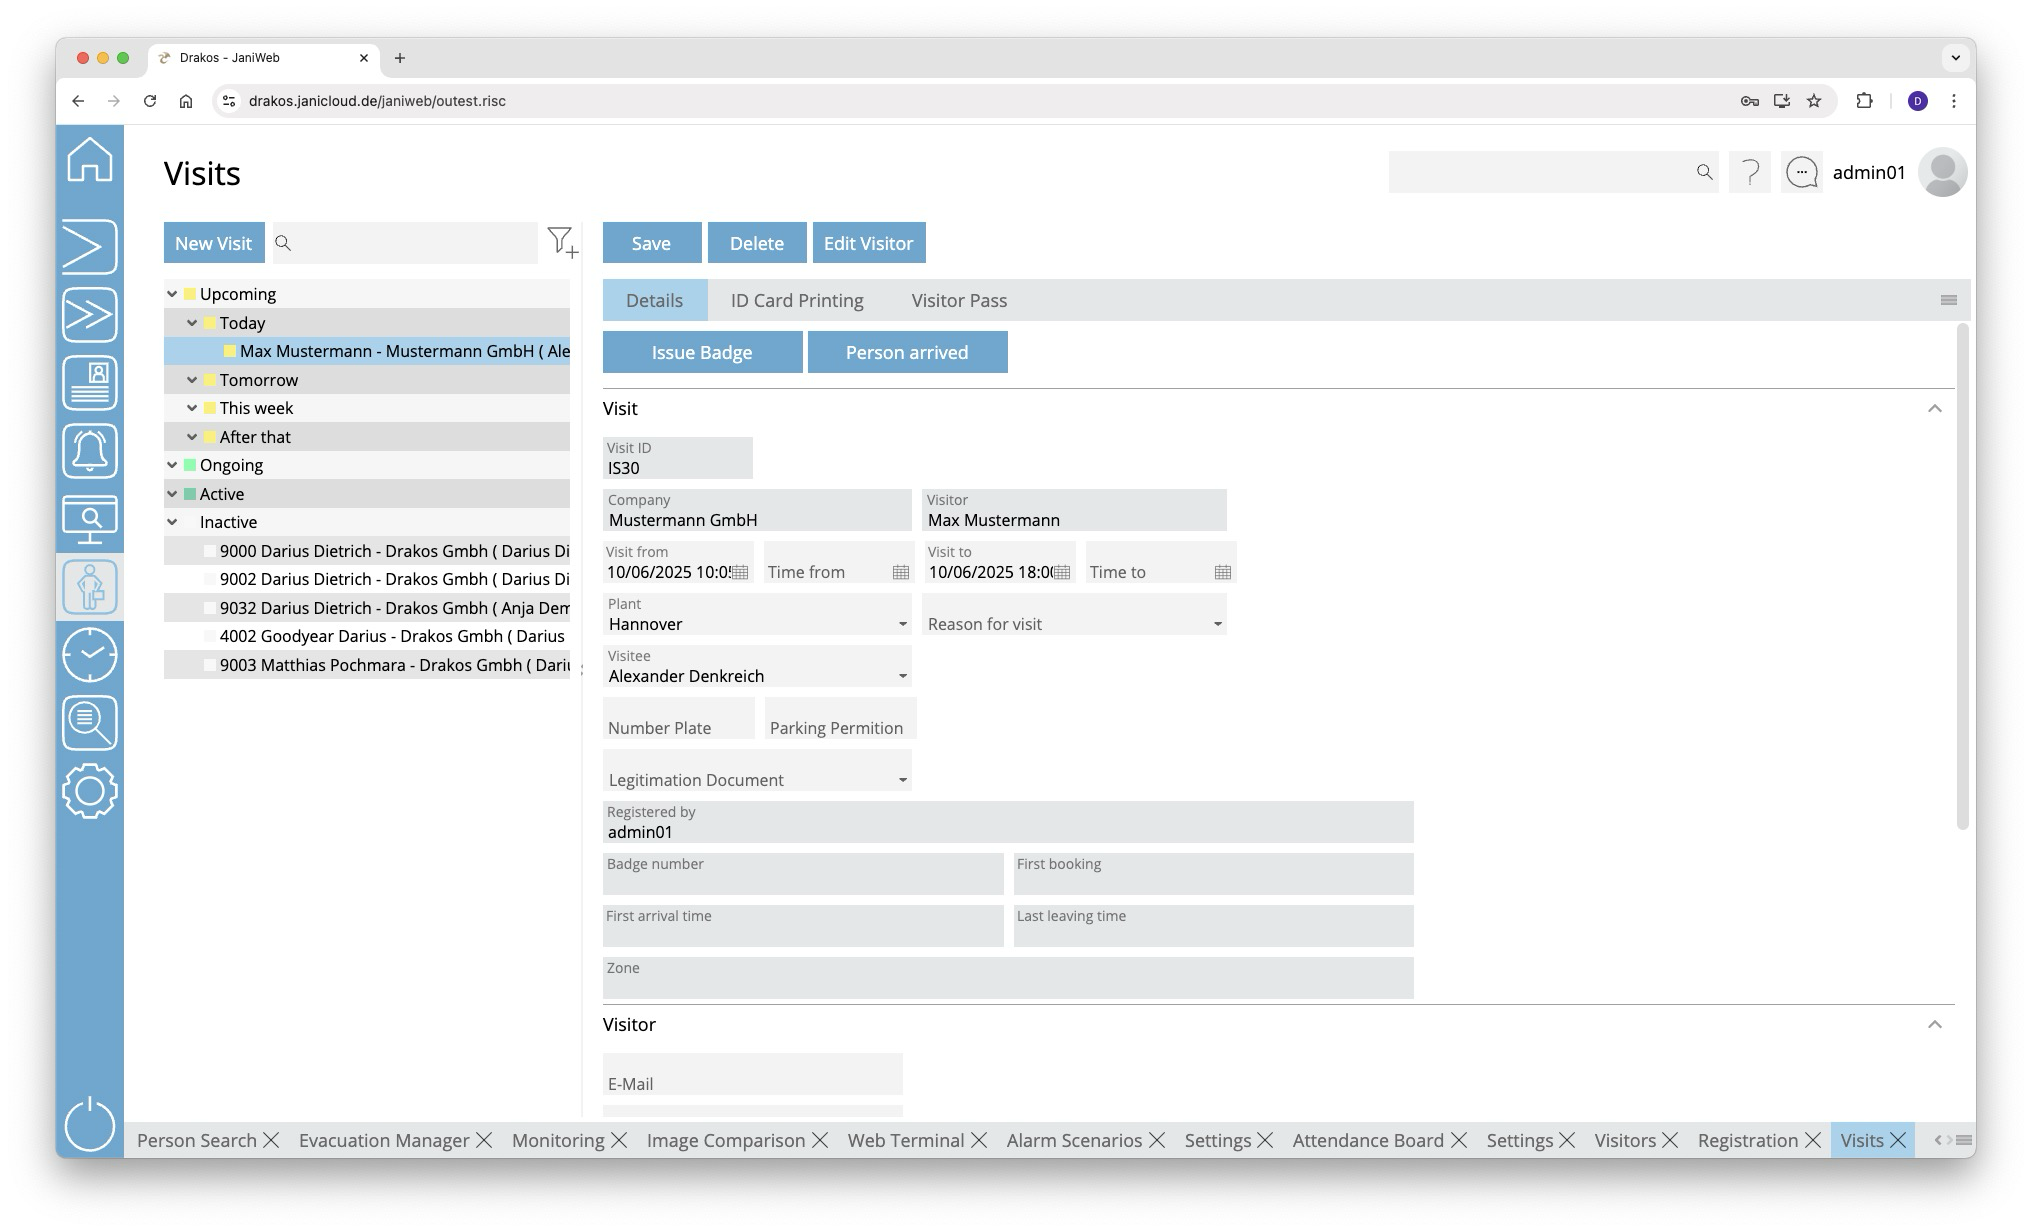
List of visits
Select a visit to display details. The list of visits can be filtered by the status and site of the visit. To do this, use the filter icon above the list.
Button New Visit
Press New Visit to create a new visit. Enter all the required information and press Save. The visit then appears under Upcoming.
Create visitor: If the person expected for the visit does not yet exist in the system, you can create them as a visitor here. To do this, press New Visitor.
Button Save
You can change the details of the selected visit. Press Save to save the changes.
Button Delete
You can delete visits listed under Upcoming at any time. To do this, press Delete. A confirmation dialog will appear.
Buttons Issue Badge and Person arrived
When the expected visit arrives, select it under Upcoming. Then carry out one of the following steps:
- Press Issue Badge to assign the visitor an Badge from a list. Badges highlighted in red are still in use, badges highlighted in green are ready to be issued.
- Press Person arrived to mark the visit as active without issuing an badge.
The visitor is now marked as Present.
Buttons Return Badge and Person left
To mark a visit as finished or absent, select it under Present. Then carry out one of the following steps:
- If an badge has been issued, press Return Badge.
- If no badge has been issued, press Person left.
The visit is now marked as Active. If necessary, you can mark active visits as Present again by pressing Person arrived/Issue Badge again. Visits remain Active until the day entered as the end of the visit has passed.
Inactive visits
Visits whose end date has already passed, but for which a badge has not yet been returned, appear as Inactive. Inactive visits can either be terminated or reactivated.
You can print a badge or visitor’s pass with the stored information at any time using the tabs Badge Printing or Visitor Pass.
Button Edit Visitor
TIPS
You can specify which fields are displayed for a visit via the menu item Settings for visitor management.
QR-Code
The menu item QR-Code allows you to create QR-Codes for use with FAAC barrier systems.
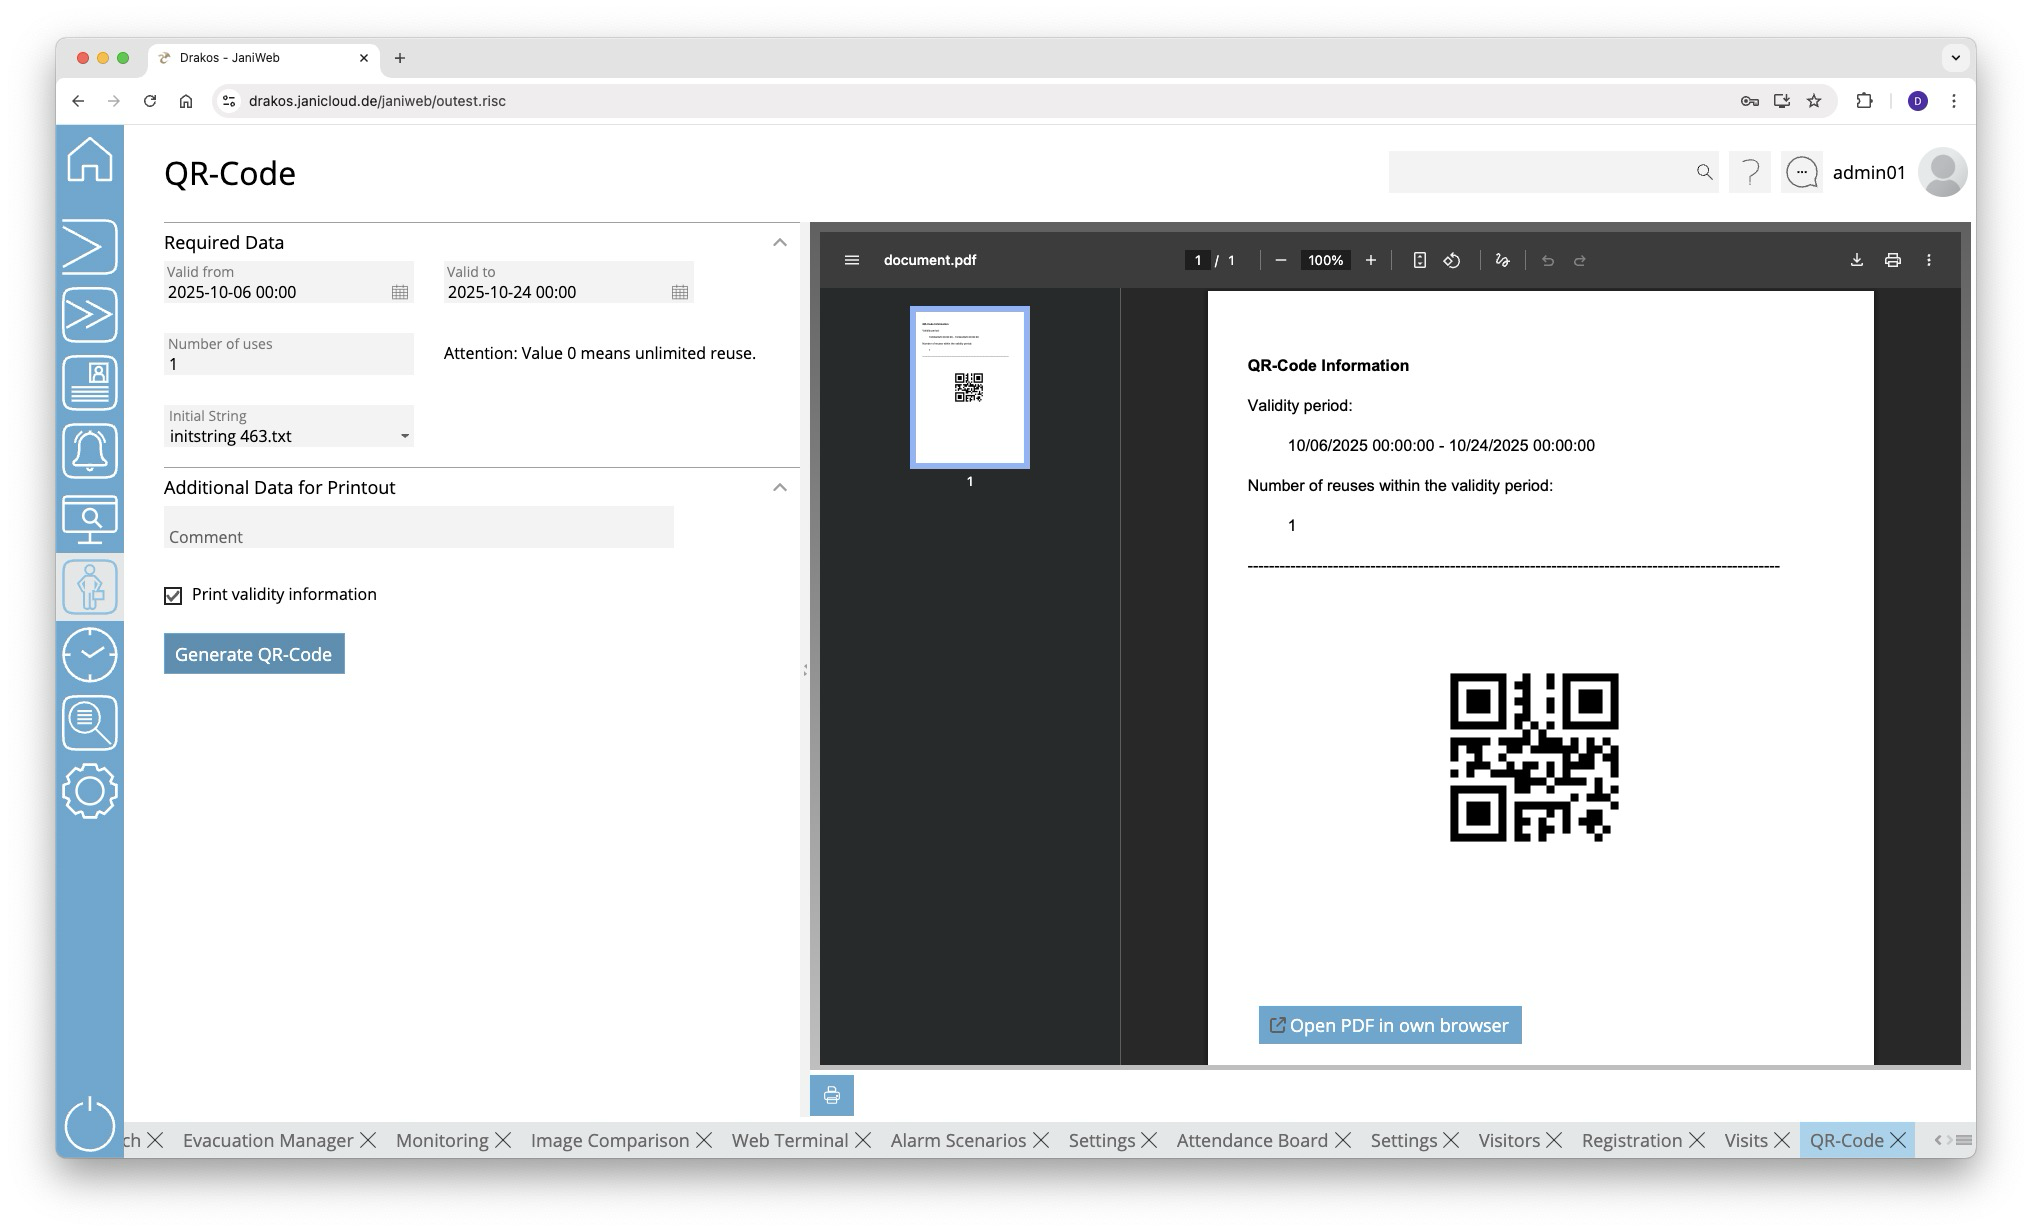
To create a QR-Code, follow these steps:
- Enter a period in the fields Valid from and Valid to during which the QR-Code should be valid.
- In the field Number of uses, enter the number of times the QR-Code can be used within the validity period.
- The field Initial String indicates for which barrier system the QR-Code is created. If there are several barrier systems, select the desired system.
- (Optional) In the area Additional Data for Printout, enter a comment to appear on the printout. Select Print validity information if you want the number of uses and the validity period to appear on the printout as well.
- Press Generate QR-Code to generate the document.
- Press Print to print the document.
TIPS
You can create additional barrier systems via the menu item Settings in the visitor management.
Settings
Use the menu item Settings to define the basic settings for visitor management. These include number ranges, visitor ID layouts and the fields to be displayed.
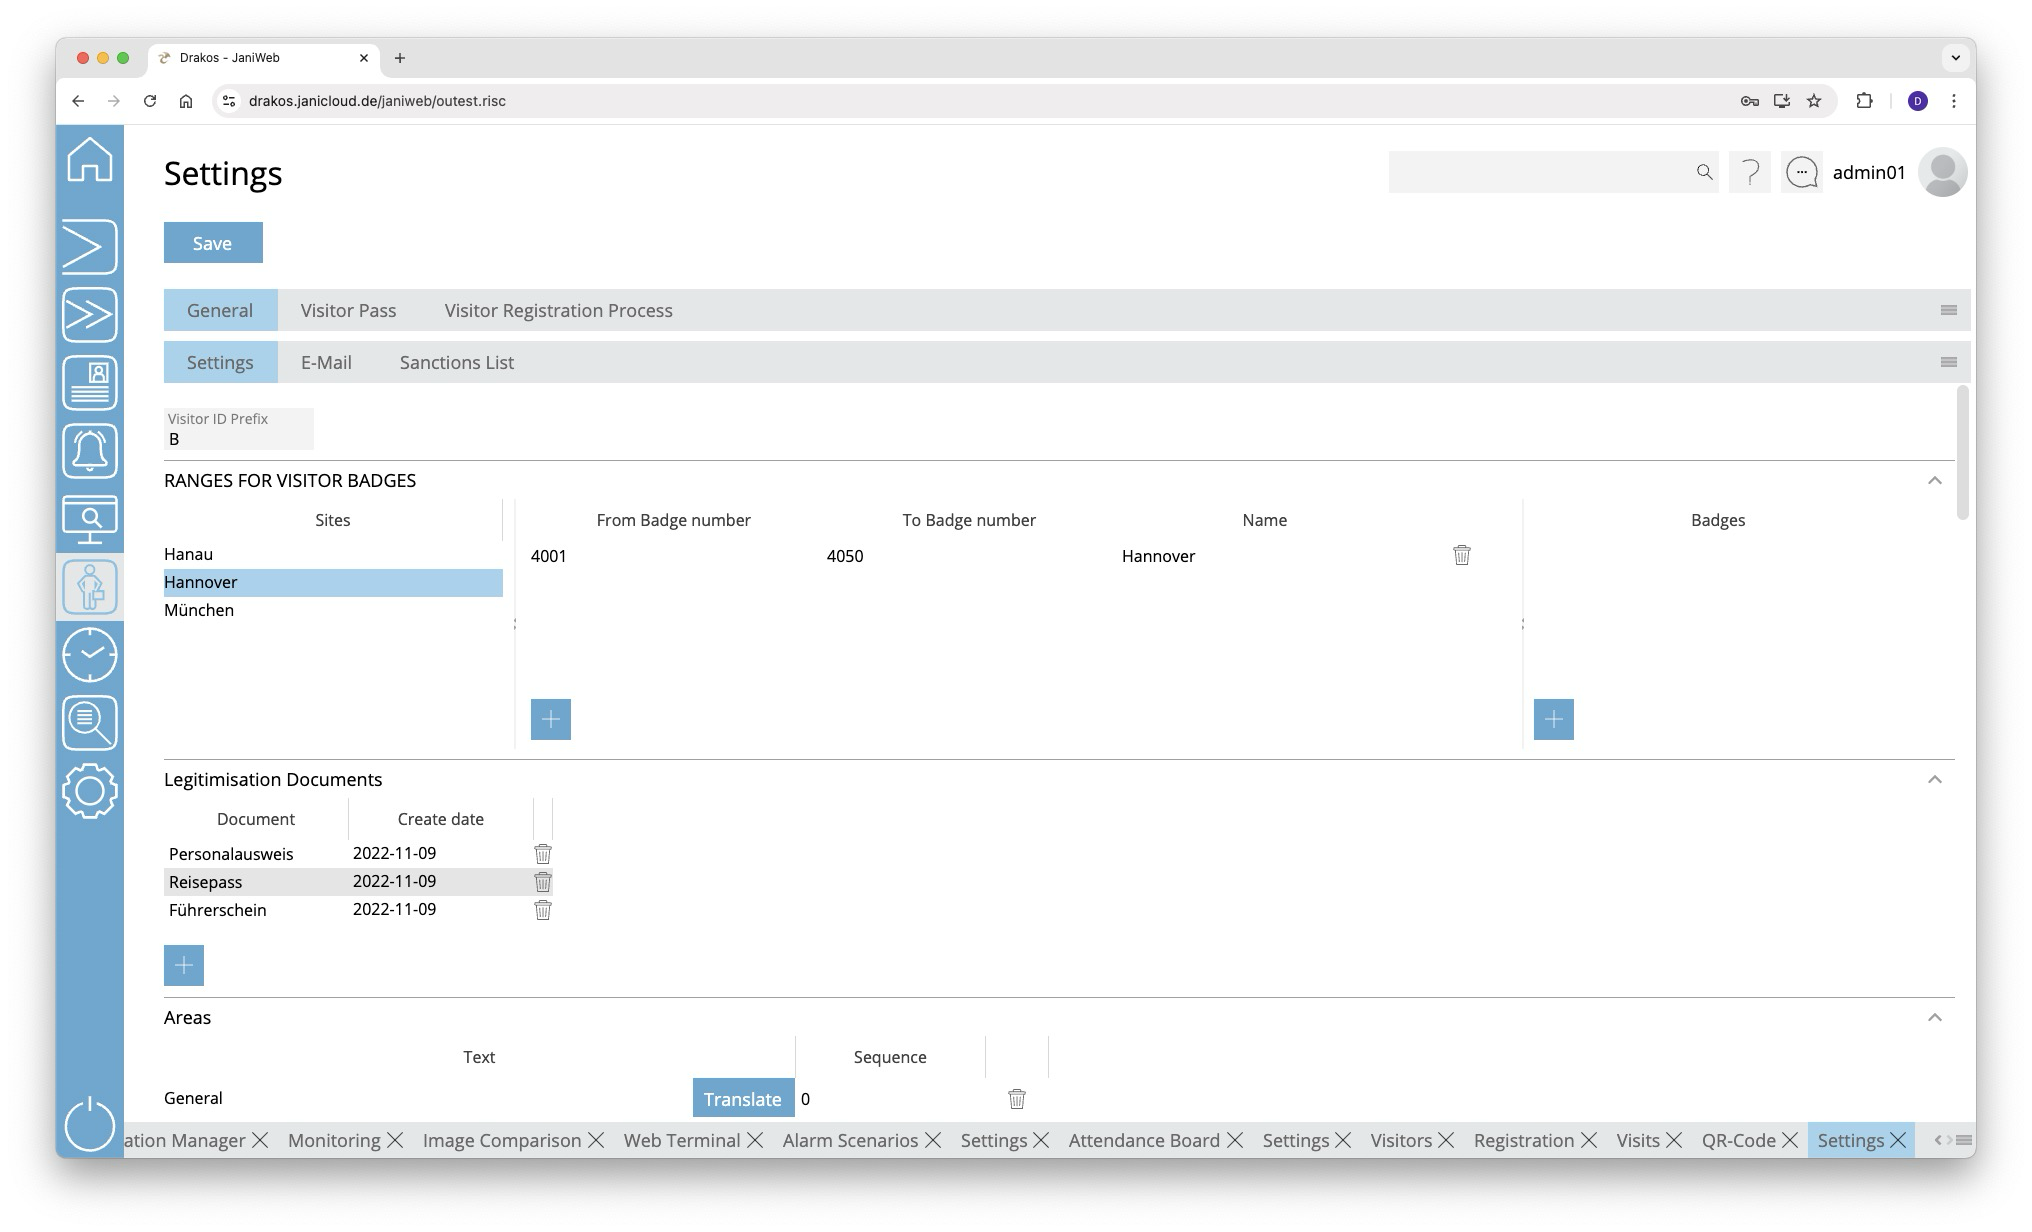
Button Save
Press Save to apply your changes.
Tab General > Settings
In the field Visitor ID Prefix, define the prefix for visitor personnel numbers.
Area Ranges for Visitor Badges
Define the number ranges for visitor badges. Create a separate definition for each site. You can either specify a range (From badge number / To badges number) for all visitor badges or create individual numbers under Badges.
Area Legitimisation Documents
Define the documents that should be available for selection in the field Legitimisation Document for Visits.
Area Areas
Here you determine which areas appear in the menu item Visitors. When you select the visible fields for visitors (Fields Visitor), specify where the corresponding field is displayed by selecting one of the areas defined here.
To create a new area, perform the following steps:
- Press the plus icon (Add) to add a new entry.
- Press Translate.
- Enter the area description for the respective languages.
- Press Save.
Enter a number in the Order column to determine the order in which the areas are displayed.
When creating a new area, you must first save it before you can assign a field to it.
Area Fields Visitor
This is where you manage the fields for the menu item Visitors.
List field Site
You can define the visibility and positioning of the fields separately for each site. Select the site for which the settings in this area should apply.
The fields displayed to the user depend on the site assigned to the user. If no site is assigned to a user, the settings for the Default site are used. To assign sites to a user, use the Settings in the main menu, menu item Users.
Tab Static Fields
Specify which fields are visible (check box in the second column) and where they are positioned (Row, Column, Width).
To define the name for a field, press Translate. Enter the names for the respective languages and press Save.
In the column Registration, you can define whether the respective field also appears in the visitor Registration.
Tab Dynamic Fields
Here you can define up to 20 dynamic fields. For each dynamic field, specify whether it should be a list field (drop-down), a date field, a checkbox or a free text field.
To define the name for a field, press Translate. Enter the names for the respective languages and press Save.
Area Fields Visits/Registration
Here you manage the fields for the menu items Registration and Visits.
List field Site
You can define the visibility and positioning of the fields separately for each site. Select the site for which the settings in this area should apply.
The fields displayed to the user depend on the site assigned to the user. If no site is assigned to a user, the settings for the Default site are used. To assign sites to a user, use the Settings in the main menu, menu item Users.
Tab Static Fields
Specify which fields are visible (check box in the second column) and where they are positioned (Row, Column, Width).
To define the name for a field, press Translate. Enter the names for the respective languages and press Save.
In the column Mandatory, you can specify whether the entry in the respective field is mandatory.
Tab Dynamic Fields
Here you can define up to 20 dynamic fields. For each dynamic field, specify whether it should be a list field (drop-down), a date field, a checkbox or a free text field.
To define the name for a field, press Translate. Enter the names for the respective languages and press Save.
In the column Mandatory, you can specify whether the entry in the respective field is mandatory.
Button Copy Field Configuration
You can use this button to copy the field configuration from the currently selected site to another site. To do this, click the button and then select the site for which you want to copy the field configuration from the site drop-down menu. Confirm your selection with the Ok button.
Area Visible Buttons Visits
Use these options to specify which buttons should be visible in the Visits menu item.
- Signature: Activates/deactivates the button that starts the process of capturing a visitor’s signature on the signature pad.
- Issue Badge / Return Badge: Activates/deactivates the buttons for issuing and returning a badge. The issuing/returning of an badge also marks the visit as active/completed.
- Person arrived/Person left: Activates/deactivates the buttons for manually activating/ending a visit.
Area Fields Invite Visitors
This is where you manage the fields for the menu item Invite Visitors (only visible to users with employee login).
Tab Visitor
Tab Static Fields
Specify which fields are visible in the area Visitor (checkbox in the second column) and where they are positioned (Row, Column, Width).
Tab Dynamic Fields
Here you can define up to 20 dynamic fields. For each dynamic field, specify whether it should be a list field (drop-down), a date field, a checkbox or a free text field.
To define the name for a field, press Translate. Enter the names for the respective languages and press Save.
Tab Visit
Tab Static Fields
Specify which fields are visible in the area Visit (checkbox in the second column) and where they are positioned (Row, Column, Width).
Tab Dynamic Fields
Here you can define up to 20 dynamic fields. For each dynamic field, specify whether it should be a list field (drop-down), a date field, a checkbox or a free text field.
To define the name for a field, press Translate. Enter the names for the respective languages and press Save.
Button Copy Field Configuration
You can use this button to copy the field configuration from the currently selected site to another site. To do this, click the button and then select the site for which you want to copy the field configuration from the site drop-down menu. Confirm your selection with the Ok button.
Area QR-Code
This is where you manage the FAAC barrier systems that should be available for selection in the menu item QR-Code. To create a new barrier system, upload the corresponding init string into the system using the button Upload the initial string.
Area Additional Settings
This is where you define further settings for visitors.
- Enable sanctions list: Enables the sanctions list check.
- Enable badge number in Visits screen: Enables the badge number in the list of visits in the menu item Visits.
- Enable Visits by the hour: Enables to create visits by the hour.
- Sort option for visits: Choose whether to sort visits by first name or surname.
- Visitee additional Information: Select the additional information that should be available for the visitee.
- Validity Visitors (Days): Enter the standard validity in days for visitors that were created via registration or the menu item Invite Visitors.
- Validity Invitation Link (Days): Defines how long an invitation link is valid in days.
- Invitation Link: If the server running JaniWeb for external users is different from the one sending the invitations, the URL of the external server must be specified here.
- Enable Invitation: This setting activates the function that allows employees to send invitation links to visitors.
- Enable Visitor Groups: If this option is selected, it is possible to create visits for visitor groups.
- Search delay Visits (in milliseconds): Configures the delay with which the application will start the search after the last input into search field of Visits menu.
-
Visitor self-registration inactivity timeout (in seconds): Configures the timeout in seconds after which if the user does not interact with the visitor self-registration the application will lead to the language selection screen.
- Allow parallel visits: Allows the creation of a parallel visit for the same visitor.
Area Automatic Visit Status
Here, devices can be assigned to a specific event type. If a visitor makes a booking on such a device, the status of the associated visit is automatically set to Ongoing or Active.
The configuration can be made on a site-specific basis.
Tab General > E-Mail
This is where you manage the settings for sending E-Mails in visitor management.
List field Site
You can define the E-Mail settings separately for each site. Select the site for which the settings in this area should apply.
List of documents
The documents stored in this list are attached to the confirmation E-Mail when visitors register.
- Download icon: Downloads the corresponding document to your computer.
- Trash icon: Deletes the corresponding document from the system. A confirmation dialog will appear.
Button Upload Documents
Select one or more PDF or image files on your computer to add them to the list.
Button Remove All
Deletes all documents. A confirmation dialog will appear.
Checkbox Dynamic sender E-Mail
If this setting is activated, the visitor's e-mail address is used as the sender in the visitor management. Conversely, the visitor also receives the visitee's matching sender address.
Area E-Mail: Visitor Registration
- Inform visitor about registration: The visitor will receive a notification as soon as they have been registered for a visit.
- Inform visitee about registration: The person being visited will receive a notification as soon as a visit has been registered for them.
- Send ICS to Visitor. The visitor also receives the appointment as an E-Mail attachment in ICS format.
- Send ICS to Visitee. The visitee also receives the appointment as an E-Mail attachment in ICS format.
- E-Mail Layout Visitor / E-Mail Layout Visitee: This is where you define the content of the E-Mails to visitors and visitors using XML layouts. Select a language and use the buttons Upload new layout to upload a layout.
Examples of E-Mail layouts
Sample layouts for E-Mails in XML format:
- Visitor information: email_visitor_registration_visitor.xml
- Visitee information: email_visitor_registration_visitee.xml
Area E-Mail: Delete Visit
- Inform Visitor about Delete: The visitor receives a notification when the visit has been deleted.
- Inform Visitee about Delete: The person being visited receives a notification when the visit has been deleted.
- Visitor E-Mail Layout / Visitee E-Mail Layout: This is where you define the content of the E-Mails to visitors and visitors using XML layouts. Select a language and use the buttons Upload new layout to upload a layout.
Examples of E-Mail layouts
Sample layouts for E-Mails in XML format:
- E-mail about the deletion of the visit to the visitor: email_visitor_registration_visitor_delete.xml
- E-mail about the deletion of the visit to the visited: email_visitor_registration_visitee_delete.xml
Area E-Mail: Arrival Visitor
- Inform Visitor about arrival: The visitor will receive a notification as soon as they have been arrived.
- Inform Visitee about arrival: The person being visited will receive a notification as soon as a visit has been arrived.
- E-Mail Layout Visitor / E-Mail Layout Visitee: This is where you define the content of the E-Mails to visitors and visitors using XML layouts. Select a language and use the buttons Upload new layout to upload a layout.
Examples of E-Mail layouts
Sample layouts for E-Mails in XML format:
- Visitor information: email_visitor_registration_visitor.xml
- Visitee information: email_visitor_registration_visitee.xml
Area E-Mail: Invitation Visitor
- E-Mail Layout Visitor: Here you can define the content of the E-Mails sent to visitors using XML layouts when they are invited via the Invite Visitors menu. Select a language and use the buttons Upload new layout to upload a layout.
Examples of E-Mail layouts
Sample layouts for E-Mails in XML format:
- Visitor information: email_visitor_invitation.xml
Tab General > Sanctions List
You can activate the sanctions list check within visitor registration here. This checks whether the visitor created is on a sanctions list. Different information about the visitor can be checked for an entry on a sanctions list.
- Select the database table and the field containing the sanctions list.
- Select the visitor information to be checked against the sanctions list.
- To check for validity, activate the option Validity and select the table column for the validity check in the next field.
- Use the option Include List to select whether the check should fail if
- the information is on the sanctions list (check mark),
- the information is not on the sanctions list (no check mark).
- the information is on the sanctions list (check mark),
The sanctions list check is displayed in visitor registration if it is activated in the Additional Settings.
Use the Enable sanctions list via API setting to activate sanctions list checking via the dbh interface. Then configure the following values in the API area:
- URL: Endpoint to be called for sanctions list checking.
- Request name: Name of the request.
- Client: Client via which the request is made.
- Username: User name used for authentication at the endpoint.
- Password: Password used for authentication at the endpoint.
- Visitor field: Field of the created visitor master records that is compared with a field in the sanctions lists.
- API field: Field in the sanctions list against which the visitor information is compared.
Tab Visitor Pass
Here you can manage different layouts for printing visitor passes. Select an entry in the list to display or change details.
To upload a new layout:
- Press New.
- Enter a description and select the site for which the layout should be used.
(Only layouts for the visit location are displayed in the menu item Visits.) - Press Upload new layout to upload an XML layout.
- Press Upload new logo to upload an image file with a logo.
- Press Save to apply the settings.
- Set Signature Pad Text: If a signature is required for visitor registration, press this button to set the text that appears on the signature pad in the respective language.
- Send PDF to visitee and Send PDF to visitor: Use this to specify whether the issued visitor pass, including signature, is to be sent to the visitor or to the attended in PDF format by E-Mail.
- Save PDF in database: Use this to specify whether issued visitor passes are to be saved in PDF format in the database.
You can find a sample layout for a visitor pass here: SampleVisitorPassLayout.xml
TIPS
To create the layout, get in touch with your contact person.
Tab Visitor Registration Process
Use modules in this area to define the processes for visitor registration and for visitor check-in and check-out, independently for each site.
Tab Registration
Registration allows your visitors to register independently at the reception. A visitor master record and a visit are created. On this tab, modules are used to define the registration process. Different processes can be specified for visitors and external companies.
- Inserting modules: Drag the required modules in the desired order to the area of the relevant location or press the button with the + to select the corresponding module in the following dialog.
- Reordering modules: Drag the modules to the desired position.
- Editing modules: Use the edit icon to specify details such as the fields to be displayed for the respective module.
- Removing modules: Use the trash icon to remove a module from the process.
Once you have configured a process, you can jump directly to the process via the Open process link. This will then open in a new tab.
Overview of the modules
Language selection
This module displays a dialog for the visitor at the start of the registration process, where they can select the language of the user interface. To activate other languages in addition to German and English:
- Press Upload in the Flag column and upload a suitable image.
- Activate the language in the column Active.
- The Welcome text column allows you to display a text to visitors when welcoming them to the self-service.
- Press Save.
Visitor data
This module displays the input fields for visitor information. Select which fields are displayed and where they are positioned (Row, Column, Width). You must also specify the client with which the visitor master records are to be created. Use the Mandatory column to define whether the field must be filled in.
- Tab Dynamic Fields: Here you can define up to 20 dynamic fields. For each dynamic field, specify whether it should be a list field (drop-down), a date field, a checkbox or a free text field.
- Tab Dynamic Fields - Visits: Specify here which fields should be displayed that are directly linked to the visit. To define the name for a field, press Translate. Enter the names for the respective languages and press Save.
PDF View
This module displays a PDF to the visitor. Select a language and press Upload new PDF to upload a PDF for that language.
- Send PDF to visitee / Send PDF to visitor: Use this option to specify whether the PDF should be sent by E-Mail to the visitor and/or to the person visited at the end of the process.
- Save PDF in database: Use this option to specify whether the PDF should be linked directly to the visitor master record.
Signature
This module prompts the visitor to sign. Press Set Signature Pad Text to define the text to be displayed in addition to the signature field for the respective language. Activate the option Use external signature pad if an external signature pad is connected. Leave the option disabled if the visitor is to use the mouse or the touchpad or touchscreen for the signature.
Print visitor pass
This module prints a visitor pass. To upload a PDF layout for the respective language, select the language and press Upload new layout.
- Send PDF to visitee and Send PDF to visitor: Specify whether the issued visitor pass is sent by E-Mail to the visitor or to the person visited in PDF format.
- Save PDF in database: Specify whether the visitor pass is linked to the visitor master record.
You can find a sample layout for a visitor pass here: SampleVisitorPassLayout.xml
XML View
This module displays a PDF with the information that the visitor has entered (e.g. name, E-Mail address). To upload a PDF layout for the respective language, select the language and press Upload new layout.
- Send PDF to visitee and Send PDF to visitor: Use this option to specify whether the PDF should be sent by email to the visitor and/or to the person visited.
- Save PDF in database: Use this option to specify whether the PDF should be linked to the visitor master record.
- Not visible: Specify whether the created PDF is displayed in the registration process.
- Accept: Specify whether the visitor must confirm the information in the displayed PDF.
You can find a sample layout in XML format here: SampleVisitorPassLayout.xml
End
This module displays a final text and sets the visit to either “Upcoming” or “Present”.
- Generate QR-Code: Use this option to specify whether a QR-Code should be generated for the visit.
- Upcoming/ Present: Select the status for the visit.
- Message display duration (seconds): Use this option to specify how long the text should be displayed. Enter a whole number.
- Translate: Press this button to set the text that will be displayed in the respective language at the end of the registration process.
Use this module to specify the subject line and layout for the E-Mails that are to be sent to the attended and visiting party at the end of the registration process.
- Press E-Mail Subject Visitor / E-Mail Subject Visitee, and enter the text that should be used as the subject for the E-Mail in the respective language.
- Press E-Mail Layout Visitor / E-Mail Layout Visitee, select a language and press Upload new layout to upload an E-Mail layout for this language.
Sample layouts for E-Mails in XML format:
- Visitor information: email_visitor_registration_visitor.xml
- Visitee information: email_visitor_registration_visitee.xml
CI
This module allows you to customise the appearance of the visitor self-registration to match your company's CI.
You can use the Upload Logo button to display your own logo within the visitor self-registration. This appears in the process in the top right-hand corner.
The Upload Background Image button allows you to upload a background image, which is displayed in the language selection, registration selection, check-in or check-out steps and at the end of the process.
Use the Background Color field to determine the background color of the pages displayed in the process.
Use the Top Bar Color field to determine the color of the top bar.
Use the Set Title button to define the title that is displayed in the process within the top bar.
Visitor Type
The registration process can be defined separately for visitors or external companies. This module loads the process for a visitor or an external company.
Restriction Visitees
This module restricts the selectable visitees displayed in the module Visitor Data . The restriction is based on person groups.
To create a new person group:
- Press Add.
- Enter a name and a validity period for the person group.
- Press Add criteria.
- Select the required criterion from the list field.
- In the field From, select a single value or use both fields to specify a range. You can also specify multiple values for the same criterion (Add value).
- (Optional) Add another criterion with value(s).
Logic of criteria and values
- The values of a criterion are linked logically by OR (one match is sufficient).
- Criteria are linked logically by AND (all criteria must be met).
Site
This module allows selection of the location for which the visitor registers. Define which sites should be available for selection during registration.
Access visitor registration using the following URL: https://{server}/janiweb/visit
Quiz
This module allows you to integrate a quiz into the process.
Tab Check-in
The check-in is used by visitors who are already registered in the system and for whom a planned visit exists. Upon arrival, the visitor activates their visit by scanning a QR-Code.
Use modules on this tab to define the check-in process. Different processes can be specified for visitors and external companies.
- Inserting modules: Drag the required modules in the desired order to the area of the relevant location or press the button with the + to select the corresponding module in the following dialog.
- Reordering modules: Drag the modules to the desired position.
- Editing modules: Use the edit icon to specify details such as the fields to be displayed for the respective module.
- Removing modules: Use the trash icon to remove a module from the process.
Once you have configured a process, you can jump directly to the process via the Open process link. This will then open in a new tab.
Overview of the modules
Visitor data
This module displays the input fields for visitor information. Select which fields are displayed and where they are positioned (Row, Column, Width). You must also specify the client with which the visitor master records are to be created. Use the Mandatory column to define whether the field must be filled in.
- Tab Dynamic Fields: Here you can define up to 20 dynamic fields. For each dynamic field, specify whether it should be a list field (drop-down), a date field, a checkbox or a free text field.
- Tab Dynamic Fields - Visits: Specify here which fields should be displayed that are directly linked to the visit. To define the name for a field, press Translate. Enter the names for the respective languages and press Save.
Signature
This module prompts the visitor to sign. Press Set Signature Pad Text to define the text to be displayed in addition to the signature field for the respective language.Activate the option Use external signature pad if an external signature pad is connected. Leave the option disabled if the visitor is to use the mouse or the touchpad or touchscreen for the signature.
XML View
This module displays a PDF with the information that the visitor has entered (e.g. name, E-Mail address). To upload a PDF layout for the respective language, select the language and press Upload new layout.
- Send PDF to visitee and Send PDF to visitor: Use this option to specify whether the PDF should be sent by E-Mail to the visitor and/or to the person visited.
- Save PDF in database: Use this option to specify whether the PDF should be linked to the visitor master record.
- Not visible: Specify whether the created PDF is displayed in the registration process.
- Accept: Specify whether the visitor must confirm the information in the displayed PDF.
You can find a sample layout in XML format here: SampleVisitorPassLayout.xml
Use this module to specify the subject line and layout for the E-Mails that are to be sent to the attended and visiting party at the end of the process.
- Press E-Mail Subject Visitor / E-Mail Subject Visitee, and enter the text that should be used as the subject for the E-Mail in the respective language.
- Press E-Mail Layout Visitor / E-Mail Layout Visitee, select a language and press Upload new layout to upload an E-Mail layout for this language.
Sample layouts for E-Mails in XML format:
- Visitor information: email_visitor_registration_visitor.xml
- Visitee information: email_visitor_registration_visitee.xml
PDF View
This module displays a PDF to the visitor. Select a language and press Upload new PDF to upload a PDF for that language.
- Send PDF to visitee and Send PDF to visitor: Use this option to specify whether the PDF should be sent by E-Mail to the visitor and/or to the person visited at the end of the process.
- Save PDF in database: Use this option to specify whether the PDF should be linked directly to the visitor master record.
Visitor Type
The registration process can be defined separately for visitors or external companies. This module loads the process for a visitor or an external company.
Quiz
This module allows you to integrate a quiz into the process.
End
This module displays a final text and sets the visit to either “Upcoming” or “Present”.
- Generate QR-Code: Use this option to specify whether a QR-Code should be generated for the visit.
- Upcoming/ Present: Select the status for the visit.
- Message display duration (seconds): Use this option to specify how long the text should be displayed. Enter a whole number.
- Translate: Press this button to set the text that will be displayed in the respective language at the end of the registration process.
Access visitor registration using the following URL: https://{server}/janiweb/visit
Tab Check-out
Check-out is used by visitors who are already registered in the system and who have an active visit. Upon departure, the visitor checks out by scanning their QR-Code.
Drag the module Self-Checkout to the area of the respective site. Use the edit icon to set a farewell text and the display duration in seconds.
Access visitor registration using the following URL: https://{server}/janiweb/visit
Once you have configured a process, you can jump directly to the process via the Open process link. This will then open in a new tab.
Tab Visitor Types
You have the option of creating different visitor types, which you can use to configure different processes for egistration, check-in and check-out for each visitor type. By default, there are the visitor types Visitor and Contractor.
To add a new visitor type, use the Add button. Then set the name for the visitor type using the Translate button. Use the option in the Default column to define the visitor type as which new visitors are created in the standard system. You can delete a visitor type again using the bin icon.
Invite Visitors
You can create a new visitor via the menu item Invite visitor and register directly for a visit.
This menu item is only available if you have logged in as an employee. This menu item is not available if you are logged in as an admin.
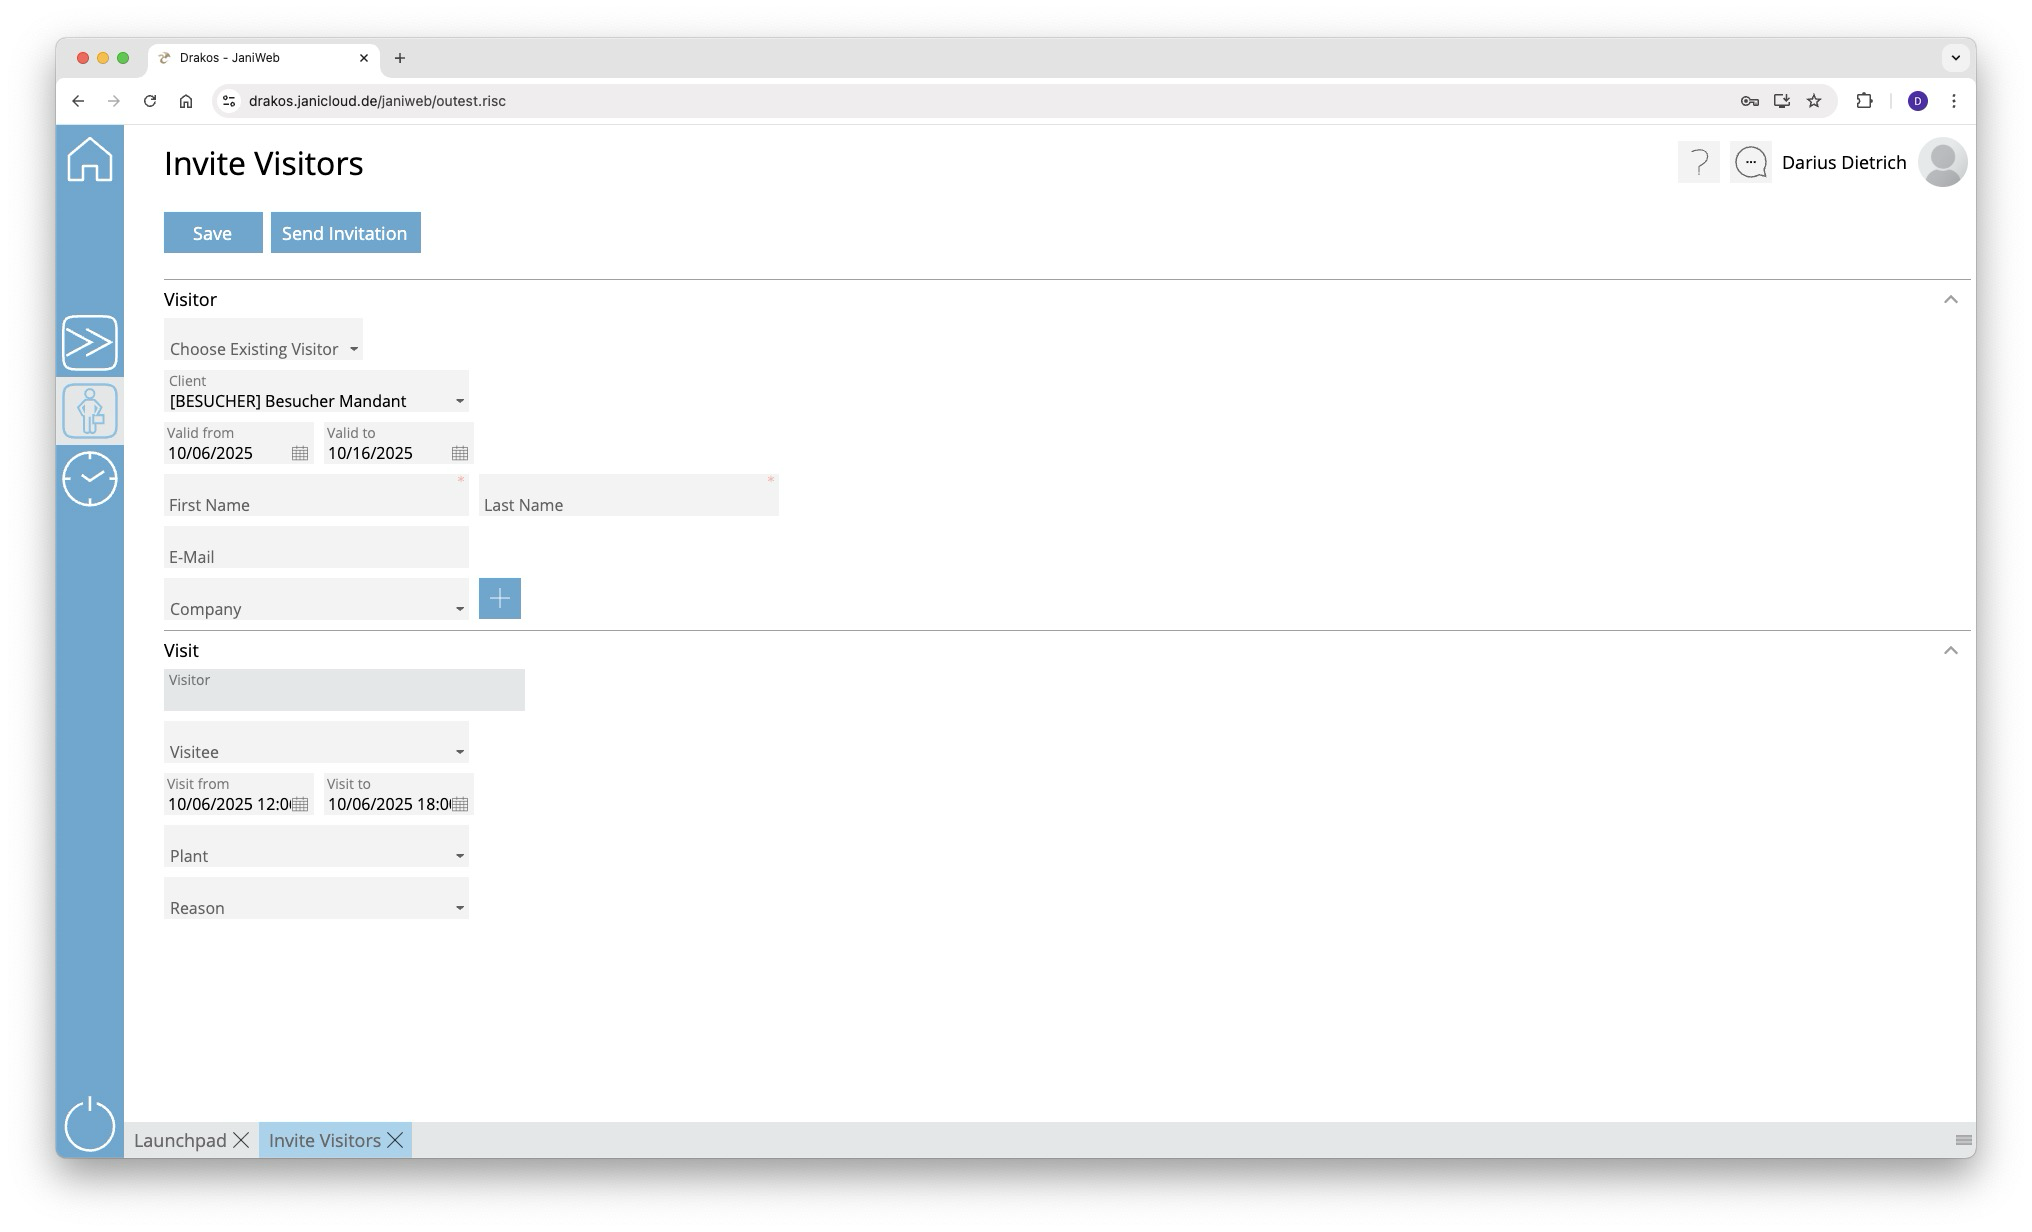
Area Visitor
Here you can create visitors or change information for an existing visitor.
New Visitor
If you would like to create a new visitor, enter the required information for the visitor in the Visitor area and click on Save.
Existing Visitor
If you would like to use an existing visitor, select it in the Choose existing Visitor dropdown. You now have the option to edit the information for the visitor.
Register Visitor Groups
The Add Visitor Group button allows you to register a visitor group for a visit. After clicking the button, a window opens for creating the visitor group.
You can add existing visitors to the visitor group using the drop-down menu in the Choose Existing Visitor column. Alternatively, you can enter information for a new visitor in the First Name, Last Name, E-Mail and Company columns.
Use the Import as CSV button to import a visitor group from a CSV file. The structure of this CSV file can be found here.
You can remove existing entries from the visitor group using the Bin-Button.
Finish editing the visitor group by clicking the Save button.
Area Visit
Enter the information for the visit here. Confirm your entries with Save.
Button Save
You can change the details of the selected visitor and create the information for the visit. Press Save to save the changes.
Button Send Invitation
You have the option of sending the visitor an invitation by E-Mail. This invitation gives the visitor the opportunity to register themselves. The process for visitor self-registration of the respective site is used for this.
Time and Attendance
Overview Bookings
The menu item Overview Bookings allows you to view time bookings (clock-in/out events). You can also edit bookings, add new bookings and display the working times resulting from the bookings.
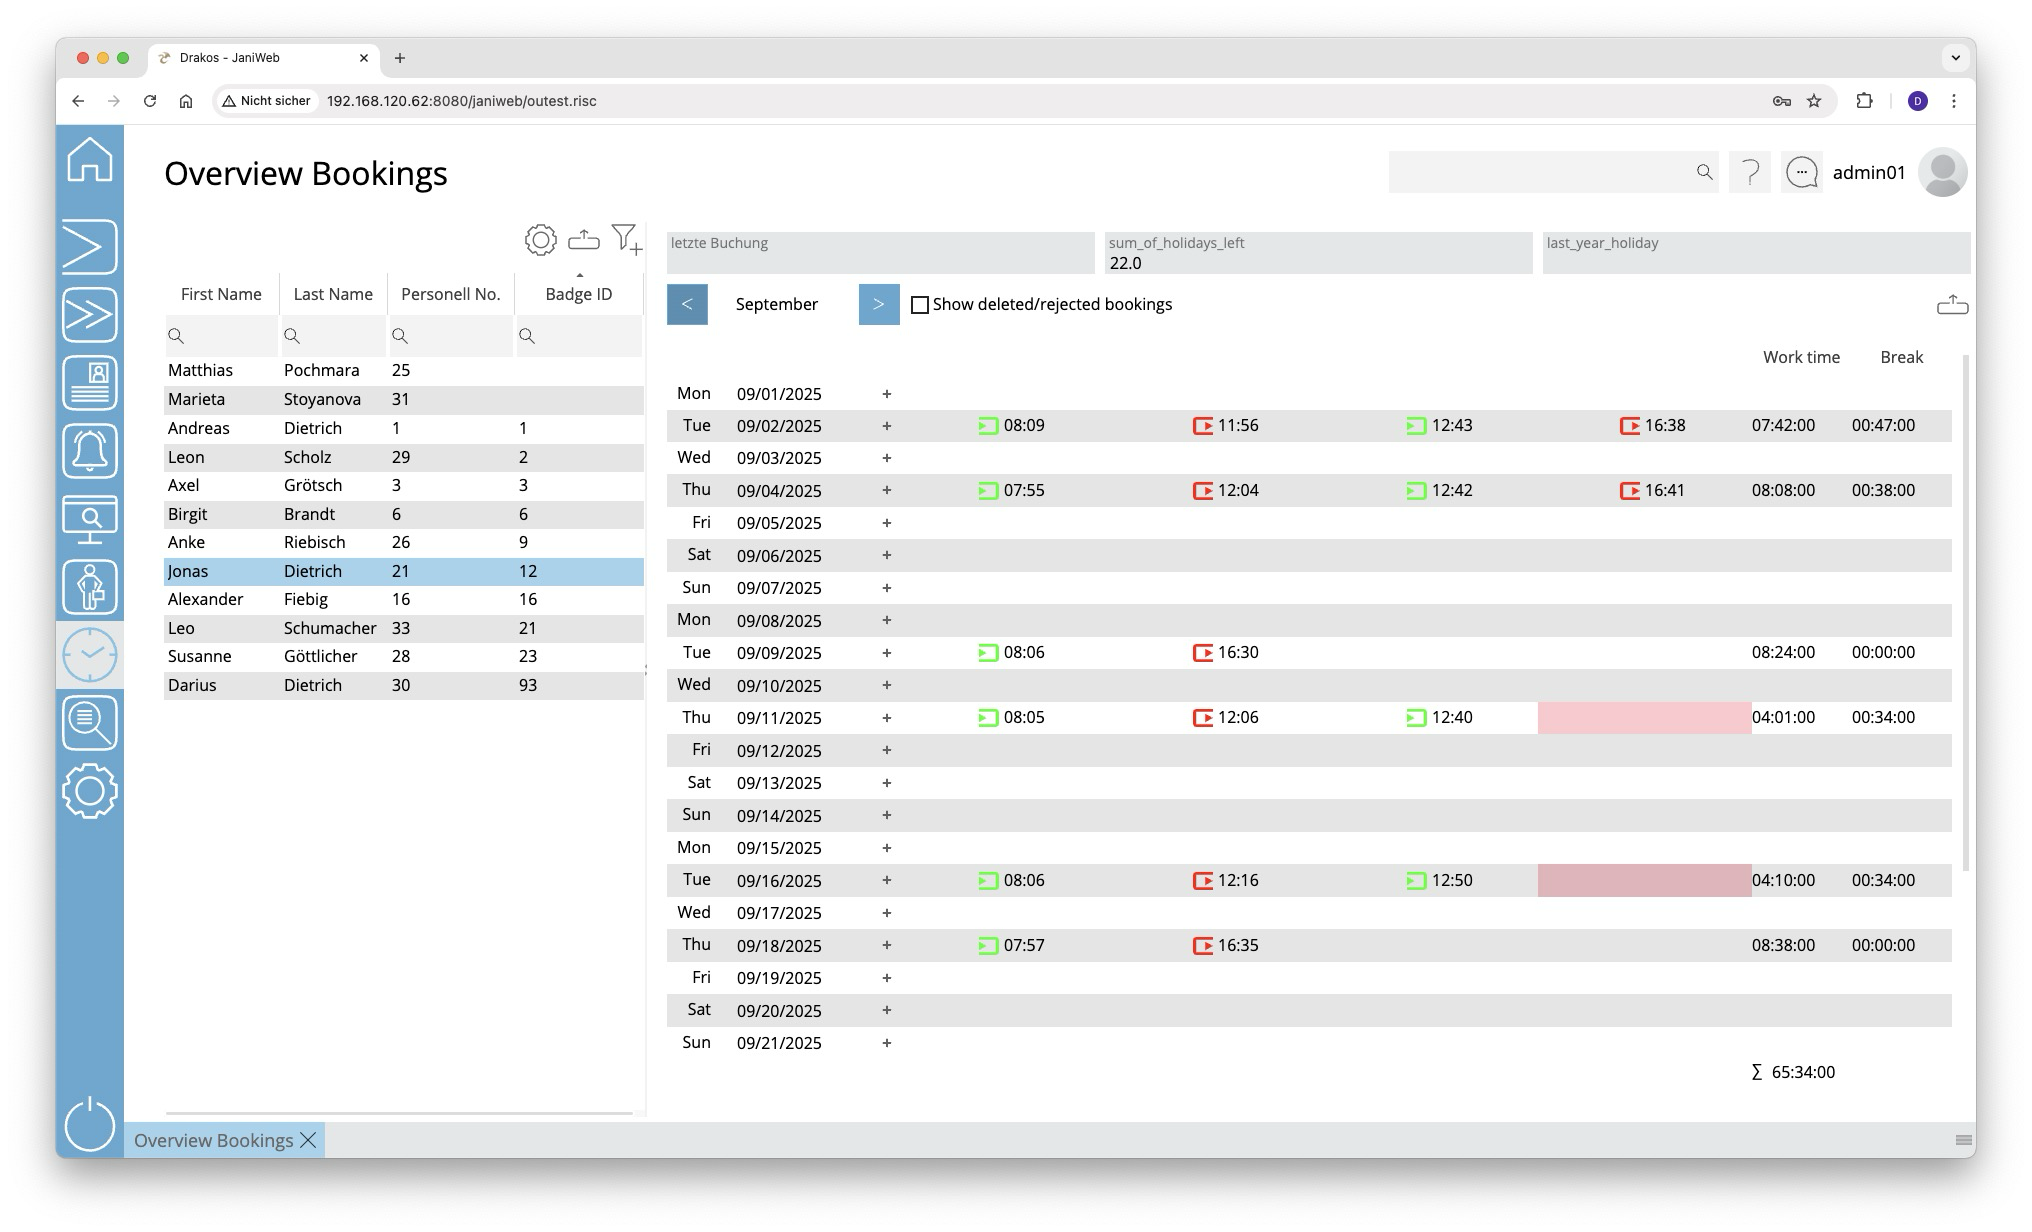
List of persons
The list contains all persons for whom time bookings are available. Select a person to view details.
The list offers the following options:
- Select columns to display: Press the gear icon. Select which columns you want to display and in which order. Arrange the columns using the mouse or the arrow icons. Press Apply to adopt the changes.
- Filter by client and status: Press the filter icon. Select the clients and the status (Active, Active in future, Inactive) for which persons should be displayed. Changes are visible immediately.
- Search in columns: Enter text or numbers in the search field (magnifying glass icon) of a column to search for names, personnel numbers, or other criteria. The entries take effect immediately: the list only displays hits.
Tip: Search for substrings. You can find “Spencer-Churchill” with “spe”, “chur” or “hill”. The search is not case sensitive. - Export the entire list: Press the download icon. Select the format in which you want to export the list. The export files are downloaded or displayed depending on the browser/operating system settings.For details on the available export formats, see the General > Export Formats chapter of this manual.
Detail area
This is where the time bookings for the selected month appear. You have the following options:
- Change period: Use the arrow icons at the top to jump to the previous/next month.
- Include deleted bookings: Select Show deleted/rejected bookings to also display such bookings.
- Add time bookings: To create a new time event, double-click in an empty field or press the plus icon and select New booking. Then select the desired booking type, enter the time and press Save to confirm.
- Add absences: To create a new absence, double-click in an empty field or click the plus icon and select New absence. Enter a period and press Save to confirm. You can recognize absence bookings by the calendar icon next to the date. Double-click the icon to display details of the absence.
If a workflow is set up for creating a booking, the status of the request is indicated by a colored background:
- Yellow: The request has not yet been approved.
- Green: The request has been approved.
Empty fields with a red background indicate an error in the sequence of bookings. This can occur, for example, if there is an incorrect sequence of attendance and absence bookings.
Column Working Time
The working time resulting from the time bookings for the day in question appears here. The total monthly working time is shown at the end of the list.
Column Break deduction
The break time appears here, which is either calculated from the break bookings or from defined working time rules. If the booked times fall short of the required break time, the break time of the working time rule(s) automatically appears here together with a clock icon.
Working time rules are specified in Settings > Working Time Report.
Exporting the booking overview
You can export the booking overview. To do so, follow these steps:
- Press the Download icon above the booking overview.
- Select a period:
- Enter the start and end date in the From and To fields, or
- select a calendar week in the Week field, or
- select a calendar month in the Month field.
- Press Show Results to load the overview.
- Press the Download icon again and select the desired export format (Excel or PDF).
Overview Bookings Companies
This menu item gives you an overview of the recorded working times of all persons assigned to a specific company.
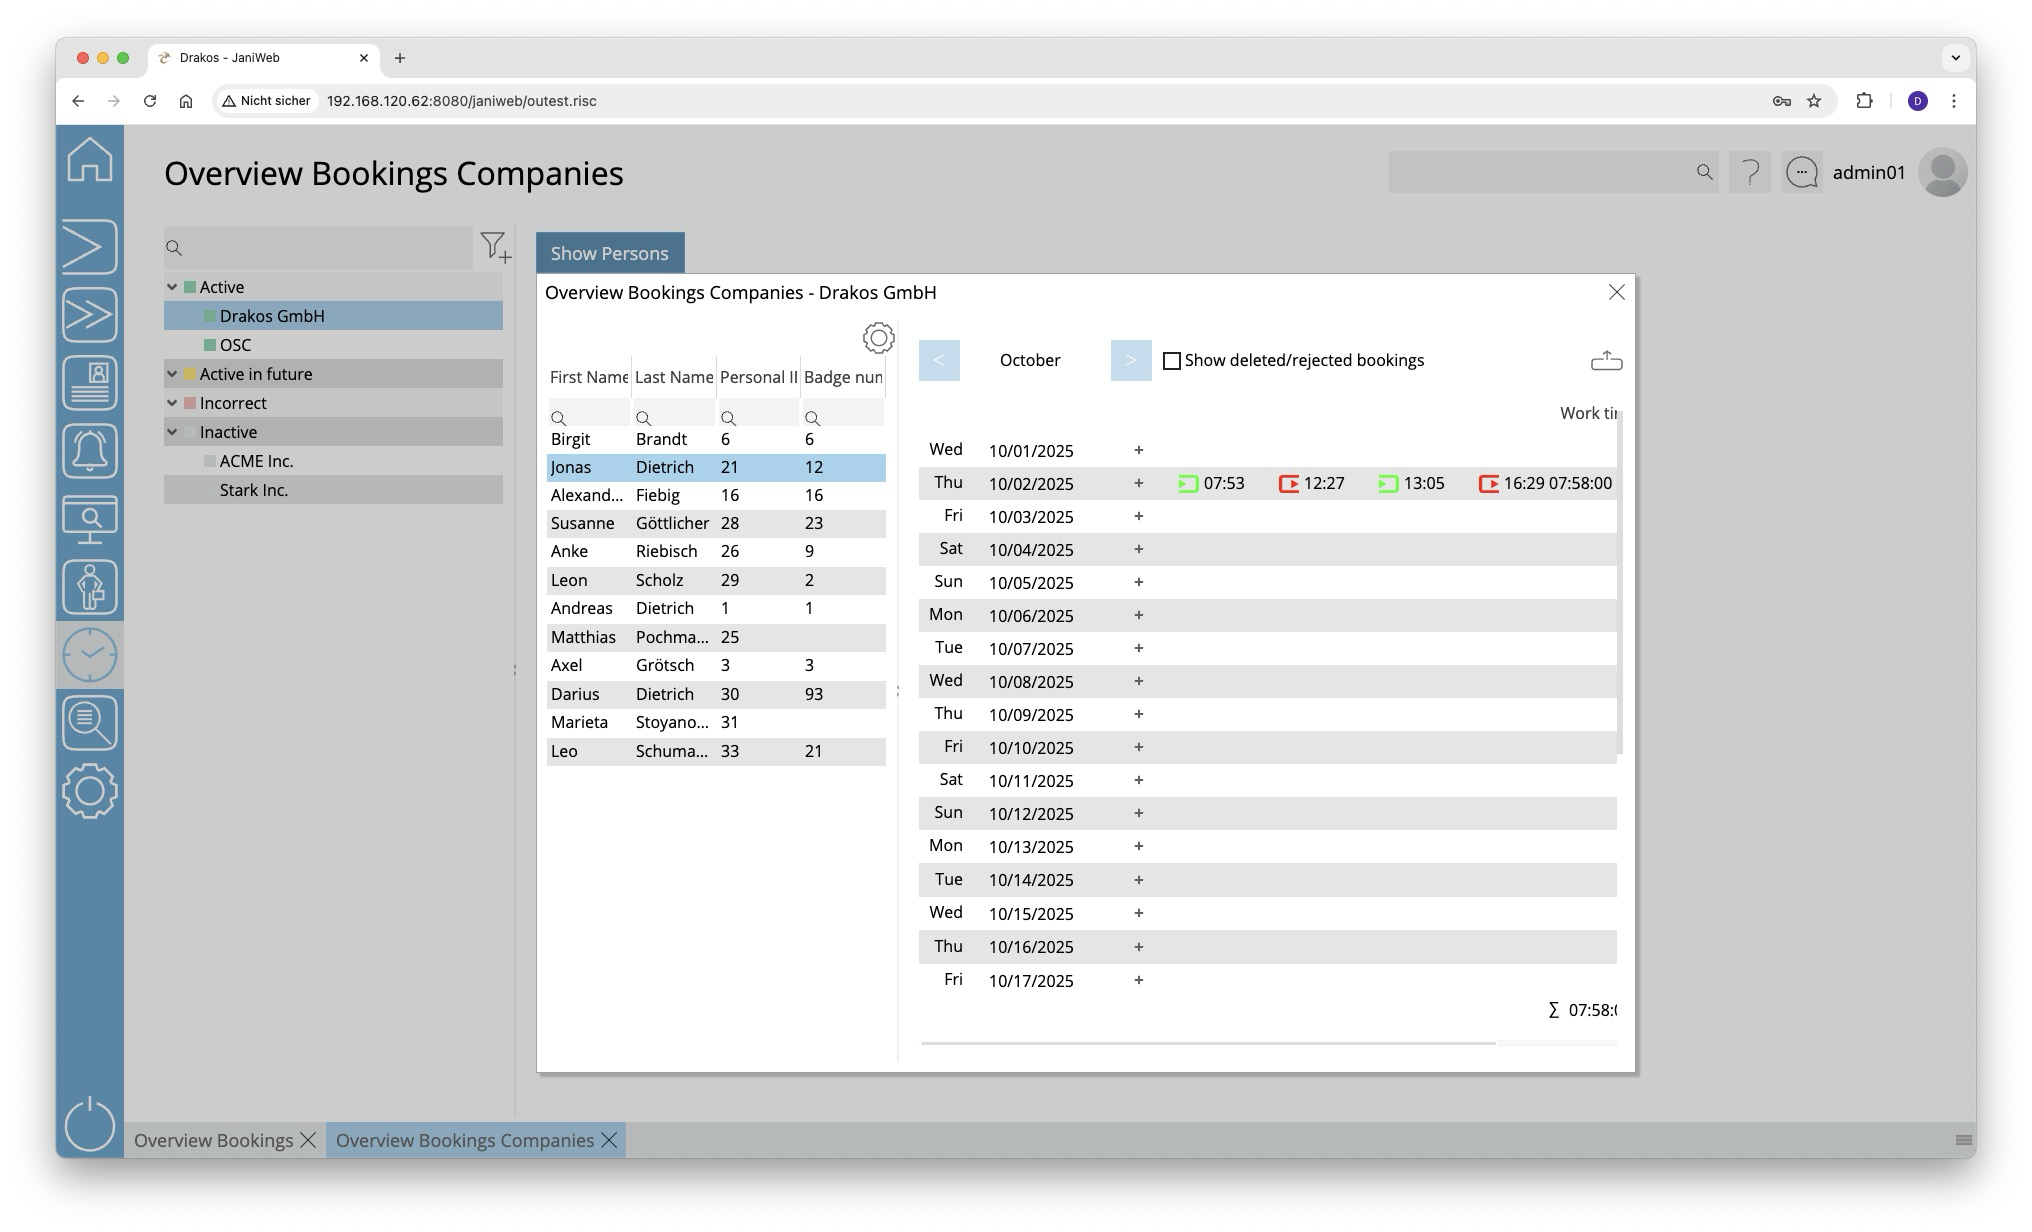
List of companies
The list contains the companies already created, sorted by their current status (Active, Active in future, Incorrect, Inactive). It offers the following options:
- Search: Enter text or numbers in the search field (magnifying glass icon) at the top to search for companies. The entries take effect immediately: the list only displays hits. The search is not case sensitive.
- Filter: Press the filter icon. Select the criteria for which you want to display companies. Changes are visible immediately.
Select a company to view the recorded working times for the current month.
Detail area
List of booked working times
The list on the left contains all working times that were recorded for this company in the selected period. Use the arrow buttons above the list to select a different month.
List of persons
The list on the right contains all persons for whom working times were recorded in the selected period, along with the total hours worked.
Button Show Persons
Press this button to view the individual bookings for a person. A pop-up window appears. Select a person from the left-hand list. The time bookings for the person in the selected period will appear on the right.
Exporting the booking overview
You can export the booking overview. To do so, follow these steps:
- Press the Download icon above the booking overview.
- Select a period:
- Enter the start and end date in the From and To fields, or
- select a calendar week in the Week field, or
- select a calendar month in the Month field.
- Press Show Results to load the overview.
- Press the Download icon again and select the desired export format (Excel or PDF).
Persons
You can manage the persons within the Time and Attendance module using the menu item Persons. Here you can also define supervisors for employees or specify substitudes for supervisors.
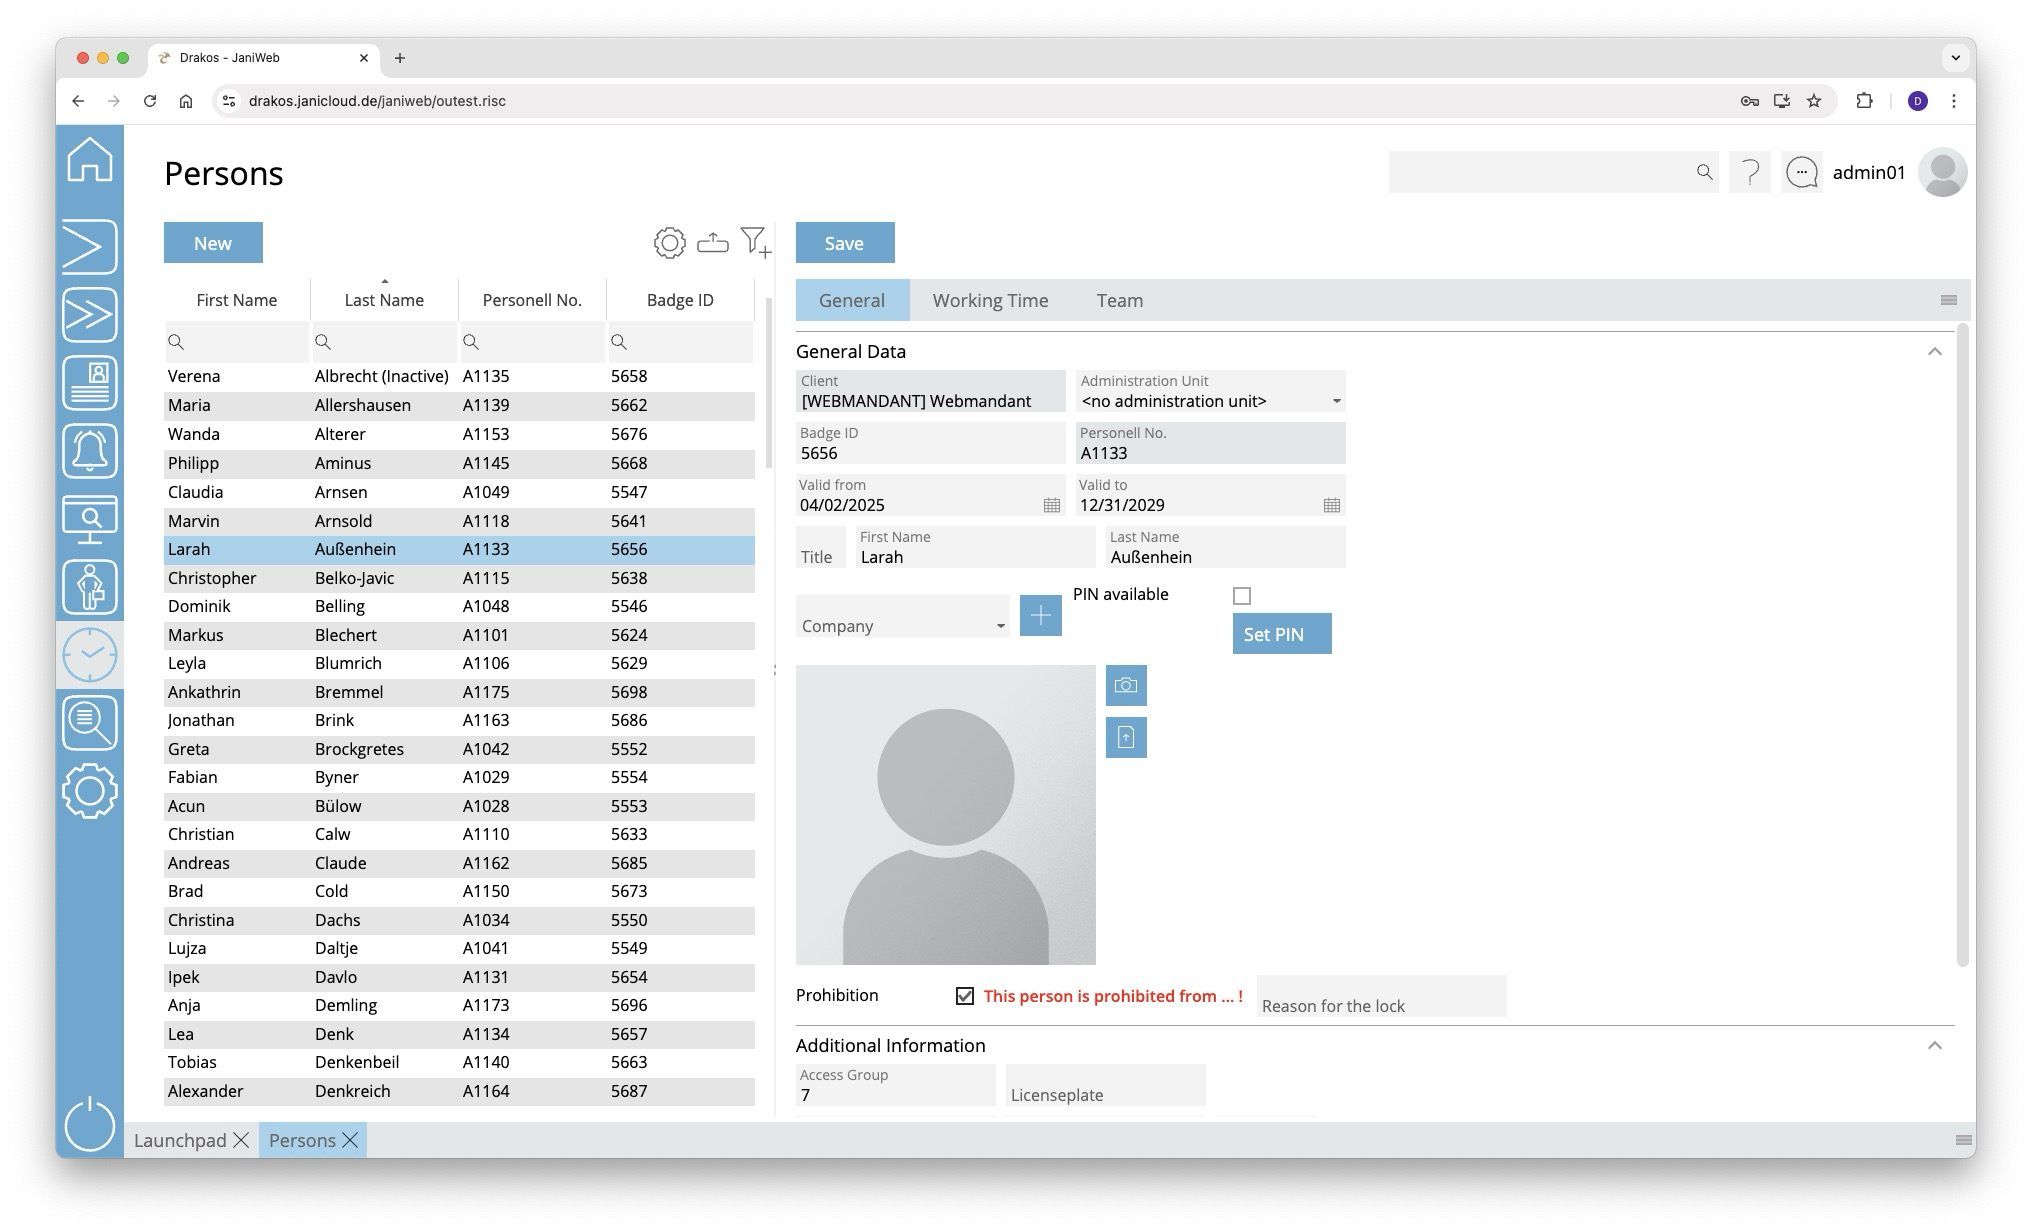
List of persons
The list contains the persons that have already been created. Select a person to view details.
The list offers the following options:
- Select columns to display: Press the gear icon. Select which columns you want to display and in which order. Arrange the columns using the mouse or the arrow icons. Press Apply to adopt the changes.
- Filter by client and status: Press the filter icon. Select the clients and the status (Active, Active in future, Inactive) for which persons should be displayed. Changes are visible immediately.
- Search in columns: Enter text or numbers in the search field (magnifying glass icon) of a column to search for names, personnel numbers, or other criteria. The entries take effect immediately: the list only displays hits.
Tip: Search for substrings. You can find “Spencer-Churchill” with “spe”, “chur” or “hill”. The search is not case sensitive. - Export the entire list: Press the download icon. Select the format in which you want to export the list. The export files are downloaded or displayed depending on the browser/operating system settings.For details on the available export formats, see the General > Export Formats chapter of this manual.
Button New
Press New to create a new person. Enter the required information about the person on the tab General Data and press Save.
Tab General Data
This is where you store and edit personal data. You can individually define which fields and areas are available here via Settings > tab General.
Personal data that is transferred from external systems (e.g. SAP) cannot be changed here. They must be edited in the respective source system.
Tab Working Time
- Leave: Enter the annual holiday for the person.
- Holiday Calendar: Select a holiday calendar for the person. This calendar will be considered in the Team Calendar for this person.
Tab Team
Select the Supervisor for the person. This determines the person to whom workflow requests for bookings and absences are forwarded. The supervisor is authorized to process such requests in the menu item Workflow.
In addition, supervisors can designate up to three Substitudes for themselves. During the substitution period, all workflow requests are also forwarded to the supervisor’s substitude.
Team Calendar
The menu item Team calendar provides an overview of absences in your team and the option to edit them.
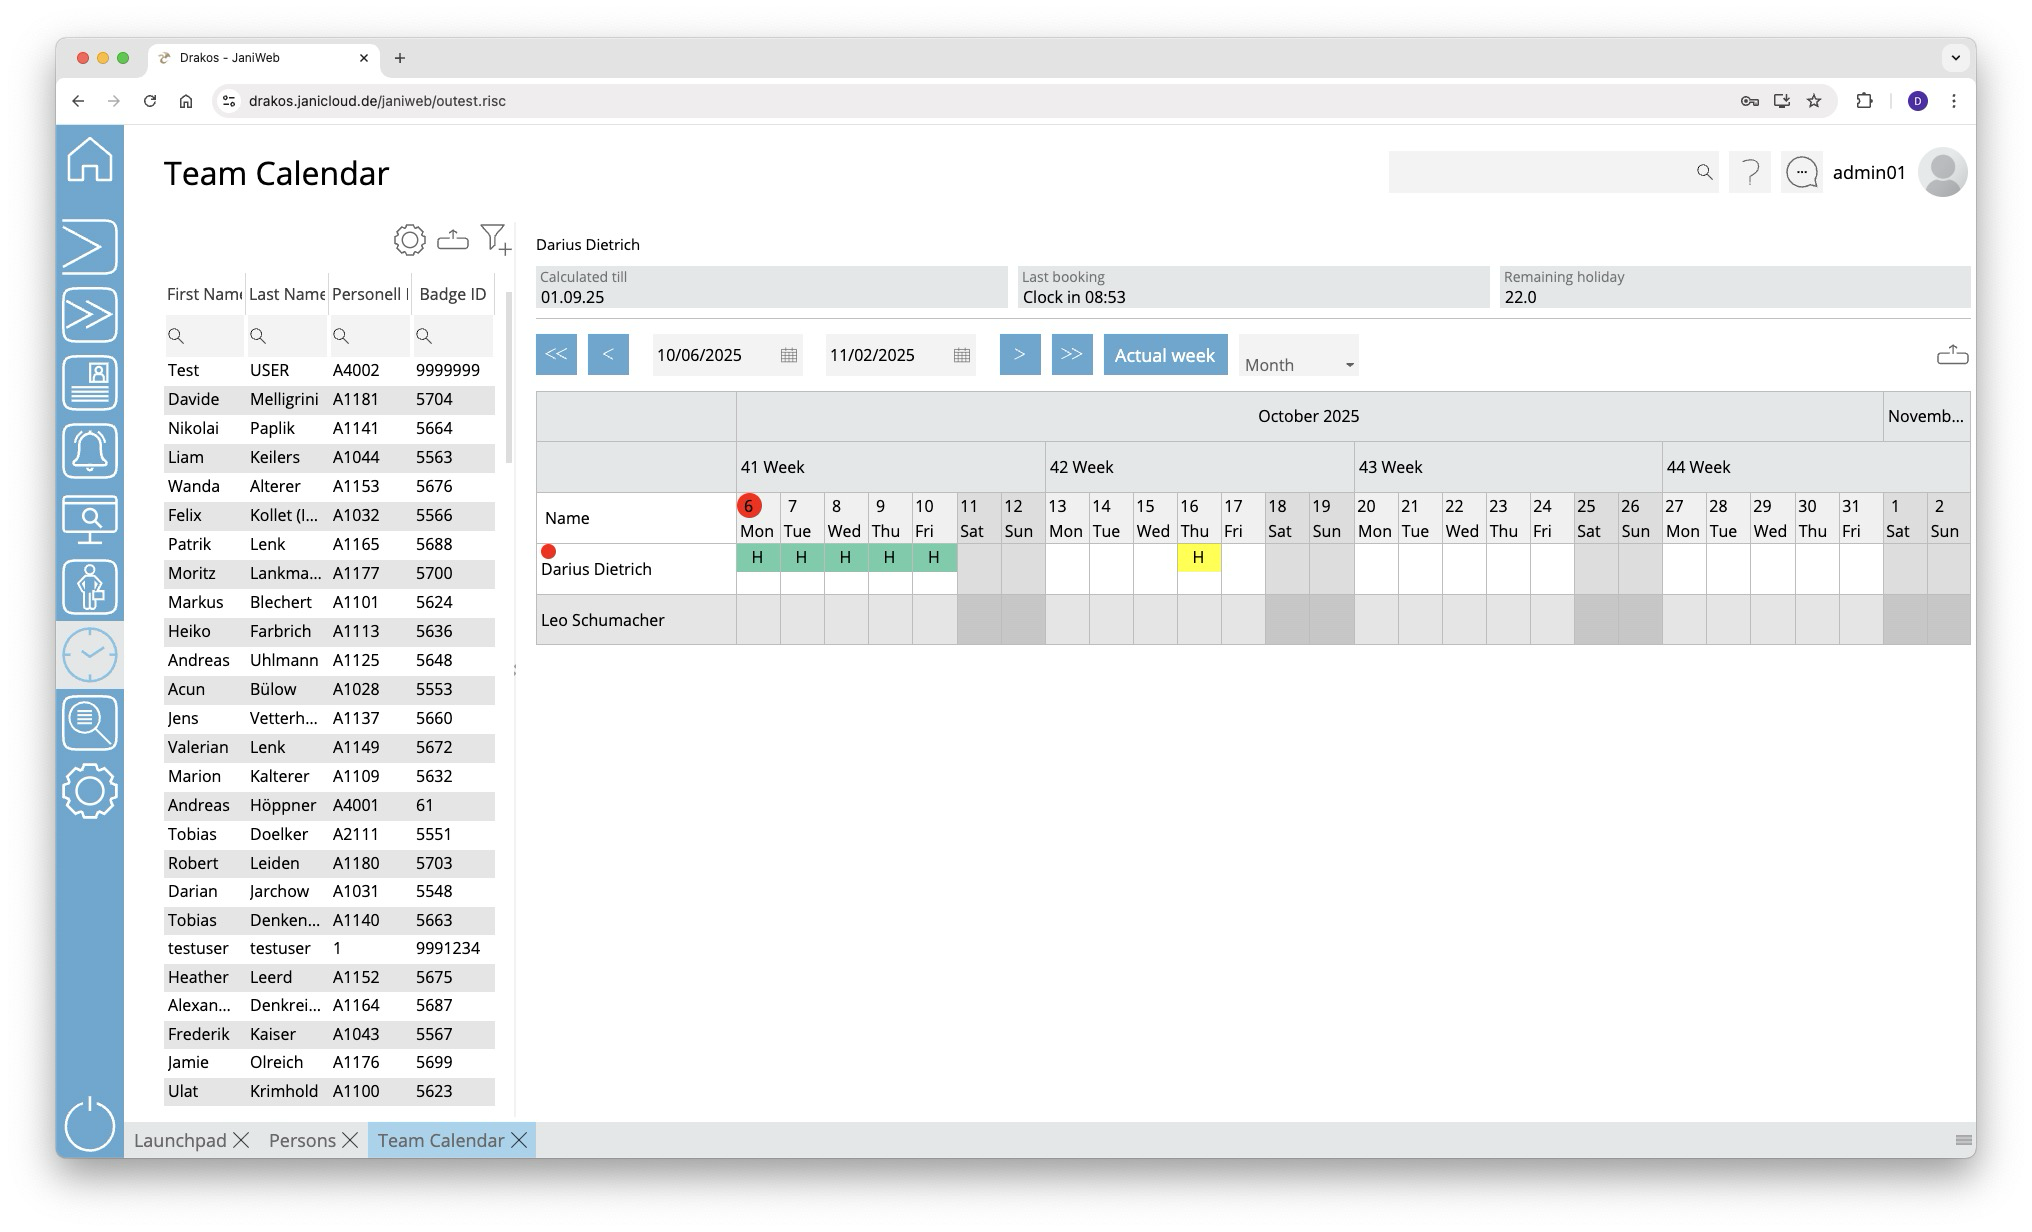
List of persons
The list contains the persons that have already been created. Select a person to view details.
The list offers the following options:
- Select columns to display: Press the gear icon. Select which columns you want to display and in which order. Arrange the columns using the mouse or the arrow icons. Press Apply to adopt the changes.
- Filter by client and status: Press the filter icon. Select the clients and the status (Active, Active in future, Inactive) for which persons should be displayed. Changes are visible immediately.
- Search in columns: Enter text or numbers in the search field (magnifying glass icon) of a column to search for names, personnel numbers, or other criteria. The entries take effect immediately: the list only displays hits.
Tip: Search for substrings. You can find “Spencer-Churchill” with “spe”, “chur” or “hill”. The search is not case sensitive. - Export the entire list: Press the download icon. Select the format in which you want to export the list. The export files are downloaded or displayed depending on the browser/operating system settings.For details on the available export formats, see the General > Export Formats chapter of this manual.
The list of persons is only visible when you log in as an administrator. When you log in as an employee, only your own team calendar is visible.
Calendar view
Use the arrow icons and selection fields to select a period. Within the calendar, you have the following options:
Create new absence
- Right-click in the field of the desired day and select Create new absence.
- Select a type under Absence.
- Enter the desired period using the From and To fields.
- Press Save.
The absence appears in the team calendar together with an abbreviation for the type (e.g. “FLT” for flextime).
Remove an absence
- Double-click on the absence. The details are displayed.
- Press Delete. A confirmation dialog appears.
Absences are marked by a colored background as follows:
- Green: absence approved
- Yellow: approval pending
- Red: absence rejected
- Blue: approval to delete pending
You can manage requests for absences in the menu item Workflow.
Exporting the team calendar
You can export the team calendar. To do so, press the Download icon above the team calendar and select the desired export format (Excel or PDF).
Web Terminal
The Web Terminal allows you to enter time bookings via a browser.
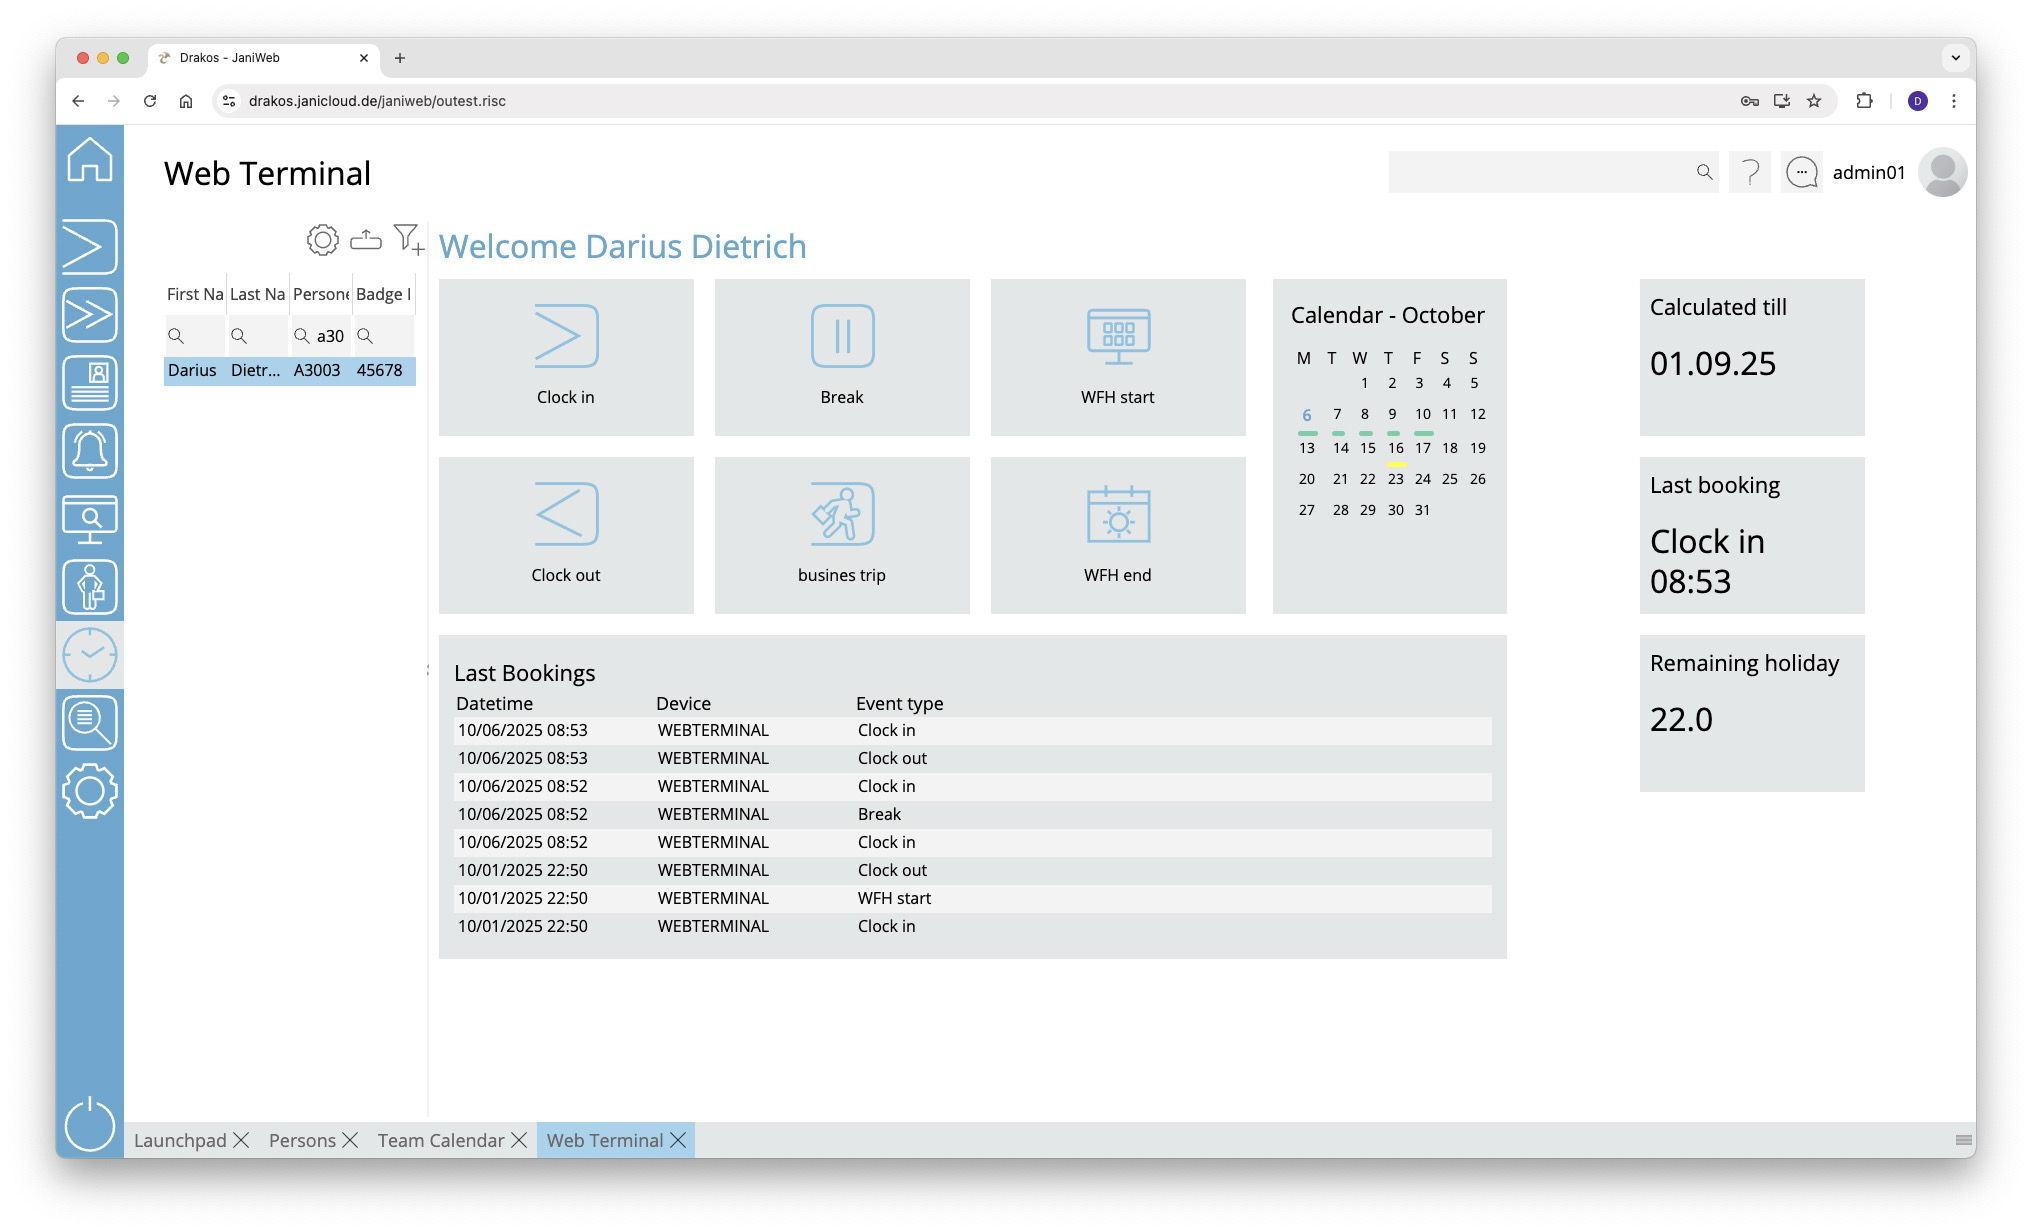
List of persons
Select the person you want to display the web terminal for.
The list offers the following options:
- Select columns to display: Press the gear icon. Select which columns you want to display and in which order. Arrange the columns using the mouse or the arrow icons. Press Apply to adopt the changes.
- Filter by client and status: Press the filter icon. Select the clients and the status (Active, Active in future, Inactive) for which persons should be displayed. Changes are visible immediately.
- Search in columns: Enter text or numbers in the search field (magnifying glass icon) of a column to search for names, personnel numbers, or other criteria. The entries take effect immediately: the list only displays hits.
Tip: Search for substrings. You can find “Spencer-Churchill” with “spe”, “chur” or “hill”. The search is not case sensitive. - Export the entire list: Press the download icon. Select the format in which you want to export the list. The export files are downloaded or displayed depending on the browser/operating system settings.For details on the available export formats, see the General > Export Formats chapter of this manual.
Buttons for bookings
Press the corresponding button to create a new booking. A colored message appears in the message area:
- Green: Booking successful
- Red: Booking failed
Status messages appear in the message area at the bottom of the screen.
You can specify which buttons are available here in the menu item Settings, tab Web Terminal.
Workflow
You can use the menu item Workflow to view the status of your workflow requests for time tracking and permissions. As a supervisor or a supervisor’s deputy, you can also edit workflow requests directly.
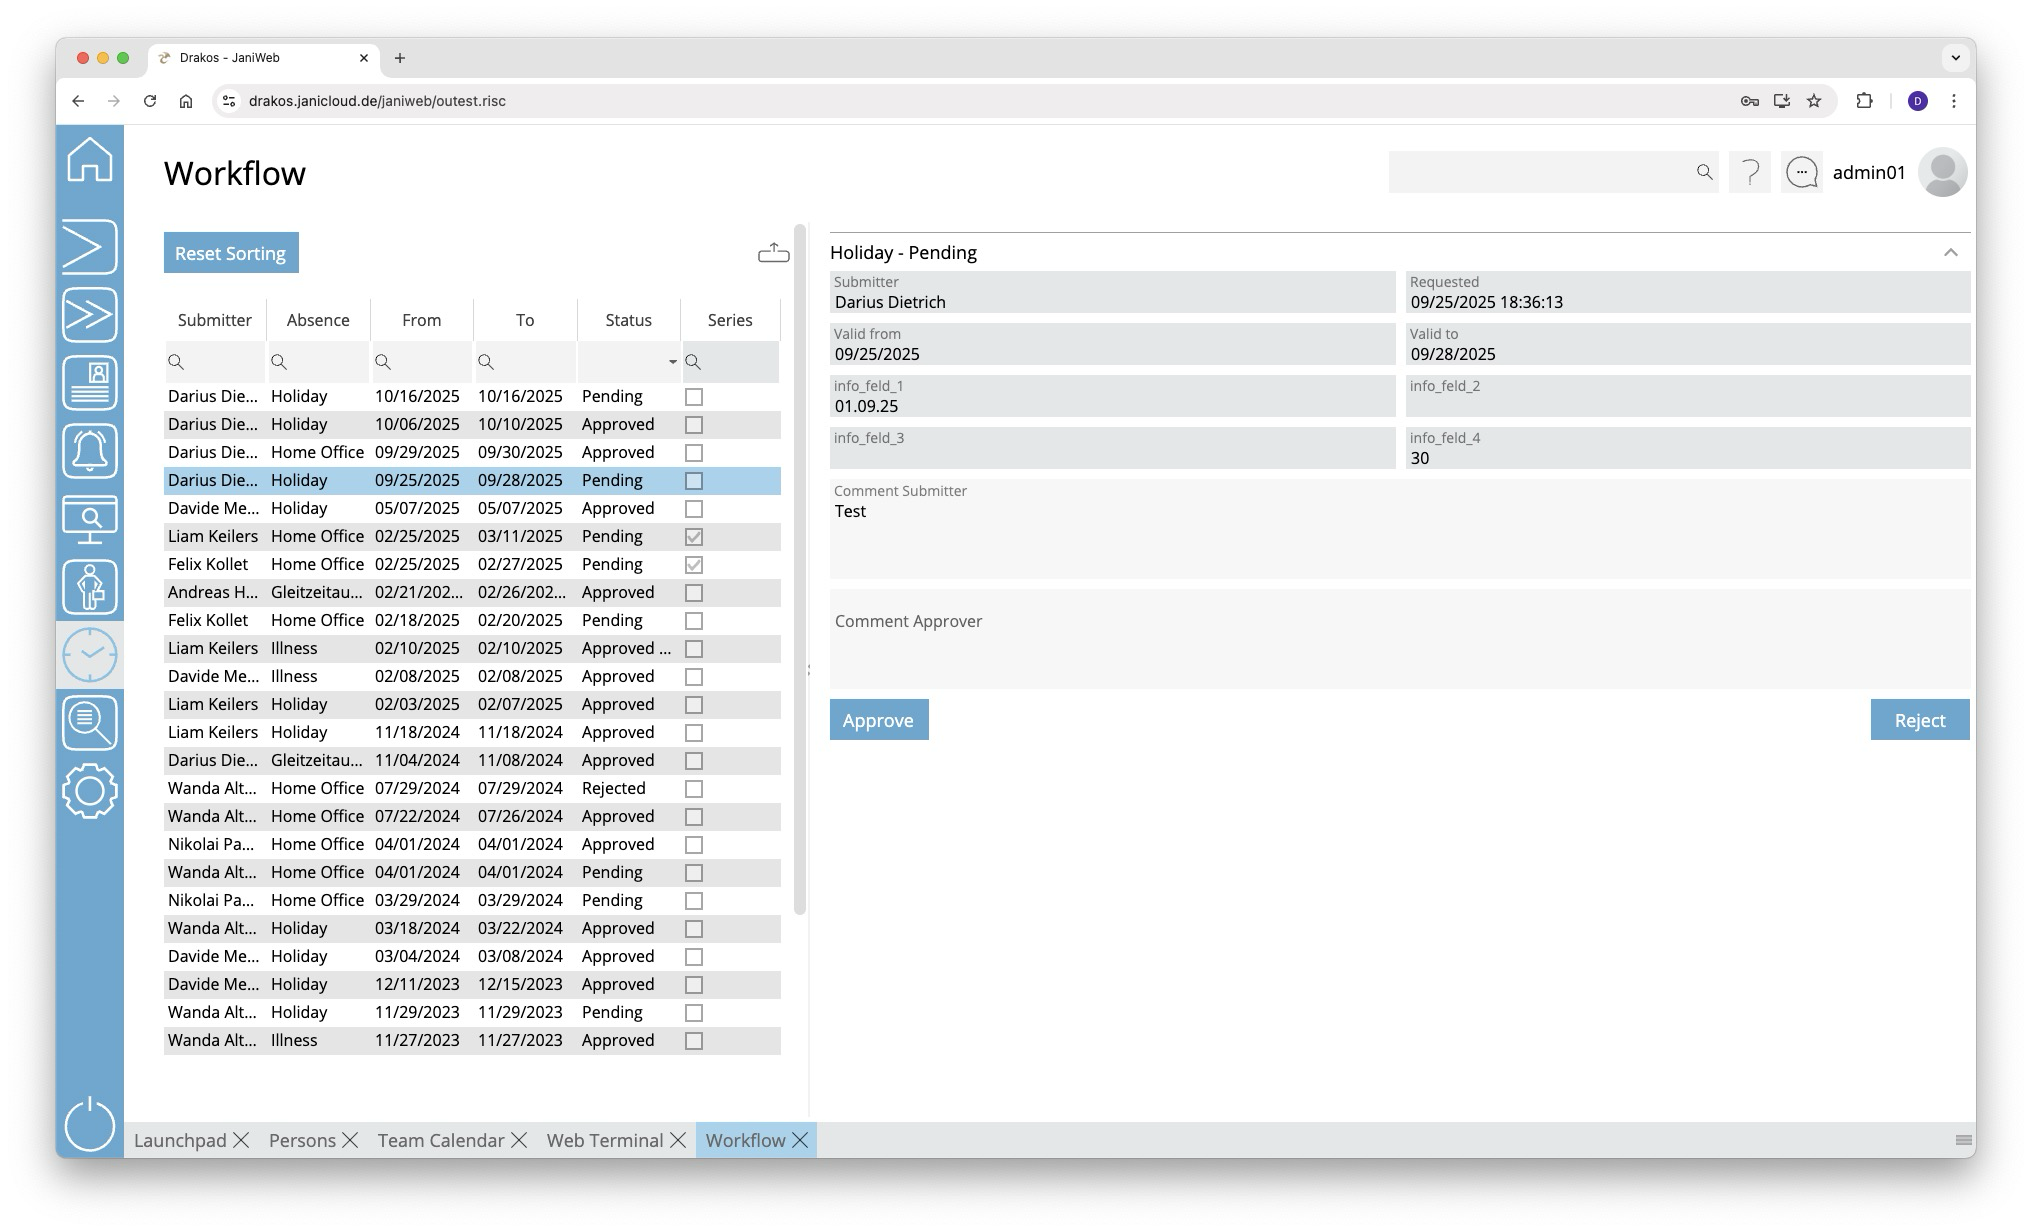
List of workflow requests
The list contains your active workflow requests. Select an entry to view details.
- In the text field Comment Approver, enter a comment that will be displayed to the requester.
- Press Approve to approve the request.
- Press Decline to decline the request.
The list offers you further options:
- Sorting by column: Click on a column header to sort the entries in ascending or descending order by this column.
- Search: Enter text or numbers in the search field (magnifying glass icon) at the top to search for entries. The entries take effect immediately: the list only displays hits. The search is not case sensitive.
- Filter by status: Open the list field in the Status column. Select the criteria for which you want to display entries. A set filter is saved and remains in place even after you log out. Press Reset Sorting to reset the filter and sorting.
- Export the entire list: Press the download icon. Select the format in which you want to export the list. For details on the available export formats, see the General > Export Formats chapter of this manual.
Time Sheet
This menu item allows you to view and print time sheets from third-party systems such as SAP. As a supervisor, you also have access to the time sheets of the employees assigned to you.

Select the person for whom a time sheet is available. Click Print to print the file.
The list of persons is only visible when you log in as an administrator. When you log in as an employee, only your own time sheet is visible.
Settings
Use the menu item Settings to make all the settings relevant for time tracking.
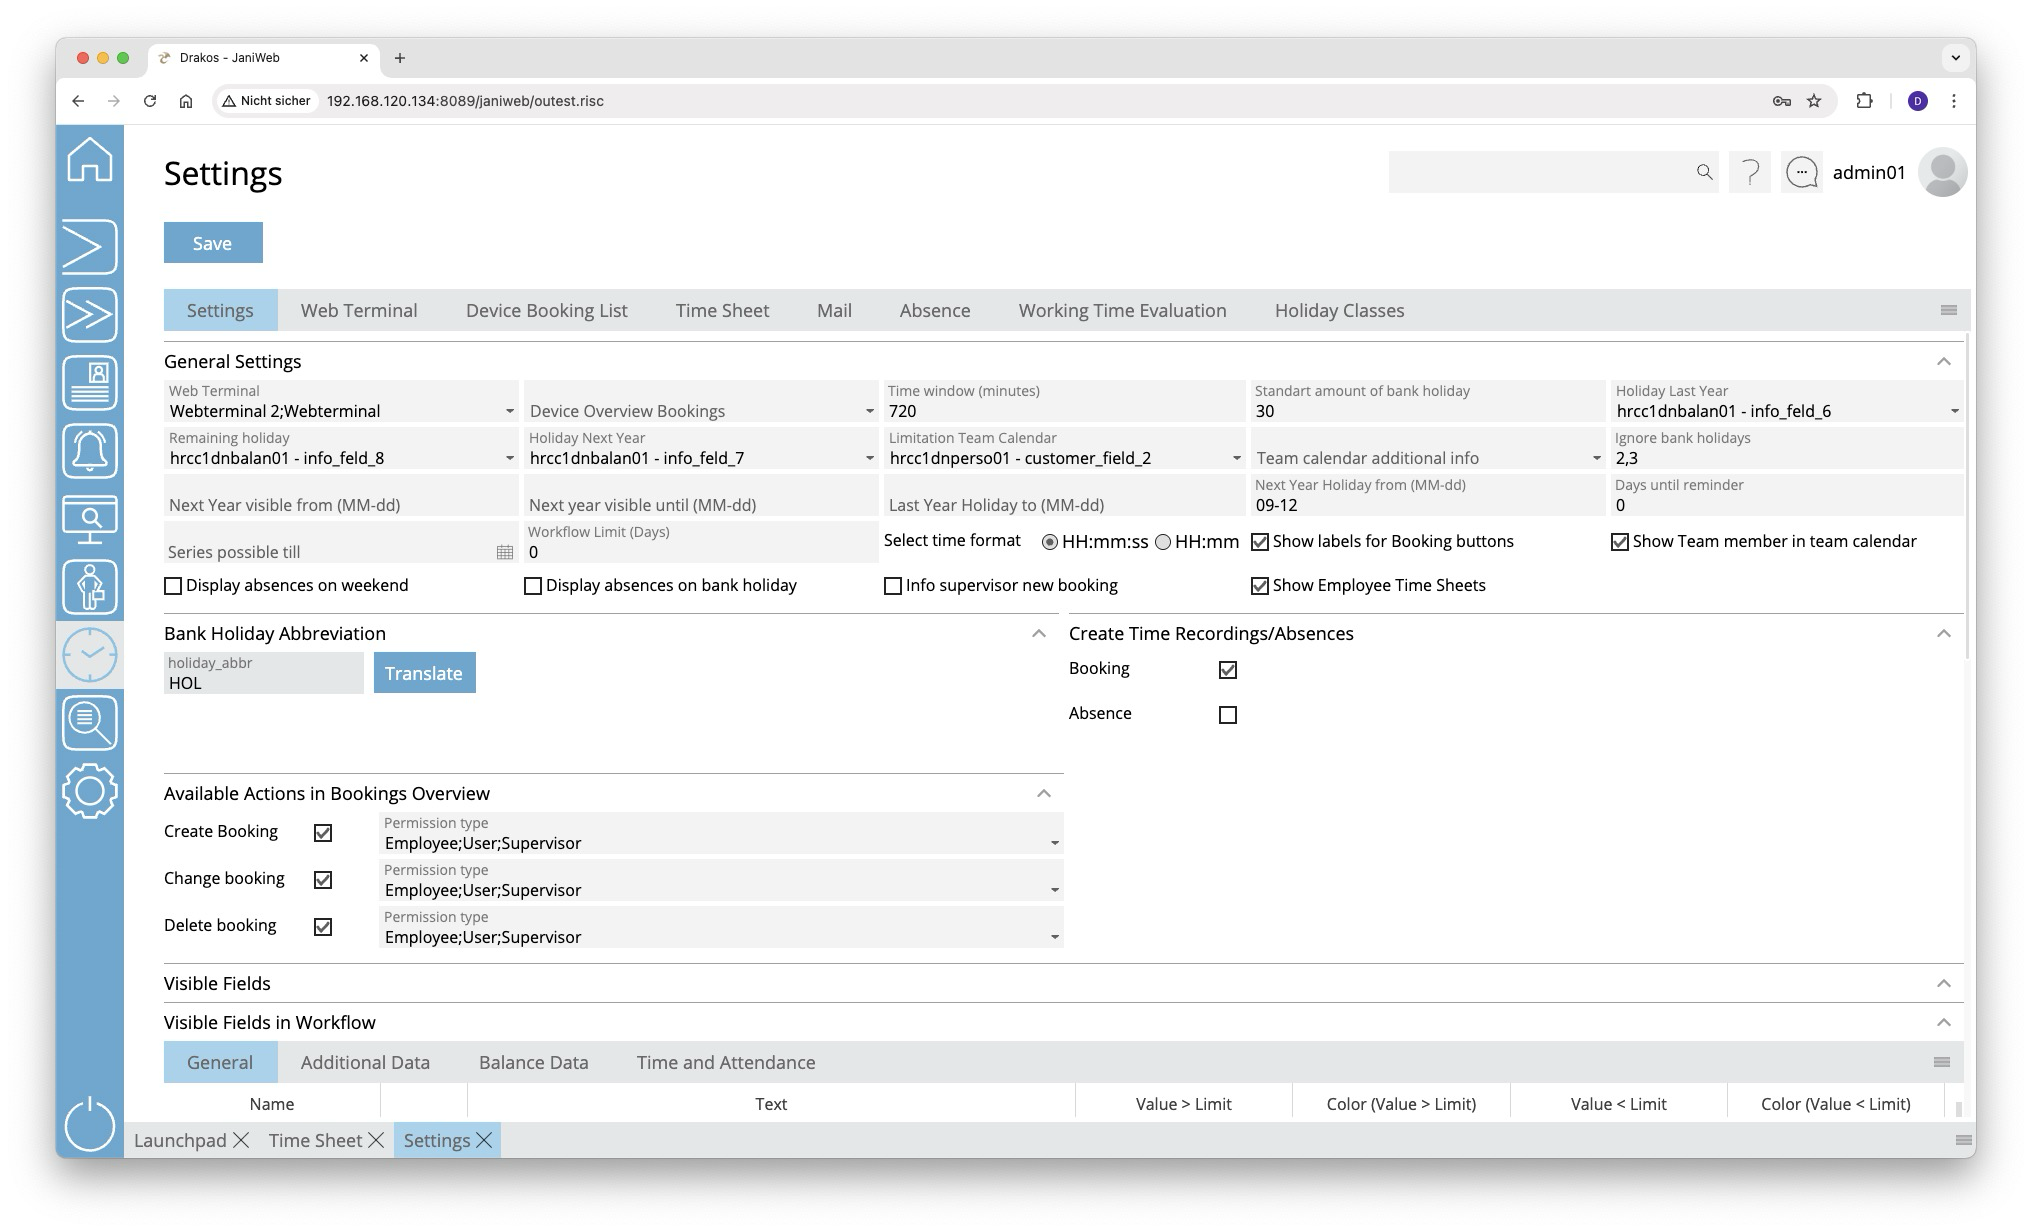
Tab Settings
Area General Settings
- Web Terminal: Select devices that should serve as a web terminal.
- Device Overview Bookings: Select the device with which bookings are created that users create manually via the menu item Overview Bookings (for example, to add a booking).
- Time window (minutes): Specify the time span within which pairs of clock-in/clock-out bookings are used to calculate working hours.
- Holiday Last Year: Select the database field that contains the holiday entitlement that was transferred from the previous year to the current year.
- Remaining holiday: Select the database field that contains the total holiday entitlement. The holiday for the current year is calculated as follows:
Holiday current year = remaining holiday – holiday last year – holiday next year. - Holiday Next Year: Select the database field containing the holiday entitlement for the coming year.
- Ignore bank holidays: Specify the holiday classes (separated by commas) that should not be displayed in the Team Calendar and should therefore not be used for the holiday calculation.
- Next year visible from (MM-dd): Specify the day from which the team calendar should be visible for the next year.
- Next year visible until (MM-dd): Specify the day until the team calendar should be visible for the next year.
- Holiday last year until (MM-dd): Define the day until employees can take holiday from the previous year.
- Holiday next year from (MM-dd): Define the day from which employees can plan holiday for the next year.
- Days until reminder: Enter the number of days after which a reminder E-Mail is automatically sent to the supervisor if they have not responded to an absence request.
- Show Team Member in Team Calendar: Activate this option if you want team members to be displayed in the Team Calendar.
- Information on rejected applicationts by leading system: If this option is selected, employees and supervisors are informed about requests that have been rejected by the leading system.
- Display absences on weekend: Activate this option if you want absences to be displayed at the weekend as well and included in the holiday calculation.
- Info supervisor new booking: Activate this option to inform the manager when an employee makes a late booking via the menu item Overview Bookings.
- Show Employee Time Sheets: Activate this option if you want to allow supervisors to view their employees’ time sheets (including time sheets from SAP).
-
Team calendar additional info: Here you can select a database field that will be displayed in addition to the person’s name in the menu item Team Calendar.
-
Limitation Team Calendar: Select a database field here to further limit a team (a team consists of all persons who have the same supervisor).
-
Series possible until: Enter a date here if you want to restrict the period in which employees can create series of absences.
-
Select time format: Here you can specify whether the times are displayed in hours:minutes:seconds or just in hours:minutes in the Overview Bookings.
-
Show labels for Booking buttons: Activate this option to display the labels for the booking buttons in the Web Terminal menu in addition to the buttons themselves.
- Enable New Absence button: If this option is selected, a New Absence button will be displayed in the Team Calendar, which can be used to create absences without having to right-click or press and hold (on touch devices).
- Maximum Age for Booking Modification (Days): This setting determines the maximum number of days that entries in the booking overview may be old before they can no longer be edited. Enter a positive integer. The default value is set to 90 days. Entries can be added, amended or deleted within the defined period.
Area Abbreviations for Bank Holidays
Specify the abbreviations that are displayed for holidays in the menu item Team Calendar.
Area Create Time Recordings/Absences
Activate the corresponding option if you want to allow users to perform Booking Actions and/or Absences via the menu item Overview Bookings.
Area Available Actions in Overview Bookings
Use this area to define which persons can create, change or delete bookings via the menu item Overview Bookings. Persons are distinguished by:
- Employee: Employee via the employee login.
- User: Administrator via the admin login.
- Supervisors: Employee who are a supervisor via the employee login.
Area Visible Fields
Specify here which additional information (e.g. balances) should be displayed in the various menu items. The fields Value > Limit, Color (Value > Limit) and Value < Limit, Color (Value < Limit) allow you to highlight values above or below a limit in color.
Tab Web Terminal
Specify the booking buttons for the Web Terminal here. First, select the web terminal for which you want to edit the settings from the Web Terminal drop-down menu.
- Button Add: Press Add to add a booking button. It will appear at the end of the list.
- Column Event type: Select the type of booking for which the button is to be used.
- Column Icon: If you want to display an icon other than the default one, press Upload and select a graphic file.
- Column Visible: Select whether the button should be visible.
- Booking Type: Shows whether the booking marks the person as present or absent (this is particularly important for calculating working hours in the Overview Bookings menu item).
- Row: Here you can specify the row in which the booking button should appear in the web terminal.
- Column: Here you can specify the column in which the booking button should appear in the web terminal.
Area Visible Fields
Specify here which additional information (e.g. balances) should be displayed in the various menu items. The fields Value > Limit, Color (Value > Limit) and Value < Limit, Color (Value < Limit) allow you to highlight values above or below a limit in color.
Tab Device Booking List
Dormakaba devices allow persons to view a list of their most recent bookings using a booking. Specify the appearance of this list here.
- Days past: Here you can specify the number of days for which bookings should be displayed.
- Timeout: Specify after how many seconds the list should automatically disappear (privacy protection).
- Dark mode: Activate this option if you want the booking list to be displayed in a dark mode.
Area Visible Columns
Specify which information should be included. Activate the corresponding options.
Area Visible Event Types
Specify which bookings should be displayed. Activate the corresponding options.
Tab Time Sheet
JaniWeb can display time statements from an SAP system in the menu item Time Sheet. On this tab page, you specify whether these time statements should be accessed via the file interface or the SOAP interface.
Enable SOAP: Activate this option to enable the SOAP interface. The fields SOAP URL, SOAP User and SOAP Password also appear. Enter the required data.
Client, Path, File extension: Specify the information for the file interface. One path can be configured for each client.
Tab Mail
Enter an additional text to be included in E-Mails that are sent automatically when creating/approving/rejecting holiday requests.
Tab Absence
Use this tab to manage the various types of absences.
List of absence types
The list contains all the absence types that have already been created. Select an entry to view details.
Button New
Press New to create a new absence type. Enter the Description, Client, Validity and any other required data. To set the label, press Translate. Enter the names for the respective languages and press Save.
- Days future / Days past: Specify how many days in the future or in the past the absence can be created.
- Absence reason SAP: Select the relevant absence type from SAP here. This link is important for transferring the absences to SAP.
- Workflow Past / Workflow Future: Select a workflow for the absence type here. You can define workflows under the menu item Workflow.
- Abbreviation: Define an abbreviation that will be displayed in the Team Calendar for this absence type.
- To define the name for an abbreviation, click Translate. Enter the names for the respective languages and press Save.
- Contingent: Choose whether to check a contingent when an absence is created.
- No check: The created absence is not checked.
- Holiday: The created absence is checked against the holiday contingent.
- Other: Choose this option in order to select a database field in the Contingent field, against which the absence is checked when it is created. Enter the Unit (days, hours or minutes) for the value of the database field. You can also set a Limit that is checked when the absence is created. This prevents the absence from being created if the value of the contingent is above or below the set limit.
- Comment mandatory: Users must enter a comment when creating an absence.
- Upload Documents: Users are allowed to upload documents when creating an absence.
- Supervisor must approve: Activates the workflow for approval by the supervisor.
- Notify supervisor: When an absence is created, the supervisor is automatically notified.
- Supervisor approves delete: Activates the workflow for approval by the supervisor when deleting an absence.
- Notify supervisor on delete: When deleting an absence, the superior is automatically notified.
- With time: Users can specify a time in addition to the date when creating an absence.
- Show in team calendar: The absence appears in the team calendar.
- Allow series: Users may create an absence as a recurring series.
- Not selectable: Absences cannot be selected in the team calendar.
- Supervisor can create: The supervisor can create absences for their employees.
- Employee can create: Employees can create absences themselves.
- Incognito: The abbreviation of the absence type is not visible to team members.
- Automatic Approval: If this setting is enabled, you can specify in the Days field how many days without a response from the responsible person will result in the absence being automatically approved.
- Flexitime: Once this setting is configured for an absence, only persons with a specific value in the 'zterf' (database table: hrcc1dnperso01_data_relation) field can create this absence from the team calendar.
Tab Working Time Report
Here you define which booking types are used for calculating the working hours in the Overview Bookings (top list). You can also create working time rules for the automatic deduction of break times (bottom list).
List of booking types
- Button Add: Press Add to add a booking type. The entry appears at the end of the list.
- Column Event type: Select the booking type to be included in the report.
- Column Device: Select the devices for which bookings are to be reported.
- Column Icon: If you want to display a different icon than the default icon in the report, press Upload and select a graphic file.
- Booking Type: Shows whether the booking is considered as Present or Absent (this is particularly important for calculating working hours).
List of working time rules
- Button Add: Press Add to add a new working time rule. It will appear at the end of the list.
- Column Description: Enter a meaningful name.
- Column Working time limit (minutes): Enter the time in minutes from which the break time is automatically deducted if there are no break bookings of sufficient duration (i.e. the person has not had a long enough break).
- Column Automatic deduction (minutes): Enter the break time in minutes that is automatically deducted.
Tab Holiday Classes
Here you specify the time valuation for various holiday classes to ensure that holiday is calculated correctly.
- For full-day holidays, enter the number 1 in the Value field.
- For holidays that are considered half days (such as Christmas and New Year’s Eve in Germany, for example), enter 0.5.
Employees Overview
In the Employees Overview menu, you can view the balances for employees for whom you are the supervisor.
This menu item is only available if you have logged in as an employee. This menu item is not available if you are logged in as an admin.
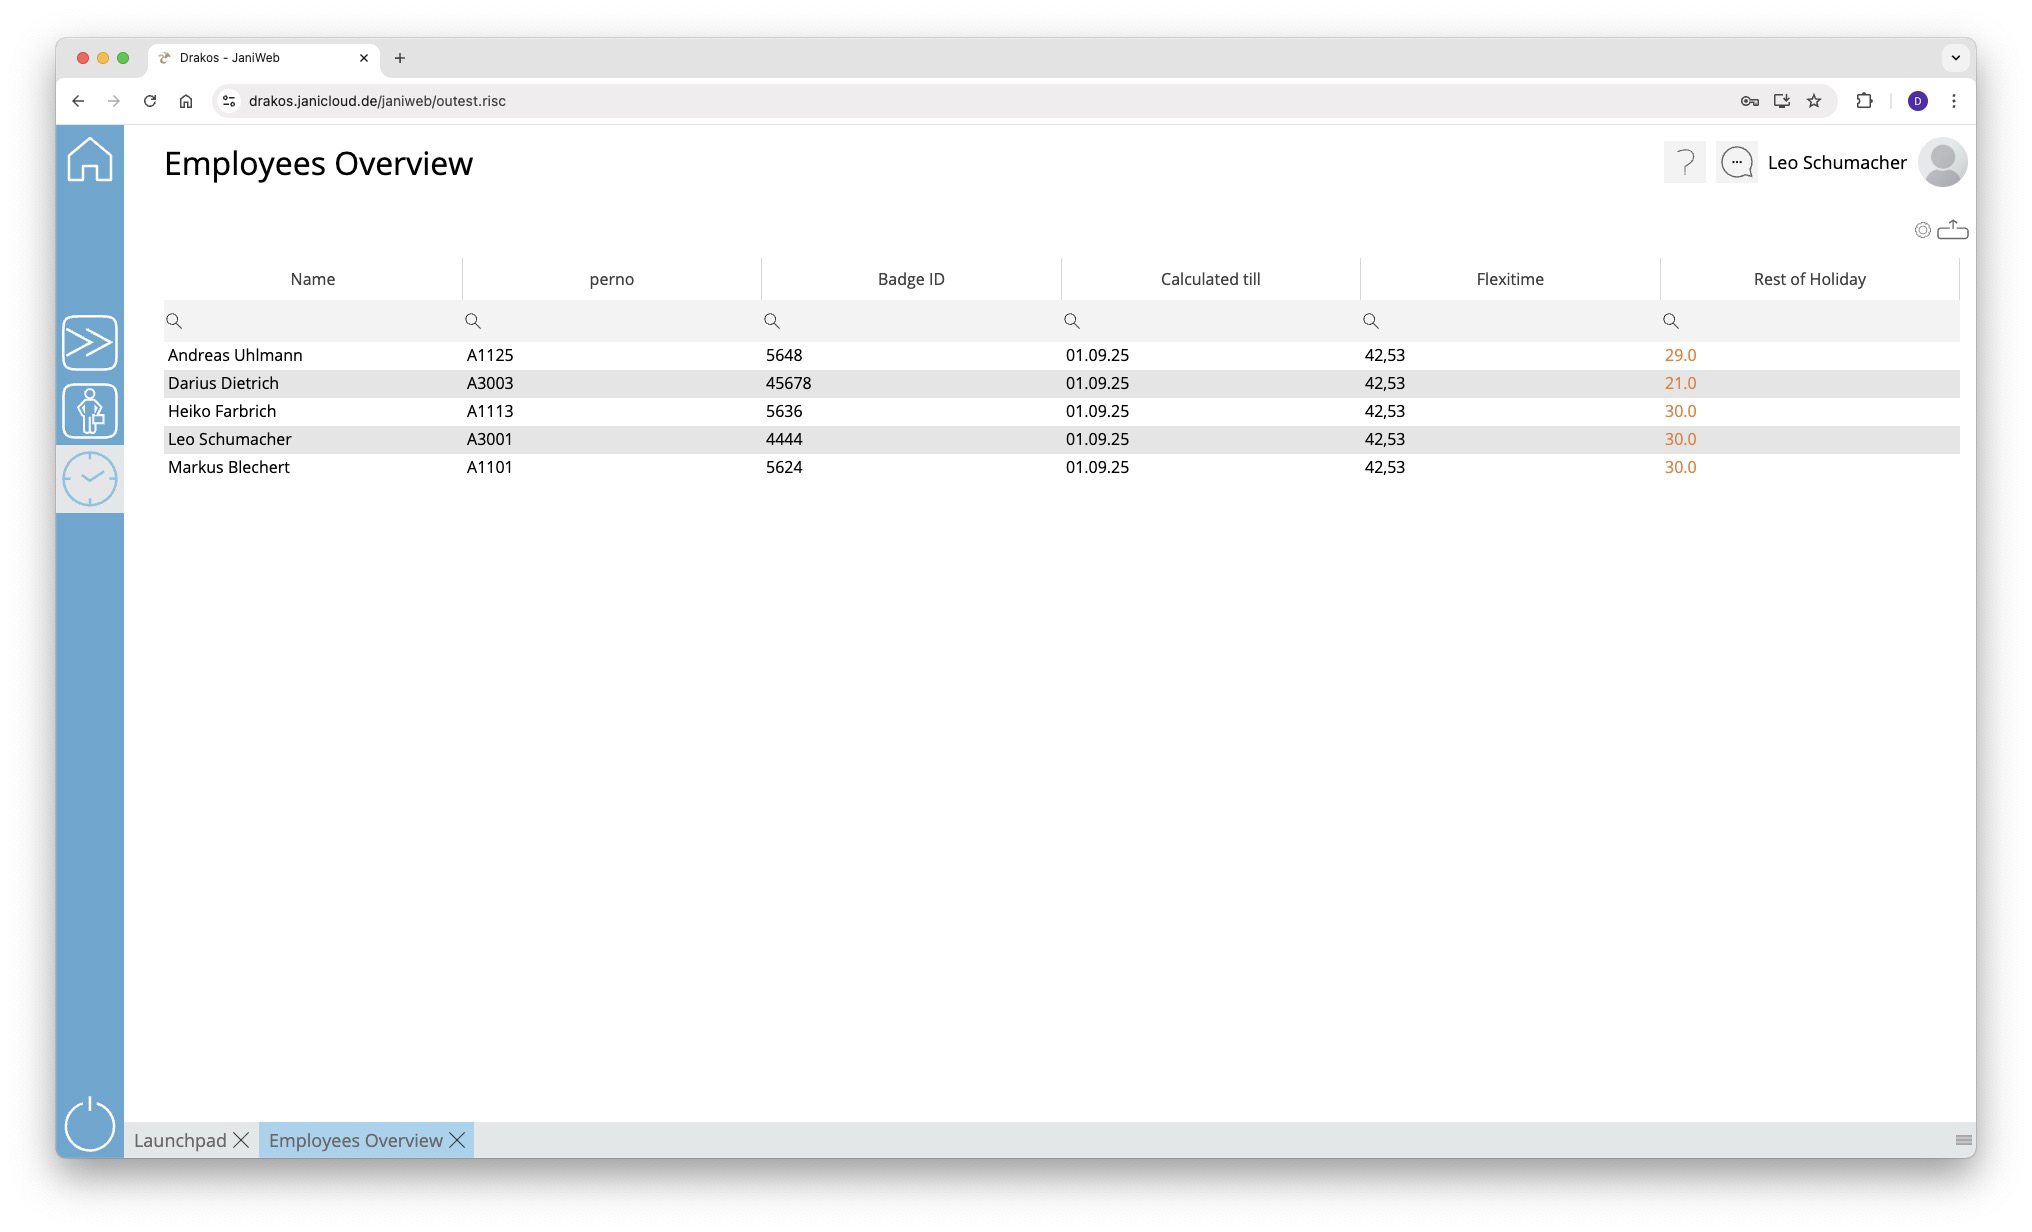
Analyses
Permissions
Use the Permissions menu to determine which persons are authorized to access which devices and at what times.
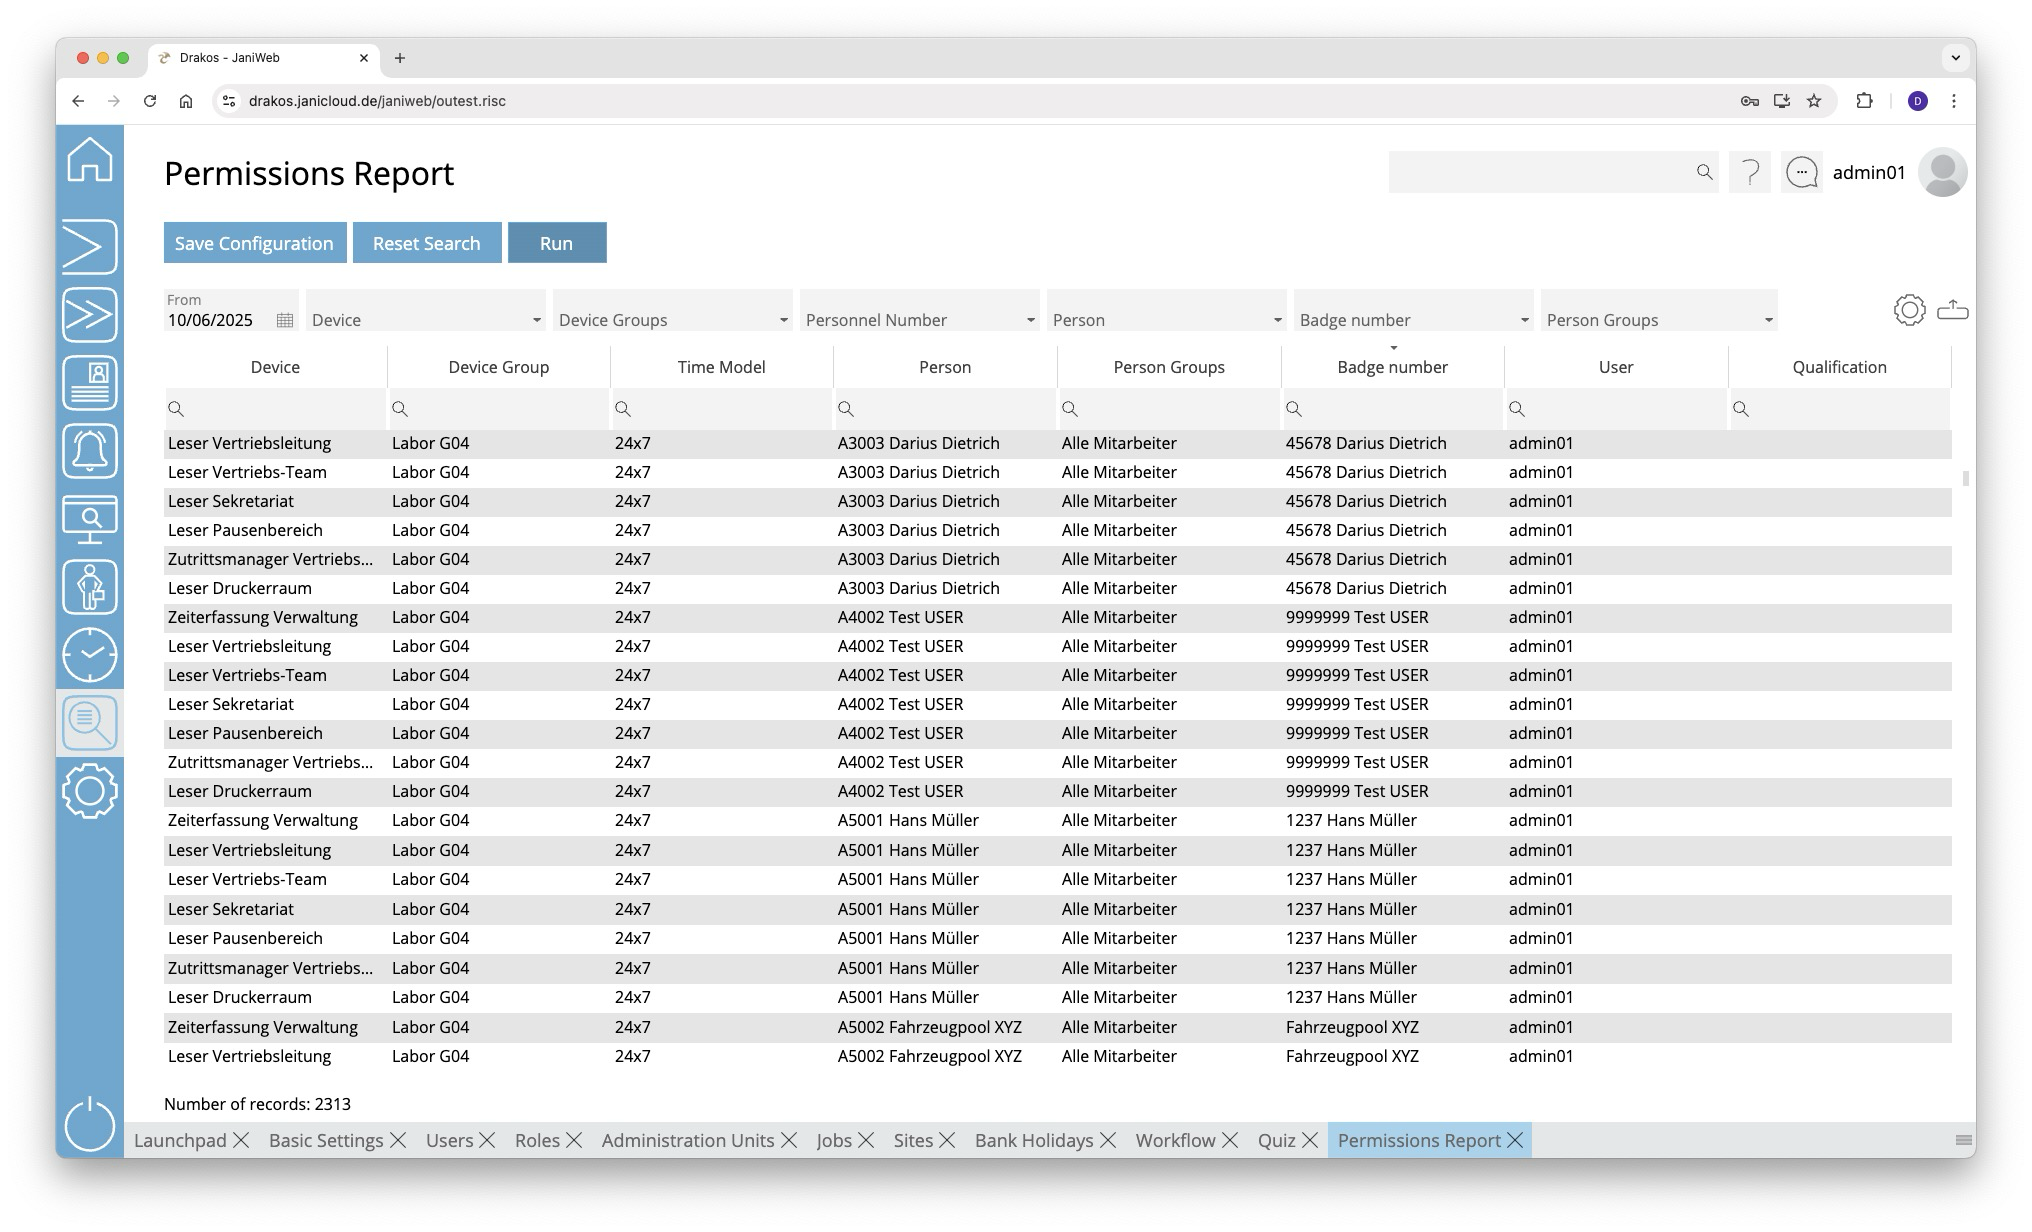
Creating the report
- Select the date for which you want to generate the report.
- (Optional) Use the additional fields to narrow the report. For example, you can find out which persons are authorized on a particular device or on which devices a particular person is authorized. You can also display permissions for a badge number or person group.
- Press Run to start the report.
Further options with the report
- Select columns to display: Press the gear icon. Select which columns you want to display and in which order. Arrange the columns using the mouse or the arrow icons. Press Apply to adopt the changes.
- Search in columns: Enter text or numbers in the search field (magnifying glass icon) of a column to search for names, personnel numbers, or other criteria. The entries take effect immediately: the list only displays hits.
- Export the entire list: Press the download icon. Select the format in which you want to export the list. The export files are downloaded or displayed depending on the browser/operating system settings. For details on the available export formats, see the General > Export Formats chapter of this manual.
- Save report: For details on saving reports, see the chapter General > Custom Reports.
Color highlighting
In the report, individual permissions can be highlighted in the following colors:
- Blue: The permission has been assigned by a third-party system (e.g. SAP (Janitor)).
Button Reset Selection
Press Reset Selection to reset all fields to their initial value.
TIPS
- The column User shows which user has assigned the permission.
- Double-click the column Time Model of a row to display a weekly plan for the corresponding time model.
- Double-click the column Device Group of a row to display the devices contained in the group.
Bookings
Use the menu item Bookings to output a booking list. This makes it possible to evaluate which person has booked on a device at a specific point in time.
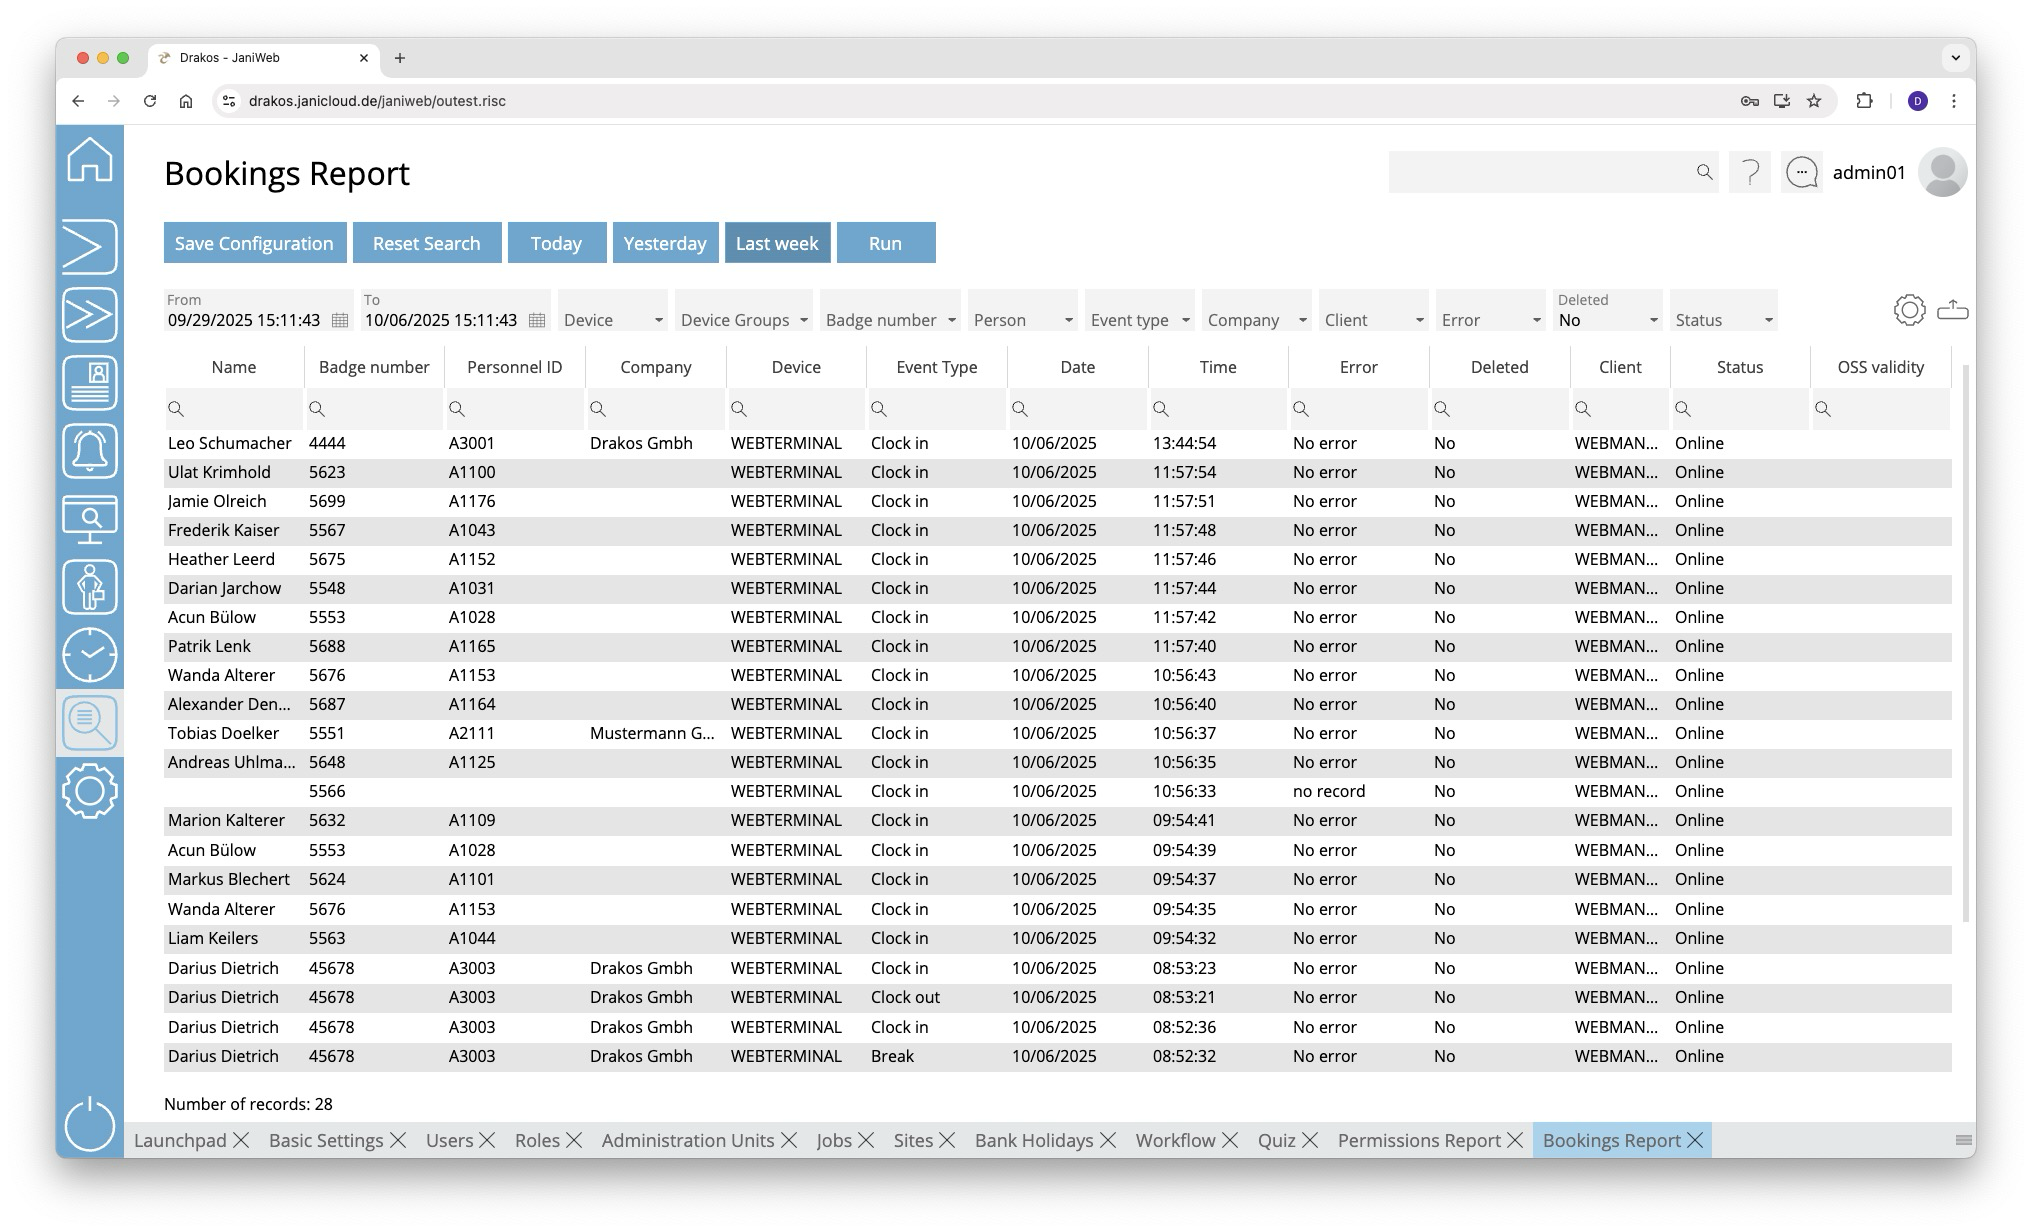
Creating the report
- Specify the time period for which you want to generate the report (From – To). Or press Today, Yesterday or Last week to quickly generate a report for the corresponding period.
- (Optional) Use the additional fields to narrow the report.
- Press Run to start the report.
Further options with the report
- Select columns to display: Press the gear icon. Select which columns you want to display and in which order. Arrange the columns using the mouse or the arrow icons. Press Apply to adopt the changes.
- Search in columns: Enter text or numbers in the search field (magnifying glass icon) of a column to search for names, personnel numbers, or other criteria. The entries take effect immediately: the list only displays hits.
- Export the entire list: Press the download icon. Select the format in which you want to export the list. The export files are downloaded or displayed depending on the browser/operating system settings. For details on the available export formats, see the General > Export Formats chapter of this manual.
- Save report: For details on saving reports, see the chapter General > Custom Reports.
Button Reset Selection
Press Reset Selection to reset all fields to their initial value.
TIPS
Double-click the column Device of a line to show details about the corresponding device.
Booking Sequence Check
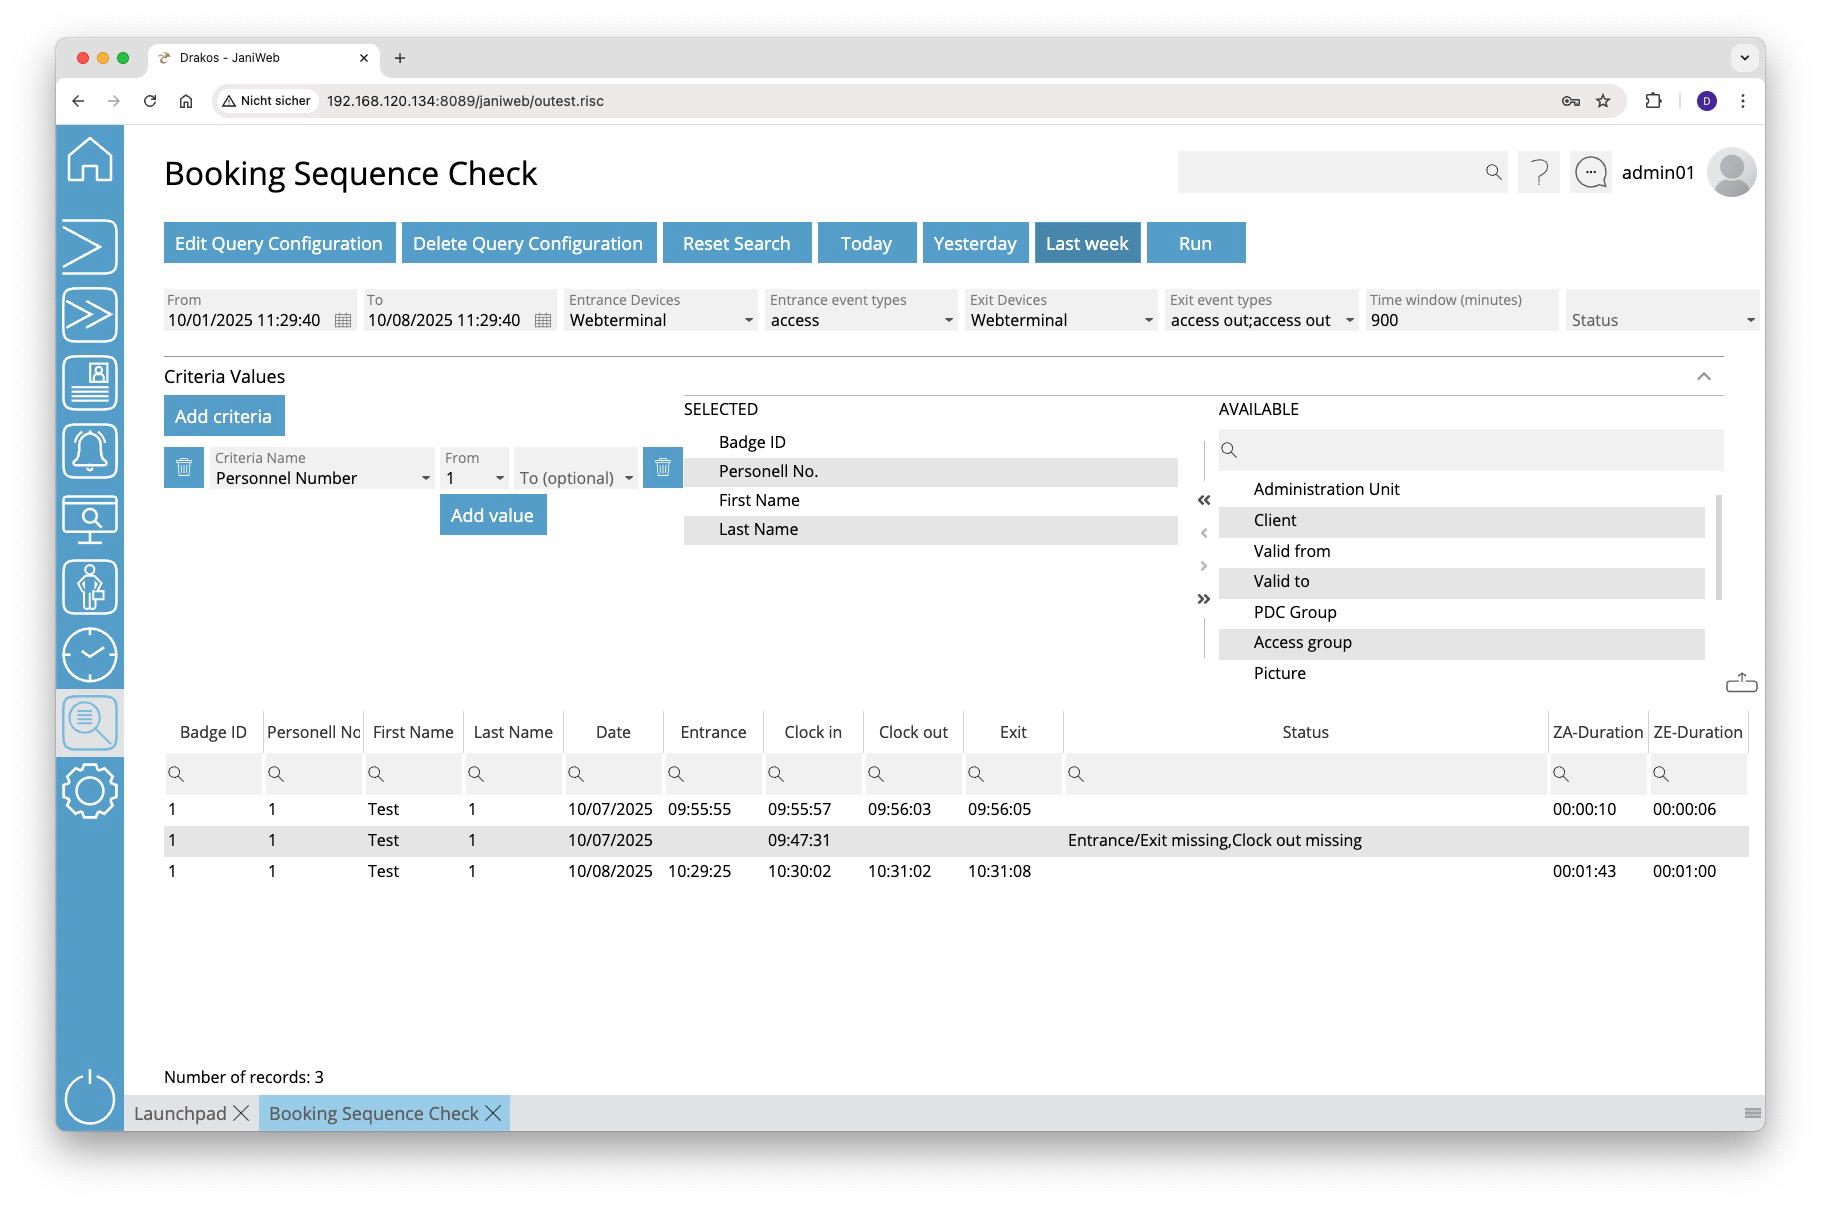
Creating the report
- Specify the time period for which you want to generate the report (From – To). Or press Today, Yesterday or Last week to quickly generate a report for the corresponding period.
- To evaluate entry bookings: Select Entrance Devices in conjunction with Entrance event types.
- To evaluate exit bookings: Select Exit Devices in conjunction with Exit event types.
- Specify a Period (minutes) to evaluate related bookings.
- (Optional) Use the additional fields to narrow the report.
- Press Run to start the report.
- Press Add criteria.
- Select the required criterion from the list field.
- Press Add value.
- In the field From, select a single value or use both fields to specify a range. You can also specify multiple values for the same criterion (Add value).
- (Optional) Add another criterion with value(s).
- Drag the data fields (columns) you want to display from the list Available to the list Selected. Or use the arrow buttons.
- Press Run to start the report.
- The values within the same criterion are linked logically by OR (one match is sufficient).
- Different criteria are linked logically by AND (all criteria must be met).
Further options with the report
- Search in columns: Enter text or numbers in the search field (magnifying glass icon) of a column to search for names, personnel numbers, or other criteria. The entries take effect immediately: the list only displays hits.
- Export the entire list: Press the download icon. Select the format in which you want to export the list. The export files are downloaded or displayed depending on the browser/operating system settings. For details on the available export formats, see the General > Export Formats chapter of this manual.
- Save report: For details on saving reports, see the chapter General > Custom Reports.
Button Reset Selection
Press Reset Selection to reset all fields to their initial value.
Time and Attendance

Creating the report
- Specify the time period for which you want to generate the report (From – To). Or press Today, Yesterday or Last week to quickly generate a report for the corresponding period.
- If you only want to evaluate bookings from certain devices/device groups, you can restrict this using the Devices/Device Groups filter.
- Specify a Period (minutes) to evaluate related clock-in and clock-out bookings.
- If you want to check whether the length of the working time has been adhered to, you can set the value Undertime (minutes)
- If the working time (difference between clock-in and clock-out bookings) is less than this value, the status Undertime is set
- (Optional) Use the additional fields to narrow the report.
- Press Run to start the report.
- Press Add criteria.
- Select the required criterion from the list field.
- Press Add value.
- In the field From, select a single value or use both fields to specify a range. You can also specify multiple values for the same criterion (Add value).
- (Optional) Add another criterion with value(s).
- Drag the data fields (columns) you want to display from the list Available to the list Selected. Or use the arrow buttons.
- Press Run to start the report.
- The values within the same criterion are linked logically by OR (one match is sufficient).
- Different criteria are linked logically by AND (all criteria must be met).
Further options with the report
- Search in columns: Enter text or numbers in the search field (magnifying glass icon) of a column to search for names, personnel numbers, or other criteria. The entries take effect immediately: the list only displays hits.
- Export the entire list: Press the download icon. Select the format in which you want to export the list. The export files are downloaded or displayed depending on the browser/operating system settings. For details on the available export formats, see the General > Export Formats chapter of this manual.
- Save report: For details on saving reports, see the chapter General > Custom Reports.
Button Reset Selection
Press Reset Selection to reset all fields to their initial value.
Replacement Badges
Use the menu item Replacement Badges to find out to which persons replacement badges have been issued. In addition, active replacement badges can be returned here.
Creating the report
- Specify the time period for which you want to generate the report (From – To).
- (Optional) Select one or more Persons to narrow the report.
- (Optional) Select the options Active and/or Issued to display only active and/or issued replacement badges.
- Press Run to start the report.
Further options with the report
- Select columns to display: Press the gear icon. Select which columns you want to display and in which order. Arrange the columns using the mouse or the arrow icons. Press Apply to adopt the changes.
- Search in columns: Enter text or numbers in the search field (magnifying glass icon) of a column to search for names, personnel numbers, or other criteria. The entries take effect immediately: the list only displays hits.
- Export the entire list: Press the download icon. Select the format in which you want to export the list. The export files are downloaded or displayed depending on the browser/operating system settings. For details on the available export formats, see the General > Export Formats chapter of this manual.
- Save report: For details on saving reports, see the chapter General > Custom Reports.
Button Reset Selection
Press Reset Selection to reset all fields to their initial value.
TIPS
- Double-click on the column Replacement Badge of a row to return the corresponding replacement badge.
- Double-click on the column Name of a row to show details for the corresponding person.
Change Log Persons
Use the menu item Change Log Persons to find out who changed the master data of a person and when.
Creating the report
- Specify the time period for which you want to generate the report (From – To).
- Select the Person for whom you want to see the change log.
- Press Run to start the report.
The first line, highlighted in green, shows information about the current record of the person. The following lines show the historical changes. The column Updated shows the date and time of the change. The user who made the change appears in the column User.
Further options with the report
- Select columns to display: Press the gear icon. Select which columns you want to display and in which order. Arrange the columns using the mouse or the arrow icons. Press Apply to adopt the changes.
- Search in columns: Enter text or numbers in the search field (magnifying glass icon) of a column to search for names, personnel numbers, or other criteria. The entries take effect immediately: the list only displays hits.
- Export the entire list: Press the download icon. Select the format in which you want to export the list. The export files are downloaded or displayed depending on the browser/operating system settings. For details on the available export formats, see the General > Export Formats chapter of this manual.
- Save report: For details on saving reports, see the chapter General > Custom Reports.
Button Reset Selection
Press Reset Selection to reset all fields to their initial value.
Persons
Use the menu item Persons to output a list of the existing personnel master records. All fields that describe a person can be displayed here.
Creating the report
In this report, use criteria and values to define the group of persons to be evaluated and select the data fields to be displayed from a list. To do so, follow these steps:
- Press Add criteria.
- Select the required criterion from the list field.
- Press Add value.
- In the From field, select a single value or use both fields to specify a range.You can also specify multiple values for the same criterion (Add value).
- (Optional) Add another criterion with value(s).
- Drag the data fields (columns) you want to display from the list Available to the list Selected. Or use the arrow buttons.
- Press Run to start the report.
Logic of criteria and values
- The values within the same criterion are linked logically by OR (one match is sufficient).
- Different criteria are linked logically by AND (all criteria must be met).
Further options with the report
- Search in columns: Enter text or numbers in the search field (magnifying glass icon) of a column to search for names, personnel numbers, or other criteria. The entries take effect immediately: the list only displays hits.
- Export the entire list: Press the download icon. Select the format in which you want to export the list. The export files are downloaded or displayed depending on the browser/operating system settings. For details on the available export formats, see the General > Export Formats chapter of this manual.
- Save report: For details on saving reports, see the chapter General > Custom Reports.
Button Reset Selection
Press Reset Selection to reset all fields to their initial value.
Unused Badges
Use the menu item Unused Badges to determine which persons have not used their badge during a specific period.
Creating the report
In this report, use criteria and values to define the group of persons to be evaluated and select the data fields to be displayed from a list. To do so, follow these steps:
- Specify the time period you want to check for unused badges (From – To).
- Press Add criteria.
- Select the required criterion from the list field.
- Press Add value.
- In the From field, select a single value or use both fields to specify a range.You can also specify multiple values for the same criterion (Add value).
- (Optional) Add another criterion with value(s).
- Drag the data fields (columns) you want to display from the list Available to the list Selected. Or use the arrow buttons.
- Press Run to start the report.
Logic of criteria and values
- The values within the same criterion are linked logically by OR (one match is sufficient).
- Different criteria are linked logically by AND (all criteria must be met).
Further options with the report
- Search in columns: Enter text or numbers in the search field (magnifying glass icon) of a column to search for names, personnel numbers, or other criteria. The entries take effect immediately: the list only displays hits.
- Export the entire list: Press the download icon. Select the format in which you want to export the list. The export files are downloaded or displayed depending on the browser/operating system settings. For details on the available export formats, see the General > Export Formats chapter of this manual.
- Save report: For details on saving reports, see the chapter General > Custom Reports.
Button Reset Selection
Press Reset Selection to reset all fields to their initial value.
Visits
Use the menu item Visits to find out which employees have received which visitors and when.
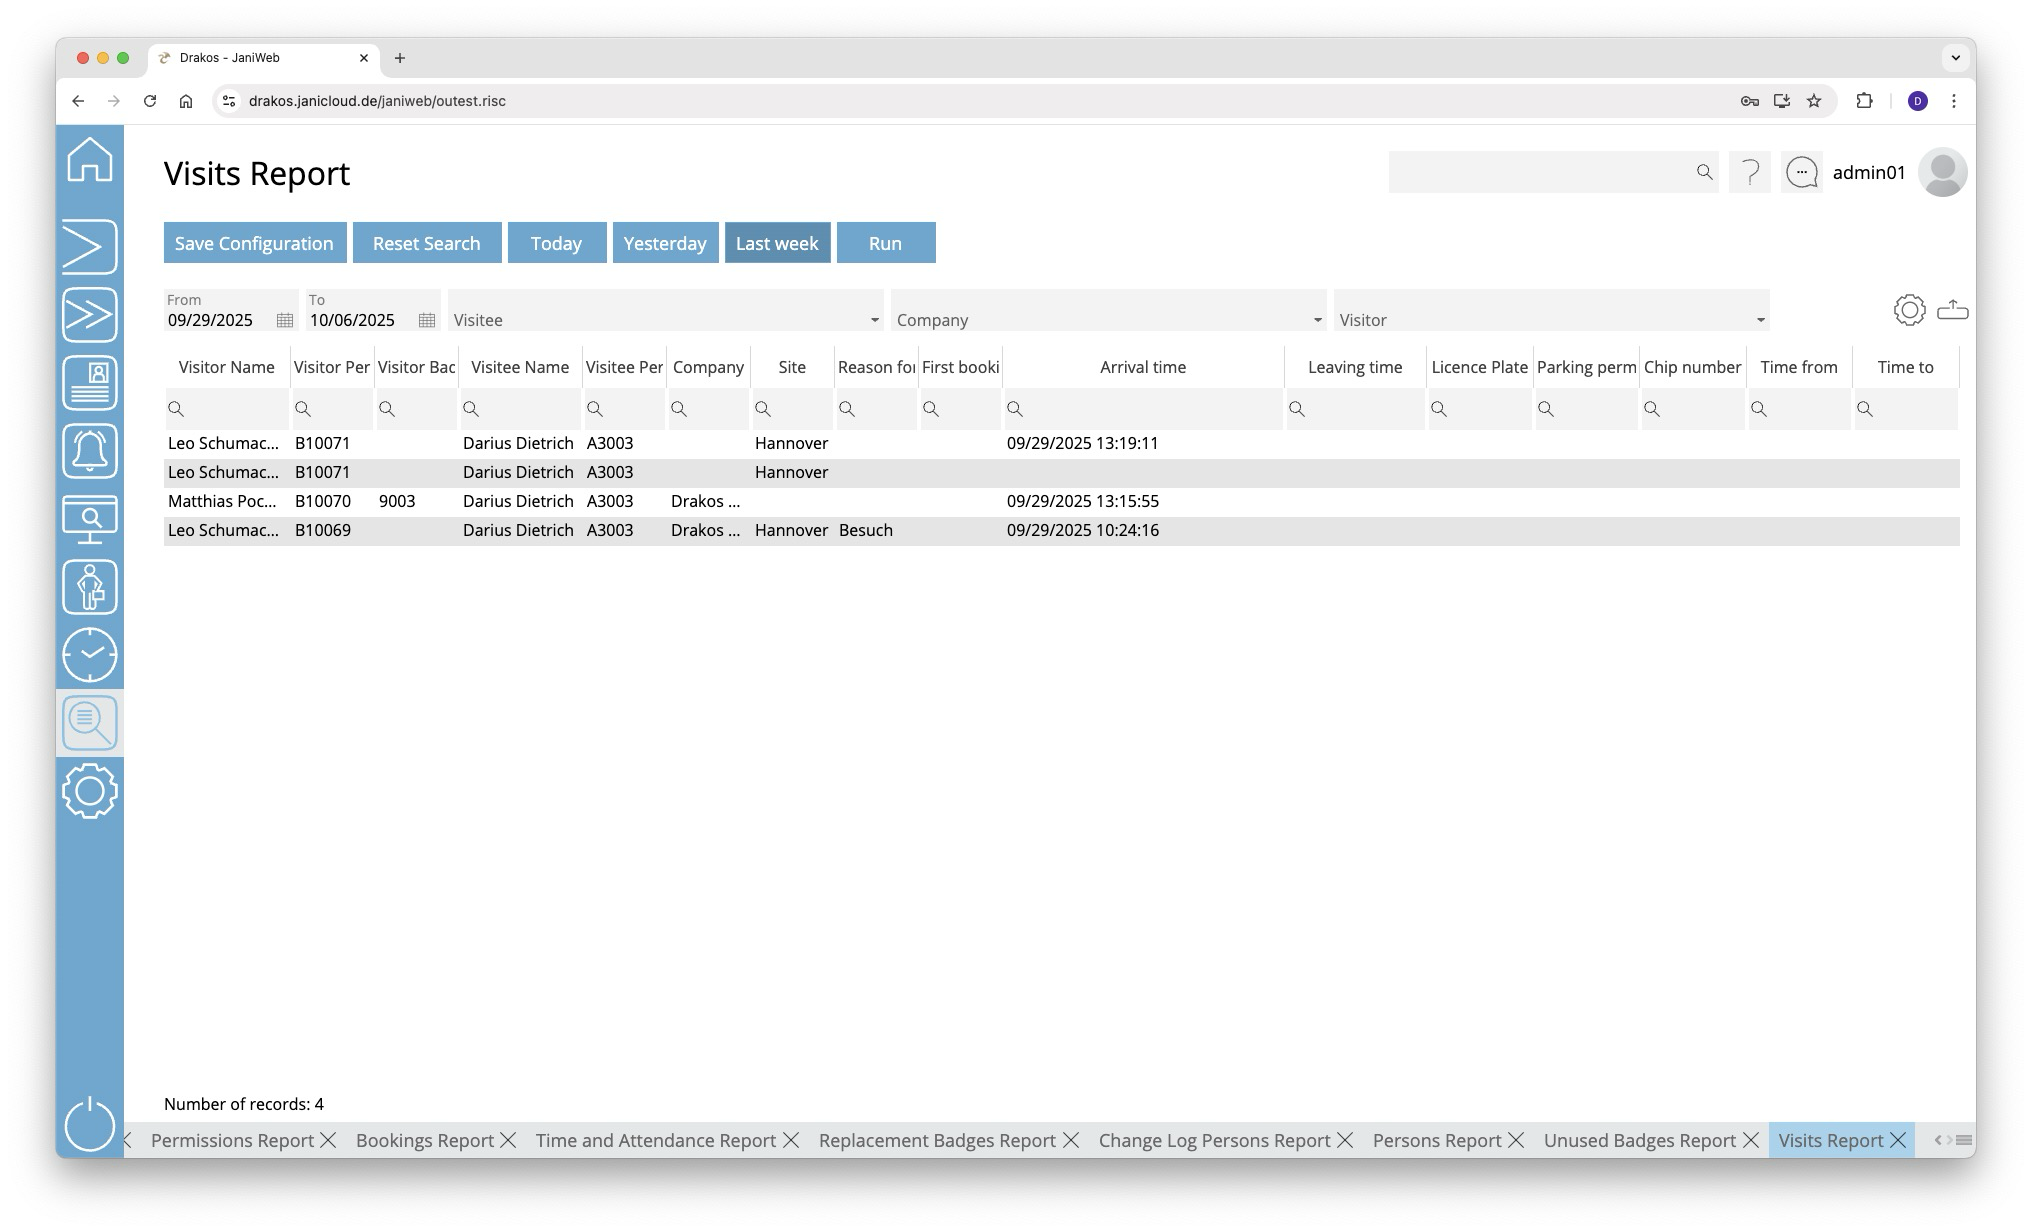
Creating the report
- Specify the time period for which you want to generate the report (From – To). Or press Today, Yesterday or Last week to quickly generate a report for the corresponding period.
- (Optional) Use the additional fields to narrow the report.
- Press Run to start the report.
Further options with the report
- Select columns to display: Press the gear icon. Select which columns you want to display and in which order. Arrange the columns using the mouse or the arrow icons. Press Apply to adopt the changes.
- Search in columns: Enter text or numbers in the search field (magnifying glass icon) of a column to search for names, personnel numbers, or other criteria. The entries take effect immediately: the list only displays hits.
- Export the entire list: Press the download icon. Select the format in which you want to export the list. The export files are downloaded or displayed depending on the browser/operating system settings. For details on the available export formats, see the General > Export Formats chapter of this manual.
- Save report: For details on saving reports, see the chapter General > Custom Reports.
Button Reset Selection
Press Reset Selection to reset all fields to their initial value.
Presence

Absences
Use the menu item Absences to display a list of all absence requests created.
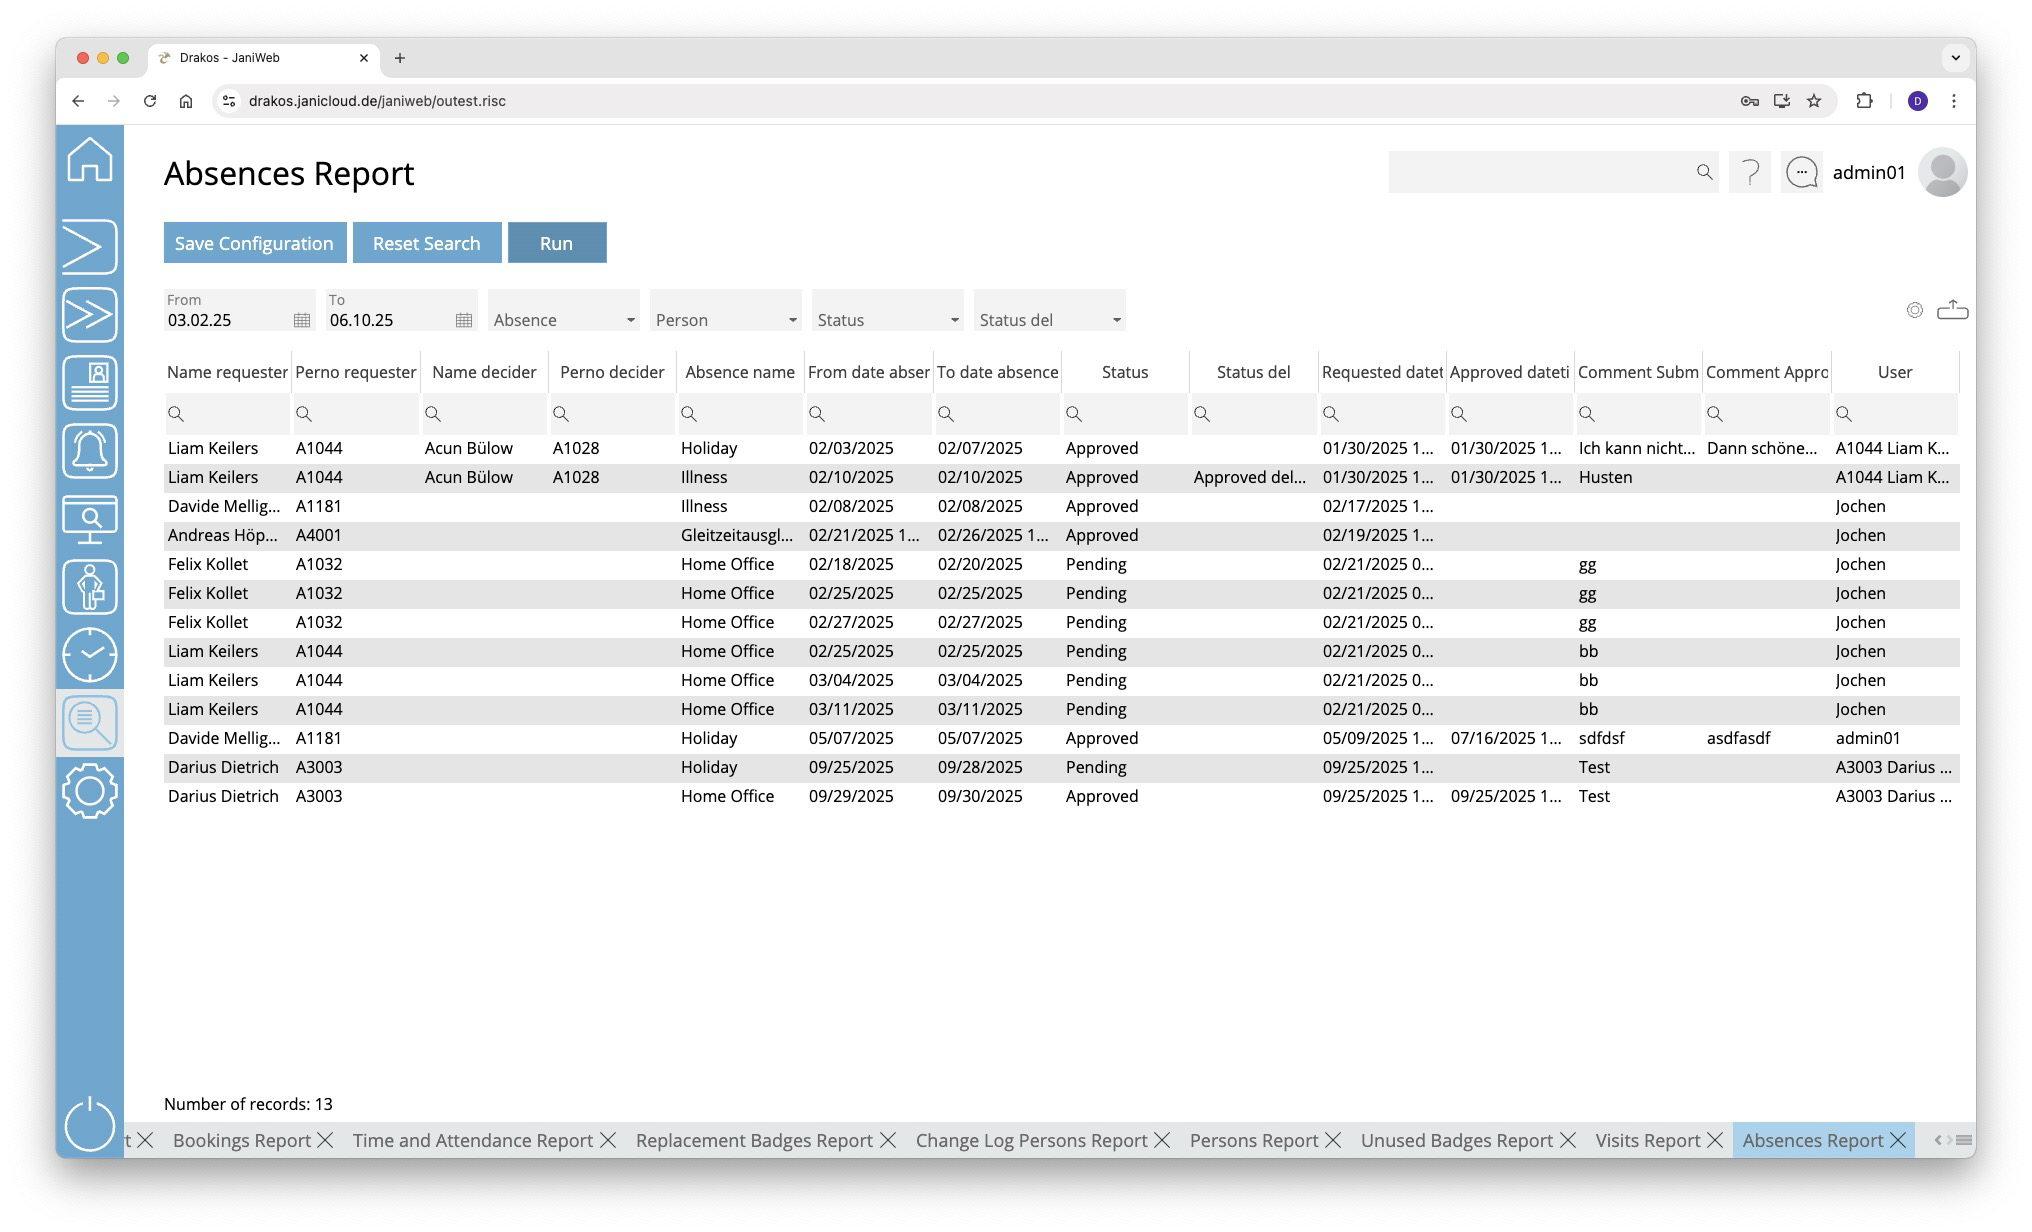
Creating the report
- Specify the time period for which you want to generate the report (From – To).
- (Optional) Use the additional fields to narrow the report.
- Press Run to start the report.
Further options with the report
- Select columns to display: Press the gear icon. Select which columns you want to display and in which order. Arrange the columns using the mouse or the arrow icons. Press Apply to adopt the changes.
- Search in columns: Enter text or numbers in the search field (magnifying glass icon) of a column to search for names, personnel numbers, or other criteria. The entries take effect immediately: the list only displays hits.
- Export the entire list: Press the download icon. Select the format in which you want to export the list. The export files are downloaded or displayed depending on the browser/operating system settings. For details on the available export formats, see the General > Export Formats chapter of this manual.
- Save report: For details on saving reports, see the chapter General > Custom Reports.
Button Reset Selection
Press Reset Selection to reset all fields to their initial value.
Qualifications
Use the menu item Qualifications to display a list of all persons with an assigned qualification, along with the qualification’s validity period.
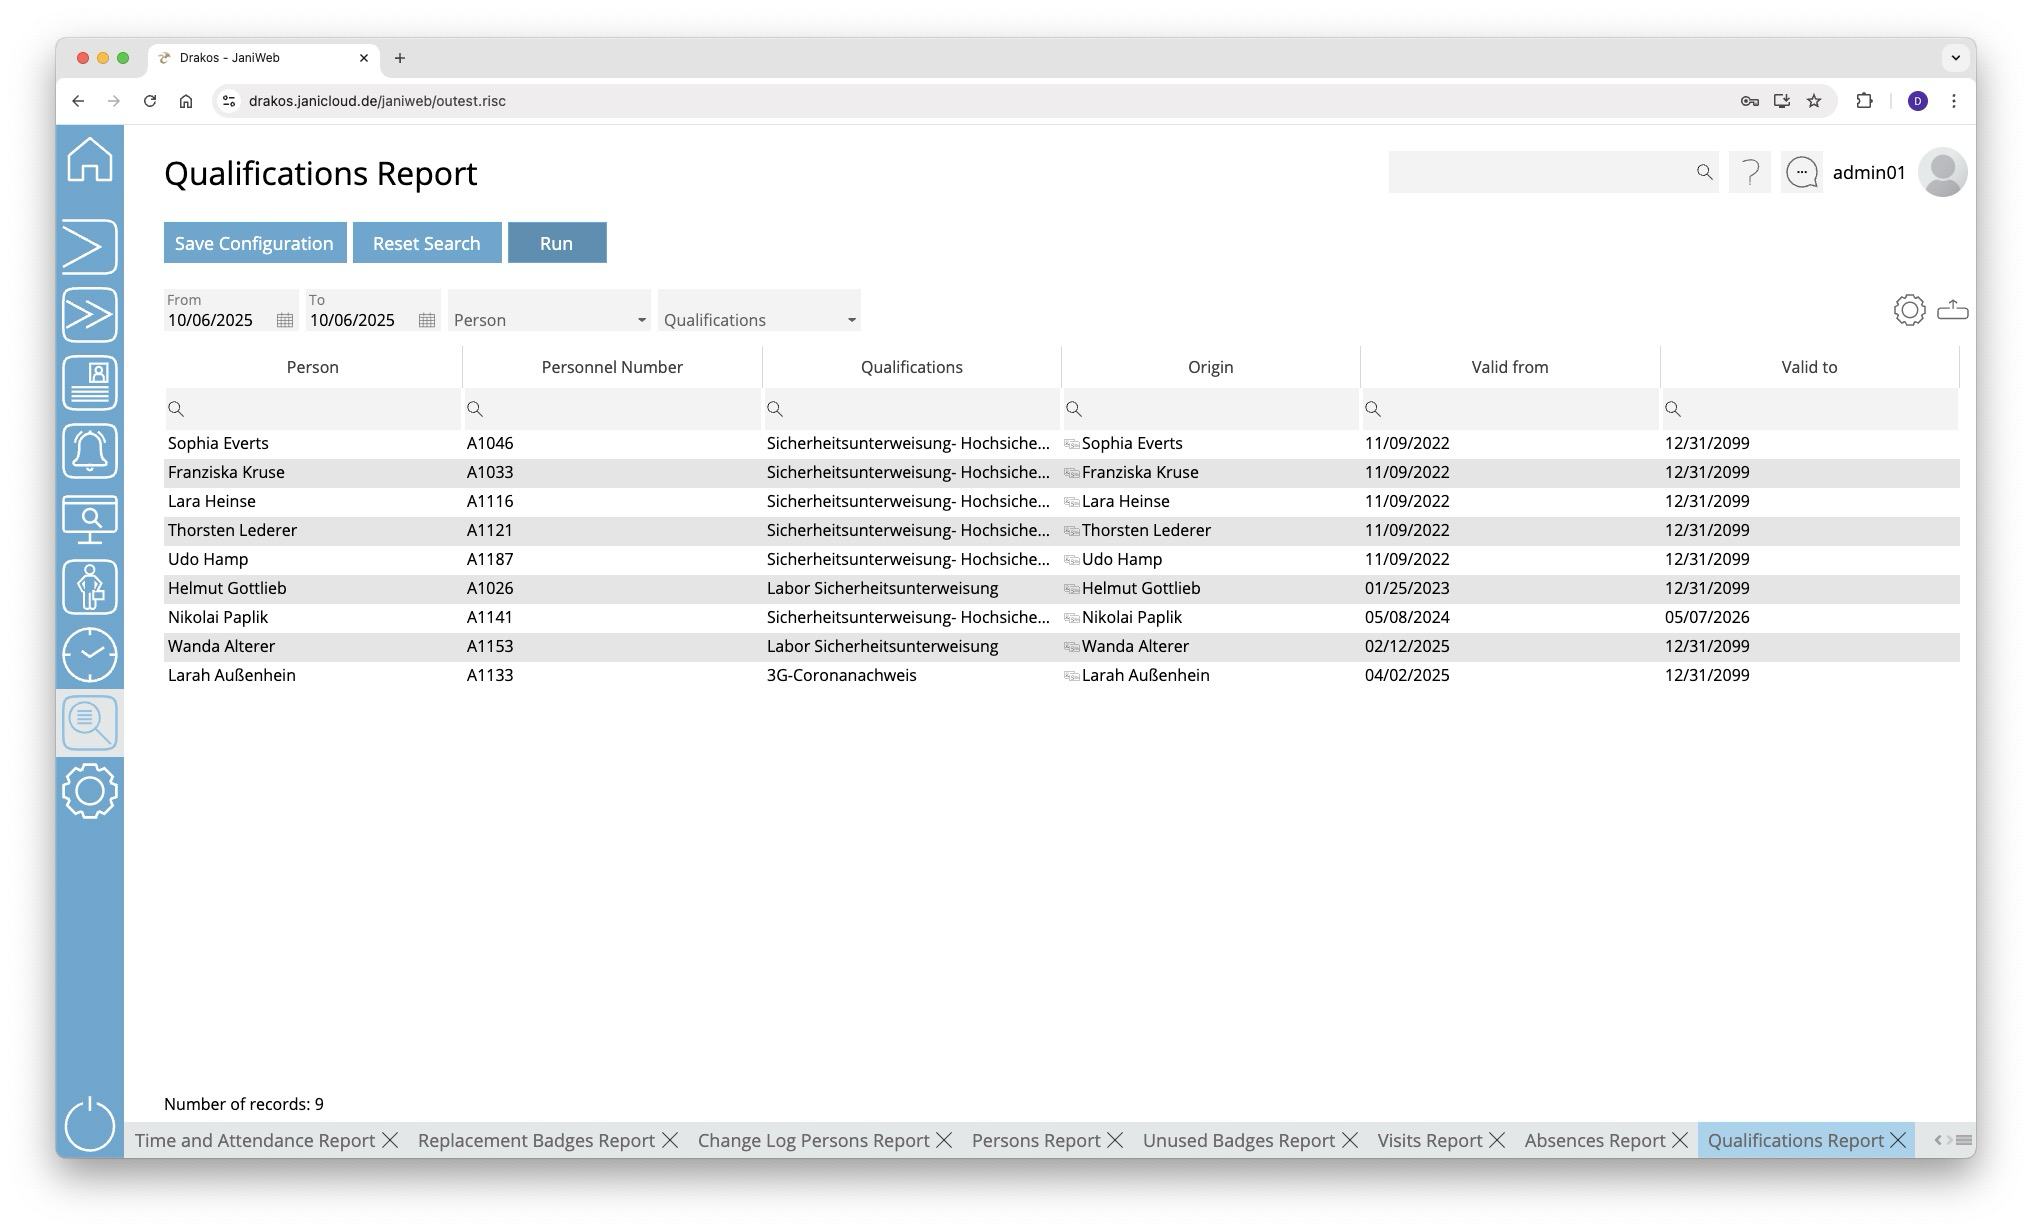
Creating the report
- Specify the time period for which you want to generate the report (From – To).
- (Optional) Use the additional fields to narrow the report.
- Press Run to start the report.
Further options with the report
- Select columns to display: Press the gear icon. Select which columns you want to display and in which order. Arrange the columns using the mouse or the arrow icons. Press Apply to adopt the changes.
- Search in columns: Enter text or numbers in the search field (magnifying glass icon) of a column to search for names, personnel numbers, or other criteria. The entries take effect immediately: the list only displays hits.
- Export the entire list: Press the download icon. Select the format in which you want to export the list. The export files are downloaded or displayed depending on the browser/operating system settings. For details on the available export formats, see the General > Export Formats chapter of this manual.
- Save report: For details on saving reports, see the chapter General > Custom Reports.
Button Reset Selection
Press Reset Selection to reset all fields to their initial value.
Alarm Scenarios
Use this menu item to output a list of events that have occurred and that are configured in alarm scenarios.
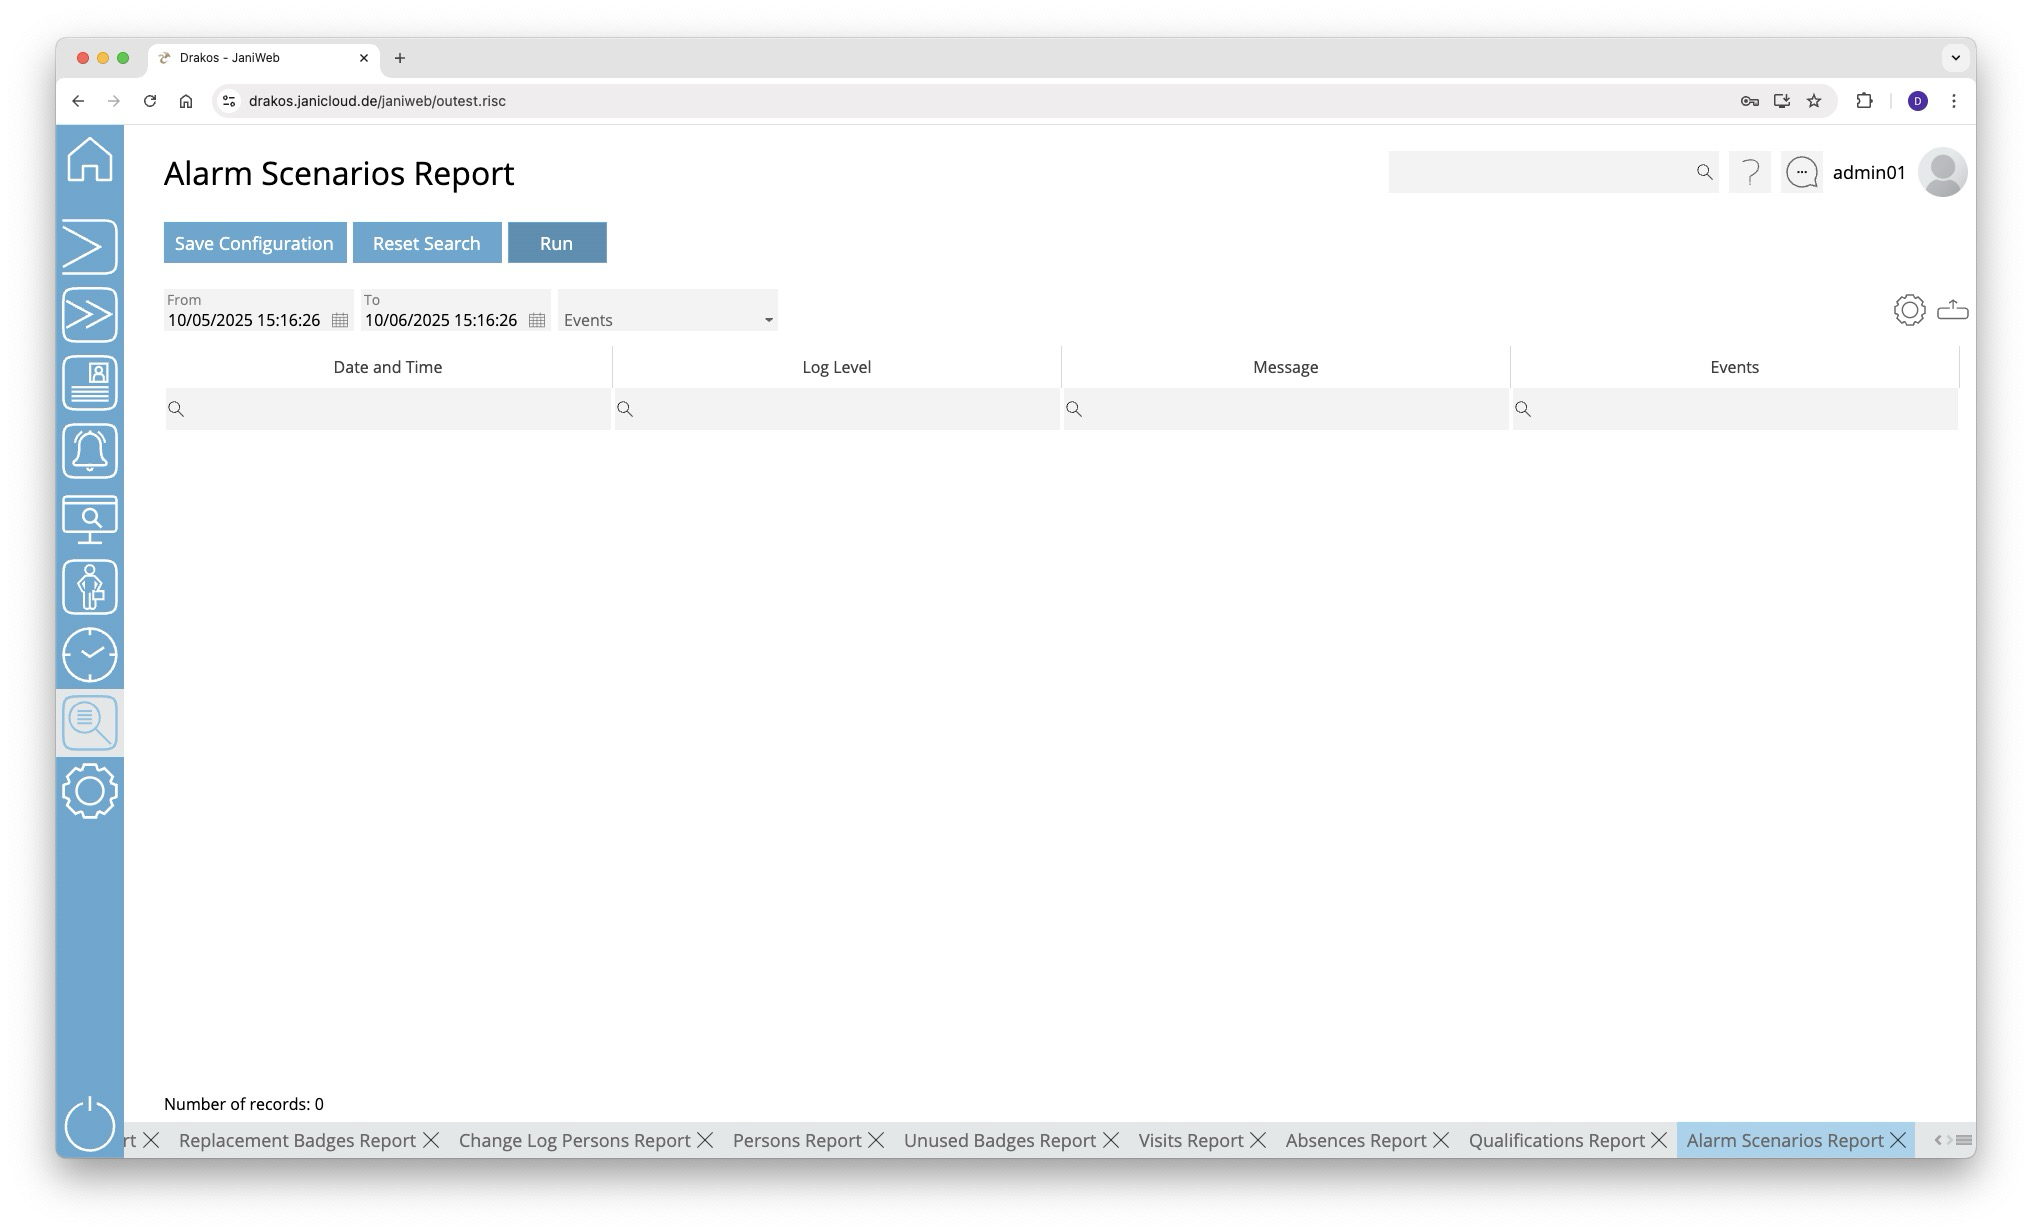
Creating the report
- Specify the time period for which you want to generate the report (From – To).
- (Optional) Use the field Events to restrict the report to specific events.
- Press Run to start the report.
Further options with the report
- Select columns to display: Press the gear icon. Select which columns you want to display and in which order. Arrange the columns using the mouse or the arrow icons. Press Apply to adopt the changes.
- Search in columns: Enter text or numbers in the search field (magnifying glass icon) of a column to search for names, personnel numbers, or other criteria. The entries take effect immediately: the list only displays hits.
- Export the entire list: Press the download icon. Select the format in which you want to export the list. The export files are downloaded or displayed depending on the browser/operating system settings. For details on the available export formats, see the General > Export Formats chapter of this manual.
- Save report: For details on saving reports, see the chapter General > Custom Reports.
Button Reset Selection
Press Reset Selection to reset all fields to their initial value.
Workflow
Scan for Bookings
Use this report, for example, to show a person a remaining time (e.g. for a smoke break) based on a booking.
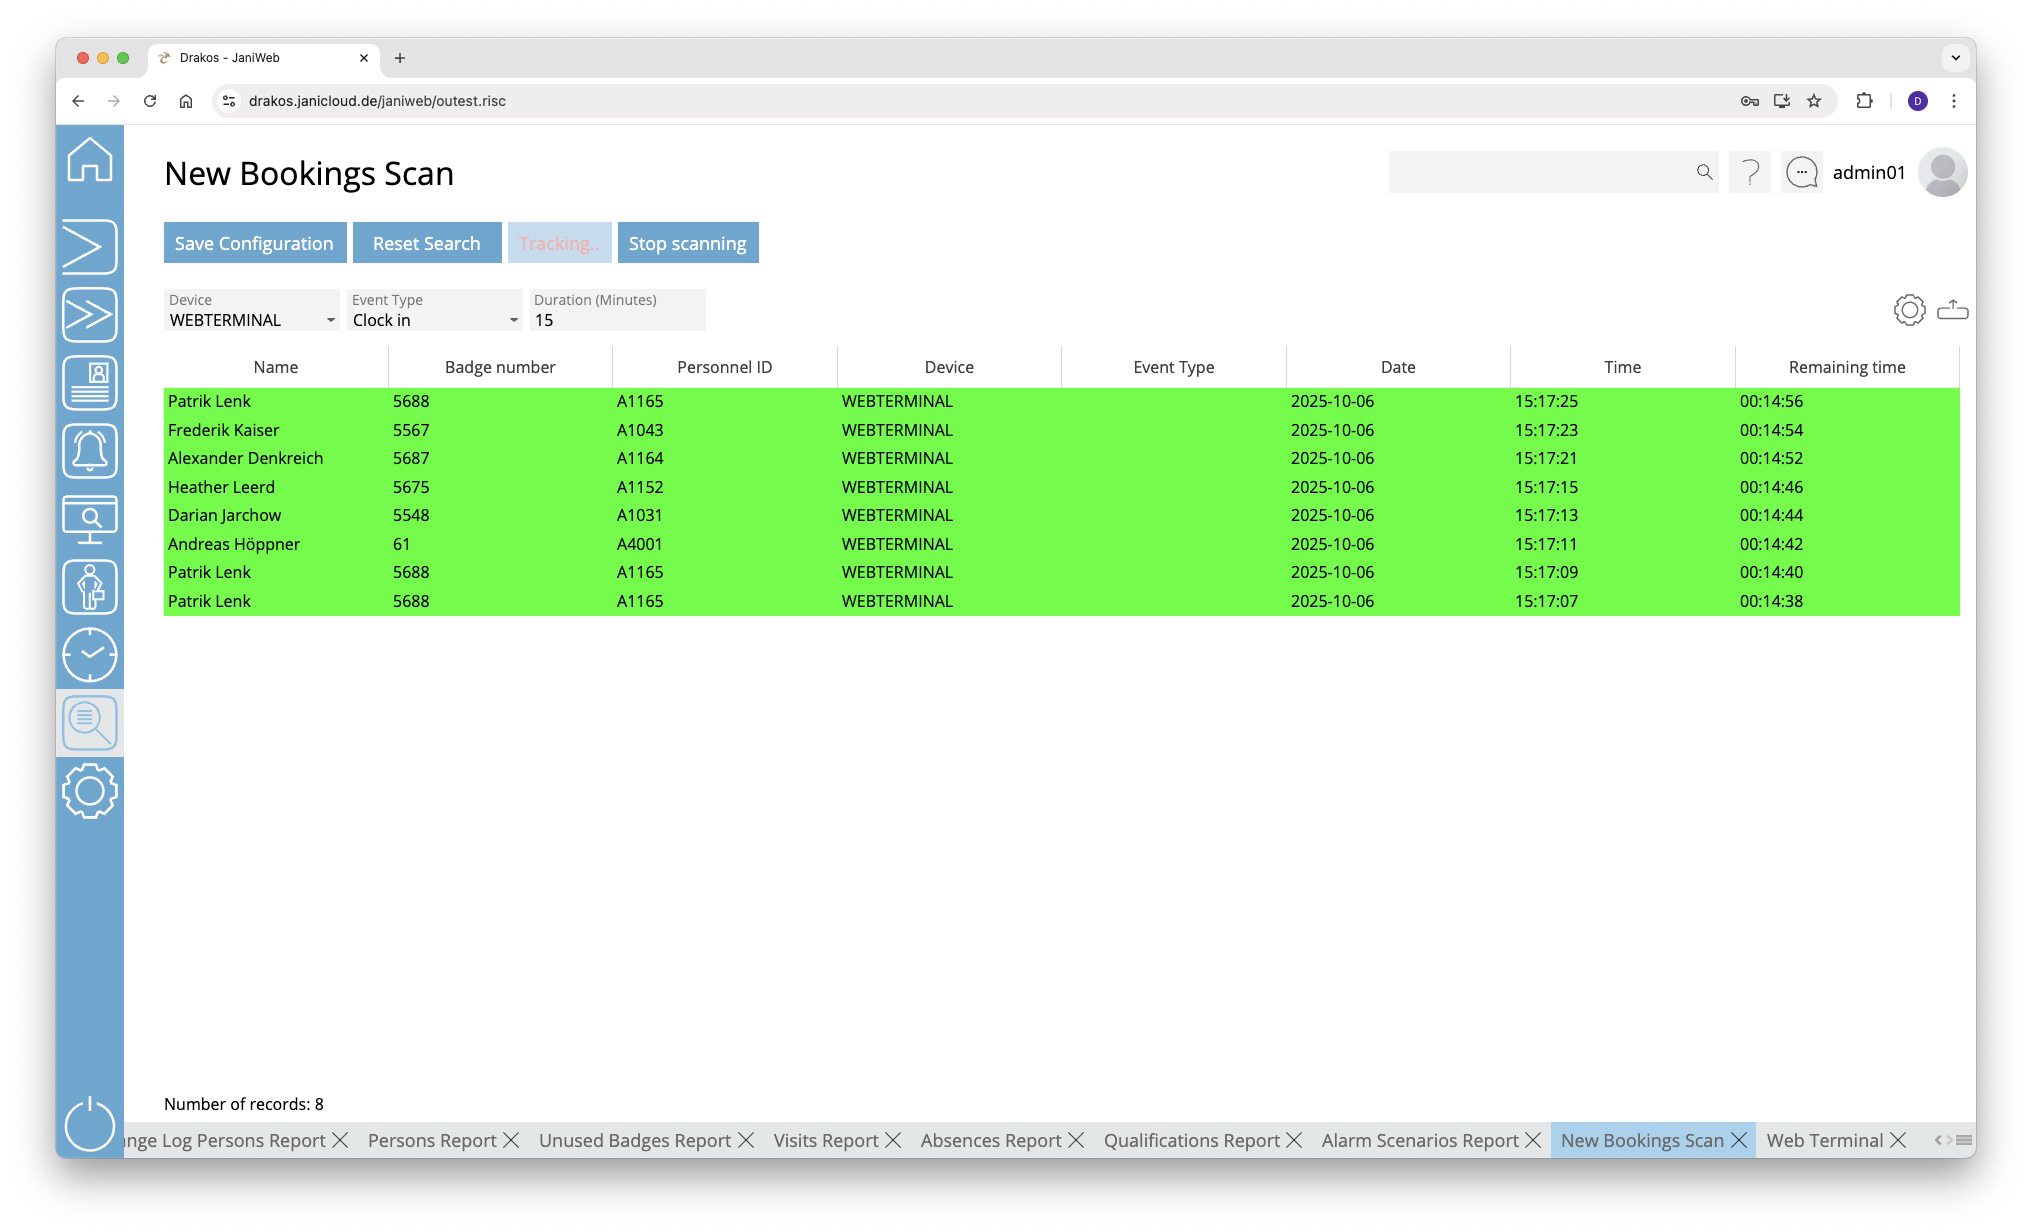
Starting a bookings scan
- Select the Device and the Event Type to be monitored.
- Enter a Duration (Minutes).
- Press Start scanning to begin monitoring bookings.
The column Remaining time shows the time remaining.
To cancel the scan, press Stop scanning.
Color-coding of bookings
- Green: The booking is within the specified time period.
- Red: The booking has exceeded the specified time period.
GDPR Users
Use this menu item to create a list of all actions that a specific user has performed in JaniWeb and to send it to one or more email addresses.

Creating the report
- Select the person for whom the report is to be created.
- Select whether the report is to be created in PDF and/or Excel format.
- Enter the email address to which the report is to be sent. Press the plus icon to enter additional email addresses.
- Press Run to send the report.
GDPR Persons
Use this menu item to create a list of all the data entered for a particular person in JaniWeb and send it to one or more email addresses.
Creating the report
- Select the person for whom the report is to be created.
- Select whether the report is to be created in PDF and/or Excel format.
- Enter the email address to which the report is to be sent. Press the plus icon to enter additional email recipients.
- Press Run to send the report.
Security Log
Use the menu item Security Log to display a list of logins to JaniWeb. Failed attempts are also logged.
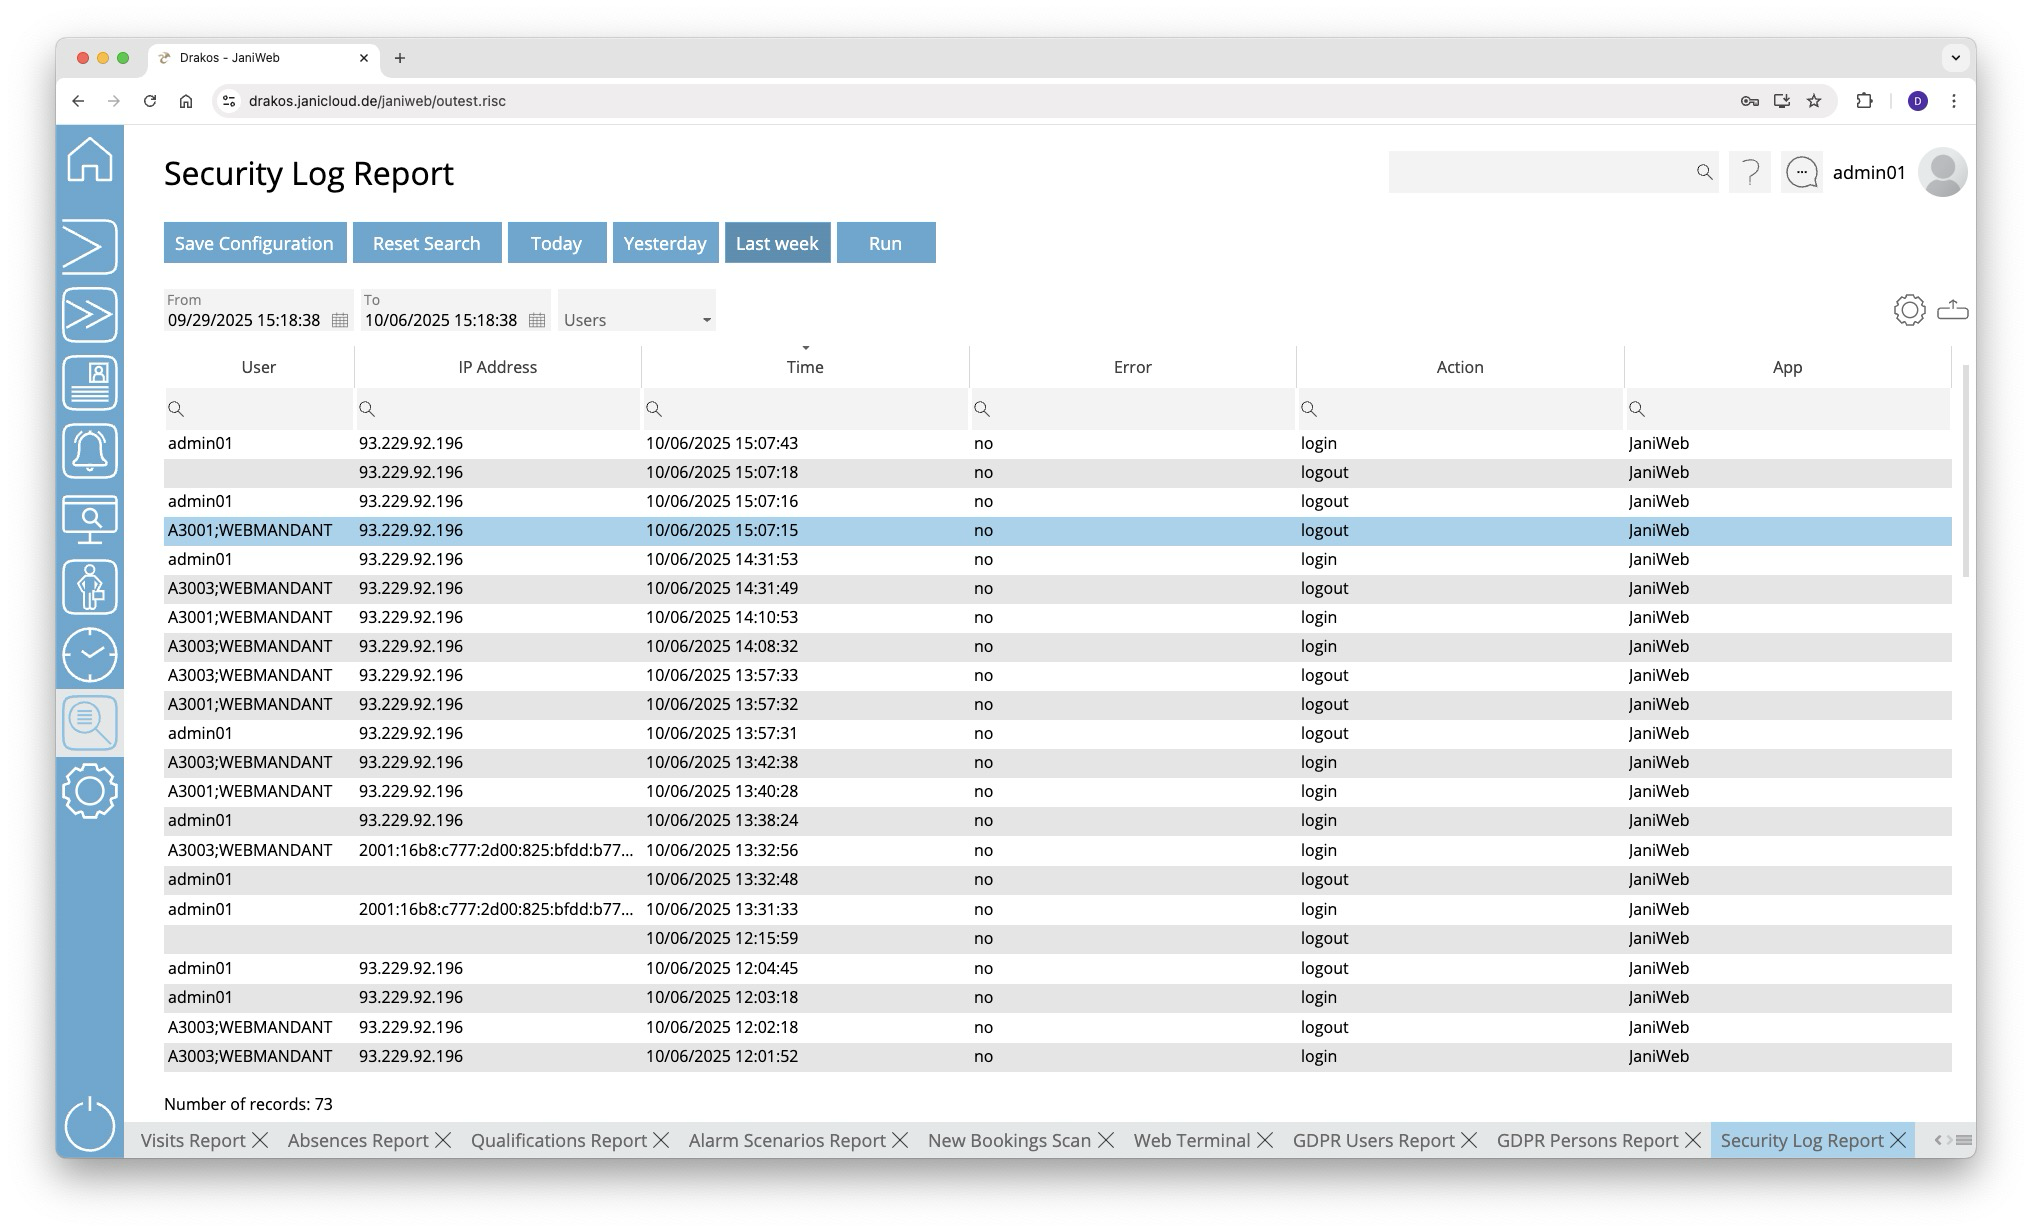
Creating the report
- Specify the time period for which you want to generate the report (From – To). Or press Today, Yesterday or Last week to quickly generate a report for the corresponding period.
- (Optional) Select the User for whom you want to generate the report.
- Press Run to start the report.
Further options with the report
- Select columns to display: Press the gear icon. Select which columns you want to display and in which order. Arrange the columns using the mouse or the arrow icons. Press Apply to adopt the changes.
- Search in columns: Enter text or numbers in the search field (magnifying glass icon) of a column to search for names, personnel numbers, or other criteria. The entries take effect immediately: the list only displays hits.
- Export the entire list: Press the download icon. Select the format in which you want to export the list. The export files are downloaded or displayed depending on the browser/operating system settings. For details on the available export formats, see the General > Export Formats chapter of this manual.
- Save report: For details on saving reports, see the chapter General > Custom Reports.
Button Reset Selection
Press Reset Selection to reset all fields to their initial value.
Employee Logins
Use this menu item to determine which persons were logged into JaniWeb during a specific period and which were not.
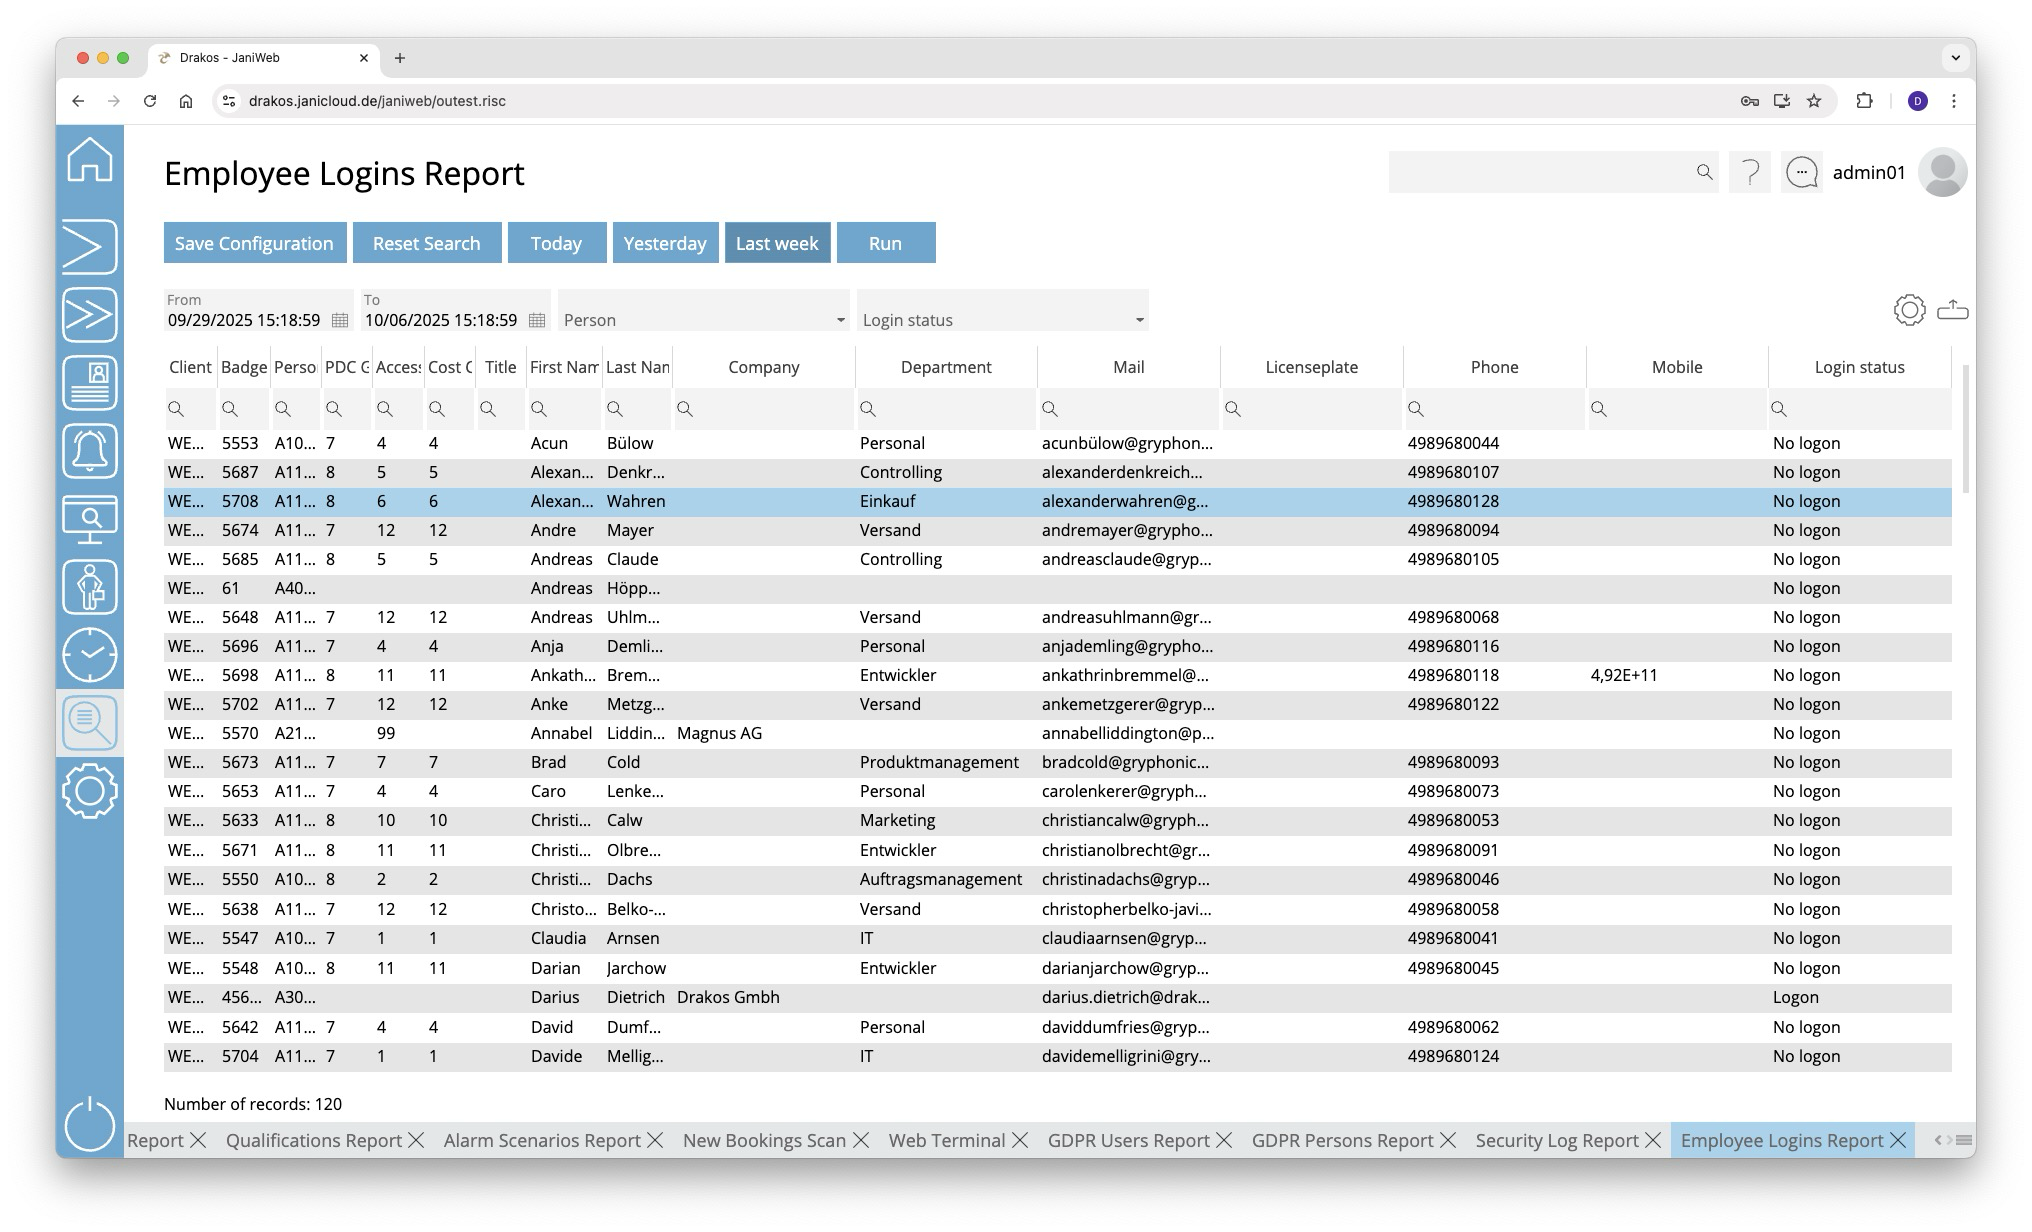
Creating the report
- Specify the time period for which you want to generate the report (From – To). Or press Today, Yesterday or Last week to quickly generate a report for the corresponding period.
- (Optional) Select a Person and/or a Login status to narrow the report.
- Press Run to start the report.
Further options with the report
- Select columns to display: Press the gear icon. Select which columns you want to display and in which order. Arrange the columns using the mouse or the arrow icons. Press Apply to adopt the changes.
- Search in columns: Enter text or numbers in the search field (magnifying glass icon) of a column to search for names, personnel numbers, or other criteria. The entries take effect immediately: the list only displays hits.
- Export the entire list: Press the download icon. Select the format in which you want to export the list. The export files are downloaded or displayed depending on the browser/operating system settings.For details on the available export formats, see the General > Export Formats chapter of this manual.
- Save report: For details on saving reports, see the chapter General > Custom Reports.
Button Reset Selection
Press Reset Selection to reset all fields to their initial value.
Server Log
Use the menu item Server Log to display a list of all system events.
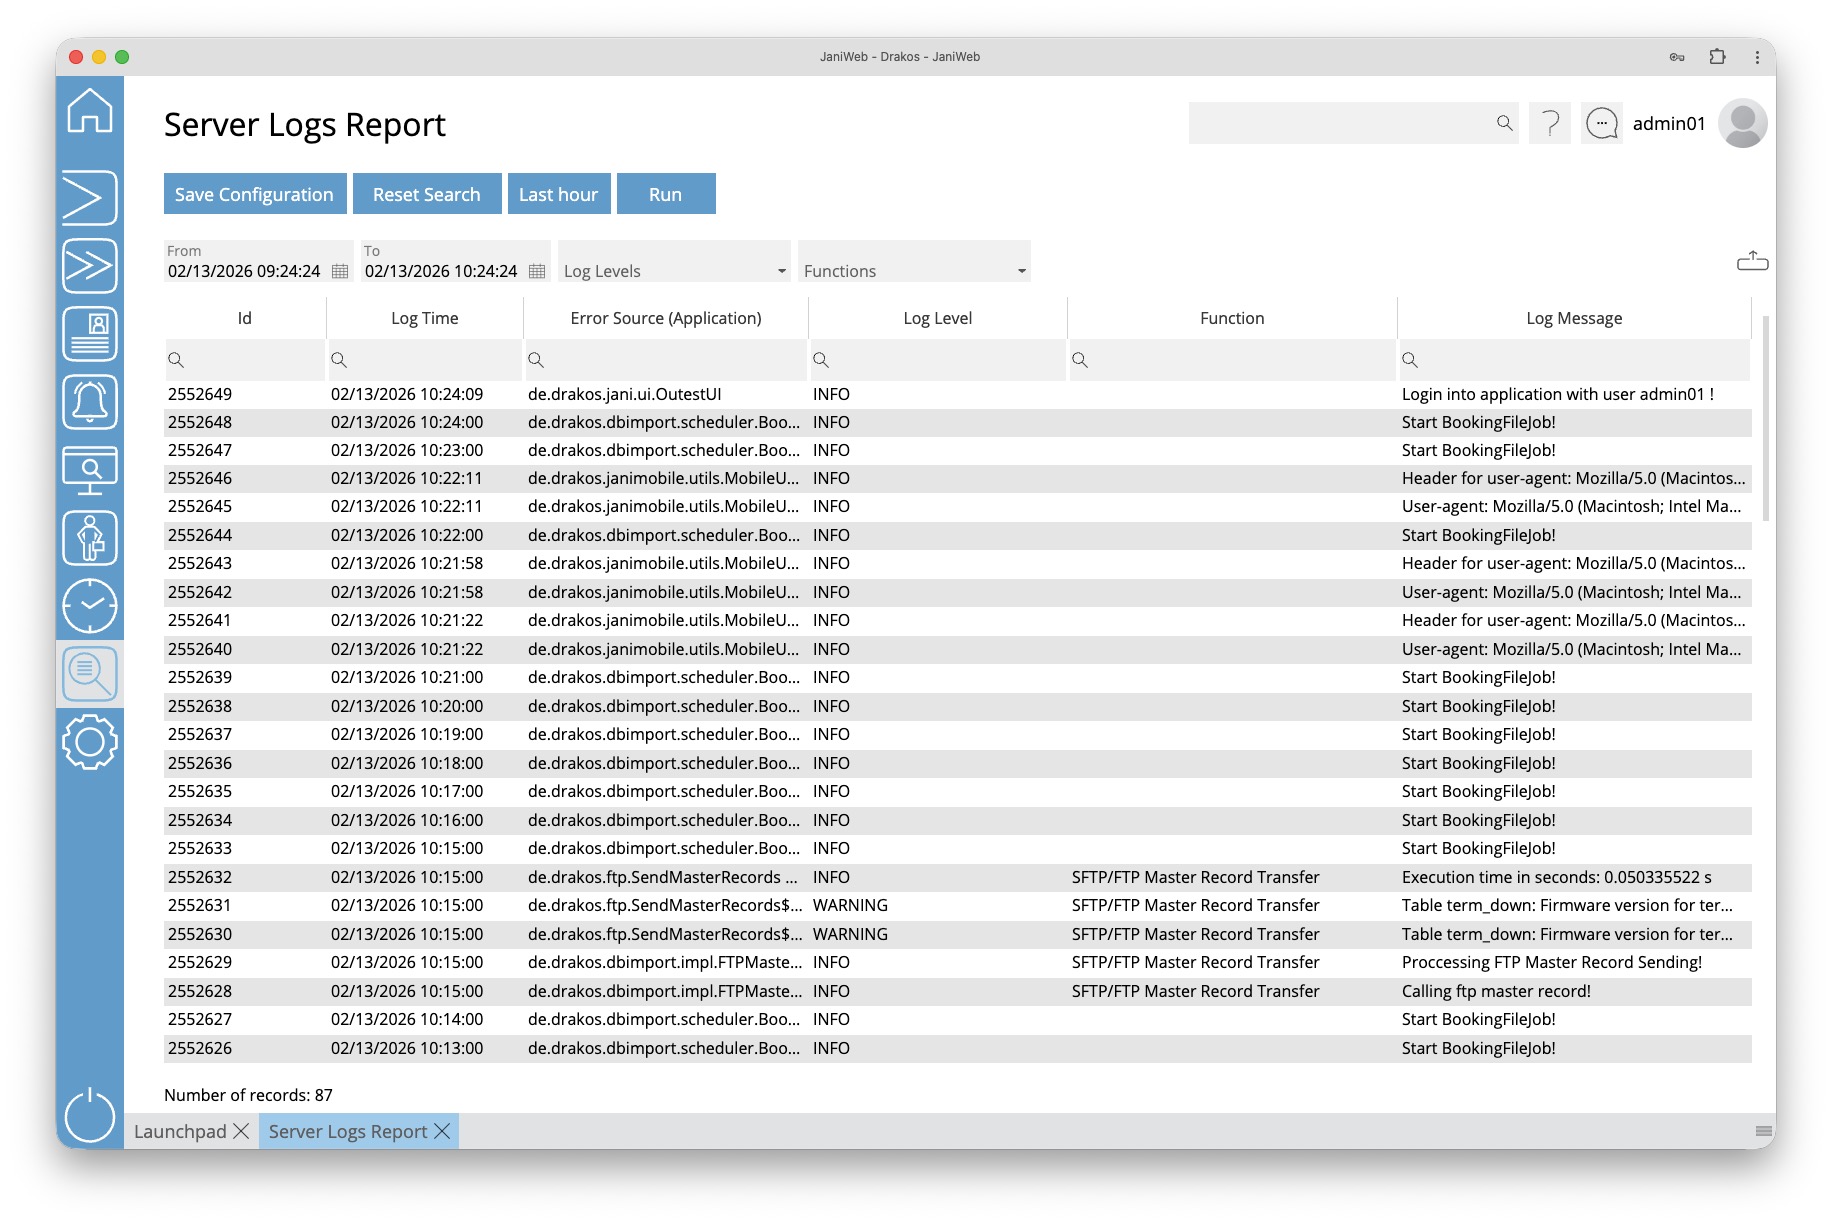
Creating the report
- Specify the time period for which you want to generate the report (From – To). Or press Last hour to quickly generate a report for the last hour.
- (Optional) Select one or more Log Levels to narrow the report.
- (Optional) Select one or more Functions to narrow the report.
- Press Run to start the report.
Further options with the report
- Search in columns: Enter text or numbers in the search field (magnifying glass icon) of a column to search for names, personnel numbers, or other criteria. The entries take effect immediately: the list only displays hits.
- Export the entire list: Press the download icon. Select the format in which you want to export the list. The export files are downloaded or displayed depending on the browser/operating system settings. For details on the available export formats, see the General > Export Formats chapter of this manual.
- Save report: For details on saving reports, see the chapter General > Custom Reports.
Button Reset Selection
Press Reset Selection to reset all fields to their initial value.
Zone Lists
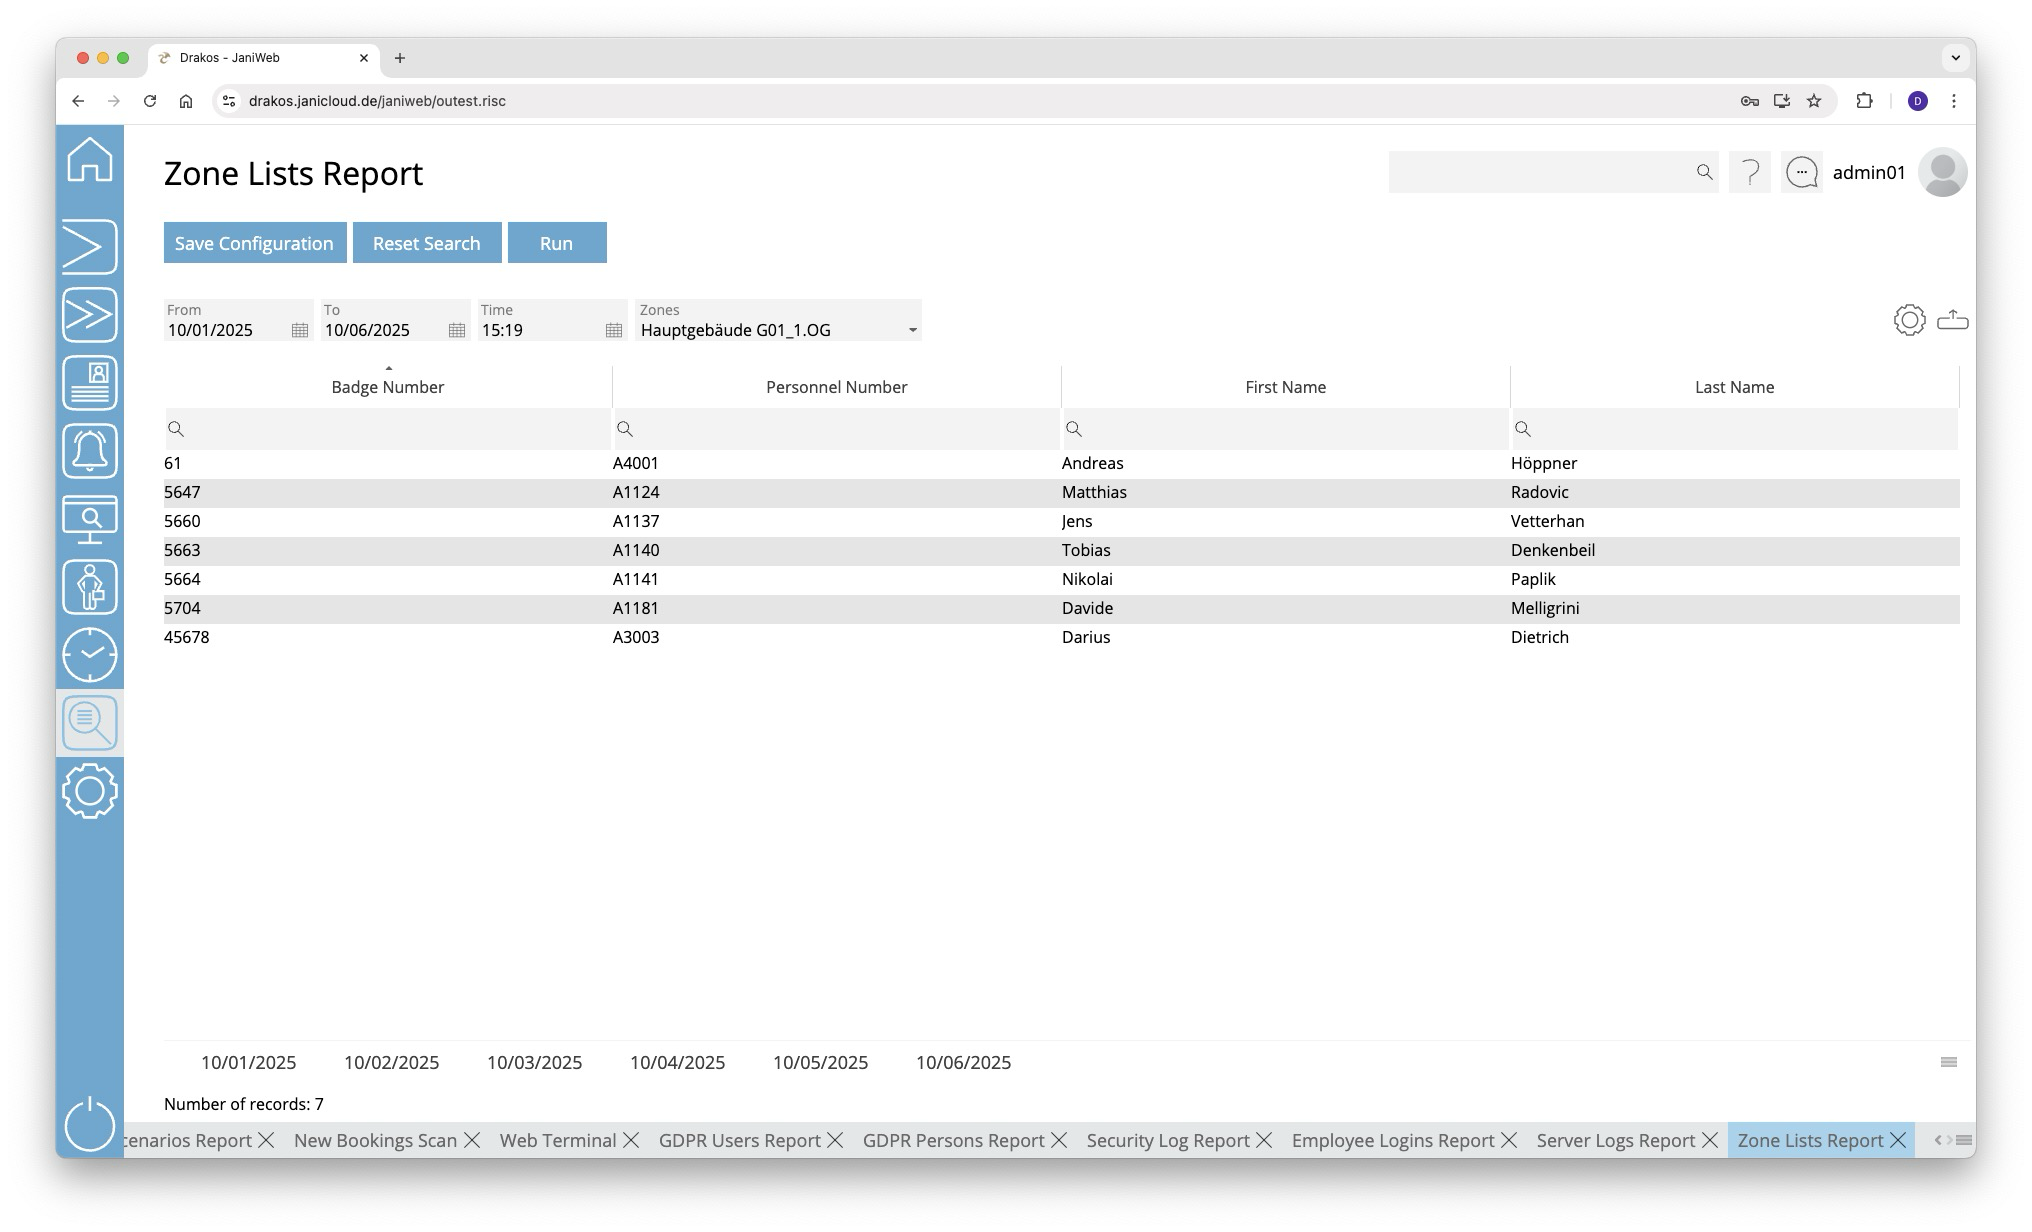
Creating the report
-
Enter the period for which you want to generate the report using the From and To fields.
-
Then, specify the time in the Time field for which you want to generate the report.
- Select the zone for which you want to generate the report.
- Click Run to start the report generation.
- Below the report results, a tab is displayed for each day within the selected period. Each tab shows the status of the zone for the corresponding date.
Further options with the report
- Select columns to display: Press the gear icon. Select which columns you want to display and in which order. Arrange the columns using the mouse or the arrow icons. Press Apply to adopt the changes.
- Search in columns: Enter text or numbers in the search field (magnifying glass icon) of a column to search for names, personnel numbers, or other criteria. The entries take effect immediately: the list only displays hits.
- Export the entire list: Press the download icon. Select the format in which you want to export the list. The export files are downloaded or displayed depending on the browser/operating system settings. For details on the available export formats, see the General > Export Formats chapter of this manual.
- Save report: For details on saving reports, see the chapter General > Custom Reports.
Would you like to automatically receive regular updates about which individuals are present in a specific zone? Then you can use the Periodic Sending feature. You can find instructions on how to set it up here: General > Custom Reports.
Button Reset Selection
Press Reset Selection to reset all fields to their initial value.
Quiz Report
You can use the Quiz Report menu item to evaluate which individuals passed or failed which quizzes.
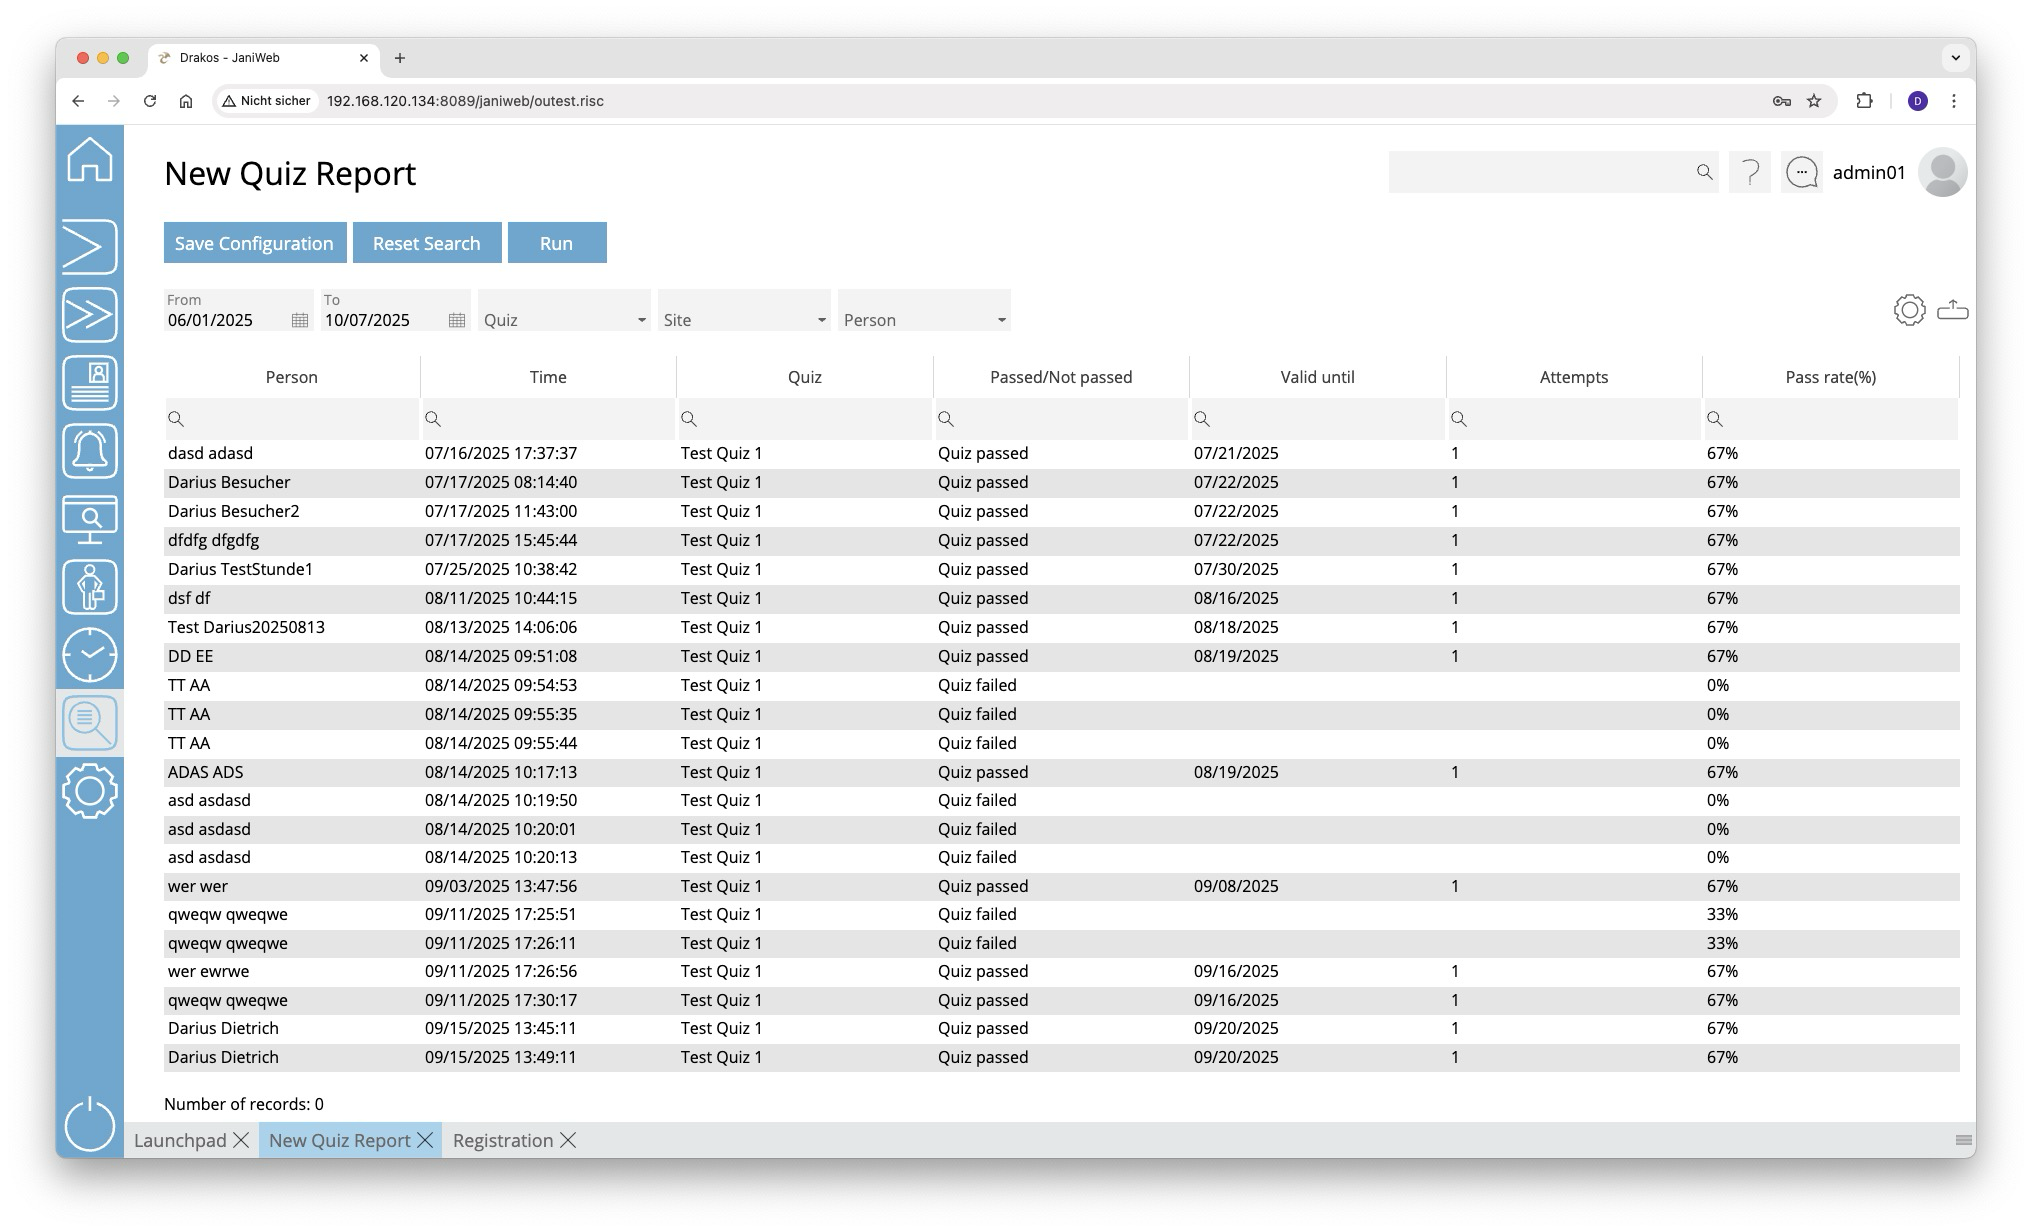
Creating the report
- Specify the time period for which you want to generate the report (From – To).
- (Optional) Use the additional fields to narrow the report.
- Press Run to start the report.
Further options with the report
- Select columns to display: Press the gear icon. Select which columns you want to display and in which order. Arrange the columns using the mouse or the arrow icons. Press Apply to adopt the changes.
- Search in columns: Enter text or numbers in the search field (magnifying glass icon) of a column to search for names, personnel numbers, or other criteria. The entries take effect immediately: the list only displays hits.
- Export the entire list: Press the download icon. Select the format in which you want to export the list. The export files are downloaded or displayed depending on the browser/operating system settings. For details on the available export formats, see the General > Export Formats chapter of this manual.
- Save report: For details on saving reports, see the chapter General > Custom Reports.
Button Reset Selection
Press Reset Selection to reset all fields to their initial value.
Device Events
You can view a list of device events via the Device Events menu option. This allows you to determine which device sent a message at a specific time.
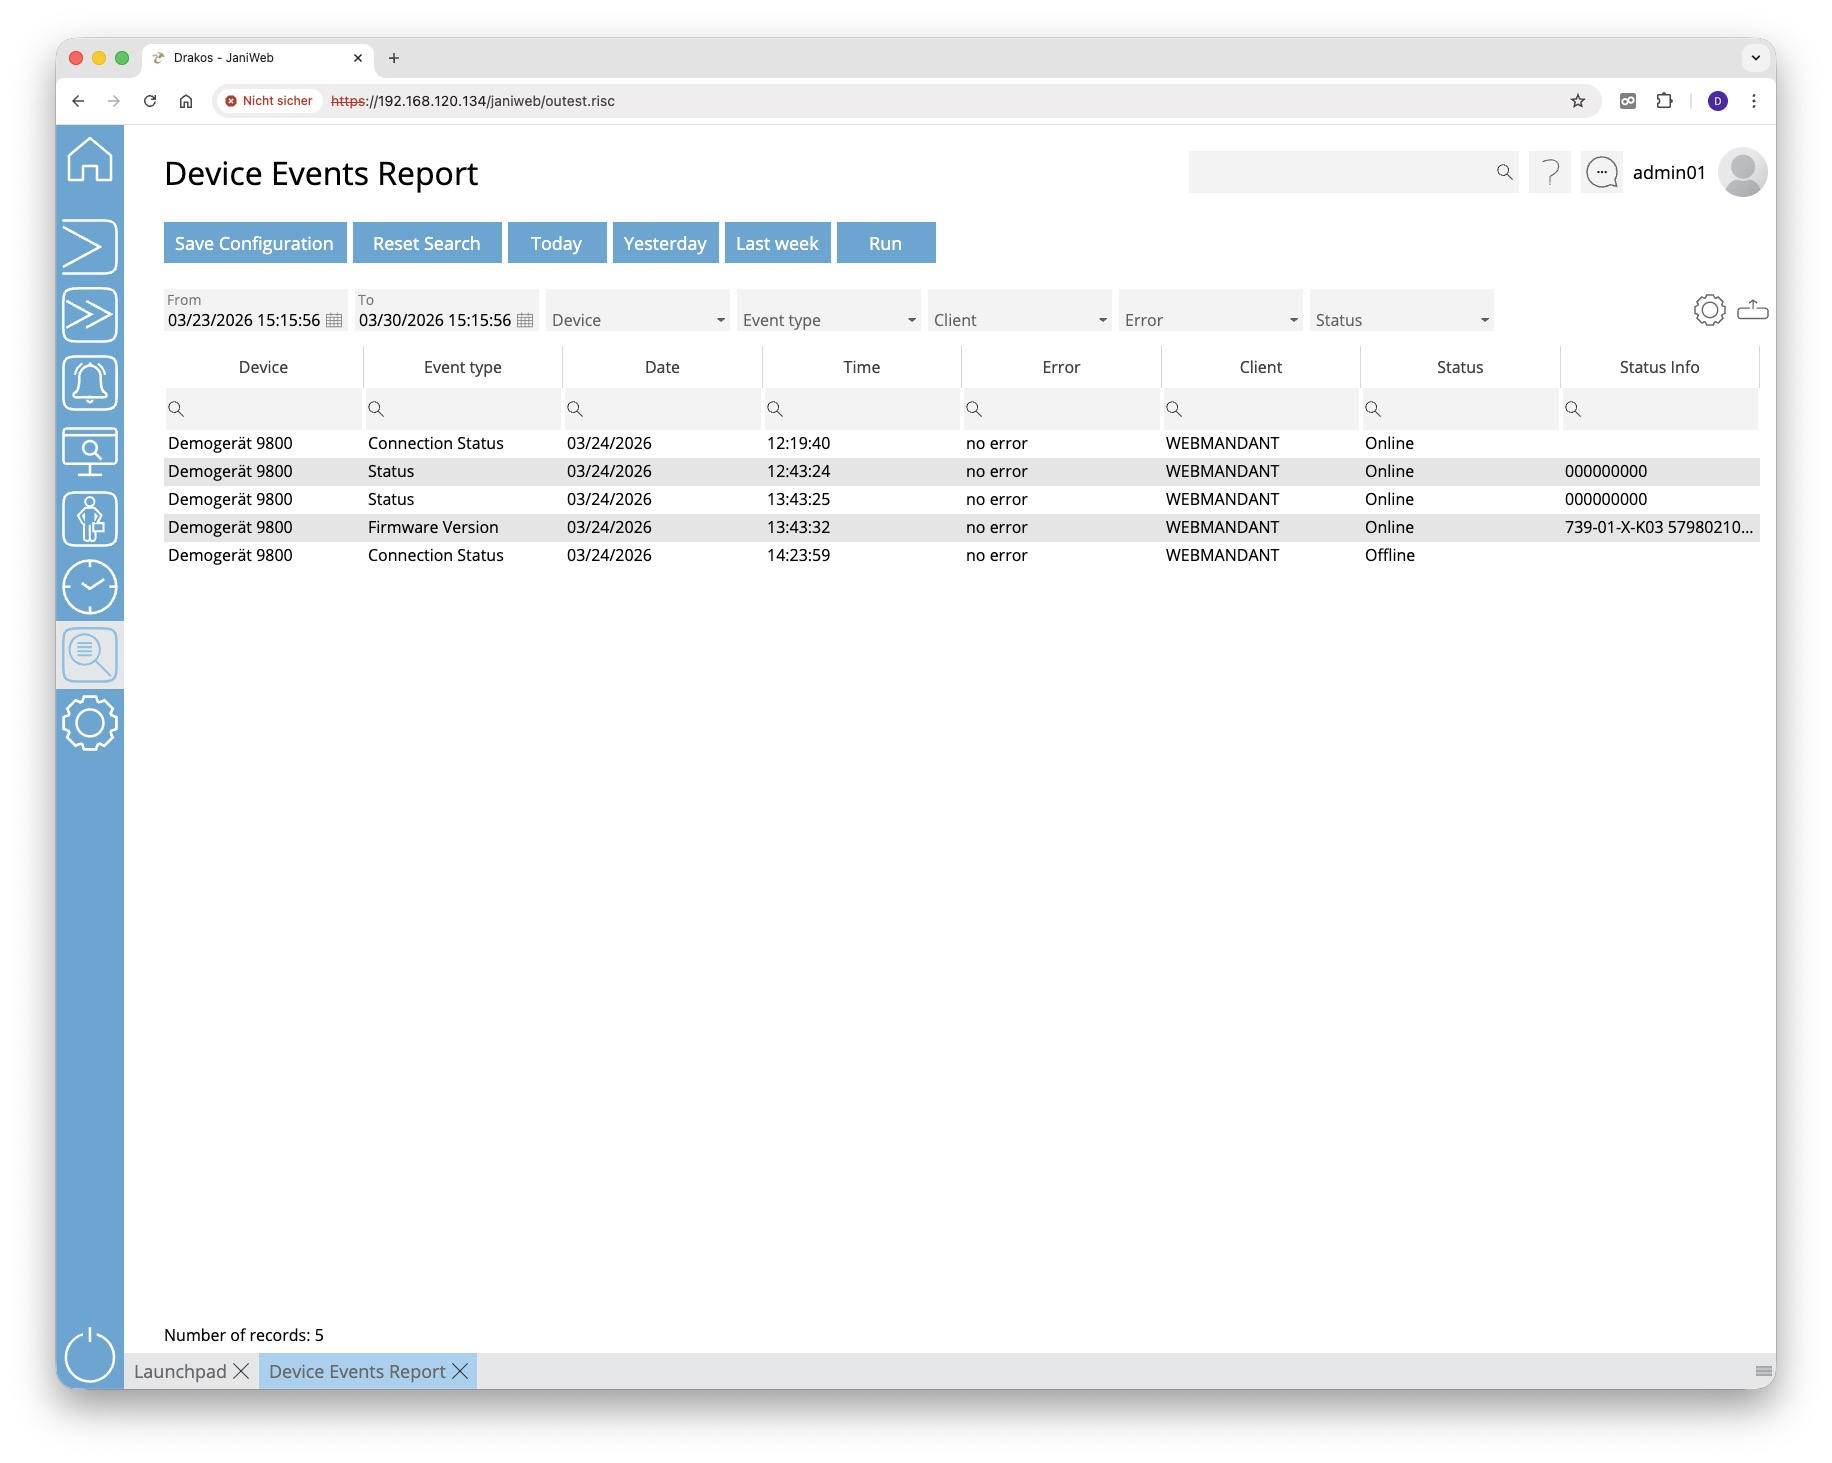
Creating the report
- Specify the time period for which you want to generate the report (From – To). Or press Today, Yesterday or Last week to quickly generate a report for the corresponding period.
- (Optional) Use the additional fields to narrow the report.
- Press Run to start the report.
Further options with the report
- Select columns to display: Press the gear icon. Select which columns you want to display and in which order. Arrange the columns using the mouse or the arrow icons. Press Apply to adopt the changes.
- Search in columns: Enter text or numbers in the search field (magnifying glass icon) of a column to search for names, personnel numbers, or other criteria. The entries take effect immediately: the list only displays hits.
- Export the entire list: Press the download icon. Select the format in which you want to export the list. The export files are downloaded or displayed depending on the browser/operating system settings. For details on the available export formats, see the General > Export Formats chapter of this manual.
- Save report: For details on saving reports, see the chapter General > Custom Reports.
Button Reset Selection
Press Reset Selection to reset all fields to their initial value.
Settings
Basic Settings
Use the menu item Basic Settings to access all of JaniWeb’s general settings.
Changes made here may affect the application itself or its interfaces. Please only make changes here that you have discussed with your contact person.

Tab Clients
This is where you manage different clients in the system. Clients describe the origin of the data and are linked to the objects (e.g. persons, devices, device groups, etc.). The list contains the clients that have already been created. Select an entry to view details.
Press New to create a new client. Enter the required data and press Save.
Detail area
- ID: Enter the 10-digit client ID.
- Description: Enter a meaningful name.
- Visitor Client: Select this option if the client is to be used for visitor management.
- SAP Client: This field is automatically filled when importing data from SAP.
- BS_DIR: Specify the base directory of the application here.
- Folder: Specify the name of the SAP exchange directory here.
- Control Management File Path: In the field Control Management File Path, enter the directory in which parameter files for devices from the manufacturer Dormakaba are to be stored when they are created using control management. - this setting is applied only to devices for the connected client.
- terminal.localfile: Enter the directory for the trigger file that triggers the creation of the terminal.ini file.- this setting is applied only to devices for the connected client.
- terminal.parameter: Enter the directory in which parameter files for devices from the manufacturer Dormakaba are to be stored. - this setting is applied only to devices for the connected client.
Tab License
Here you can see which license you are using.
Tab Configuration
You can import a new license via the License Key field. Enter the new license key and press the Update License button.
The list displays the features that are currently licensed.
Tab Monitoring
Any features whose use is restricted are displayed here together with their level of use.
If required, activate the option Alert for license violation for all users and enter a note.
Tab Pay Per Use
Use the Due Date field to specify the day of the month on which the E-Mail for pay-per-use consumption should be generated. Consumption is always calculated for the previous month.
Enter the recipient's email address in the E-Mail field. You can delete this using the trash can button or add additional E-Mail addresses using the + button.
You can manually trigger the sending of the E-Mail using the Send E-Mail button. Then select the billing period for which you want to generate the email and confirm with the Send E-Mail button.
You can check the status of the last email sendings using the Show Log button.
Tab Password Rules
Specify the strength of the passwords used. Enter the minimum Password length and select the desired options for the composition of passwords.
- Failed attempts: Specify here after how many failed login attempts the user is blocked.
- Password expiration: Specify here after how many days users are prompted to enter a new password. Enter the number 0 if passwords should be valid indefinitely.
Tab GDPR
Specify the number of days after which expired records are automatically deleted. This is also possible for the server log files.
Tab SAP Settings
Specify the number of days for which the backups of the SAP import files should be kept. You can also specify the file name for exported bookings.
- PTEX …: Use these fields to define the file name and the client for deleted bookings.
- Enable API Gateway Data Import: Activate this option to enable importing master data via the API gateway.
- Enable API Gateway Data Export: Activate this option to enable exporting master data via the API gateway.
- Threshold person import (%): Use this field to set the threshold value for the import of persons. If the current import of persons falls below the threshold value (comparison with the number of persons from the last import), the import is rejected. You can use the Import anyway button to import a rejected import anyway. If the number of persons for import remains unchanged for 5 consecutive days, the persons will be imported on the 5th day.
Tabs General / Balance Data
Use these tabs to map the fields of an imported SAP record to the fields in JaniWeb.
Tab Database
Connection and other status information for the databases used is displayed here.
- Press Show function status to display a list of the functions used for all databases in a pop-up window.
- Press Show procedure status to display a list of the procedures used for all databases in a pop-up window.
Information about the version of a function or procedure can be found in the column Comment.
Tab Holiday Calendar
Press New to create a new holiday calendar. Enter an ID and a Description. Use the respective trash icon to delete a holiday calendar.
Tab Event Types
This is where you can specify the event types that should be available at the terminals. The event types are also used for the web terminal. For each booking type, specify whether the booking is triggered by the device itself or by a person (e.g. clock-in, clock-out).
To set the Text for a event type, press Translate. Enter the names for the respective languages and press Save.
With the Booking Type column you can select whether the booking marks the person as present or absent (this is particularly important for calculating working hours in the Overview Bookings menu item).
Use the respective trash icon to delete a event type.
Tab Document Types
This is where you can manage the document types that are available for selection on the tab Documents in the personal master data.
Tab General
This is where you can define which areas and tiles should be preset in the launchpad.
- Background image: Here you can upload a background image that will be displayed in the login screen.
- Logo: Here you can upload a logo that will be displayed in the login screen.
- All Tiles: Select this option to display all menu items as tiles on the launchpad by default.
- Info text / Info mail address: Enter the text and email address that will be displayed in the info area (accessible via the user icon in the top right > Info).
- Image Aspect Ratio: Define the aspect ratio (width:heigth) for images added in the menu items Persons/Visitors (e.g. 4:3, 16:9).
Area Launchpad Areas
Create areas here that will appear by default on the launchpad.
- Press Add to create a new area.
- To set the Text for an area, press Translate. Enter the names for the respective languages and press Save.
- Enter a number in the Sequence column to determine the sequence in which the areas are displayed.
Area Visible Tiles
Create tiles here that are linked to a PDF or link. When the tile is pressed, the PDF or linked page opens.
To set the Text and the Description for a tile, press Translate. Enter the names for the respective languages and press Save.
Tab Login
Specify here how users login.
Area Username and Password
If your system does not use LDAP login, you can assign fields from the HR master record as the Username and Password.
- Username: Select the desired field from the personnel master record (for example, Personnel No.).
- Password: Select the desired field from the personnel master record (e.g. Personal PIN).
Select Own Password if the user should be able to set their own password. The user receives an Initial Password for the first login. Select a field from the personnel master record in the field of the same name.
Forgotten passwords can be reset. To do this, remove the corresponding entry from the list. The user must then login again with their initial password.
Area Login Restrictions
Here you can specify which persons are allowed to login to JaniWeb.
- Criterion: Select the database field that is used to check the login authorization.
- Filter: Enter values separated by semicolons for users who are not allowed to login.
- Whitelist: Press this button to enter IP addresses and DNS names of all clients from which the kiosk application, for example, may be accessed.
Tab Properties
This is where you make settings for the SMTP server, LDAP connection, database backup, and SAP exchange directory. Any changes made here require a restart of the Tomcat server.
Area Device Master Record Calculation
- Enable FTP/SFTP for Master Record Dispatch: Use this option to specify that master data is to be transferred to devices from the manufacturer Dormakaba using FTP/SFTP.
- BPA9 Fallback: Specify an alternative method here for when transmission to a device via FTP/SFTP is not possible (e.g. for older devices).
- Select Server File System if the master data file is to be created in a directory on the server.
- Select Network Directory if the master data file is to be stored in a network directory via SFTP.
- Press Base supply to recalculate all master data and send it to the devices.
- Trigger File Master Record Calculation : Enter the path for the trigger file that is to be created after the master data calculation. If no file is to be created, the field can be left empty.
Area Device Models
Specify the various device types that can be selected in the menu Devices.
Area Login
Specify here the required settings for logging in via LDAP or SSO.
- If Type SSO is selected
- If Type LDAP is selected
- ldap_host: IP address of the LDAP server
- ldap_port: Port of the LDAP server
- ldap_user: Enter the full Distinguished Name (DN) for the LDAP user to search the Active Directory (AD) with.
- ldap_pwd: Password of the LDAP user
- ldap_base_dn: Enter the AD directories to be searched (separate multiple directories with commas).
- ldap_field: Enter the LDAP field that is to be compared with the system field ldap_person_table (hrcc1dnperso01, hrcc1dnbalan01, hrcc1dnperso01_data_relation) and ldap_person_field in order to assign the correct person.
- ldap_object_catergory: Enter the AD field to be searched for the permissions assigned in the roles under LDAP Group.
- using_ssl: Activate this option if SSL is to be used for the connection (LDAPS).
- ignore_leading_0: Activate this option if leading zeros are to be ignored when matching the ldap_field.
Area Email
Here you define the access data for the SMTP server used.
- If Authentication Type Basic Authentication is selected
- smtp_username: Enter the user name.
- smtp_password: Enter the password.
- smtp_server: Enter the server address of the SMTP server.
- smtp_port: Enter the port of the SMTP server.
- If Authentication Type OAuth2 is selected
-
smtp_oauth2_tenant_id: Microsoft tenant ID
-
smtp_oauth2_client_id: client ID of the registered application
-
smtp_oauth2_client_secret: application’s secret key
-
smtp_oauth2_token_endpoint: URL to obtain OAuth 2.0 tokens (https://login.microsoftonline.com/{tenant-id}/oauth2/v2.0/token)
-
smtp_oauth2_scope: requested permissions (https://graph.microsoft.com/.default)
-
smtp_oauth2_redirect_uri: redirect URL after authentication (optional)
-
- If Authentication Type OAuth2 Delegated gesetzt ist
-
oauth2_delegated_tenant_id: Microsoft tenant ID
-
oauth2_delegated_client_id: client ID of the registered application
-
oauth2_delegated_client_secret: application’s secret key
- oauth2_delegated_auth_endpoint: URL to obtain OAuth 2.0 authorization (https://login.microsoftonline.com/{tenant-id}/oauth2/v2.0/token)
-
oauth2_delegated_token_endpoint: URL to obtain OAuth 2.0 tokens (https://login.microsoftonline.com/{tenant-id}/oauth2/v2.0/authorize)
-
oauth2_delegated_scope: requested permissions (https://graph.microsoft.com/.default)
-
oauth2_delegated_redirect_uri: redirect URL after authentication (https://hostname-janiweb-server/janiweb/oauth2-callback)
-
- admin_mail: Enter the email address that the system uses to send messages.
If the email address in the admin_mail field differs from the one in the smtp_username field, then the user in the smtp_username field needs authorisation to send emails as the user in the admin_mail field.
Area Master Record Lock
Activate the automatic master record lock here. You can specify after how many error attempts (number of failed attempts) within a certain period (time period in seconds) a master record should be locked. In addition, you can use the field event types to specify which booking errors should be taken into account.
Area SAP Settings
Make settings for updating SAP data here.
- sap_refresh_data_dir: Enter the directory from which the SAP import is to be read. Click the plus icon to select multiple directories.
- sap_refresh_archiving: Activate this option if you want to archive the imported data.
- booking_job_archiving: Activate this option if you want to archive the exported booking data.
Area Database Backup
Here you can configure an automatic database backup. The backup is performed once a day at night.
- db_backup_days: Enter the number of days for which the backup is to be stored.
- db_backup_dir: Enter the path where the backup should be saved.
- db_backup_filename: Enter the file name of the backup.
- db_backup_tables: Select the database tables to be backed up.
Area Devices
- terminal.localfile: Enter the directory for the trigger file that triggers the creation of the terminal.ini file.
- terminal.parameter: Enter the directory in which parameter files for devices from the manufacturer Dormakaba are to be stored.
- term.ip.gid: Specify the limit for the GID that can be assigned to a device.
- term.ip.did: Specify the limit for the DID that can be assigned to a device.
- INTUS COM Directory: Enter the directory where INTUSCOM is located.
Area Control Management
In the field control.management.filelocation, enter the directory in which parameter files for devices from the manufacturer Dormakaba are to be stored when they are created using control management.
Area Logging
In this area, you can use the field logs_directory to specify the directory to be sent to the recipients (specified in the field logs_recipients). Press Send logs to start sending.
- log_directory: The directory in which JaniWeb stores log files.
- log_limit: The maximum size of log files.
- log_count: The maximum number of log files.
- log_level: The logging level.
Area License Violation
Specify the threshold from which you would like to be informed about the current license usage.
- license_usage_email_recipient: Enter the email address to which information about license usage should be sent. Press the plus icon to add additional email recipients.
- license_violation_email_recipient: Enter the email address to which license violation information should be sent. Press the plus icon to add additional email recipients.
Area Other
Here you can define various other basic settings.
- inactivity_time: This value defines after how many minutes of inactivity a user will be automatically logged out. This is a global value that applies to all users. It can be overridden for individual users using the Session Timeout (minutes) setting in the Users menu.
- booking_report_limit: Use this option to define the maximum number of results displayed in the booking report.
- Delete archived booking records after (days): Use this option to specify the number of days after which archived bookings are deleted. This does not affect archived bookings themselves.
- badges_limit: Specify here how many people can be loaded at once (e.g. via the menu item Persons).
- disable_cookie_login: Activate this option if you do not want a cookie to be stored when logging in via the mobile application.
- Force Desktop Version: Once this option is activated, the application will be shown always in the desktop version, even if it will be called from a mobile device.
- Extended names search: This option must be activated if the first name and surname are split between the database fields hrcc1dnperso01.edit_name and hrcc1dnperso01.sort_name.
- Old Design: Starting with version 2.0, JaniWeb has a new look. If you want to use the old look, you must enable this option.
Tab Literals
This is where you can edit the terms used in the JaniWeb user interface (tab Literals) and Help texts for various languages.
IMPORTANT: If you change the terms used in the user interface, the operating instructions will no longer match the product. Drakos assumes no liability for the consequences of such changes.
Tab Import
You have the option to initially import personnel master records from a CSV file. The following fields describe a personnel master record. Entries with an X in the column Mandatory must be filled.
| Name | Data type | Table | Mandatory |
| admin_unit_id | char (4) | hrcc1dnperso01 | |
| source_sys | varchar (10) | hrcc1dnperso01 | X |
| timeid_no | char (24) | hrcc1dnperso01 | |
| from_date | date | hrcc1dnperso01 | X |
| to_date | date | hrcc1dnperso01 | X |
| timeid_version | char (1) | hrcc1dnperso01 | |
| perno | varchar (11) | hrcc1dnperso01 | X |
| first_name | varchar (40) | hrcc1dnperso01 | X |
| last_name | varchar (40) | hrcc1dnperso01 | X |
| langu | char (1) | hrcc1dnperso01 | |
| langu_iso | char (2) | hrcc1dnperso01 | |
| subsystem_grouping | char (3) | hrcc1dnperso01 | |
| access_control_group | char (2) | hrcc1dnperso01 | |
| personal_code | char (4) | hrcc1dnperso01 | |
| comp_code | char (4) | hrcc1dnperso01 | |
| costcenter | varchar (10) | hrcc1dnperso01 | |
| customer_field_1 | varchar (20) | hrcc1dnperso01 | |
| customer_field_2 | varchar (40) | hrcc1dnperso01 | |
| company_id | varchar (4) | hrcc1dnperso01_data_relation | |
| prohibition | char (1) | hrcc1dnperso01_data_relation | |
| prohibition_reason | varchar (150) | hrcc1dnperso01_data_relation | |
| ident | varchar (2) | hrcc1dnperso01_data_relation | |
| varchar (100) | hrcc1dnperso01_data_relation |
A sample file for importing persons in CSV format can be found here: Sample Personen CSV Import
Texts for functions
| Field | Values | Description | |
|---|---|---|---|
| gruppe | Terminal group from term_down => htyp. If no match is found, DEFAULT is used. | These 4 columns declare from where to start loading the options for a booking. | |
| sprache | ISO language code from hrcc1dnperso01 => langu_iso. If the language is not available, DE is used. | ||
| hersteller_id | D, K, PCS | Manufacturer from term_down => hersteller_id | |
| satza | Terminal record type of the booking. If not available, the record type falls back to an empty string. | ||
| sapsatza | SAP record type (e.g. P10, P20) to be transferred to SAP. If this field is filled, hrcc1upteven01 is served. | Fields for hrcc1upteven01 | |
| sapinfo | Additional SAP information, which is transmitted in customer_field_1. Mainly for P60 (e.g. }{AM0001). | ||
| security answer | Comma separated Semicolon separated Static response text to the terminal. |
Field antwort 1 / field info 1
zmail = hrcc1dnperso01.mail_indicator imail = hrcc1dnbalan01.time_eval_mail_indicator
Literals for zmail, imail will be configured in following table: imail = (SELECT `text` FROM `mail_texte` WHERE `kennzeichen` = 'I' AND `wert` = iflag); zmail = (SELECT `text` FROM `mail_texte` WHERE `kennzeichen` = 'Z' AND `wert` = zflag); |
|
| info | name, statv, info1, info2, info3, info4, info5, info6, info7, info8, info9, infoa, imail, zmail, lbook | Comma separated Semicolon separated Dynamic response text to the terminal. Is mainly read from hrcc1dnbalan01. |
|
| iform | R, L | Specifies on which side the spaces are output for stretching to the length specified in the field of the dynamic texts. R stands for right-aligned text and thus for the left side. With L, it is exactly the other way around. | |
| ilen | Determines the length with which the fields for info are read, left-aligned. If the field is 0 or empty, the function section is skipped. | ||
| db | Separated by commas Number of seconds searched backwards for a dynamic booking error. |
If a dynamic booking error is triggered, this refers to a new line in the funktion_texte. The original 4 fields (gruppe, sprache, hersteller_id and satza) are queried again, regardless of whether one or more of the criteria could not be found. This means that even if the sentence type, for example, was not available in the language langu_iso, the new check still starts with this. Dynamic booking errors can take the form of double bookings, plausibility checks, booking sequences and replacement bookings. Attention: This function can be used to configure an endless loop that is not intercepted by the dmgr function! |
|
| ppc | Regex field Separated by commas One or more record types that trigger the dynamic posting error. A leading exclamation mark negates the field. |
||
| pps | Regex field Separated by commas Describes all postings that should be held against the check. The triggering posting must also be represented. |
||
| ppe | Separated by commas Reference to the record type in the field satza, with which the program should continue when the trigger occurs. |
||
| statv | Separated by commas Has two fields that provide the text for a clock-in and clock-out response when tracking status. Can only be used in connection with a sapsatza P01 or SNN. With P10, the status is checked for a flat rate of 10 hours in the past, but a P01 booking is also transferred to SAP for this. With SNN, NN indicates the number of hours until the reset. In this case, a P10 or P20 booking is also transferred to SAP. |
||
| anhang | Defines a fixed booking attachment, which is set if the booking does not have its own booking attachment. | ||
| anhang_flag | anab, costc, extwa, saldo | Defines how the booking attachment is to be interpreted. anab Causes the attachment to be written to the att_abs_reason field in hrcc1upteven01. costc Causes the attachment to be written to the costc field in hrcc1upteven01. extwa This is only defined, but does not yet fulfill any function. saldo If this flag is set, an integer is expected as a booking attachment. This number then selects the respective field from the columns antwort and info, separated by semicolons. If the number is larger than answers and infos are defined, the last field is used. |
|
| 24x7 | OBSOLET Overrides the time profile check. | ||
Examples
Terminal replies
|
antwort
|
info
|
iform
|
ilen
|
|
|---|---|---|---|---|
| R1 | 0 | Returns a simple “R1” to the terminal. By setting ilen to 0, the function skips reading hrcc1dnbalan01 and formatting the values, thus saving processing time. | ||
| R1Hello | name | L | 20 | Outputs a booking confirmation, a greeting, and the name from hrcc1dnperso01 left-aligned, limited to 20 characters. It is important to ensure that the correct number of spaces is inserted after the greeting to obtain a line break. The length specified in ilen does not influence the response! |
| R40 | info1,info2,info3 | R | 8 | First outputs an “R40” and then outputs the fields info_1, info_2 and info_3 from hrcc1dnbalan01, fixed to 8 characters, right-aligned. |
| R1Hello,Balance: | name,info_1 | L | 20 | First “R1Hello” is displayed, then the name (20 characters long, left-aligned), the text “Balance: ” and finally the info_1 field from hrcc1dnbalan01. Again, make sure that the number of spaces in the column antwort is correct so that the texts are properly indented on the terminal. |
| R40 | info1,info2,info3;info4,info5,info6 | R | 8 | If the anhang_flag is set to saldo, an integer is expected in the booking attachment. This determines which of the fields separated by semicolons is selected. If the integer is greater than the number of fields, the last field is selected. In this example, if the value is 2, the only available field in antwort and the second (i.e. info4-6) would be used. |
Dynamic booking error
|
satza
|
db
|
ppc
|
pps
|
ppe
|
|
|---|---|---|---|---|---|
| BT | 60 | BT | BT | @ | Checks in the last 60 seconds against itself in a BT and thus triggers a simple double booking block. |
| B1 | 36000 | B1 | B[12] | @ | In the last 10 hours, checks B1 bookings against all B1 and B2 bookings. This is a plausibility check. If the last booking is B1, a double booking block is triggered. |
| A1 | 36000 | !B1 | B[123] | B1 | Checks whether the last booking from B1, B2 and B3 is not B1 and then refers to B1. This is a replacement booking that could be checked at a turnstile entrance. |
| A1 | 36000 | B[23] | B[123] | B1 | Same check as in the example above, only without negation. |
| A1 | 36000,36000 | BS,!B1 | B[ES123],B[123] | BE,B1 | First, BS (break start) is checked against BS, BE (break end), B1, B2 and B3. If a break start was last posted, the system now checks for a break end. It then checks again to see if another absence exists, as in the previous example. If this is the case, the system checks for B1. If none of these apply, it remains an A1 booking. Important: The db field must contain two values, otherwise the other fields in ppc, pps and ppe are not checked. |
| A1 | 84000 | ![AB][023] | X | An A1 booking may only be made if an A0, A2, A3, B0, B2, or B3 booking has been made in advance. If this is not the case, error X will be displayed. |
Status change booking
If the booking sequence is to be used to automatically determine whether the response is issued for an arrival or departure booking, the function checks the last valid booking for the person and derives the next expected booking type from this.
To do this, the corresponding values in the function_texts table must be configured accordingly.
|
satza
|
sapsatza
|
antwort
|
info
|
ilen
|
statv
|
|---|---|---|---|---|---|
| BT | P01 | R1 | statv, name | 20 | Guten Tag , Auf Wiedersehen |
Users
Use the menu item Users to manage the users of JaniWeb. Roles allow you to assign permissions to users.
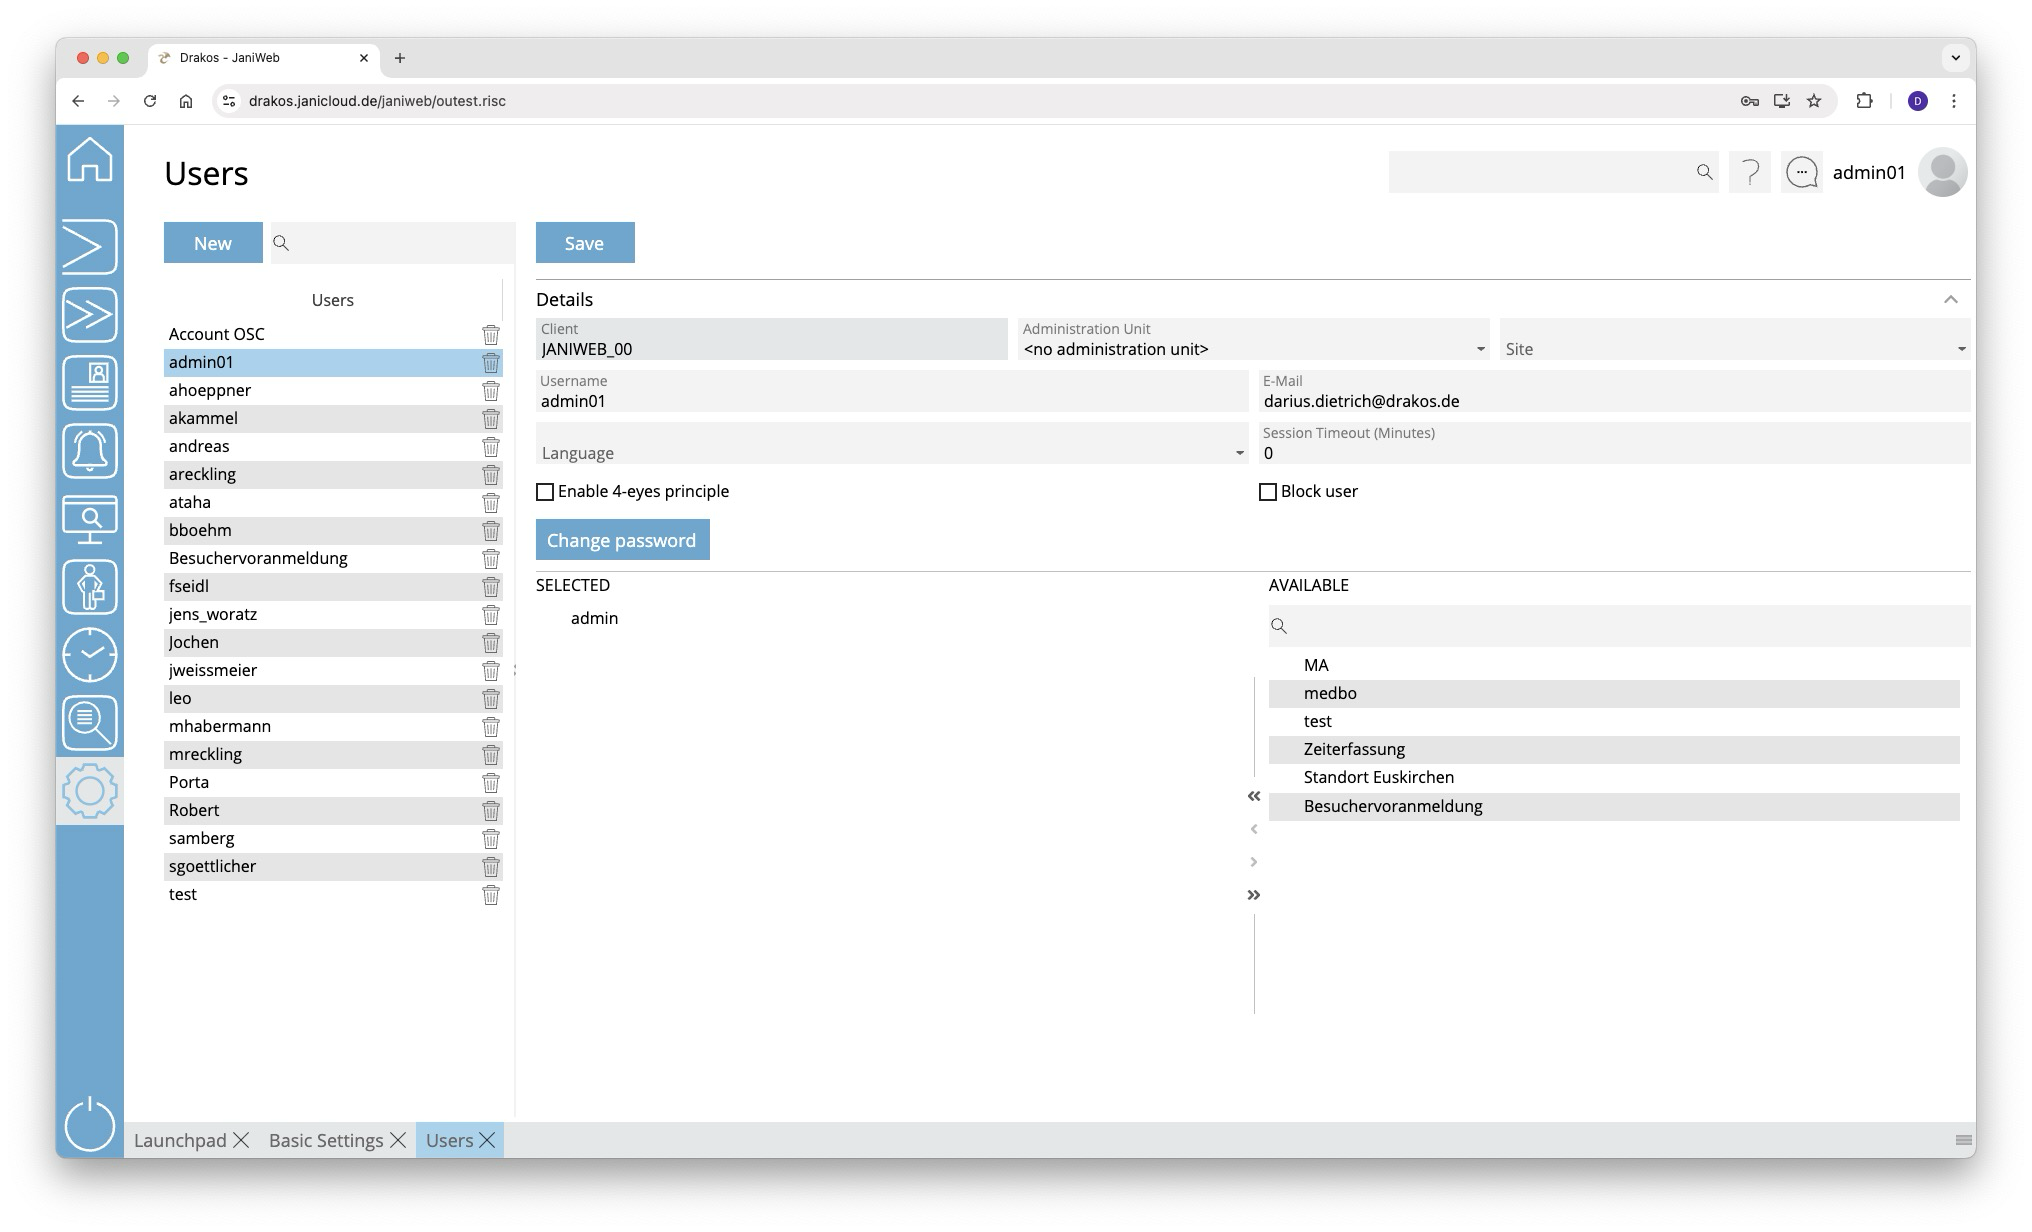
List of users
The list contains the users already created.
- Select an entry to view details.
- Use the corresponding trash icon to remove a user.
Button New
- Press New to create a new user.
- Enter a Username.
- (Optional) Select LDAP User if the user originates from an Active Directory. Then enter the Distinguished Name and click on Find LDAP User.
- Enter a secure Password and an email address (Mail) in case the password is forgotten.
- Press Save.
Area Details
Specify further details for the user.
- Language: (Optional) Select the language in which the user interface will be displayed to the user. If nothing is selected here, JaniWeb will use the language set in the user’s browser.
- Session Timeout: Specify the time in minutes after which the user is automatically logged out.
- Enable 4-eyes principle: Activate this option if the user is not allowed to log in alone. Select a second user who must log in together with the user.
- Block user: If users enter their password incorrectly too often, they are automatically blocked. To unlock a blocked user, deactivate this option.
- Change password: Press this button to assign a new password to the user.
An Active Directory can also be used for employee logins. For employee logins, it is not necessary to create each user manually. This is only required for administrator logins.
Lists of rolls
Roles are used to assign JaniWeb permissions to the user. Drag one or more roles from the right-hand list All Roles to the left-hand list Assigned Roles. Use the menu item Settings > Roles to define roles.
TIPS
By assigning a site, you can determine which configuration should be used to display the fields in the menu items Persons or Visitors.
Roles
Use the menu item Roles to define the permissions that can be assigned to users via roles. A distinction is made between permissions for the individual menus and permissions for data.
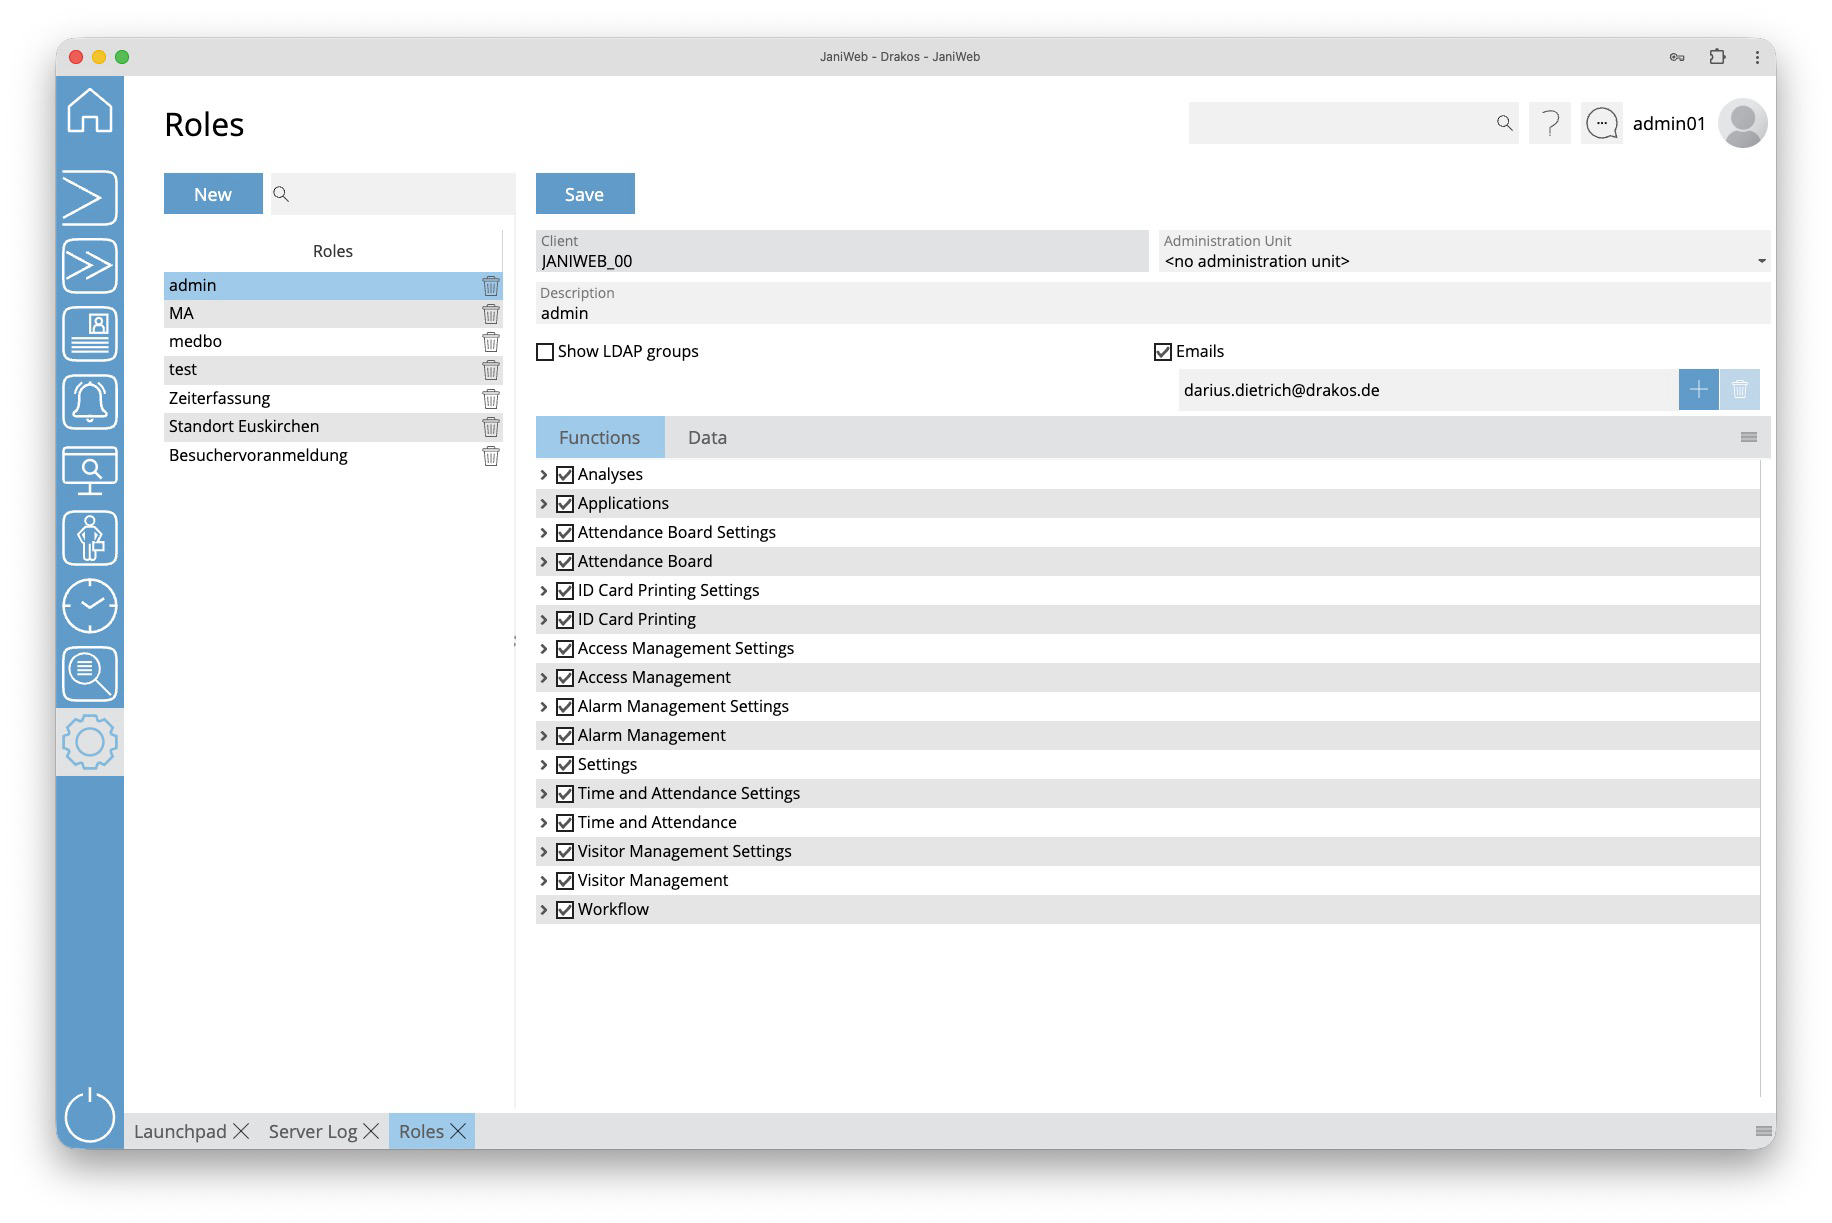
List of rolls
The list contains the rolls already created.
- Select an entry to view details.
- Use the corresponding trash icon to remove a roll.
Attention: Roles assigned to users can also be removed. These users will then no longer have the permissions from the corresponding role.
Button New
- Press New to create a new role.
- Enter a meaningful Description.
- If the role is to affect employee logon permissions, activate the option Employee Role.
- Press Save.
Detail area
Specify additional details and the permissions for the role.
- Show LDAP groups: Select this option if the role should map permissions for LDAP users. Then add the corresponding LDAP group(s) using the plus icon. Enter the complete Distinguished Name (DN).
- Emails: Add Emails for Users which should also use the Admin-Login via SSO.
- Employee Role: An employee role has fewer permissions than other roles. For example, people with this role cannot create or change devices and do not have access to settings. An employee role is automatically assigned to the people who are assigned on the tab Data under Employee Groups and activated in the column Permissions. It is possible to create different employee roles for parts of the employees to unlock different functions.
Tab Functions
This is where you define the access rights for the menu.
- Select the menu items in the menu structure for which you want to grant access rights.
- If menu items allow you to Change data, a checkbox with the same name appears. Select this option if you want the role to be able to change this data.
Tab Data
This is where you define the permissions for accessing data, subdivided according to the data’s affiliation. The parent permission is always provided by the client associated with the data. If the client does not have this permission, the data is read-only, even if the child data has permission.
- Select an element in the column Permission type.
- Select the checkbox in the column Permission for each item you want to grant permission for.
- Select the checkbox in the column Change if you want the role to allow modification of this data.
- Use Employee Groups to restrict the permission to display personnel master records. Only the personnel master records of the person groups that are activated in the column Permissions are displayed.
TIPS
If a role should have permission for all newly created data of a type, activate the element All new [data type].
Administration Units
You can use this menu option to create Administration Units. Administration units allow you to group objects according to their affiliation, so that you can assign permissions for several objects at once.
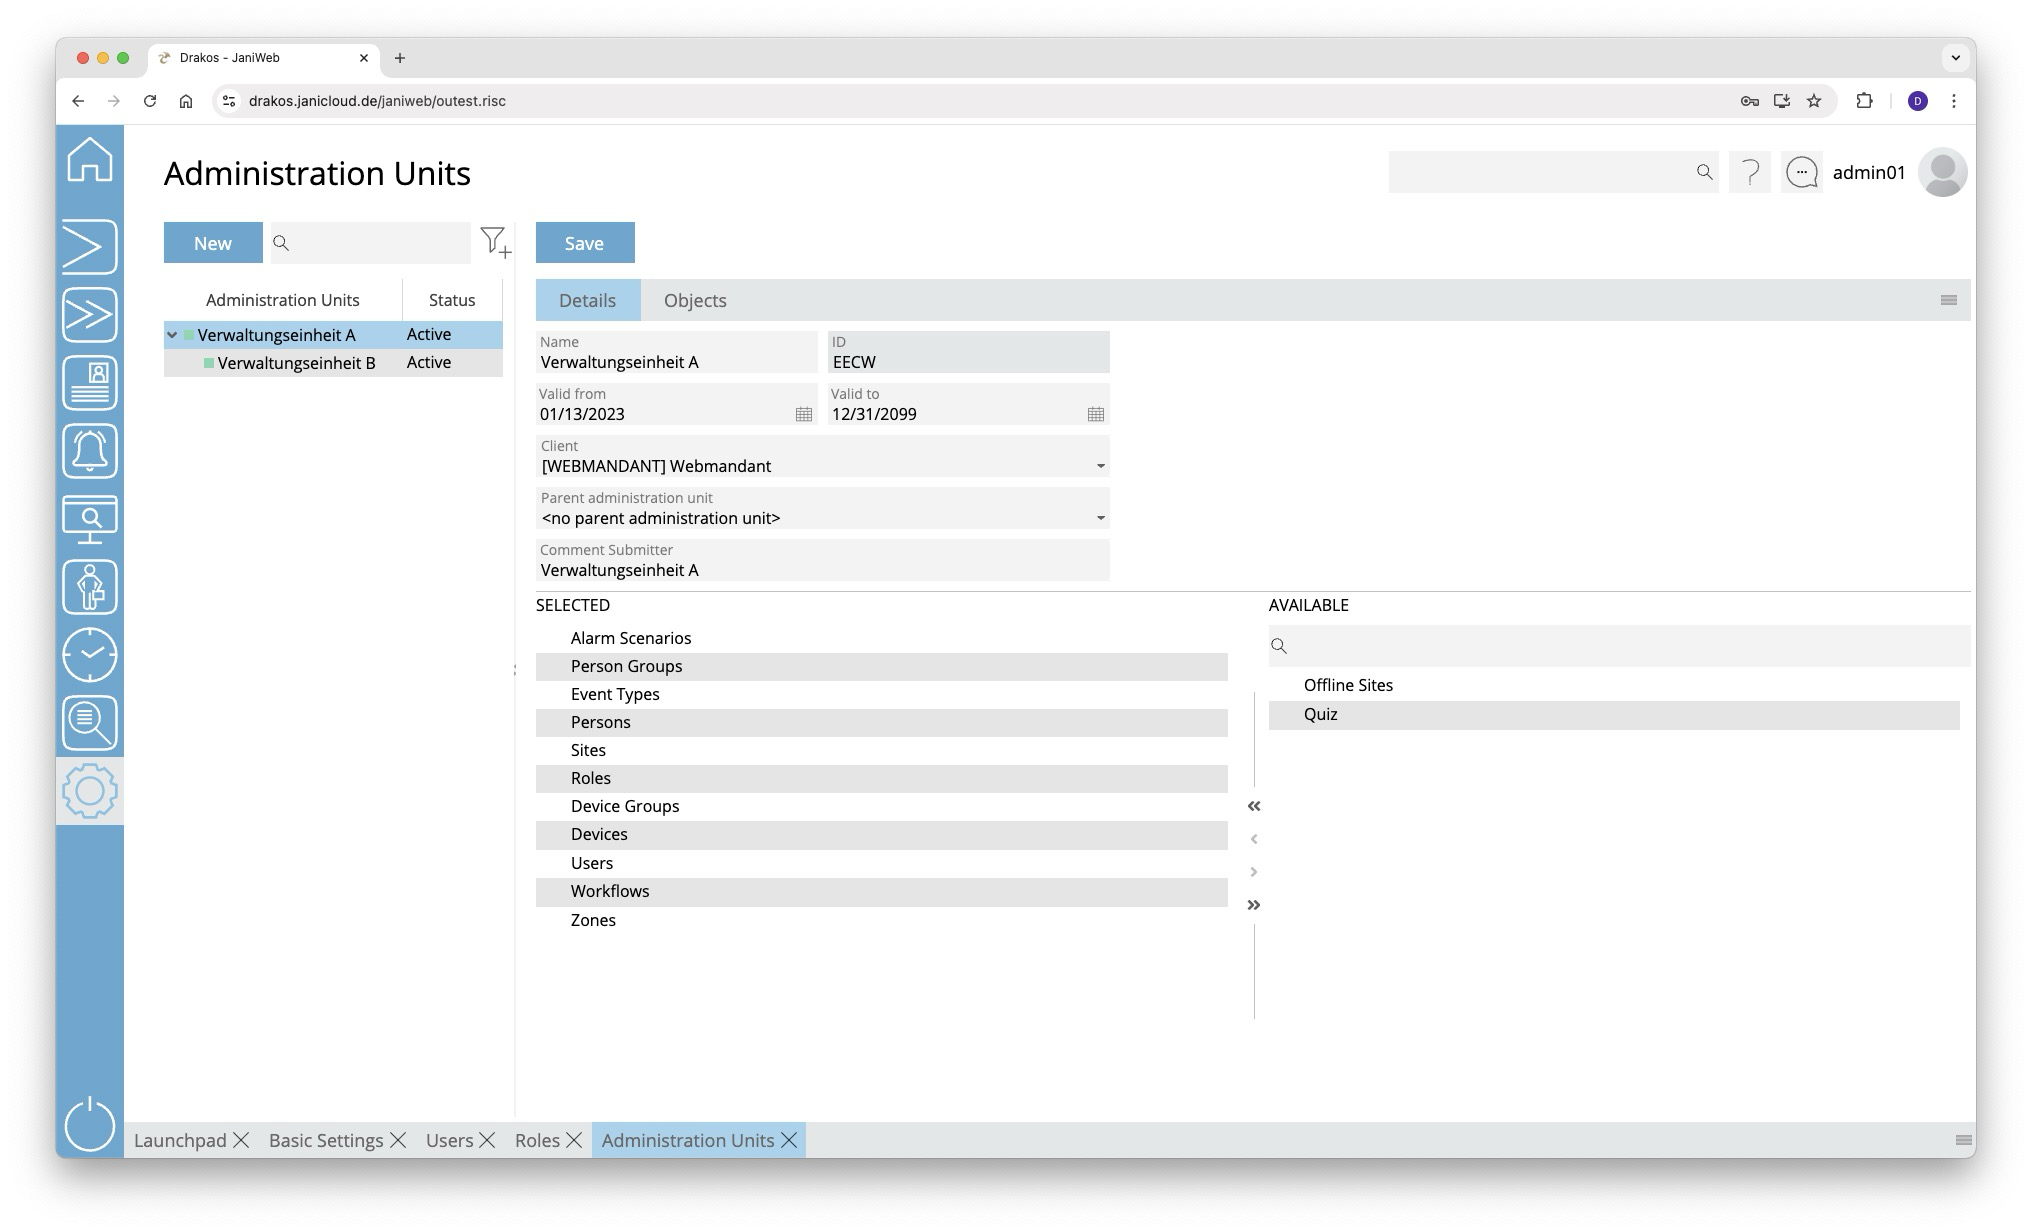
List of administration units
The list contains the already created administration units.
Button New
Press New to create a new administration Unit. Enter a Description and any additional information, and press Save.
Tab Details
Use the lists in the lower area to define which object types the administration unit can contain.
- Drag the required elements from the right-hand list Available to the left-hand list Selected.
- Press Save to confirm.
Tab Objects
The objects linked to the administration unit appear here.
TIPS
Administration units can be structured hierarchically. This means that you can assign one administration unit to another. To do this, select the parent administration unit in the details.
For example, you can first create a top-level administrative unit for the entire site. Then you can create subordinate administrative units for parts of the site. As soon as you assign a permission for a top-level administrative unit, the objects of the lower-level administrative units are included.
Jobs
The menu item Jobs allows you to manage the actions (cron jobs) that JaniWeb automatically executes in the background at certain intervals.
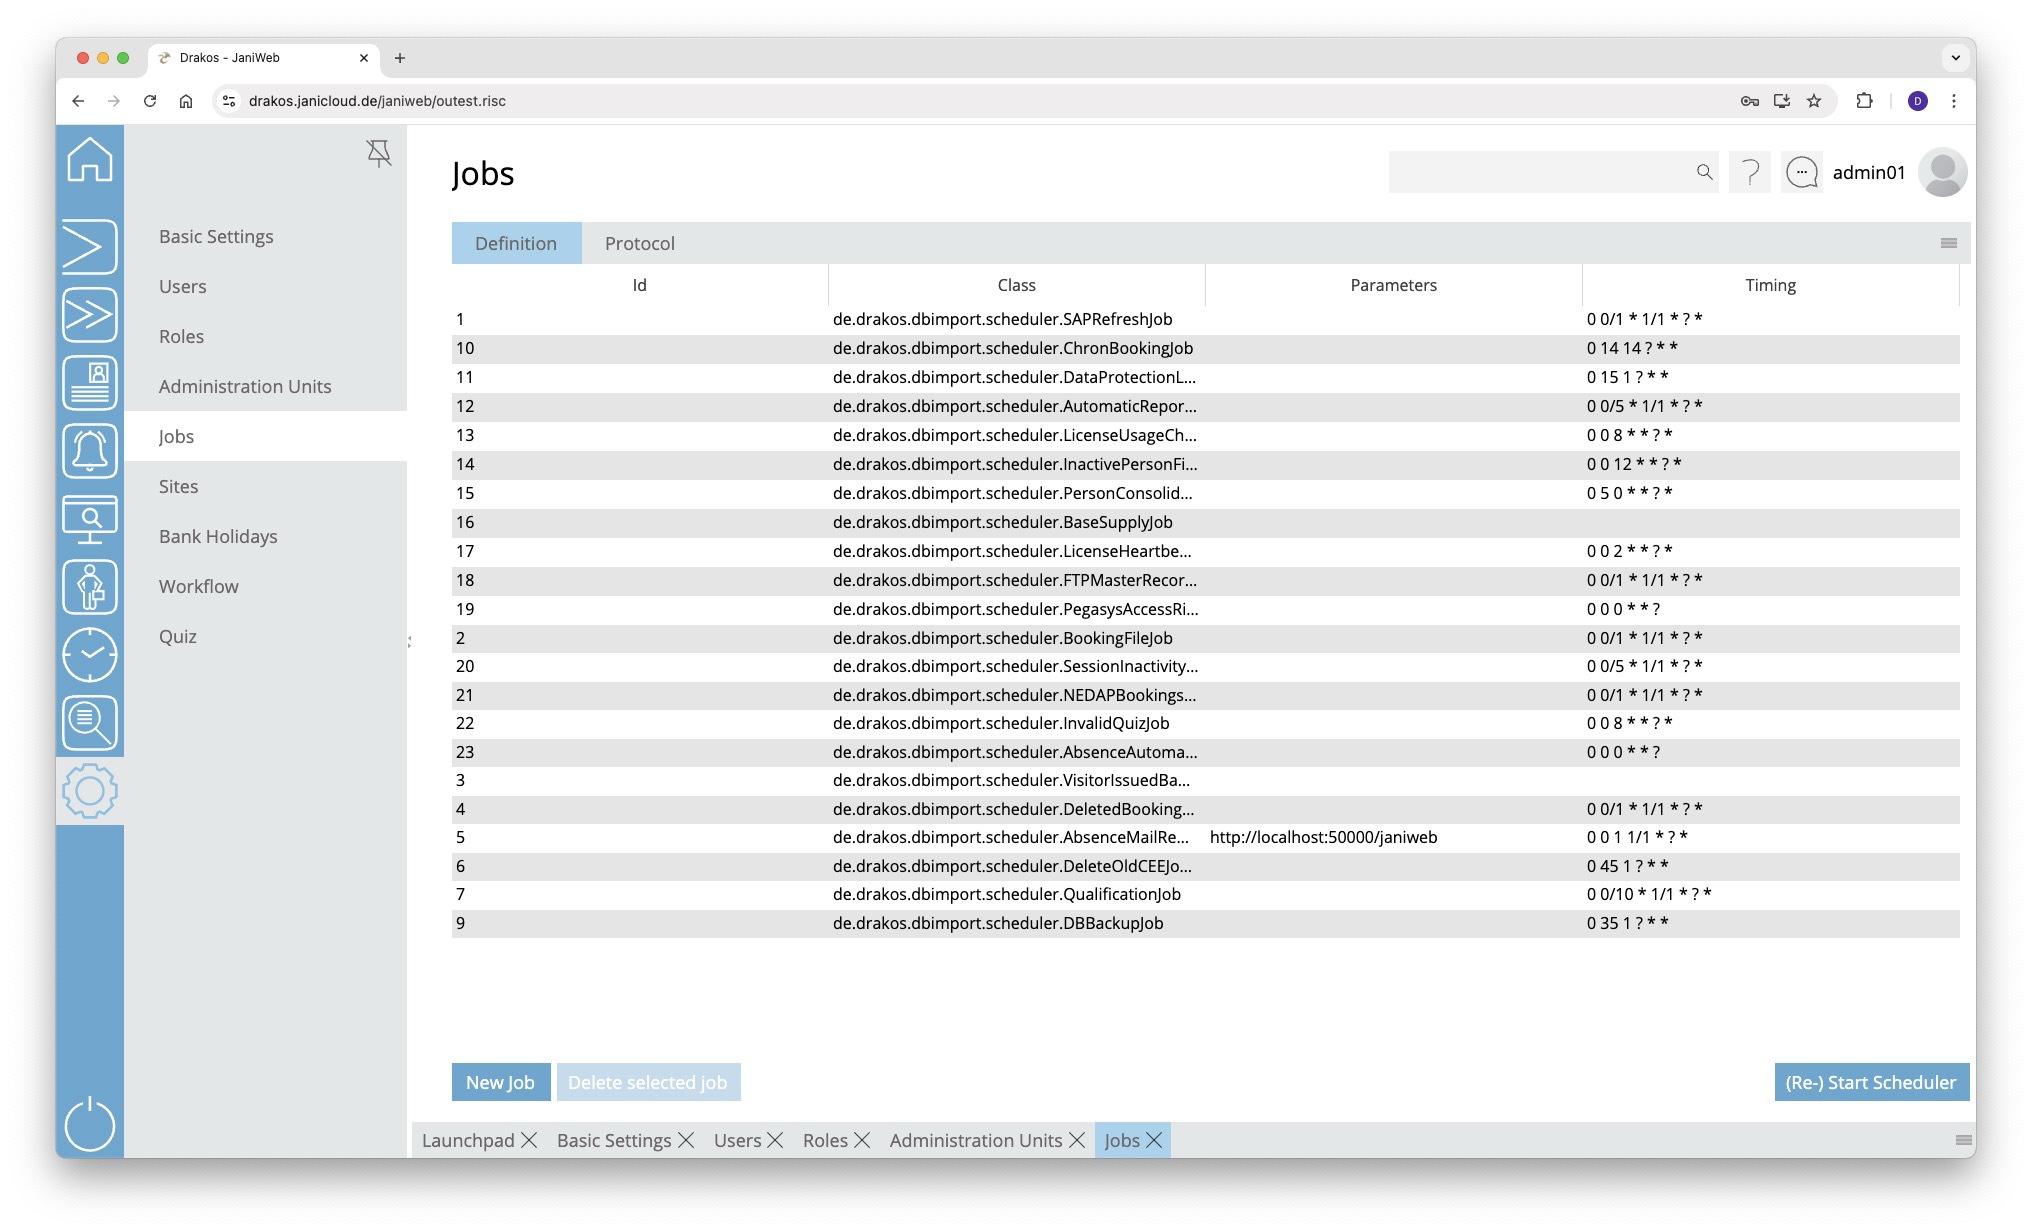
Tab Definition
The list contains all the jobs that have already been created. Double-click on an entry to change the definition of the job.
Button New Job
Press New Job to create a new job. Enter the function to be called in the field Class. Enter when the task is to be executed in the field Timing. For details, see the section Time format below.
Button Start Scheduler
After you have changed an existing job or created a new one, you must restart the scheduler. To do this, press Start Scheduler.
Tab Protocol
Here you can display a list of the jobs that have been executed.
- Enter a start time.
- (Optional) Enter an end time (To).
- (Optional) Select a status to narrow the list.
- Press Show executed jobs.
Overview of the jobs
| Job | Description |
| de.drakos.dbimport.scheduler.SAPRefreshJob | Import master data |
| de.drakos.dbimport.scheduler.AutomaticReportJob | Send automated reports |
| de.drakos.dbimport.scheduler.LicenseUsageCheckerJob | Check license usage |
| de.drakos.dbimport.scheduler.InactivePersonFinderJob | Check inactive personnel records |
| de.drakos.dbimport.scheduler.PersonConsolidationJob | Consolidate personnel master data import |
| de.drakos.dbimport.scheduler.BaseSupplyJob | Master data calculation for basic supply |
| de.drakos.dbimport.scheduler.LicenseHeartbeatJob | Heartbeat for pay-per-use license |
| de.drakos.dbimport.scheduler.FTPMasterRecordJob | Dormakaba master data distribution |
| de.drakos.dbimport.scheduler.PegasysAccessRightsCheckerJob | Check Pegasys authorizations |
| de.drakos.dbimport.scheduler.BookingFileJob | Export booking data |
| de.drakos.dbimport.scheduler.SessionInactivityCheckJob | Check session |
| de.drakos.dbimport.scheduler.DeletedBookingsFileJob | Export deleted bookings |
| de.drakos.dbimport.scheduler.AbsenceMailReminderJob | Reminder of absences in workflow |
| de.drakos.dbimport.scheduler.DeleteOldCEEJobRecordsJob | Cleanup CCEEJobExecutionProtocol |
| de.drakos.dbimport.scheduler.QualificationJob | Check permissions based on qualifications |
| de.drakos.dbimport.scheduler.DBBackupJob | Backup database |
| de.drakos.dbimport.scheduler.ChronBookingJob | Archive booking data |
| de.drakos.dbimport.scheduler.NEDAPBookingsJob | NEDAP bookings |
| de.drakos.dbimport.scheduler.DataProtectionLogicJob | Data protection audit |
| de.drakos.dbimport.scheduler.AbsenceRejectedByLeadingSystemJob | Sends E-Mails to inform about absences which were rejected by leading system. |
| de.drakos.dbimport.scheduler.InvalidQuizJob | Sends E-Mails to inform about quiz, which will get inactive soon. |
| de.drakos.dbimport.scheduler.AutomaticVisitStatusJob | Sets status for visits according bookings done by visitors at devices. |
| de.drakos.dbimport.scheduler.AbsenceAutomaticApprovalJob | Automatically approves absences after a certain period. |
Time format
JaniWeb uses the Quartz Cron syntax to define complex job timings. This extended version of the classic Cron syntax consists of six or seven fields:
Quartz Cron syntax structure
S M H DoM MoY DoW [Y]- Second (S):
0-59 - Minute (M):
0-59 - Hour (H):
0-23 - Day of month (DoM):
1-31 - Month of year (MoY):
1-12or abbreviations likeJAN, FEB - Day of week (DoW):
1-7(orSUN, MON, ...) - Year (Y) (optional):
1970-2099
Special characters
*: Any value,: List of values (e.g.MON,WED,FRI)-: Area (e.g.1-5)/: Increment (e.g.0/5for all 5 units)?: Any value, which is ignored in fields of conflict (only forDoMandDoW).
Examples
- Every day at midnight:
0 0 0 * * ? - Every Monday at 9:00 a.m:
0 0 9 ? * MON - Every 5 minutes:
0 0/5 * * * ? - On the first day of each month at 12:30 p.m.:
0 30 12 1 * ? - Every 15 seconds:
0/15 * * * * ?
Important differences to the classic Cron format
- The field second is additionally available.
?replaces*in fields with conflicts betweenDoMandDoW.- Supports more detailed timings by combining steps and lists.
Sites
The menu item Sites allows you to manage various sites within JaniWeb.
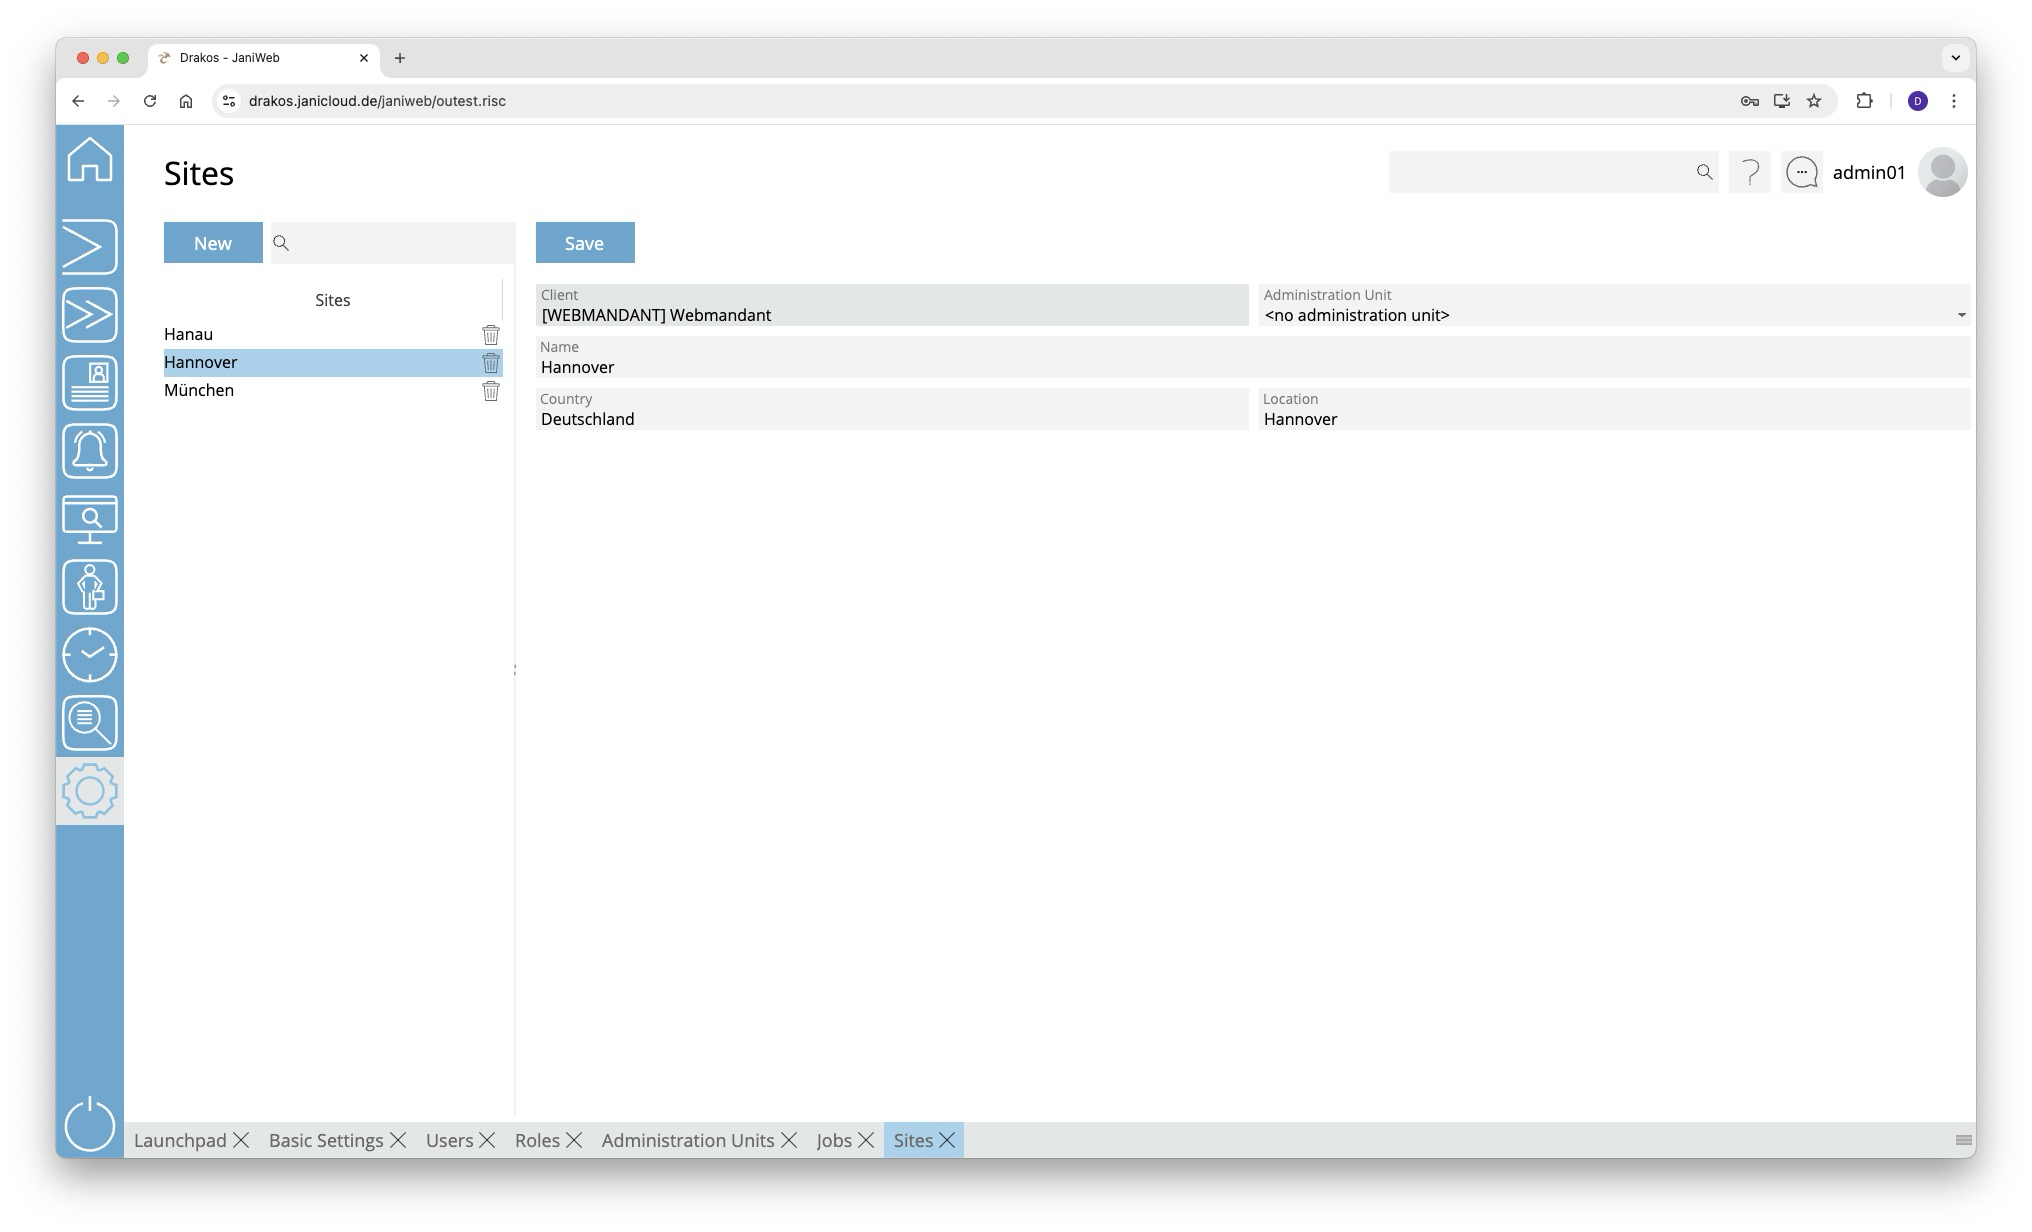
List of sites
The list contains all sites that have already been created. Select an entry to view details.
Button New
Press New to create a new site. Enter a Description, a Country and a Location, and press Save.
To delete a site, use the trash icon for the corresponding entry.
TIPS
Sites are useful, for example, for creating different configurations for the displayed fields in the menu items Persons or Visitors. In addition, different configurations for visitor self-registration can be defined using sites.
You can use the permissions for the different sites in the Roles menu to define which visits are visible in the Visits menu. Only the visits for the site for which the respective user has permission are displayed.
Holiday Calendar
Use this menu item to manage bank and individual holidays.
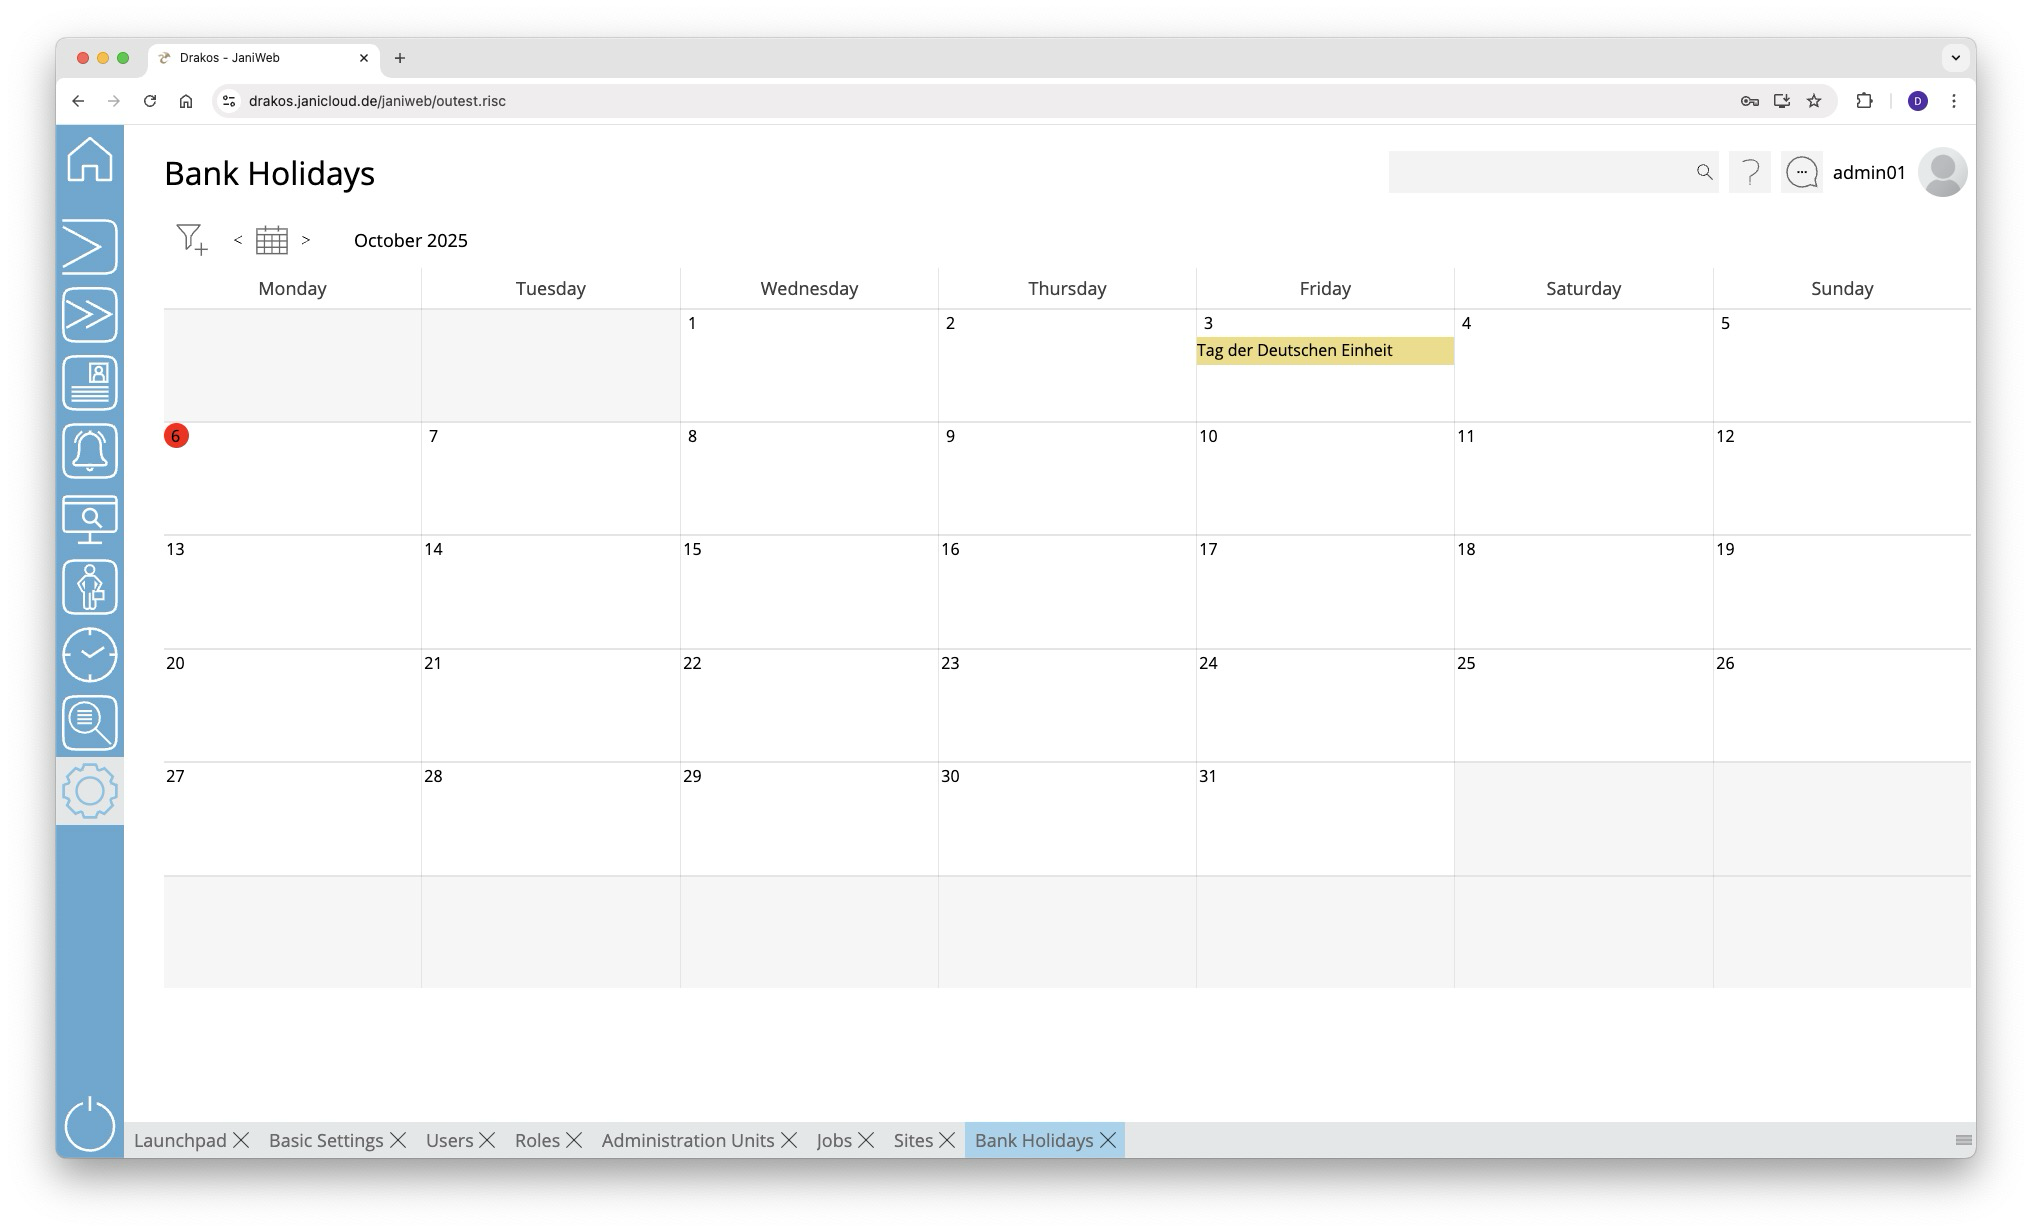
Holiday Calendar
Editing a Holiday
Double-click on the holiday you want to change.
- Press Save to apply the changes.
- Press Delete to remove the holiday.
Creating a New Holiday
- Right-click on the relevant day and select Create new.
- Enter a Description for the holiday.
- Select the Holiday Calendar for the holiday.
- Select a Holiday class to specify whether time profiles should apply on this holiday.
- Press Save.
TIPS
Use the filter icon in the upper left corner of the calendar to restrict the view to certain holiday calendars.
Workflow
The menu option Workflow allows you to manage the approval process, for example, to process absence requests or to secure the assignment of permissions.

List of workflows
The list contains all workflows that have already been created. Select an entry to view details.
Button New
Press New to create a new workflow. Enter a description, a validity period, and a client, and press Save.
Tab Details
In the area Approve, specify the persons who are allowed to approve a request created for this workflow.
- Select a Decision Maker. Press the plus icon to add further decision makers.
- Sequence: If there are several decision makers, use this to determine the sequence in which the request must be approved. Enter a number for each. If the same number is entered for two decision makers, both must approve for the request to proceed to the next step in the workflow.
Tab Objects
Use this to determine what triggers the workflow.
List Object Type
- Select Absence to trigger the workflow by absence requests, home office times or similar.
- Select whether absence times in the Past and/or in the Future should be taken into account.
- Select Booking if the workflow is to be triggered by manually creating bookings.
- Select whether booking times in the Past and/or in the Future should be taken into account.
- Select whether booking times in the Past and/or in the Future should be taken into account.
- Select Permissions if the workflow should be triggered when permissions are assigned for specific devices or device groups.
- Select the Device and/or Device Groups for which the workflow should apply. Press the plus icon to add further devices or device groups.
- (Optional) Under Person Groups, define which persons trigger the workflow when they try to assign permissions for the specified devices or device groups.
For information on how to edit workflow requests, see the Workflow section.
Alternatively, you can also define the respective workflow for individual absence types in the module Time and Attendance > Settings > Tab Absence.
TIPS
A Workflow Report allows you to track all approvals.
Quiz
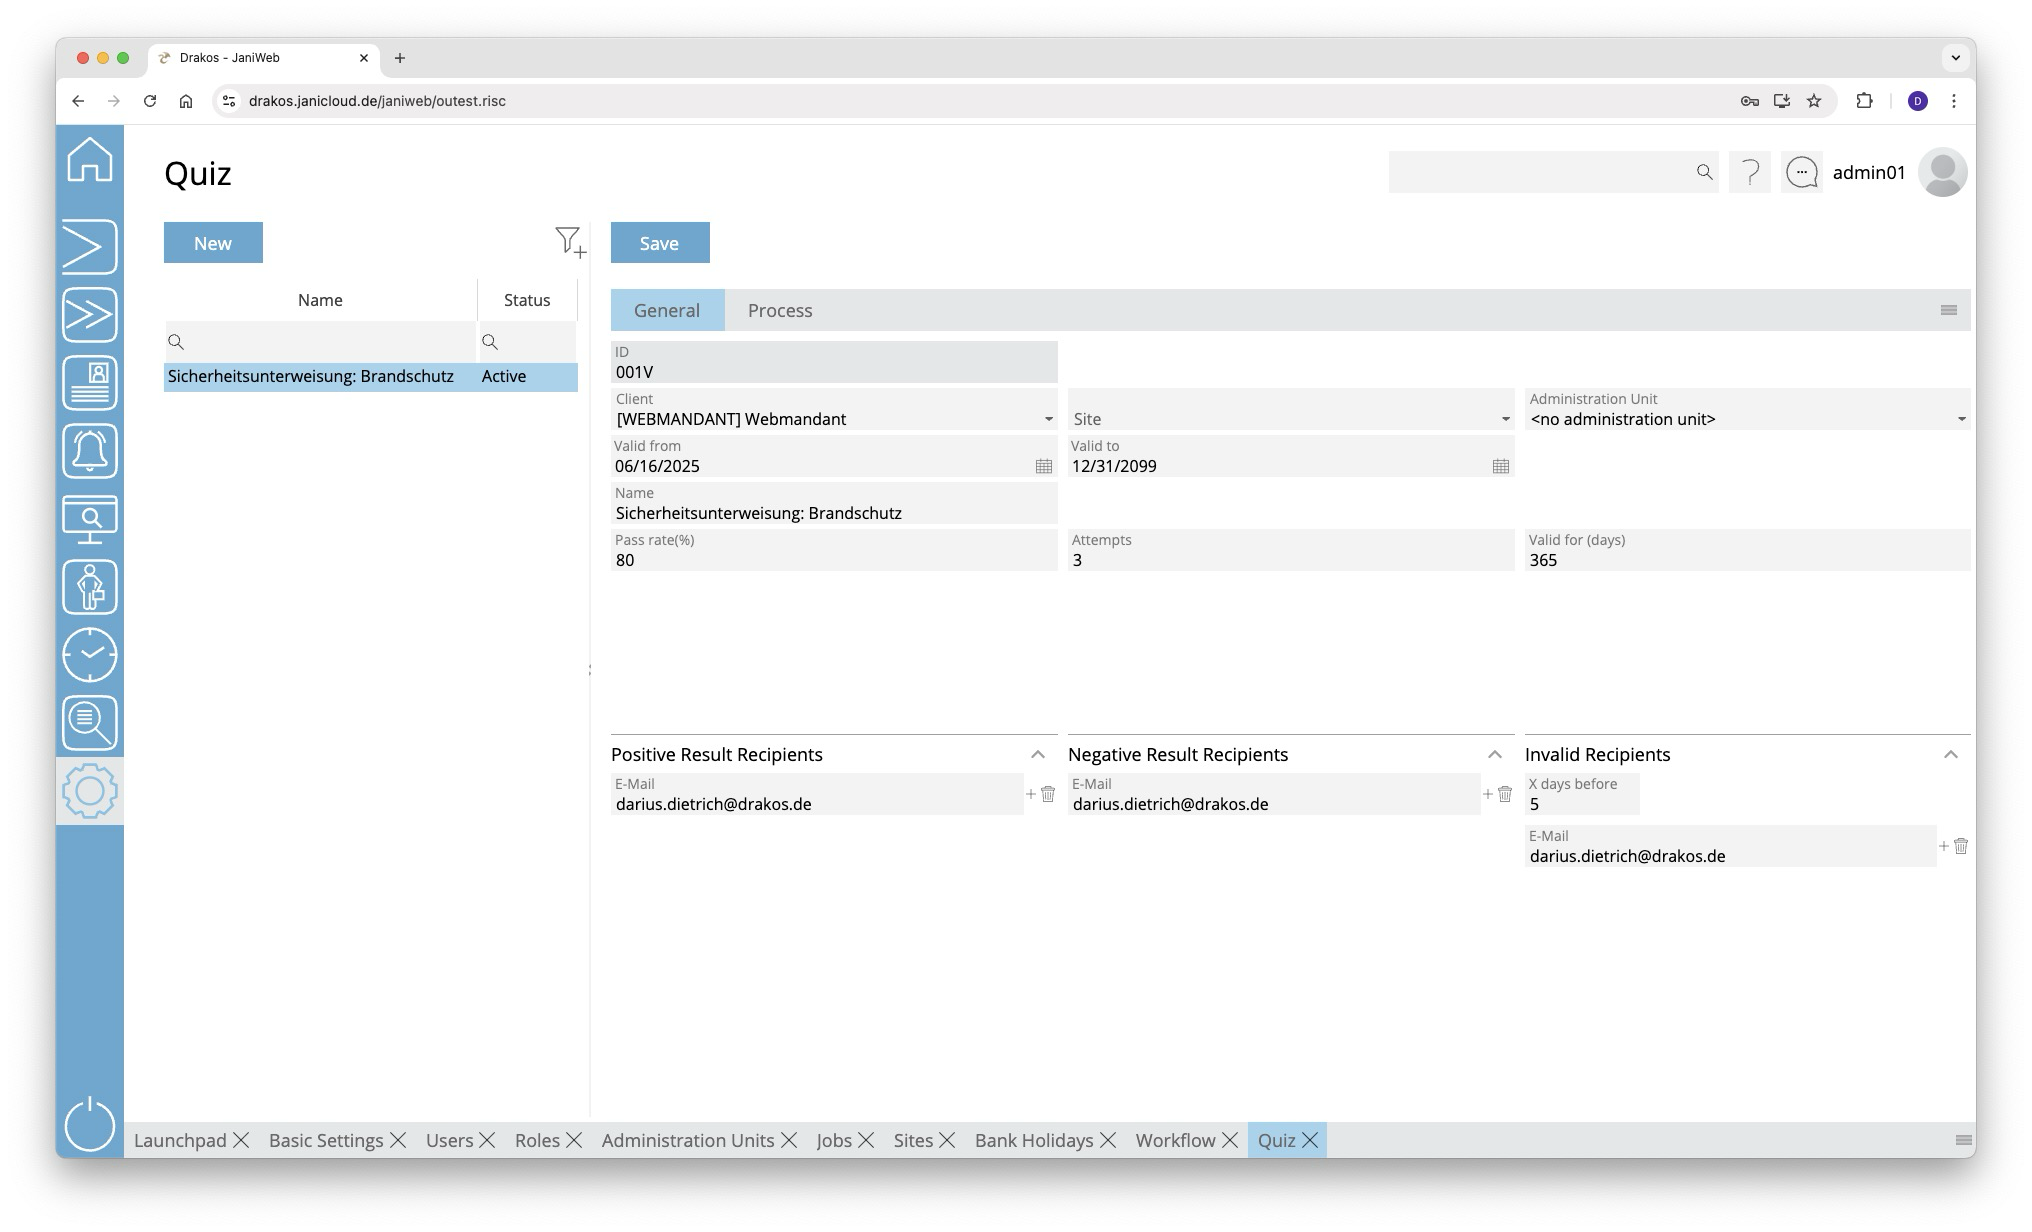
List of Quizzes
The list contains the quizzes that have already been created. Select a quiz to display details.
The list offers the following options:
- Filter by client, site and status: Click on the filter icon. Select the client, site or status (Active, Active in the future, Inactive) for which quizzes should be displayed. Changes are visible immediately.
- Search in columns: Enter text or numbers in the search field (magnifying glass symbol) of a column to search by name or status. The entries have an immediate effect: The list only shows hits.
Button New
Press New to create a new quiz. Enter the required information about the quiz on the General tab and press Save.
Tab General
This is where you enter and edit data such as name, client and validity for the quiz.
Use the Pass rate (%) field to specify the percentage of questions that must be answered correctly for the quiz to be considered passed.
The Attempts field specifies how often the quiz may be repeated in the event of a failed attempt.
The Validity (days) field specifies how long the quiz remains valid after it has been passed.
In the Positive result recipients area, you can enter e-mail addresses that are automatically notified when the quiz is passed.
In the Negative result recipients area, you can enter e-mail addresses that will be notified if the quiz is not passed.
In the Invalid recipients area, you can define e-mail addresses that will be notified before the quiz expires.
The X days before field determines how many days before expiry the e-mail is sent.
Tab Process
With a quiz, you have the option of creating training courses, such as a safety briefing. These can be integrated into the pre-registration process for visitors, for example. On this tab, you use slides to define the procedure for such a training course.
- Insert slide: Drag the required modules in the desired order into the area of the respective location or press the button with the + to select the corresponding slide in the following dialog.
- Reorder slides: Drag the slides to the desired location.
- Edit slides: Use the edit icon to specify details for the respective slide.
- Remove slides: Use the recycle bin icon to remove a slide from the sequence.
The slides at a glance
Introduction slide
- Define title and text:
Enter a title and text to be displayed on the slide.
Use the Translate button to enter the title and text in the desired languages. - Insert image:
- Use the Upload image button to add an image that will appear on the slide.
Save your entries using the Save button.
Preparatory slide
The preparatory slides are intended to convey the knowledge that will be tested in the subsequent questions and answers slides.
- Define title and text:
Enter a title and text to be displayed on the slide.
Use the Translate button to enter the title and text in the desired languages. - Insert image or video:
- Use the Upload image button to add an image that will appear on the slide.
- Alternatively, you can embed a YouTube video: Click on Set link and enter the YouTube link in the respective language field.
Save your entries using the Save button.
Question and Answer
Use this slide to define a question with the corresponding answer options.
- Define title and question:
Enter a title and a question that will be displayed on the slide.
Use the Translate button to enter the title and question in the desired languages. - Insert image or video:
- Use the Upload image button to add an image that will appear on the slide.
- Alternatively, you can embed a YouTube video: Click on Set link and enter the YouTube link in the respective language field.
- Define answers:
- Define the answer options from which users should choose.
- Mark which answer(s) are correct in the Correct column. Multiple selection is possible.
- Use Add to add further answer options.
- Use the recycle bin icon to delete individual answers.
- Each answer can be designed as text, image or a combination of both.
→ Add images with Add image, texts with Translate.
- Display options:
- Random order answers: The answer options are sorted randomly each time the quiz is called up.
- Horizontal order: Determines whether the answers are displayed horizontally or vertically.
Save your entries using the Save button.
End slide
- Define title and text:
Enter a title and text to be displayed on the slide.
Use the Translate button to enter the title and text in the desired languages. - Insert image:
- Use the Upload image button to add an image that will appear on the slide.
Save your entries using the Save button.
Instructions
Create Visits
- Log in to the application

- Navigate to Registration in the menu

- Fill in the fields and confirm with Save

- If the visitor does not yet exist in the system, they can be created using the New Visitor button

- If the visitor does not yet exist in the system, they can be created using the New Visitor button
- The visit now appears under the menu item Visits below the Upcoming section

- A badge can now be issued here via the Issue Badge button
- or the visit can be marked as present via the Person arrived button
- A badge can now be issued here via the Issue Badge button
- The visit now appears in the Ongoing section

- The visitor can be logged out via the Person left button

- As long as the visit period has not yet expired, the visit appears below the Active section


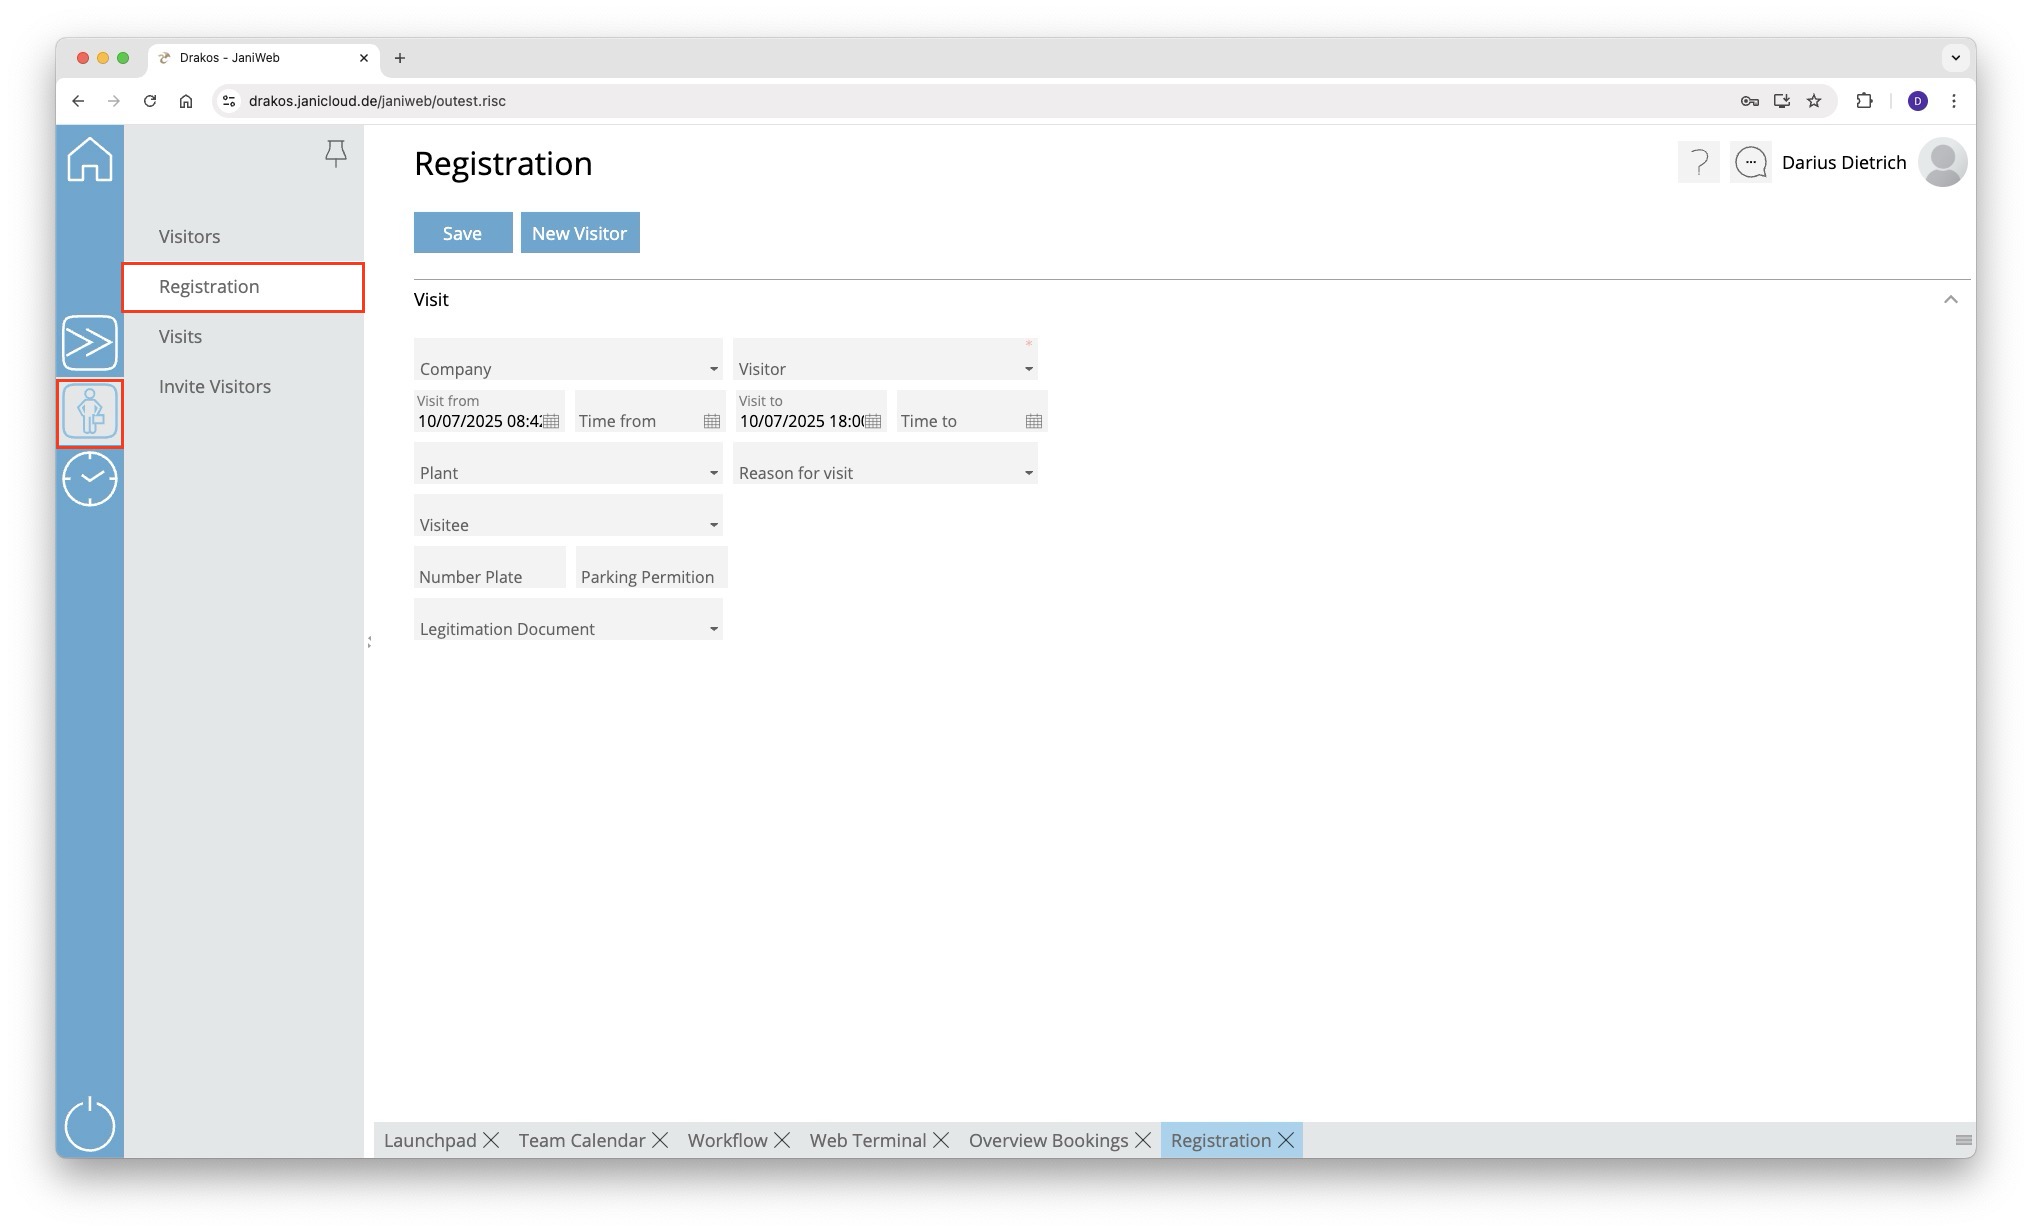


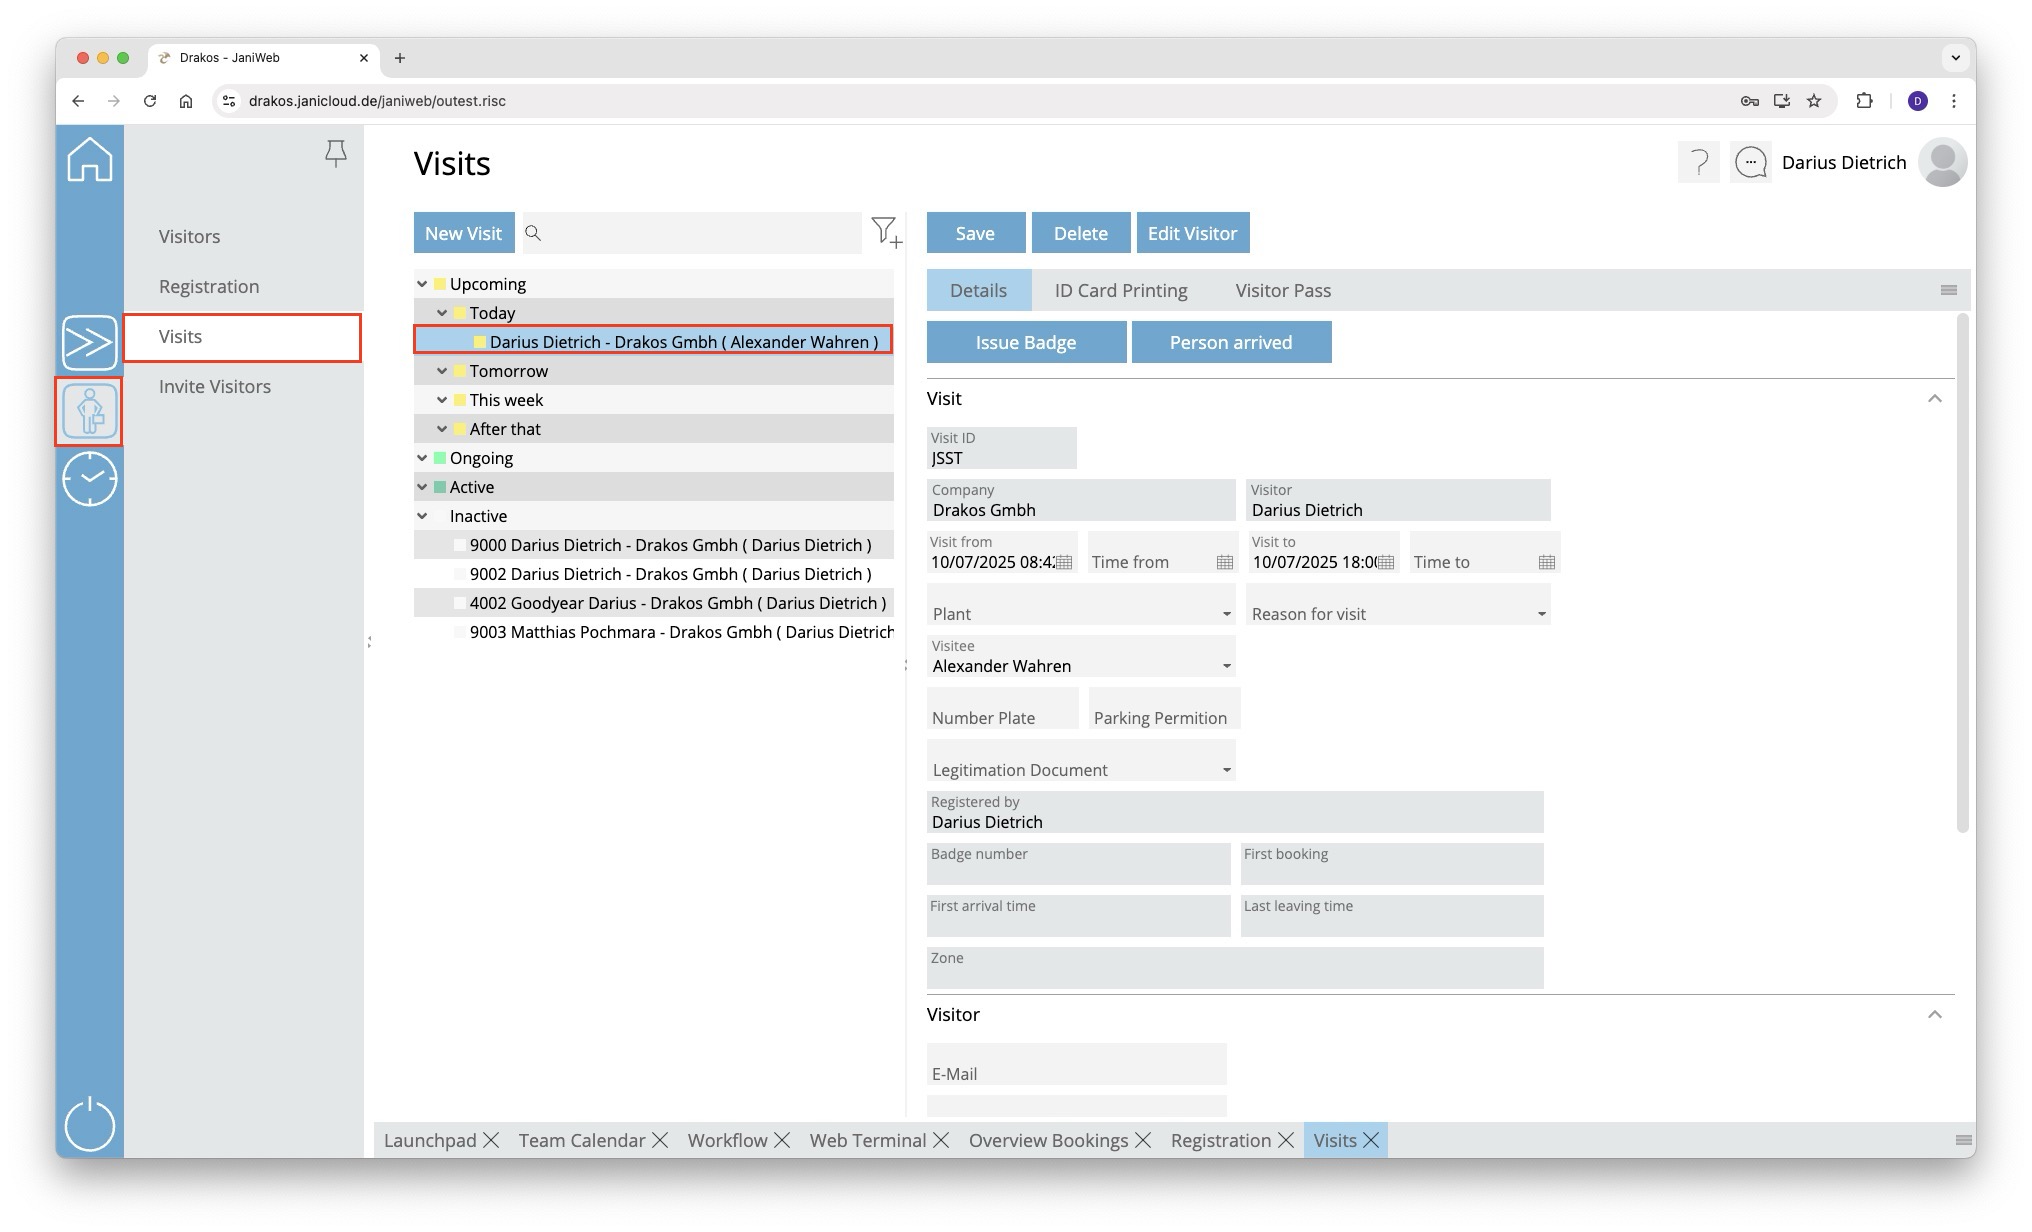
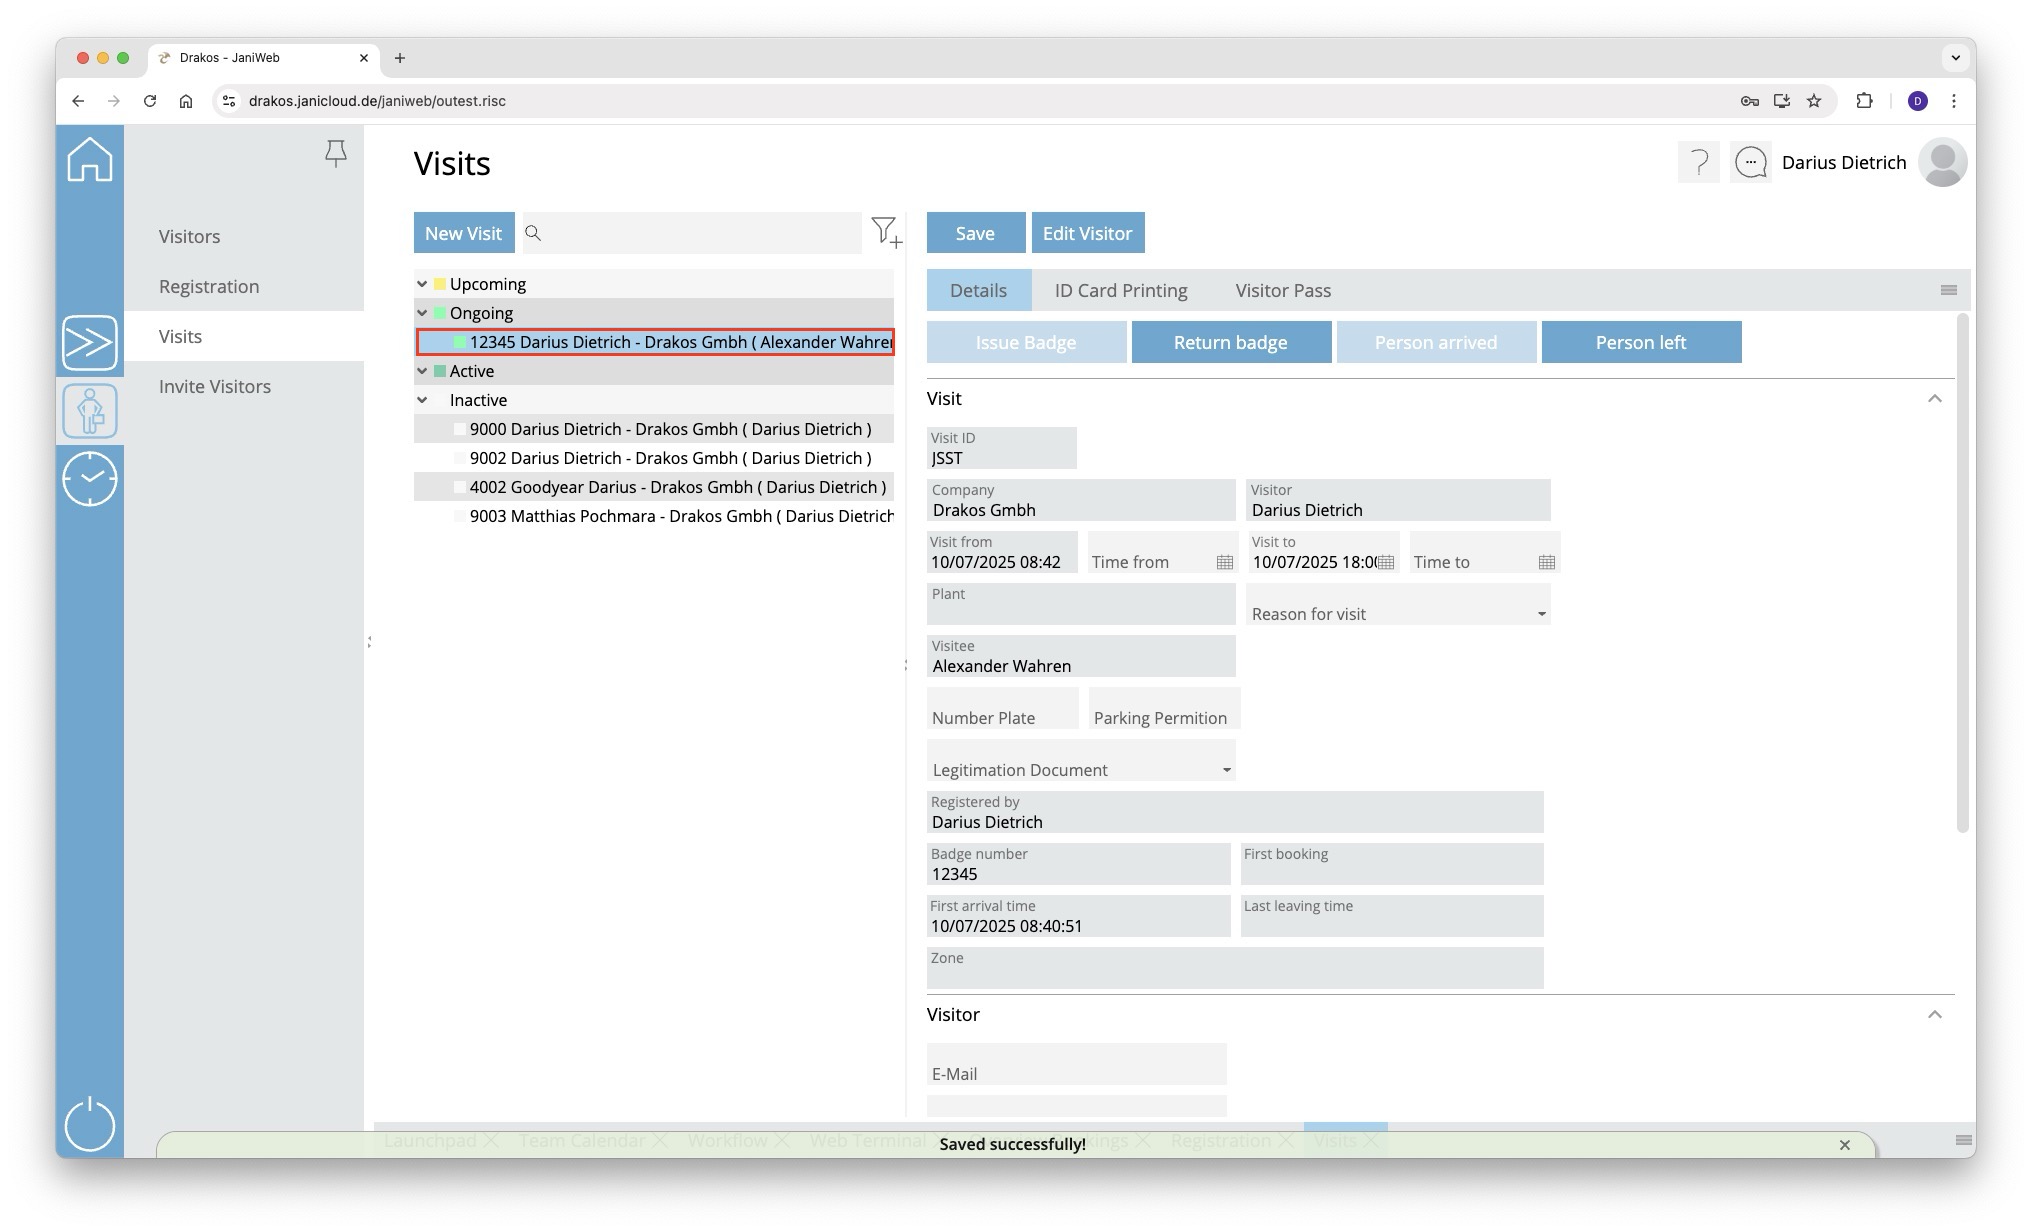
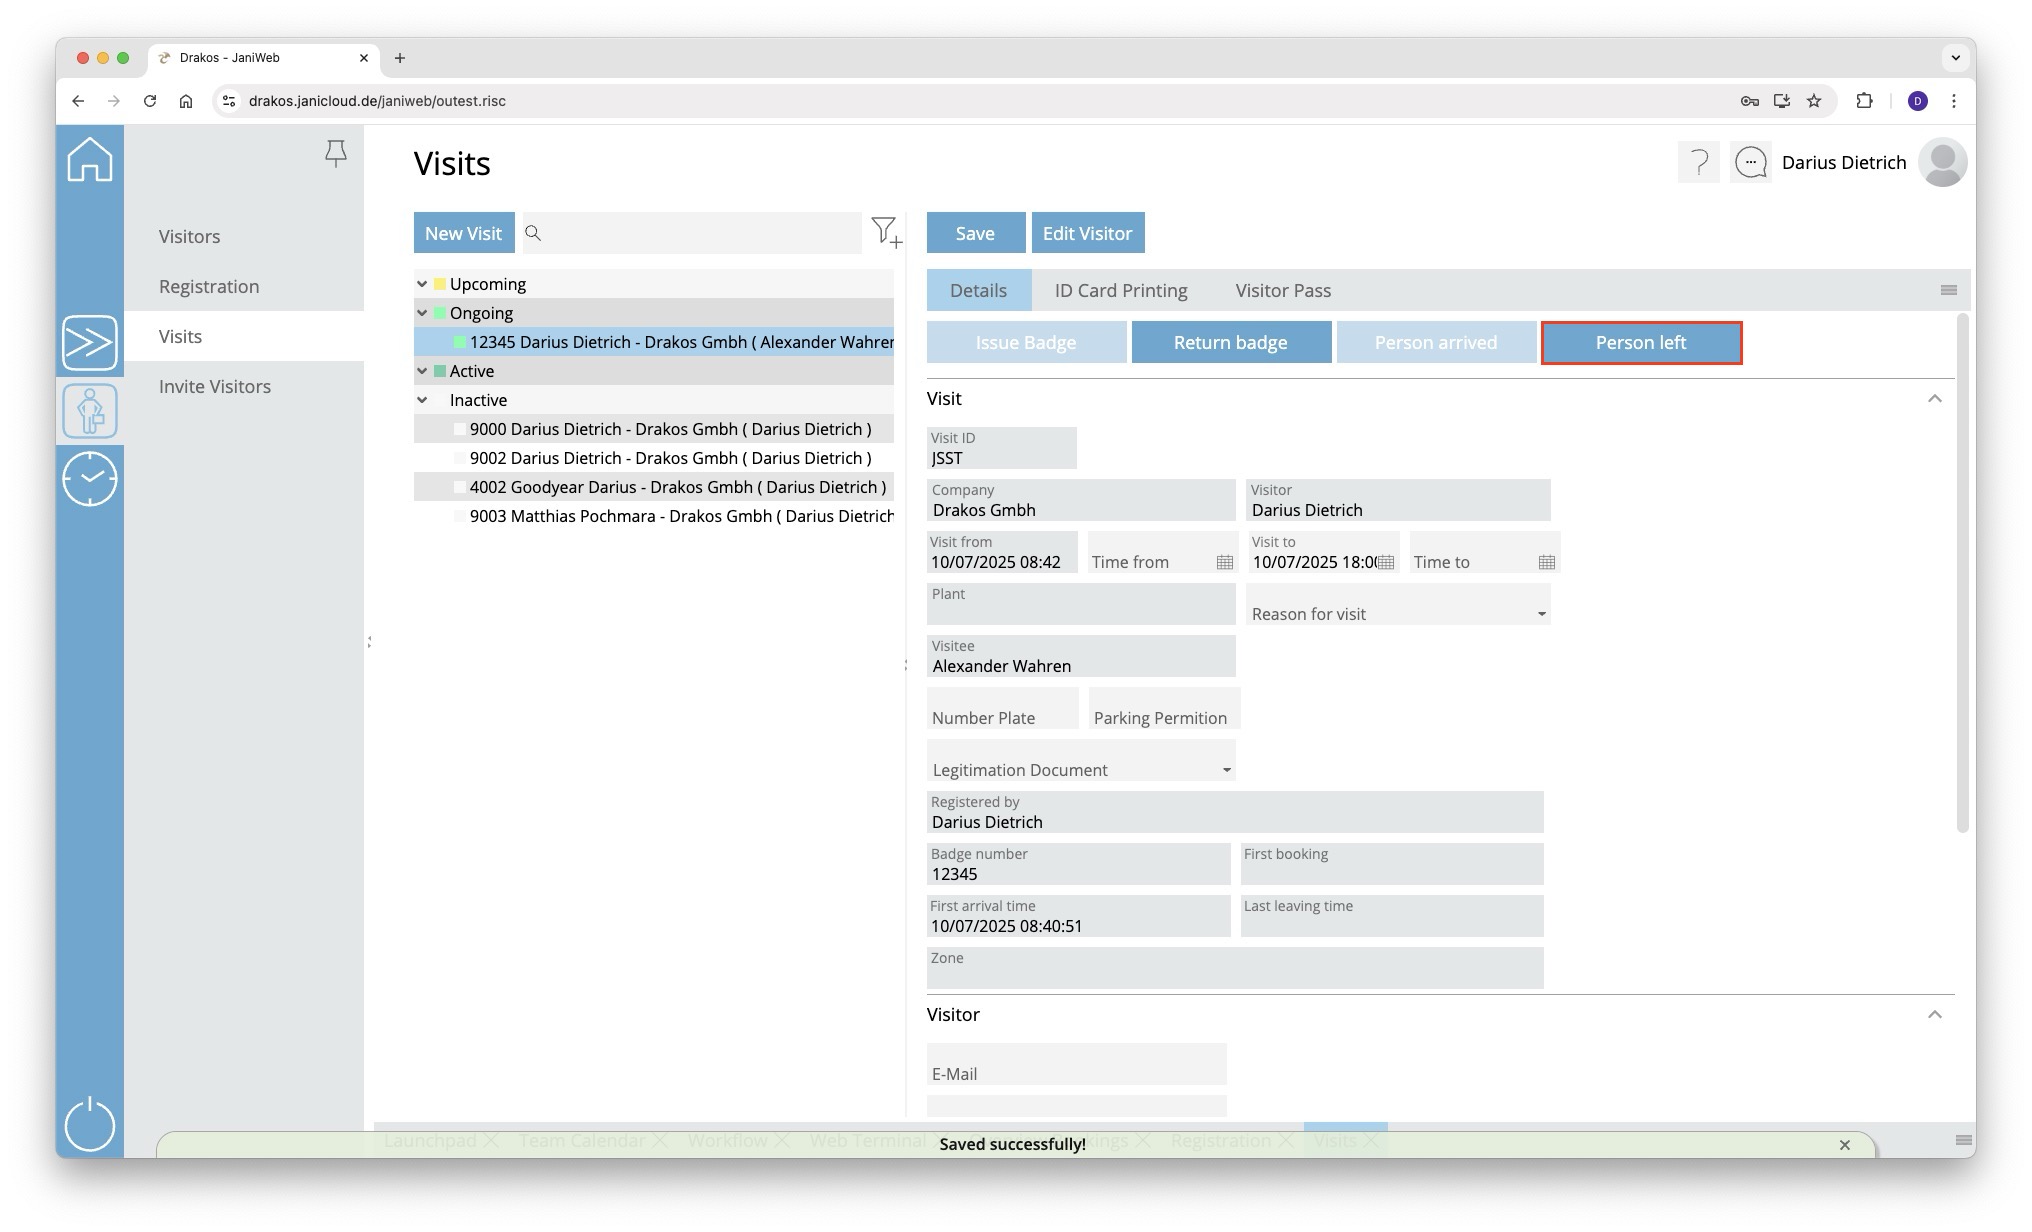
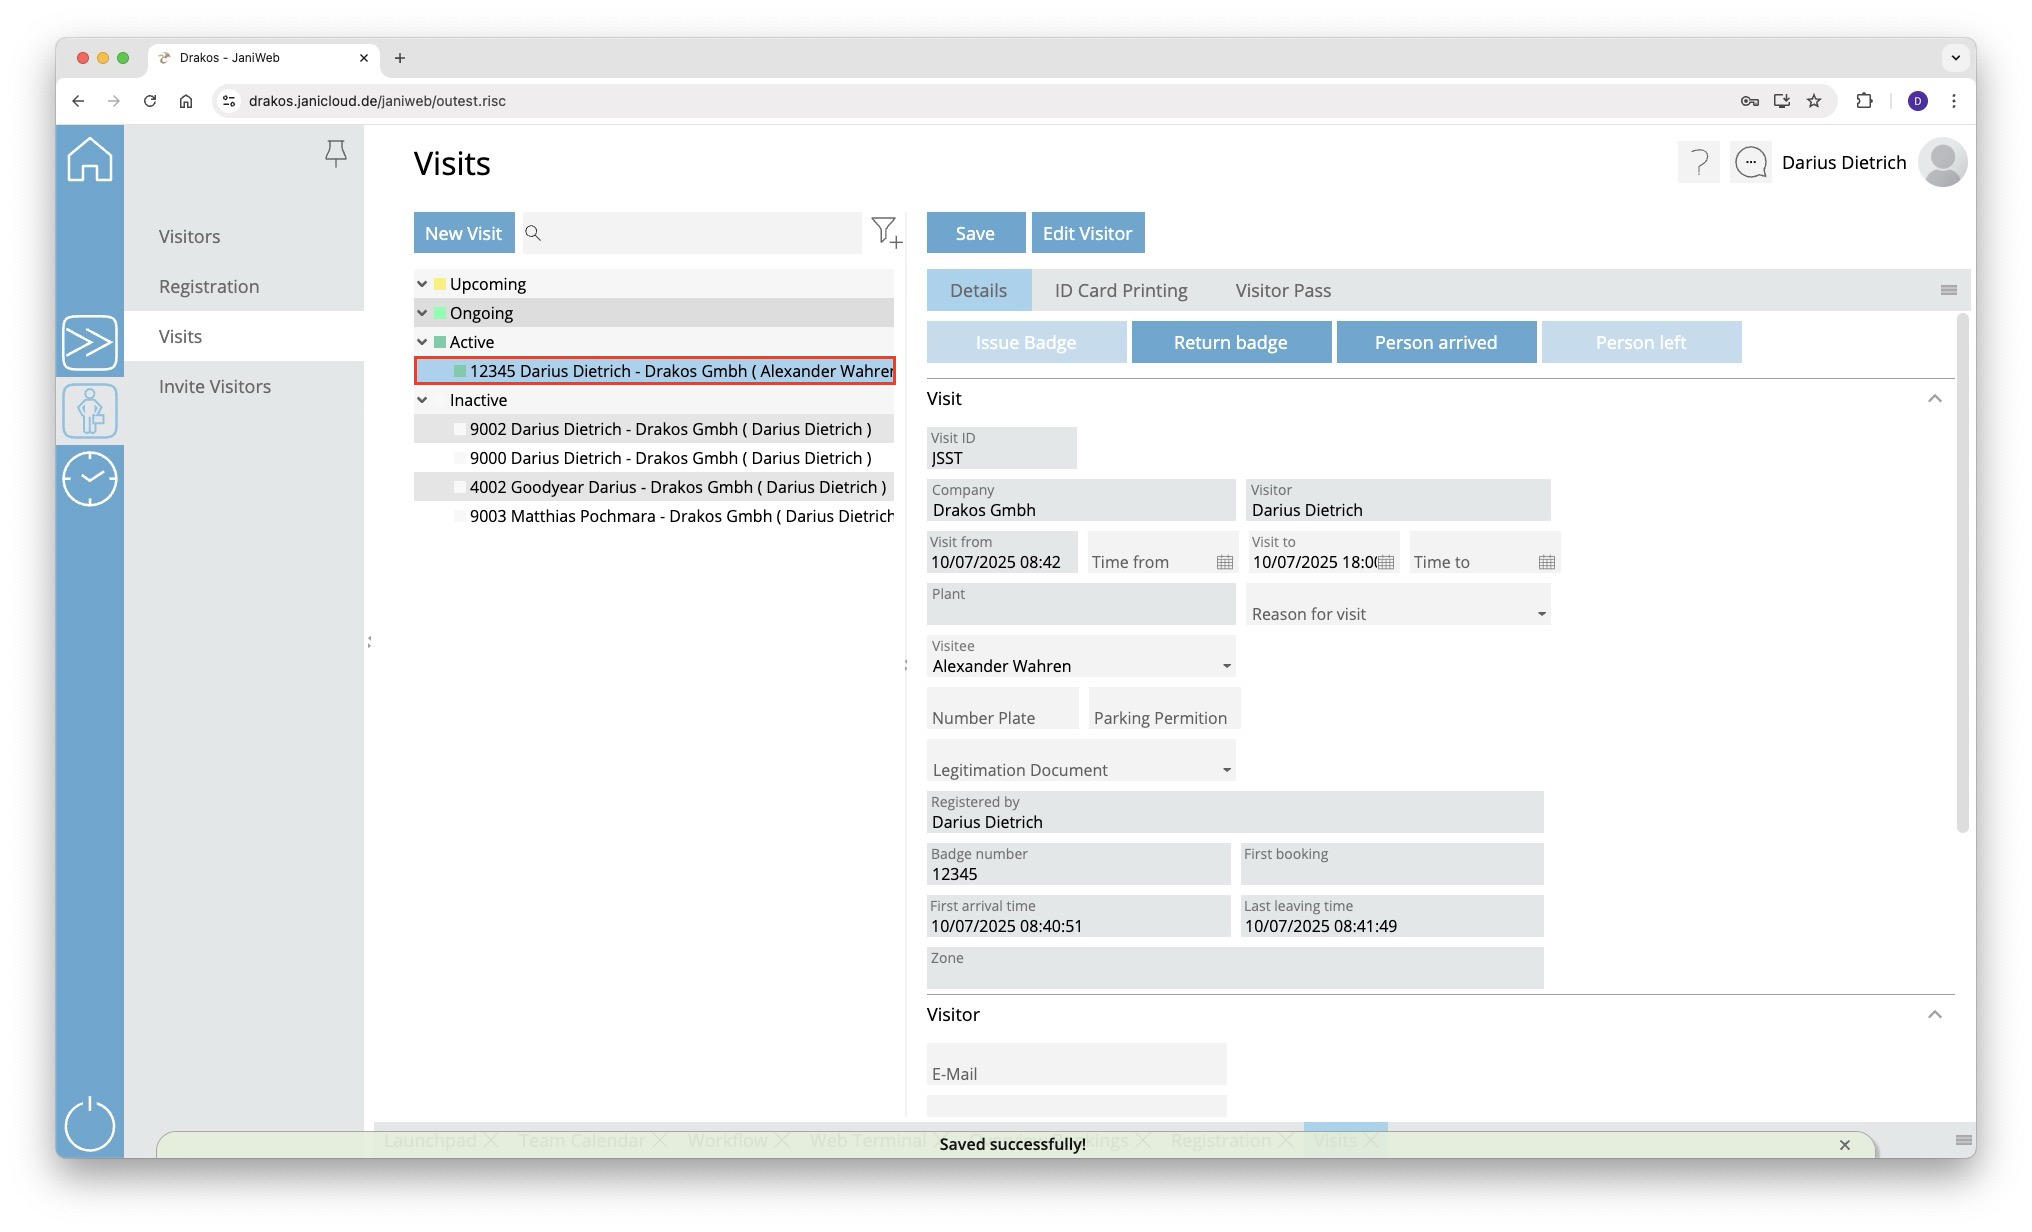
Create Absences
- Log in to the application.
- Navigate to the Team Calendar item in the menu.

- Right-click in the field for the desired date of absence > Select Create new absence

- Enter dates for From and To. Set comment for supervisor if necessary. Confirm with Save.

- Legend colored representation of absences

- In the Workflow menu, you will find past absence requests and their status.


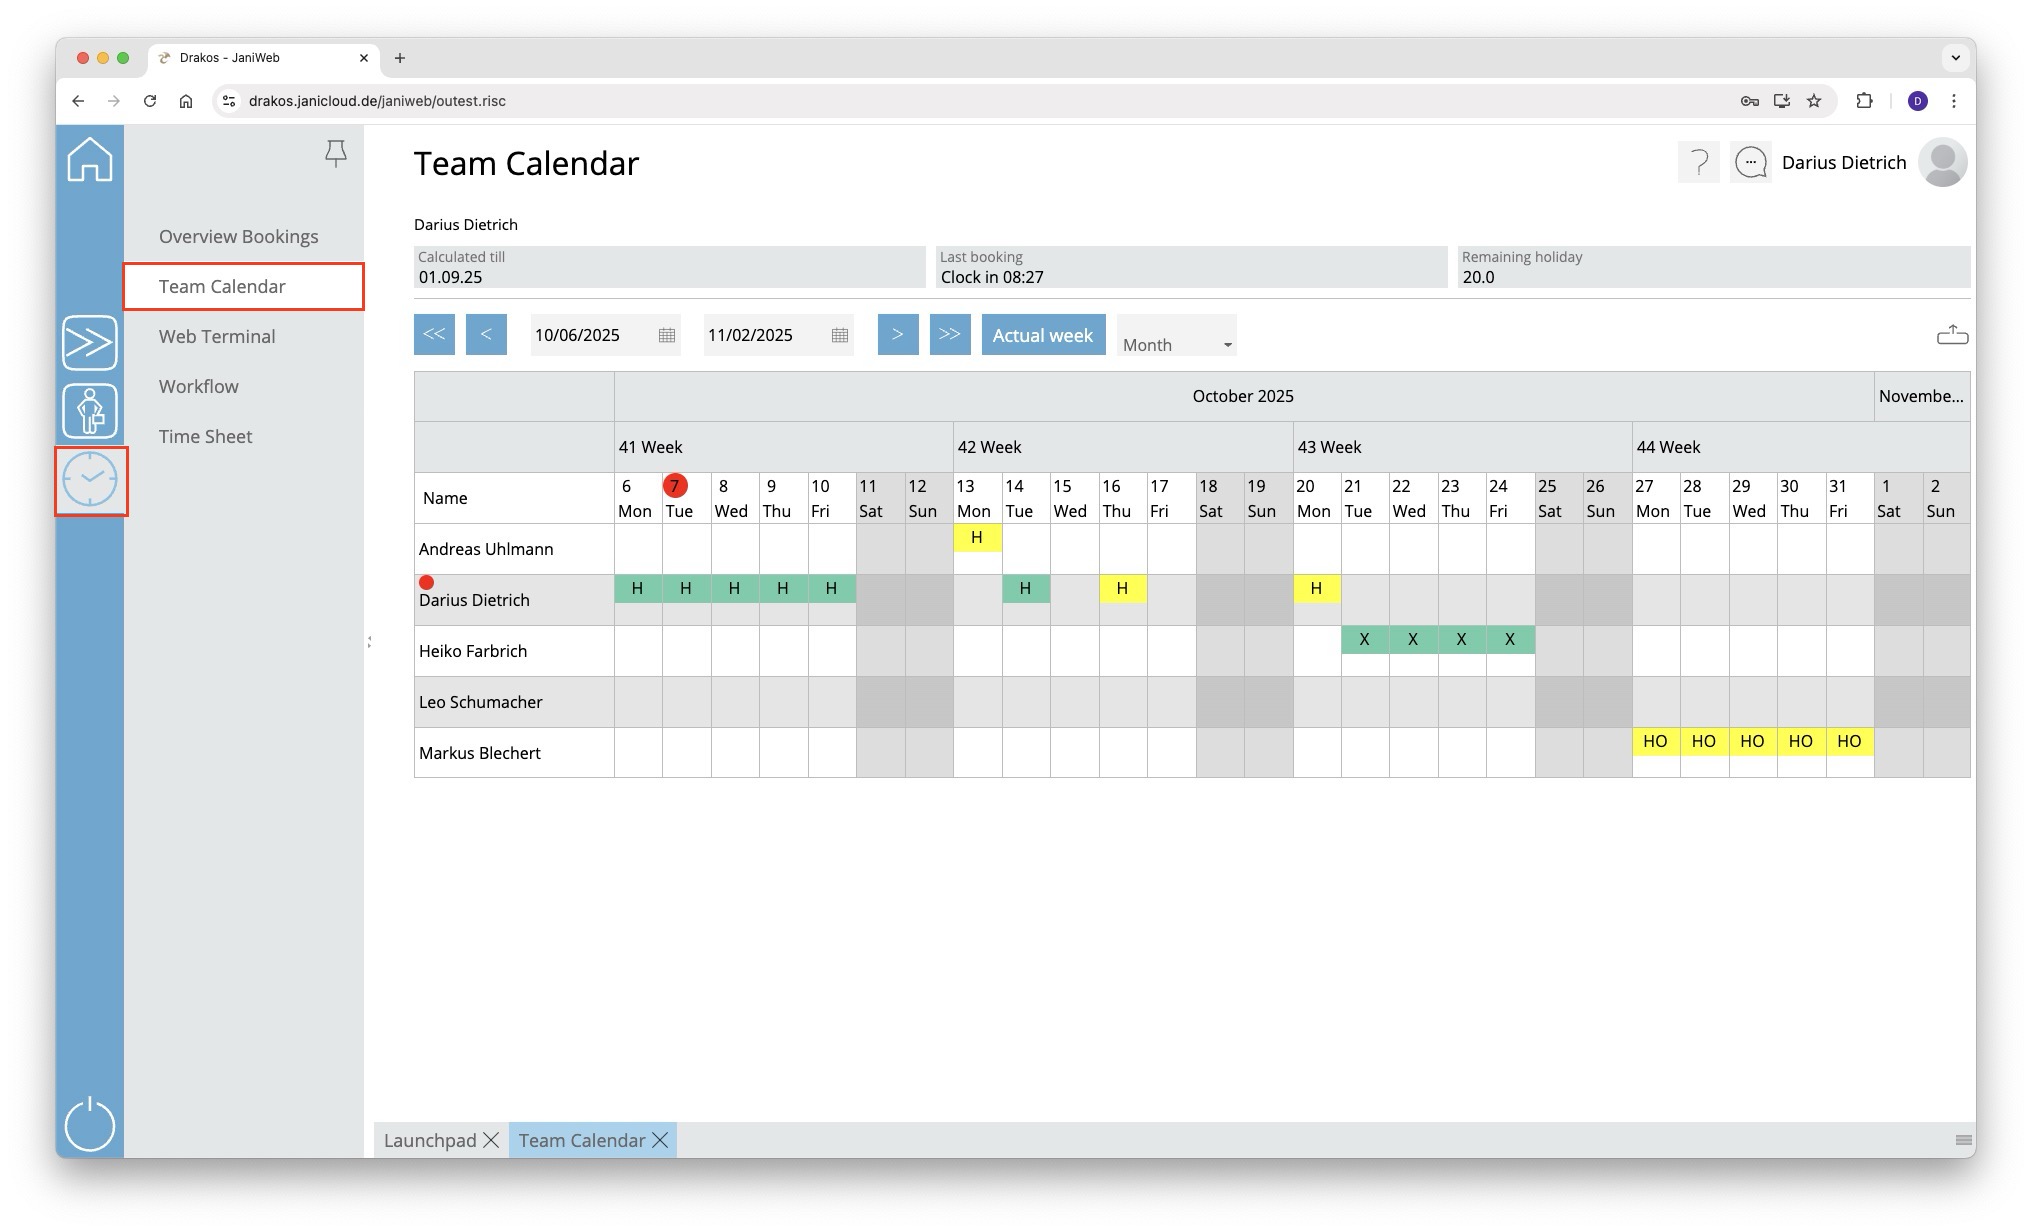
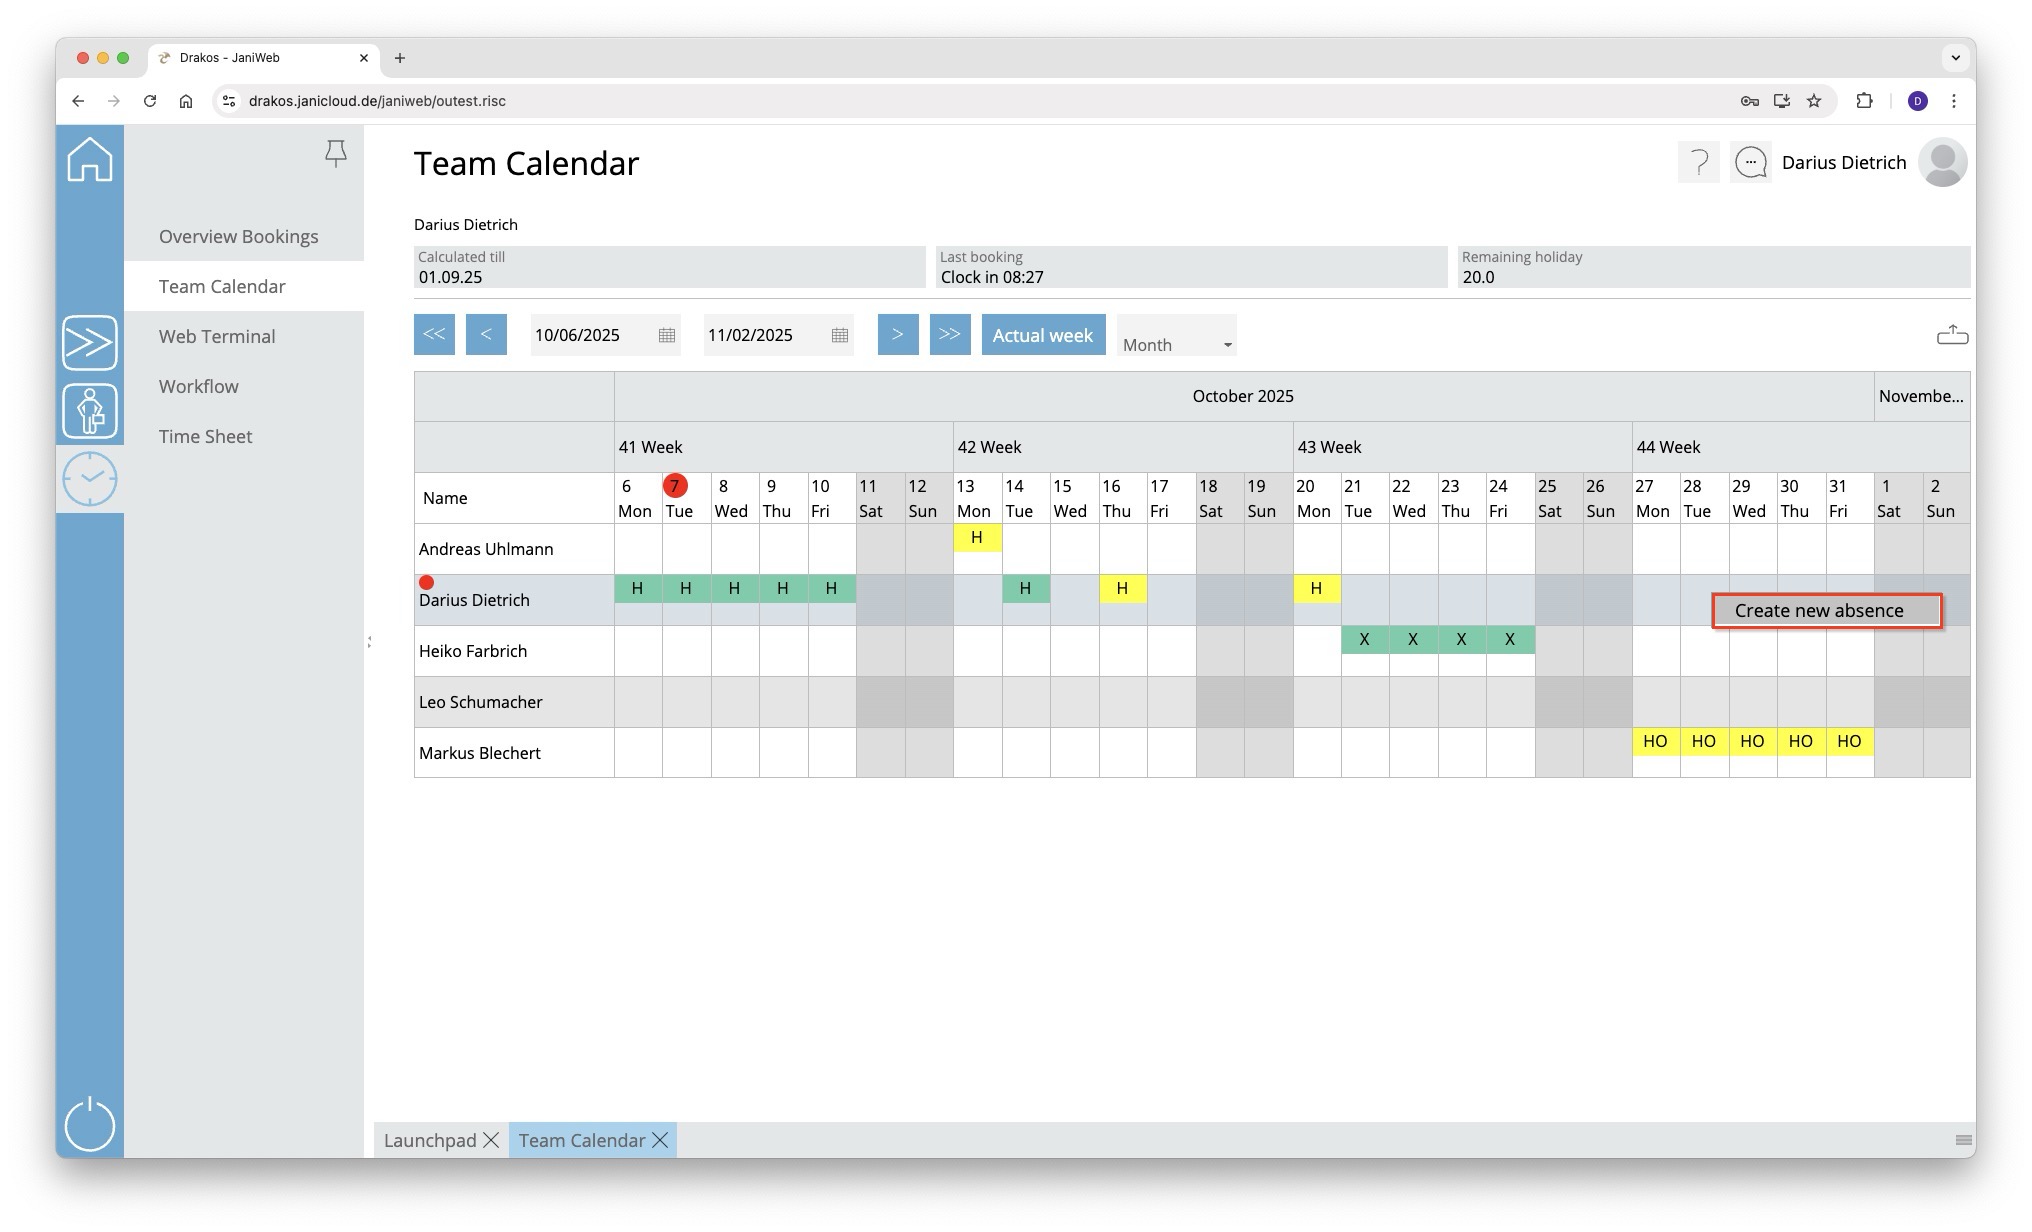
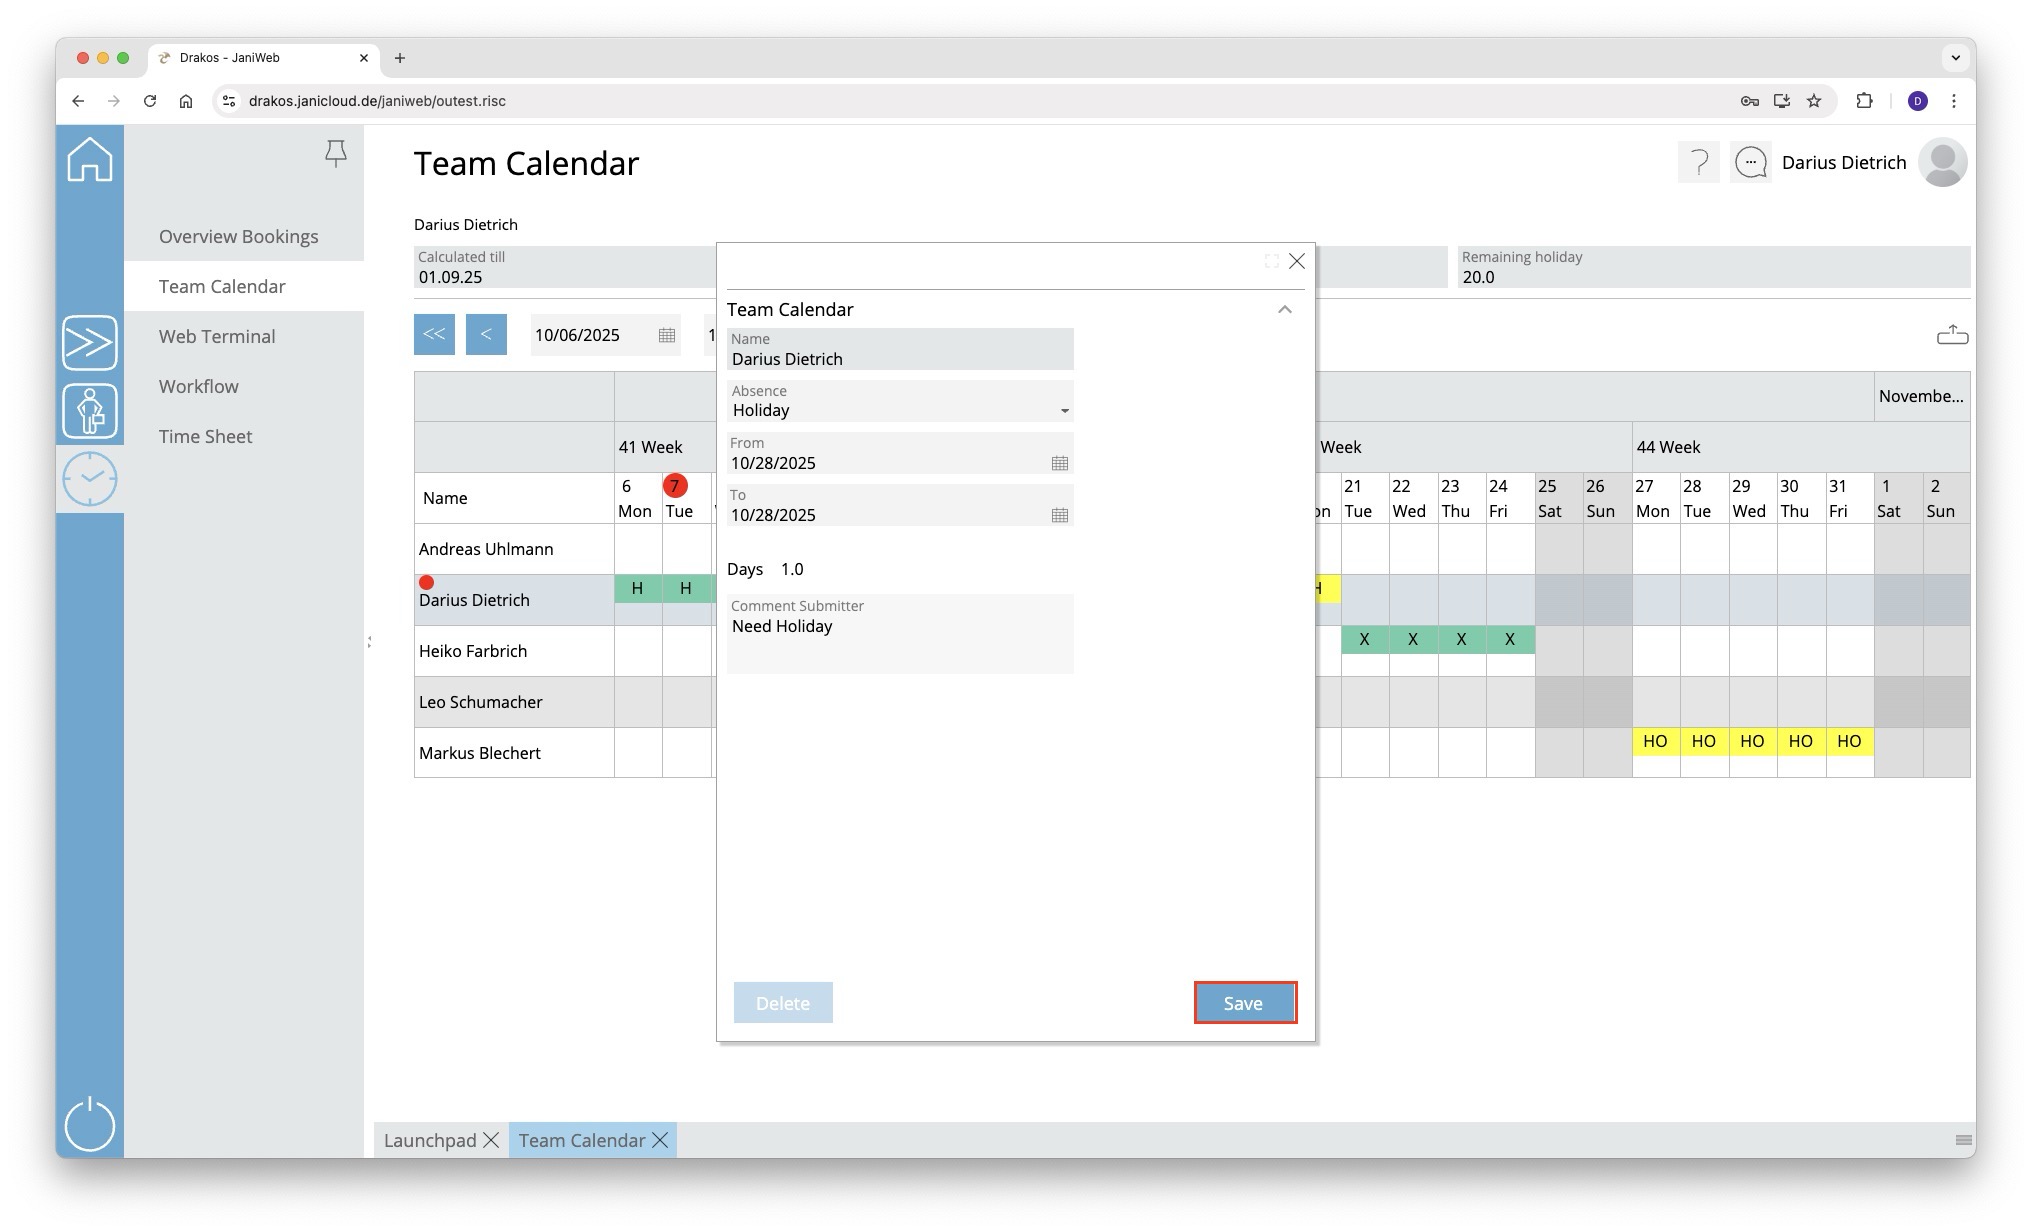

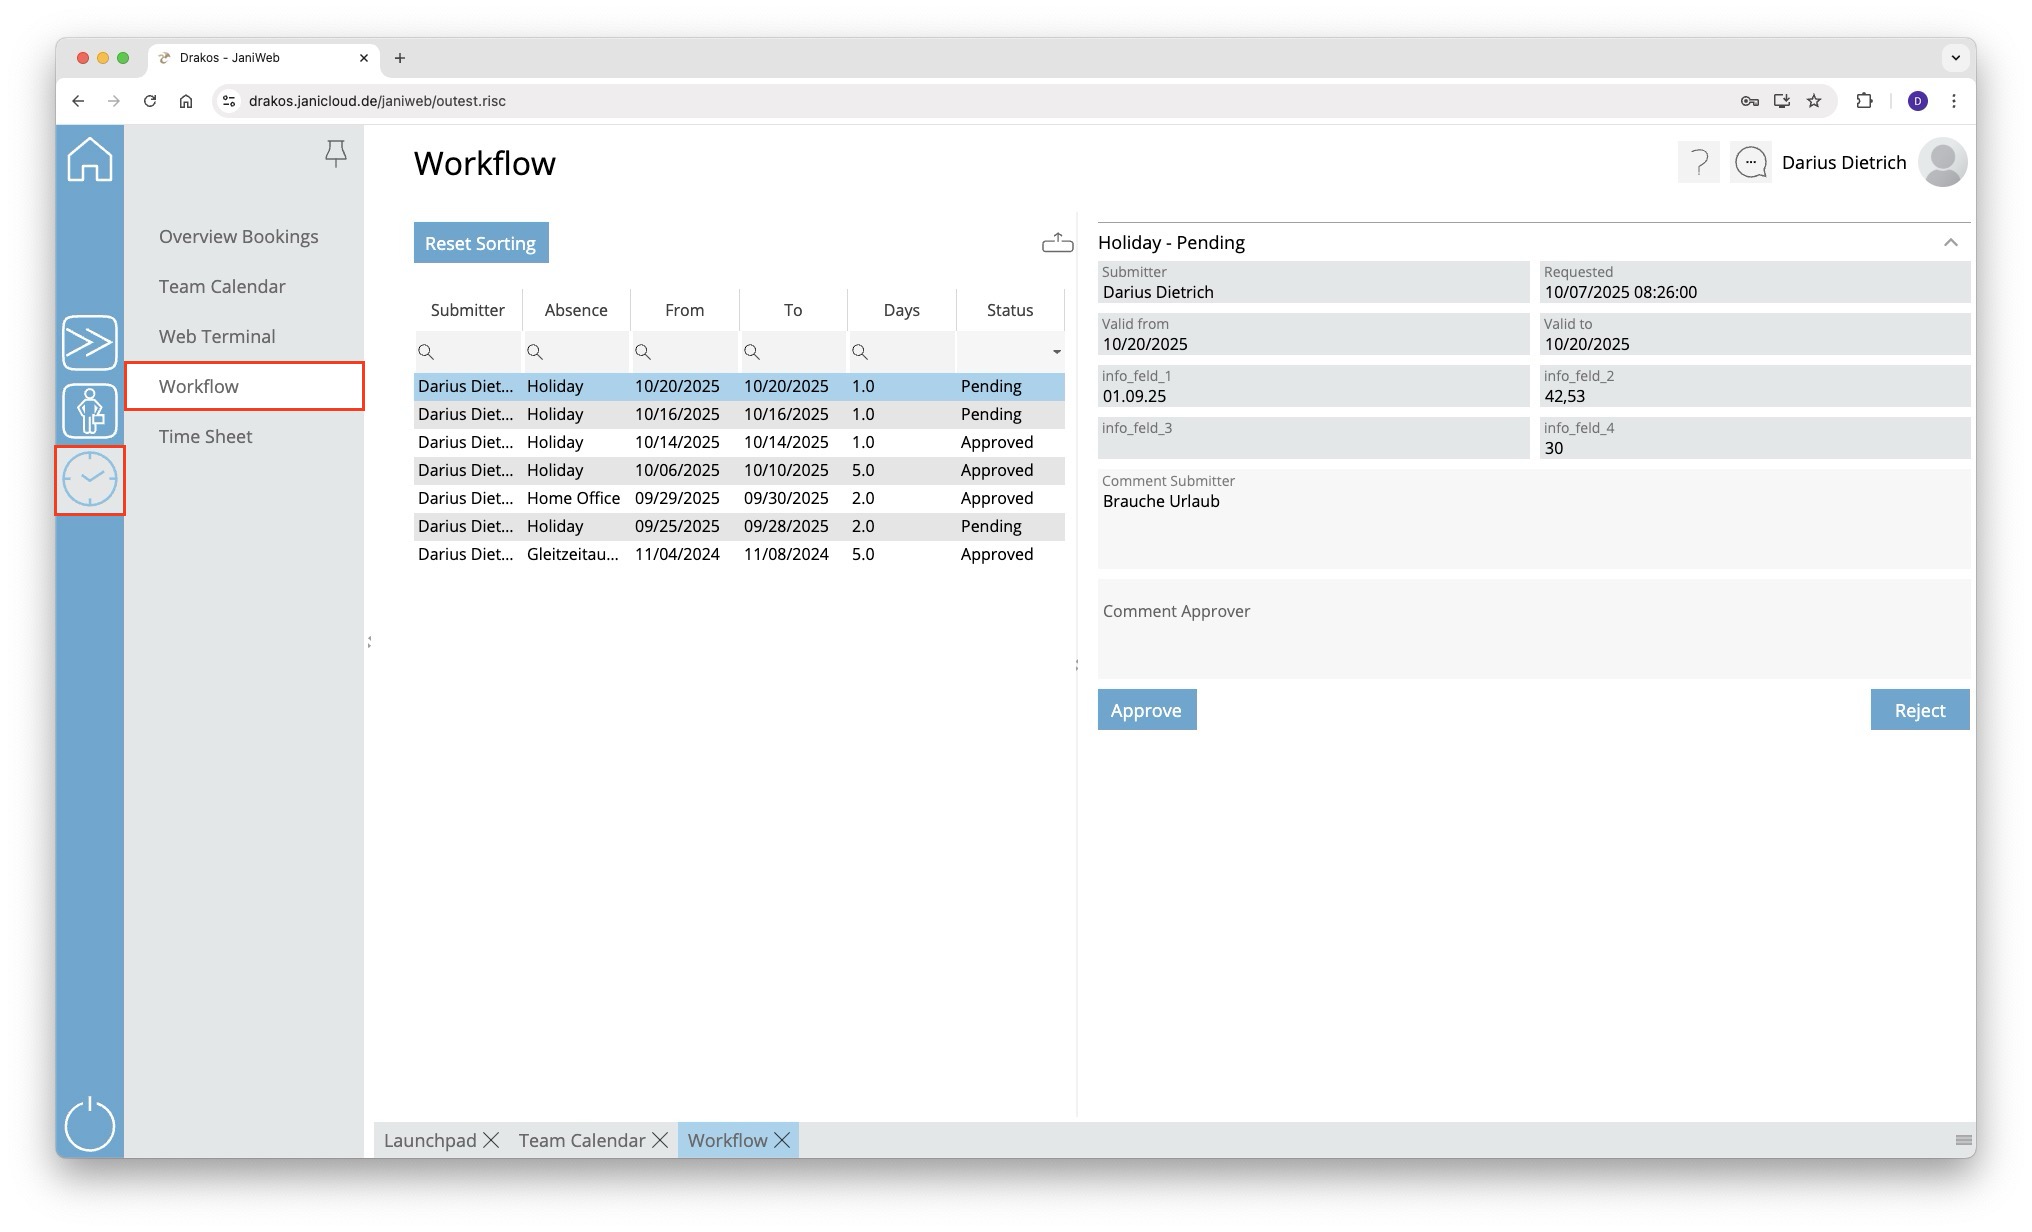
Create bookings via Web Terminal
- Log in to the application.
- Navigate to Web Terminal in the menu

- Submit the desired booking by pressing the corresponding button

- Bookings can be viewed via the Overview Bookings menu

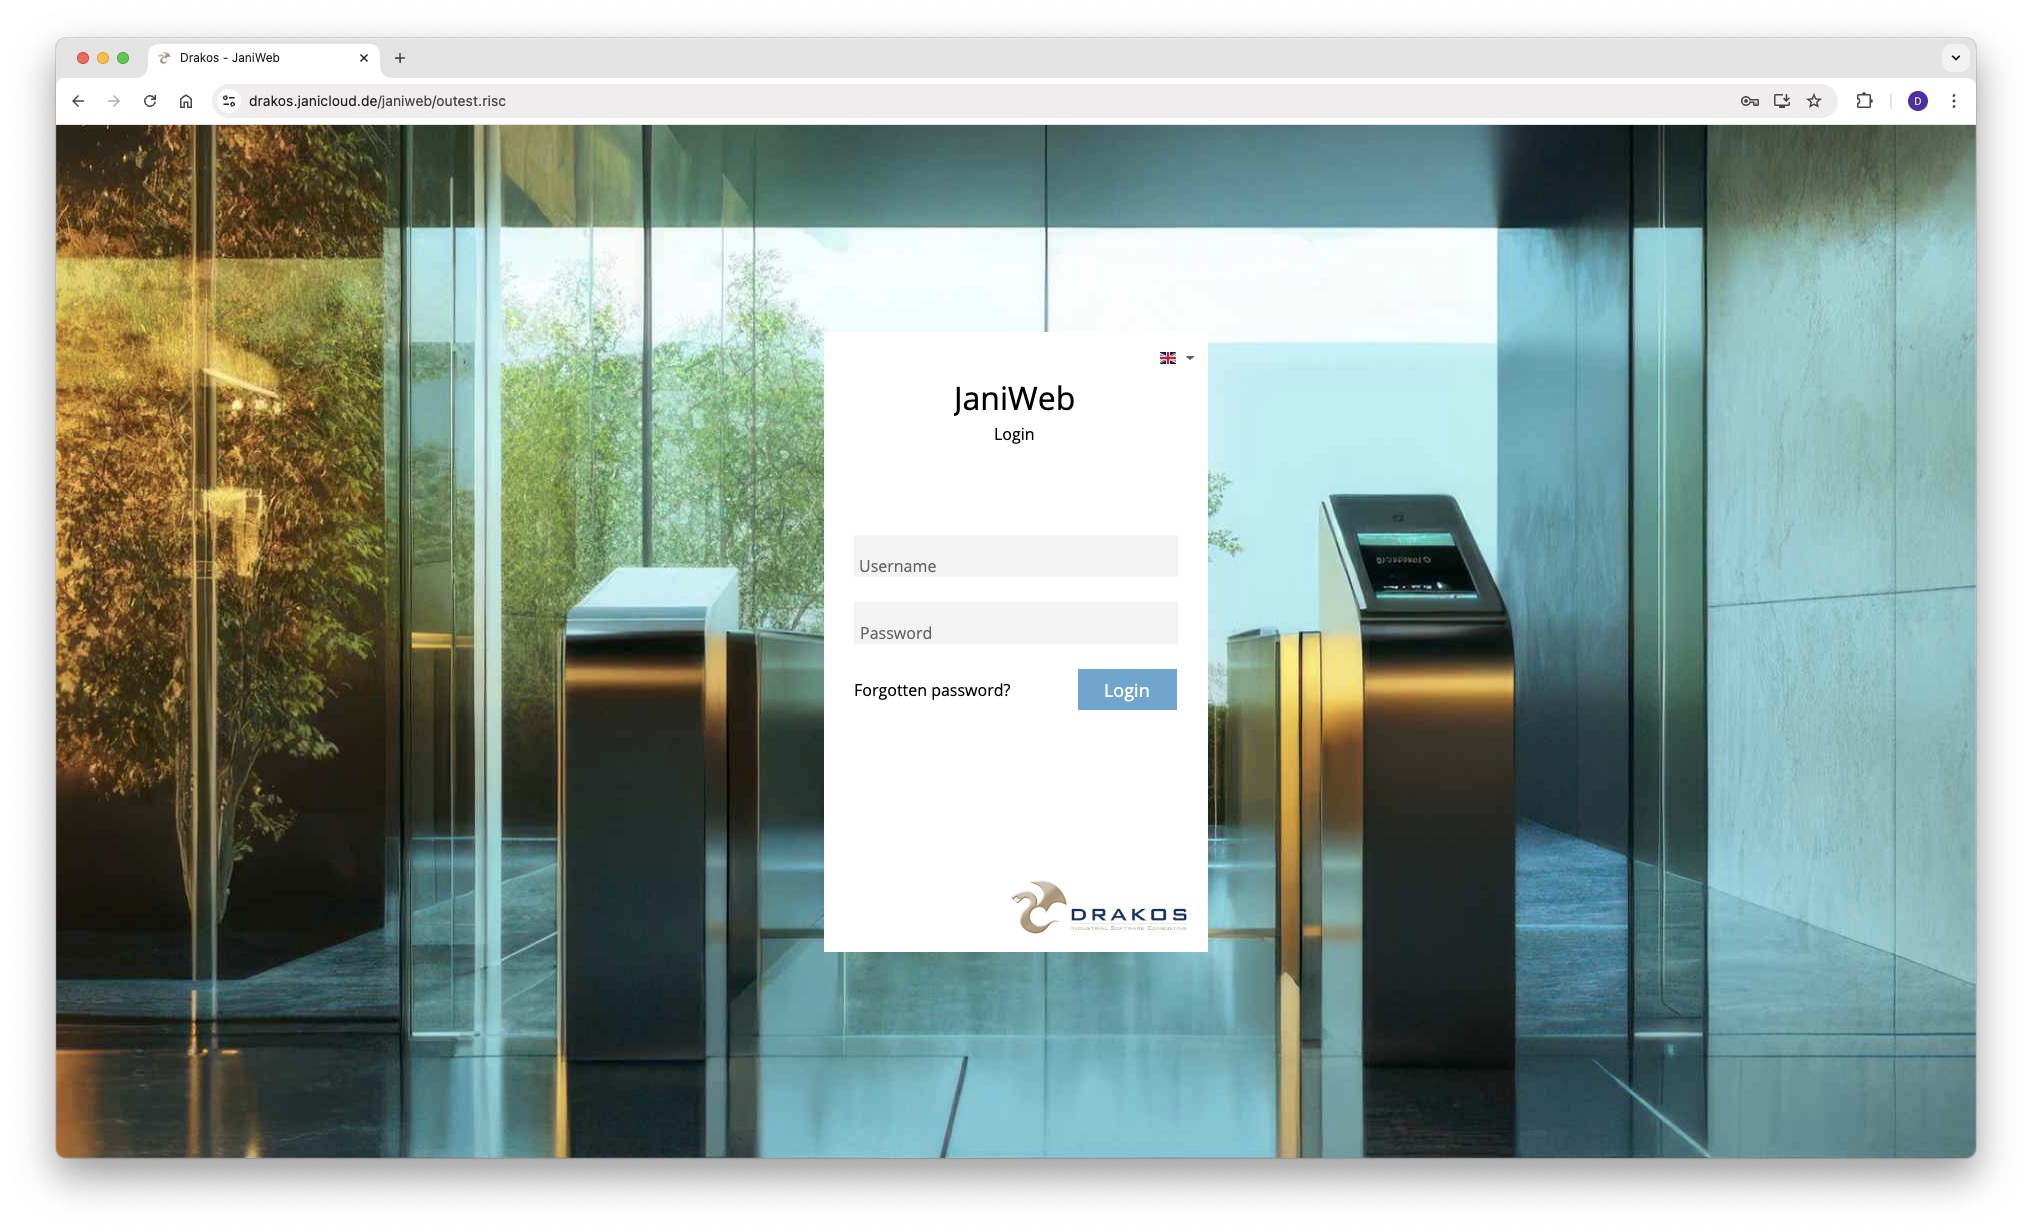
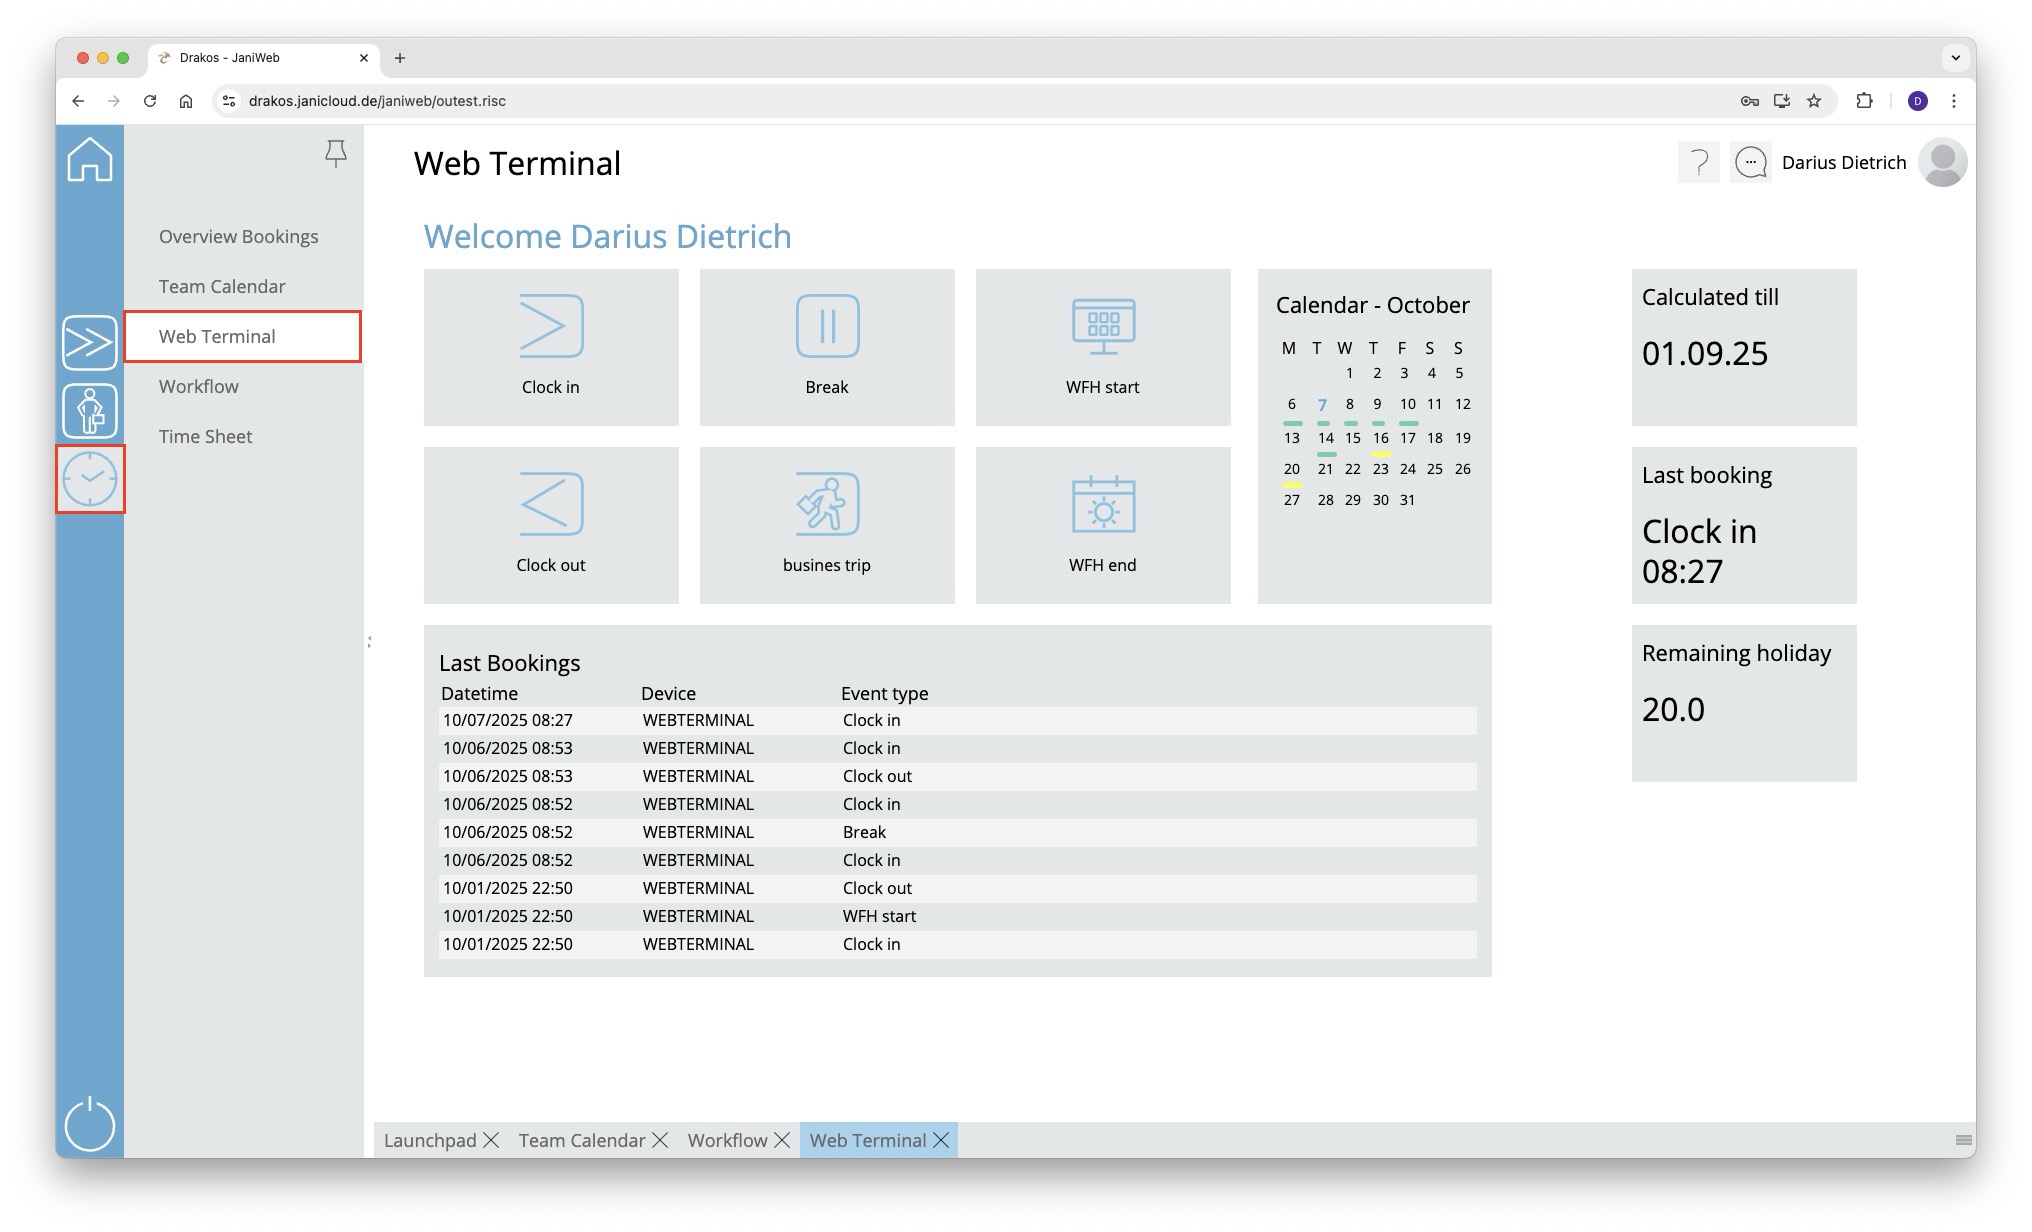
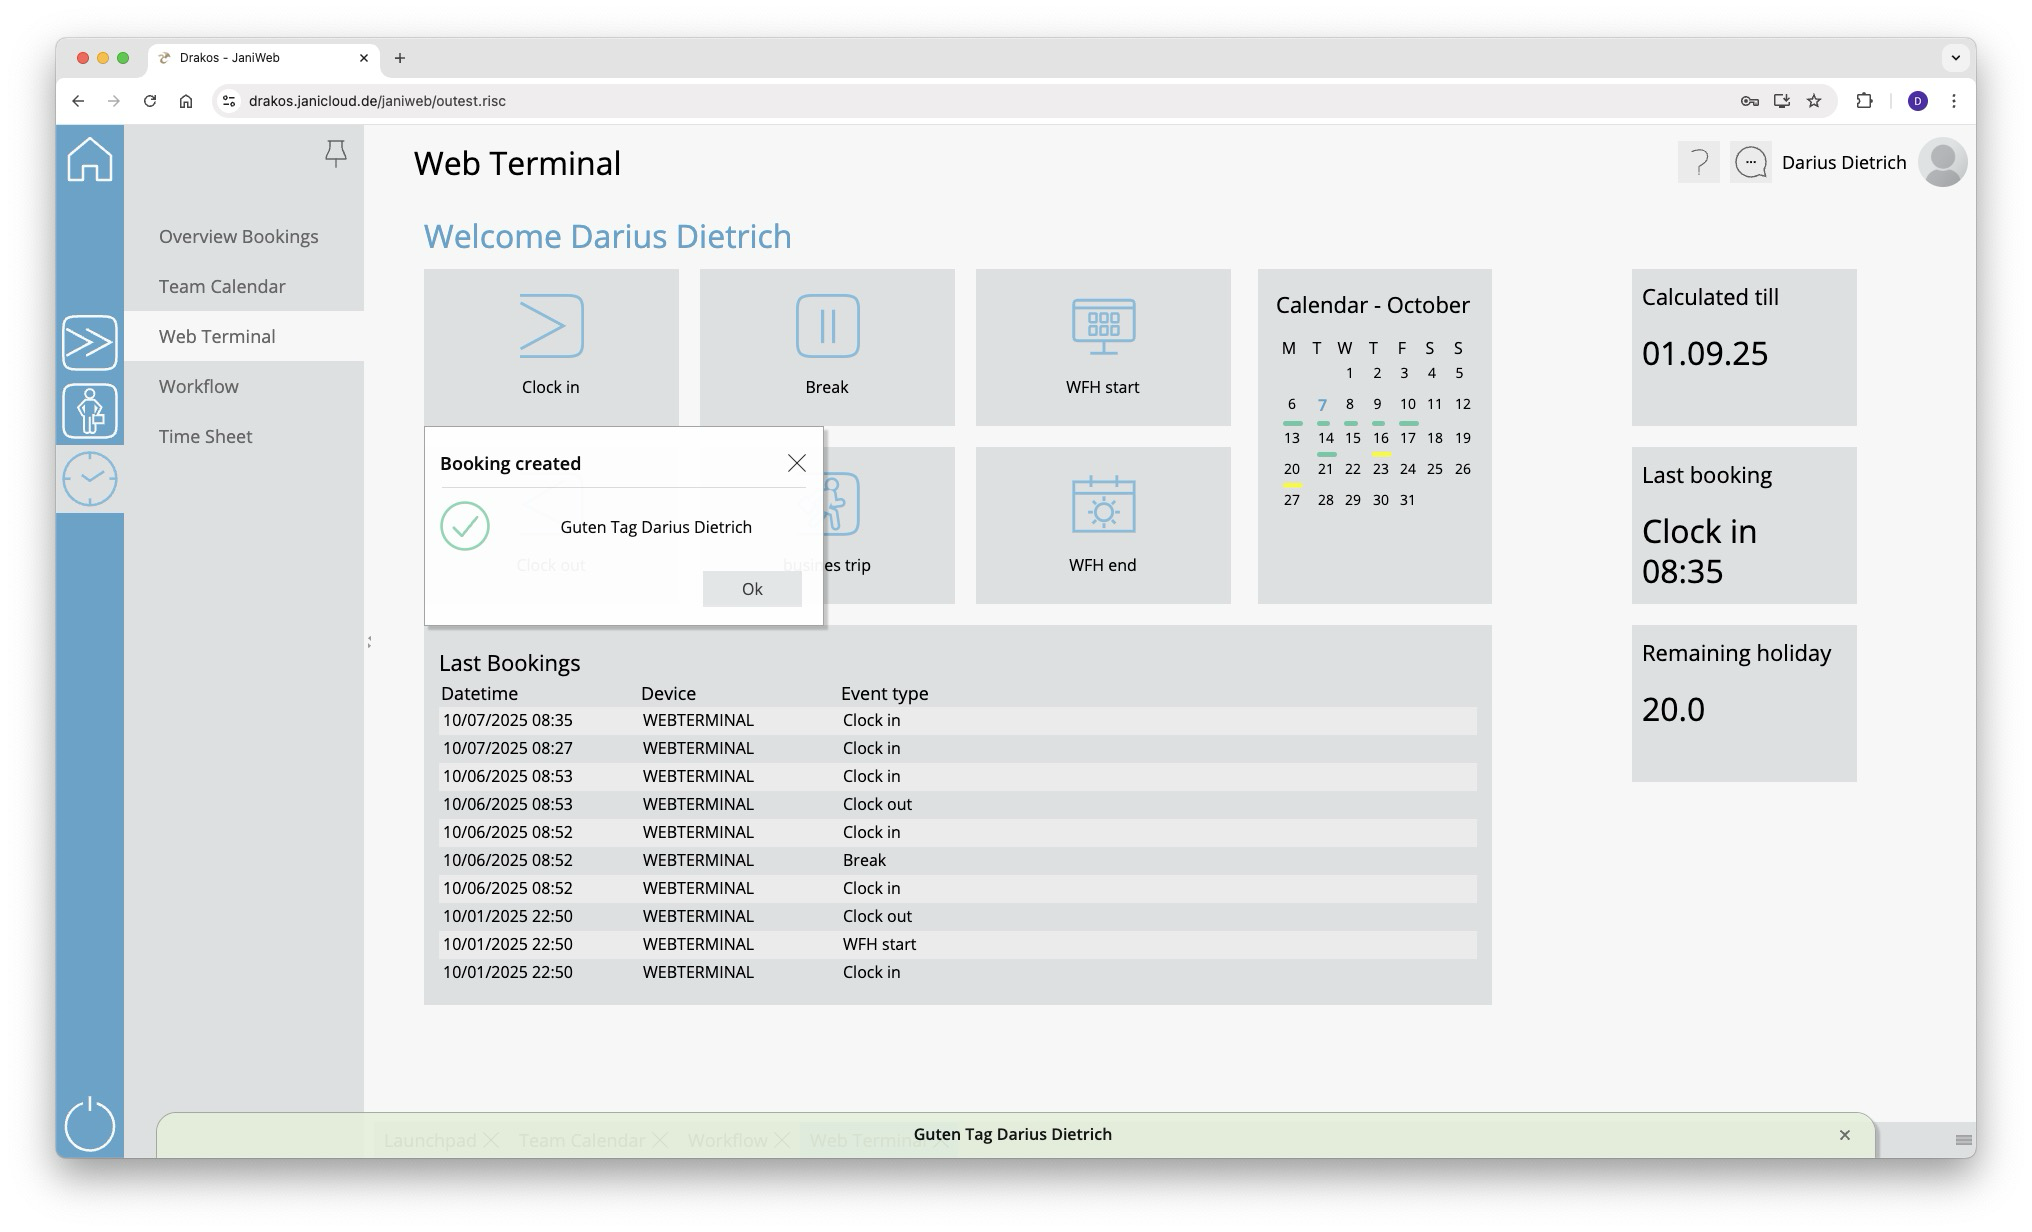

Add bookings via the Overview Bookings
- Log in to the application.
- Navigate to Overview Bookings in the menu
- Double-click on the line of the day for which the booking is to be added
- Now select the desired time in the Time field and the desired booking type in the Event Type field (e.g. Clock in or Clock out) and confirm with the Save button

- If a workflow has been set up for adding bookings, the supervisor must confirm the request