In addition to the tree view, you also have the option of displaying the terminals as a table. This allows you to display additional information, such as the IP address of the devices, in the list.
## Button *New* Press *New* to create a new device. Enter the required information and press *Save*. ## Area *General* - Select whether the device is a *Standalone* device, a *Server* or an *Offline component*. - Specify whether the device is used for *Time recording*, *Access* or plant data collection (*PDC*). ### Button *Clients Definition* - Press this button to assign and configure a sub-reader for an access server. - Make sure to select the correct *Client Position* for sub-readers. ## Area *Status* In the *Connection status* field, you can see the connection status of the device. This can have the following statuses: - connected - the device is connected - disconnected - the connection to the device is disconnected - unknown - the status of the device is unknown The time at which a status was last transmitted is shown in the *Last status* field. The *Device status* field shows the mode the device is in. The following modes are possible: - online - the device expects an online response from the device communication - offline - the device accepts bookings and checks the internal memory to see whether it is an authorised or unauthorised booking - autonomous - the device does not expect a connection to the device communication and saves the bookings in the temporary memory The *Last master record download* field indicates the time at which the device was last supplied with master data. (only available for devices from the manufacturer Dormakaba) The *Master record log* button can be used to check which master data has been sent to the device. (only available for devices from the manufacturer Dormakaba) ## Area *Device* Enter the basic information about the device. - Select a *Manufacturer ID* and a *Client*. - Enter a *Description* and additional information for the device. ## Area *Validity* Define the period during which the device should be active. ## Area *Cardlink* In the *Validation* field, specify the offline site for which the device writes validation records to the ID cards. In the *Update* field, specify the offline site for which the device writes update records to the ID cards. ## Area *Network* Specify the network settings required for the device. ## Area *Options* - *Location:* Enter a location for the device. - *Time zone:* If you are managing devices in different time zones, make sure that the correct time zone is selected. - *Holiday Calendar:* Select the appropriate bank holiday calendar for the device. ## Area *Offline Component Details* Select the *Offline Site* to which the component belongs. (You can create offline sites under *Settings > Tab Offline Components*.) ## Parameters for offline components (manufacturer Dormakaba) [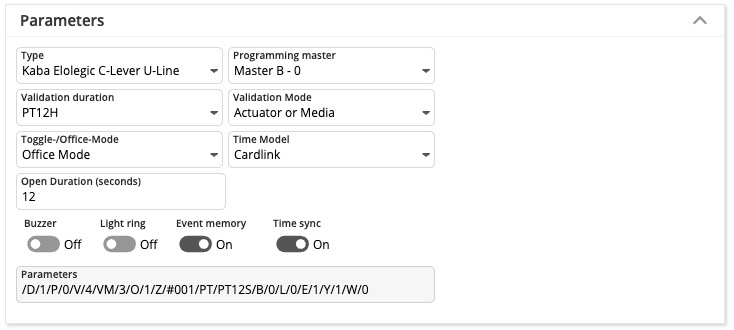](https://manual.drakos.de/uploads/images/gallery/2025-04/3Pyimage.png)**Attention:** After changing the parameters, the offline component must be rewritten with the programmer.
- **Type:** Here you define the type of offline component. - **Programming master:** Use this setting to define the programming master for the offline component. - **Validation duration:** Determines the validation duration. (Validation durations you can define into [Settings](https://manual.drakos.de/books/janiweb-j92/page/settings#bkmrk-cardlink-einstellung-1) menu) - **Days:** P\[number of days\]D (example: P7D for seven days) - **Hours:** PT\[number of hours\]H (example: PT1H for one hour) - **Fixed time:** HH:MM:SS (example: 12:00:00 for daily at 12 o’clock) - **Validation Mode:** Defines the validation mode. - **Toggle-/Office-Mode:** Activates Office Mode/ Day Night Mode. - **Off:** The door can only be opened with an authorized booking. - **Office Mode:** The first authorized booking on the offline component within the selected time model opens the door. A subsequent authorized booking closes the door again. The door remains open until the authorized time has expired and then closes again. - **Day Night Mode:** Automatic unlocking of offline components in a defined time model. - **Time Model:** Defines the time model in which Office Mode/ Day Night Mode applies. - **Open Duration (seconds):** Specify how long the offline component opens the door after a successful booking. - **Buzzer:** Switches the buzzer on or off. - **Light ring:** Switches the light ring on or off. - **Event memory:** Determines whether bookings are saved to the component or not. - **Time sync:** Activates or deactivates the time sync.| **Switch** | **Meaning** | **Values** |
| /B/ | Summer | - 0 - off - 1 - on (default) |
| /L/ | Light ring | - 0 - off - 1 - on (default) |
| /E/ | Save events | - 0 - off - 1 - on (default) |
| /Y/ | Sync time | - 0 - off - 1 - on (default) |
| /M/ | EM\_MSG | |
| /V/ | Period | - 0 - always - 1 - 24 hours - 2 - until 12:00 - 3 - 1 hour - 4 - 12 hours - 5 - 2 days - 6 - 4 days - 7 - 8 days |
| /D/ | Type | 0=198, Kaba Elolegic digital cylinder U-Line 1=199, Kaba Elolegic C-Lever U-Line 2=181, Kaba Elolegic reader U-Line 3=239, Kaba Elolegic C-Lever T-Line 4=30, Kaba Elolegic digital cylinder L-Line 5=218, Kaba Elolegic digital cylinder N-Line 6=238, Kaba Elolegic digital cylinder T-Line 7=201, Kaba Elolegic reader N-Line 8=221, Kaba Elolegic reader T-Line 9=183, Kaba Elolegic locker lock U-Line 10=222, Kaba Elolegic lock T-Line 11=182, Kaba Elolegic lock U-Line 12=31, Kaba Elolegic cylinder compact L-Line 13=210, Kaba Elolegic cylinder compact N-Line 14=230, Kaba Elolegic cylinder compact T-Line 15=190, Kaba Elolegic cylinder compact U-Line 16=214, Kaba Elolegic cylinder Stulp N-Line 17=234, Kaba Elolegic cylinder Stulp T-Line 18=194, Kaba Elolegic cylinder Stulp U-Line 19=181, Kaba IT lock 20=1064, Digital Cylinder Mifare evolo V4 21=1048, C-Lever Mifare evolo V4 22=1816, C-Lever TouchGo Mifare evolo V4 23=1128, C-Lever Mifare compact evolo V4 24=1144, Reader Mifare compact evolo V4 25=1080,Reader Mifare remote evolo V4 26=1320, Digital Cylinder Legic Advant evolo V4 27=1304, C-Lever Legic Advant evolo V4 28=1384, C-Lever compact Legic Advant evolo V4 29=2072, C-Lever TouchGo Legic Advant evolo V4 30=1400, Reader Legic Advant compact evolo V4 31=1336, Reader Legic Advant remote evolo V4 |
| /O/ | Mode | - 0 - off (default) - 1 - Office mode - 2 - Day/Night Mode |
| /Z/ | OMZPS | |
| /W/ | Offline site | - 0 - (default) |
| /P/ | Program master number | - 0 - (default) |